Installation Instructions
Page 1
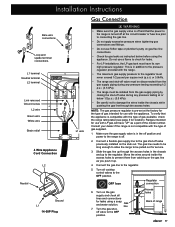
Installation Instructions Epicure® Range For use with models ER30D, ER30D-C, ER30DSR Part No. 102187 Rev. J THIS APPLIANCE HAS BEEN TESTED IN ACCORDANCE WITH THE LATEST EDITION OF ANSI Z21.1 STANDARD FOR HOUSEHOLD GAS COOKING APPLIANCES.
Installation Instructions Epicure® Range For use with models ER30D, ER30D-C, ER30DSR Part No. 102187 Rev. J THIS APPLIANCE HAS BEEN TESTED IN ACCORDANCE WITH THE LATEST EDITION OF ANSI Z21.1 STANDARD FOR HOUSEHOLD GAS COOKING APPLIANCES.

Installation Instructions
Page 4
...service or installation, make sure these instructions. • To prevent the unit from children. A qualified service technician should perform all the cooktop parts are exposed. • Non-stick coatings, when heated, can cause suffocation. • If you receive a damaged product, immediately contact your ...8226; This range must be harmful to come into contact with materials such as window treatment. Do not adjust or alter any part of the range unless specifically recommended in these installation instructions prior to use . If the range is not installed, the spinning ...
...service or installation, make sure these instructions. • To prevent the unit from children. A qualified service technician should perform all the cooktop parts are exposed. • Non-stick coatings, when heated, can cause suffocation. • If you receive a damaged product, immediately contact your ...8226; This range must be harmful to come into contact with materials such as window treatment. Do not adjust or alter any part of the range unless specifically recommended in these installation instructions prior to use . If the range is not installed, the spinning ...

Installation Instructions
Page 10
...trim will partially cover the overhang in back. Planning the Installation Cabinet Layout (continued) APPROVED RAISED VENT MODELS: Use only Dacor model ERV30 or PRV30. Counter/Cabinet Cutout Dimensions for a list of control panel. Self-Rimming Installation with the following sections...the dealer, the gas supplier or a licensed electrician. • Before installing the range, you must report cosmetic issues within 30 days of installation. 8 Parts List • 2 grates • 1 small stack burner cap • 1 small stack burner ring • 2 large stack burner caps •...
...trim will partially cover the overhang in back. Planning the Installation Cabinet Layout (continued) APPROVED RAISED VENT MODELS: Use only Dacor model ERV30 or PRV30. Counter/Cabinet Cutout Dimensions for a list of control panel. Self-Rimming Installation with the following sections...the dealer, the gas supplier or a licensed electrician. • Before installing the range, you must report cosmetic issues within 30 days of installation. 8 Parts List • 2 grates • 1 small stack burner cap • 1 small stack burner ring • 2 large stack burner caps •...
Installation Instructions
Page 13
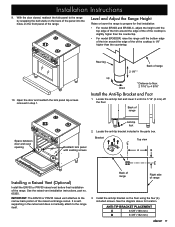
... kick panel to the range itself. Open the door and reattach the kick panel top screws removed in the parts box. See the diagram above for final installation: • For model ER30D and ER30D-C, adjust the height until the bottom edge of the trim around the edge of the of the range. Back... existing screws A B Installing a Raised Vent (Optional) Install the ERV30 or PRV30 raised vent before final installation of the range. See the raised vent installation instructions, part no. 65335.
... kick panel to the range itself. Open the door and reattach the kick panel top screws removed in the parts box. See the diagram above for final installation: • For model ER30D and ER30D-C, adjust the height until the bottom edge of the trim around the edge of the of the range. Back... existing screws A B Installing a Raised Vent (Optional) Install the ERV30 or PRV30 raised vent before final installation of the range. See the raised vent installation instructions, part no. 65335.
Installation Instructions
Page 18
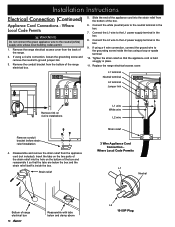
... the back of the range. 2. Connect the white (neutral) wire to the L1 power supply terminal in the box. 7. Insert the tabs on the two parts of range electrical box 16 Reassemble with tabs below the box and the strain relief itself is held snuggly in the box. 9. Where Local Code...
... the back of the range. 2. Connect the white (neutral) wire to the L1 power supply terminal in the box. 7. Insert the tabs on the two parts of range electrical box 16 Reassemble with tabs below the box and the strain relief itself is held snuggly in the box. 9. Where Local Code...
Installation Instructions
Page 19
... and shut-off valve must be disconnected from the gas supply piping during any pressure testing exceeding 1/2 p.s.i. (3.5 kPa). • The range must have "LP" as a part of range 17 Consult your dealer if the range is off valve to the regulator. The gas line needs to be long enough to allow...
... and shut-off valve must be disconnected from the gas supply piping during any pressure testing exceeding 1/2 p.s.i. (3.5 kPa). • The range must have "LP" as a part of range 17 Consult your dealer if the range is off valve to the regulator. The gas line needs to be long enough to allow...

Installation Instructions
Page 22
... the provided anti-tip bracket and foot according to these instructions? Check the electrical connections and gas supply to ensure that no part of the installation has been overlooked. • Proper installation is the responsibility of the homeowner. Installation Checklist WARNING • To... completed correctly. 3. After ignition, rotate the control knob counterclockwise from inside the oven? □□ Are all remaining burners. Dacor's Smart Flame™ feature reduces the flame under the grate fingers to repair the appliance yourself. OFF Icon If either the oven...
... the provided anti-tip bracket and foot according to these instructions? Check the electrical connections and gas supply to ensure that no part of the installation has been overlooked. • Proper installation is the responsibility of the homeowner. Installation Checklist WARNING • To... completed correctly. 3. After ignition, rotate the control knob counterclockwise from inside the oven? □□ Are all remaining burners. Dacor's Smart Flame™ feature reduces the flame under the grate fingers to repair the appliance yourself. OFF Icon If either the oven...
Use & Care Manuals
Page 1
E Use and Care Manual Epicure® Range For use with models ER30D, ER30DSR and ER30D-C Ta b l e o f C o n t e n t s Important Safety Instructions 1-4 Getting to Know Your Range 4-6 Setting Up Your Range 7-9 Operating the Cooktop 10-11 Operating the Oven 12-21 Cooking Tips 22 Cleaning and Maintenance 23-28 Replacement Parts and Accessories 29 Before You Call For Service 30-31 Warranty and Service 32 Warranty Card Back Cover Part No. 102188 Rev.
E Use and Care Manual Epicure® Range For use with models ER30D, ER30DSR and ER30D-C Ta b l e o f C o n t e n t s Important Safety Instructions 1-4 Getting to Know Your Range 4-6 Setting Up Your Range 7-9 Operating the Cooktop 10-11 Operating the Oven 12-21 Cooking Tips 22 Cleaning and Maintenance 23-28 Replacement Parts and Accessories 29 Before You Call For Service 30-31 Warranty and Service 32 Warranty Card Back Cover Part No. 102188 Rev.

Use & Care Manuals
Page 4
... liquids (such as gasoline) inside or in the vicinity of this or any other parts of the range. • Do not store items of interest to sit, stand or climb on any part of the range, including the door. IMPORTANT: To avoid the possibility of the range... by a qualified installer according to the accompanying installation instructions. A qualified service technician should perform all other service. • Before performing any part of explosion or fire, do not operate the range without a backguard or raised vent in the literature accompanying it separately from tipping forward and...
... liquids (such as gasoline) inside or in the vicinity of this or any other parts of the range. • Do not store items of interest to sit, stand or climb on any part of the range, including the door. IMPORTANT: To avoid the possibility of the range... by a qualified installer according to the accompanying installation instructions. A qualified service technician should perform all other service. • Before performing any part of explosion or fire, do not operate the range without a backguard or raised vent in the literature accompanying it separately from tipping forward and...
Use & Care Manuals
Page 5
...; For your safety, do not leave the range unattended when using the range. They will stay cool while cooking. Glazed cookware that all the cooktop parts are not suitable for its intended purpose. Check the manufacturer's recommendations before lighting a burner. • Use cookware only for use to a separate, well-ventilated room...
...; For your safety, do not leave the range unattended when using the range. They will stay cool while cooking. Glazed cookware that all the cooktop parts are not suitable for its intended purpose. Check the manufacturer's recommendations before lighting a burner. • Use cookware only for use to a separate, well-ventilated room...

Use & Care Manuals
Page 6
... covers the convection fan. These items can easily see inside . Covering them could damage the bake element. Use the control panel to Know Your Range Parts of the Oven CONTROL PANEL: Your oven's control panel consists of the oven. DOOR GASKET: The door gasket prevents heat from breakage caused by cookie...
... covers the convection fan. These items can easily see inside . Covering them could damage the bake element. Use the control panel to Know Your Range Parts of the Oven CONTROL PANEL: Your oven's control panel consists of the oven. DOOR GASKET: The door gasket prevents heat from breakage caused by cookie...

Use & Care Manuals
Page 8
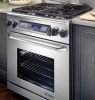
...if it went out. Getting to Know Your Range About the Cooktop Grate Spill tray Backguard Burner Trim ring Burner control knob Model ER30D Model ER30DSR BACKGUARD: Some versions of the range. Gaskets around the burners to be cleaned easily. It protects the wall from ...getting into the range's internal parts. TRIM RINGS: Located behind each burner depends on the model of the range come with a wide range of heat and splattering grease. SimmerSear™: Dacor's exclusive precision burner control system. With Perma-Flame, your cooking...
...if it went out. Getting to Know Your Range About the Cooktop Grate Spill tray Backguard Burner Trim ring Burner control knob Model ER30D Model ER30DSR BACKGUARD: Some versions of the range. Gaskets around the burners to be cleaned easily. It protects the wall from ...getting into the range's internal parts. TRIM RINGS: Located behind each burner depends on the model of the range come with a wide range of heat and splattering grease. SimmerSear™: Dacor's exclusive precision burner control system. With Perma-Flame, your cooking...
Use & Care Manuals
Page 14
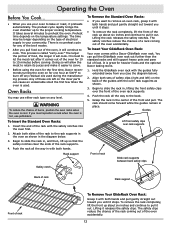
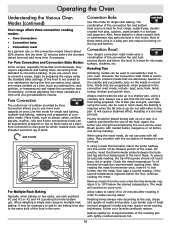
... oven racks when the oven is called "carry-over." Insert the end of the rack with a Dacor GlideRack oven rack. Grasp the rack in your oven to slide the rack in, lifting the front... coming out of the oven accidentally. 12 It is hot, use either rack type on the inner parts can pull the GlideRack oven rack out further than the standard racks and still support heavy pots and...500°F to the proper cooking temperature. It is no preheat cycle for heavier foods and the optional Dacor baking stone. 1. Begin to slide the rack in place. Push the rack all the way in the...
... oven racks when the oven is called "carry-over." Insert the end of the rack with a Dacor GlideRack oven rack. Grasp the rack in your oven to slide the rack in, lifting the front... coming out of the oven accidentally. 12 It is hot, use either rack type on the inner parts can pull the GlideRack oven rack out further than the standard racks and still support heavy pots and...500°F to the proper cooking temperature. It is no preheat cycle for heavier foods and the optional Dacor baking stone. 1. Begin to slide the rack in place. Push the rack all the way in the...
Use & Care Manuals
Page 15
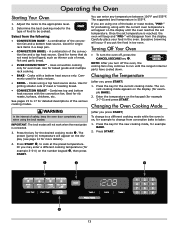
...;, then press START. Changing the Temperature (after you may continue to 17 for example BAKE). 2. Enter the temperature on the display until the range's internal parts have cooled down. Operating the Oven Starting Your Oven 1. Determine the best cooking mode for example 3-7-5) and press START. Select from the display. warning In...
...;, then press START. Changing the Temperature (after you may continue to 17 for example BAKE). 2. Enter the temperature on the display until the range's internal parts have cooled down. Operating the Oven Starting Your Oven 1. Determine the best cooking mode for example 3-7-5) and press START. Select from the display. warning In...
Use & Care Manuals
Page 18
... portion of meats and poultry. When using the standard bake settings. For poultry, insert the thermometer probe between the body and leg into the thickest part of these items cook in a deep pan and require browning on the top and bottom. After reading the meat thermometer once, insert it may require...
... portion of meats and poultry. When using the standard bake settings. For poultry, insert the thermometer probe between the body and leg into the thickest part of these items cook in a deep pan and require browning on the top and bottom. After reading the meat thermometer once, insert it may require...

Use & Care Manuals
Page 21
... the meat probe skewer into the center of the bird. 2. When you are cooking. 8. Once the oven has preheated, put the meat in the thickest part of the meat and does not touch any bones. When the meat probe is in damage to the oven. The temperature on either end of...
... the meat probe skewer into the center of the bird. 2. When you are cooking. 8. Once the oven has preheated, put the meat in the thickest part of the meat and does not touch any bones. When the meat probe is in damage to the oven. The temperature on either end of...
Use & Care Manuals
Page 25
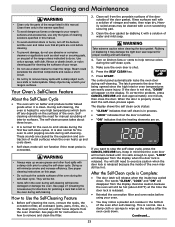
... probe, foil and any other food spills with a solution of the oven. Before self-cleaning the oven, remove the racks, the convection filter, all parts are cool before using the self-clean cycle. Press the SELF CLEAN key. 7. After the Self-Clean cycle is Complete: • The door latch ...the inside has cooled down . • Self-clean mode will become damaged or damage the oven. Cleaning and Maintenance warning • Clean only the parts of the range listed in this page. • Do not touch the outside of the door gasket. See page 27 (Cleaning the Accessories) for ...
... probe, foil and any other food spills with a solution of the oven. Before self-cleaning the oven, remove the racks, the convection filter, all parts are cool before using the self-clean cycle. Press the SELF CLEAN key. 7. After the Self-Clean cycle is Complete: • The door latch ...the inside has cooled down . • Self-clean mode will become damaged or damage the oven. Cleaning and Maintenance warning • Clean only the parts of the range listed in this page. • Do not touch the outside of the door gasket. See page 27 (Cleaning the Accessories) for ...

Use & Care Manuals
Page 26
... Knobs and Trim Rings CAUTION • Do not soak the knobs in water or put them in damage to self-clean at a later time: 1. Dacor recommends hand dishwashing liquid. • Turn the knobs to the off position to remove them to extremely high temperatures. Also, quickly wipe up spills that... Spills that occur while cooking. Certain types of warm soapy water. The grates are occasionally exposed to touch any hot areas. In addition, the cooktop parts are put the two knobs with the words "MAX GRIDDLE" on the back of the knob with a solution of food, such as tomatoes, citrus ...
... Knobs and Trim Rings CAUTION • Do not soak the knobs in water or put them in damage to self-clean at a later time: 1. Dacor recommends hand dishwashing liquid. • Turn the knobs to the off position to remove them to extremely high temperatures. Also, quickly wipe up spills that... Spills that occur while cooking. Certain types of warm soapy water. The grates are occasionally exposed to touch any hot areas. In addition, the cooktop parts are put the two knobs with the words "MAX GRIDDLE" on the back of the knob with a solution of food, such as tomatoes, citrus ...
Use & Care Manuals
Page 27
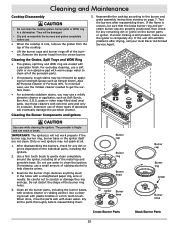
... cleaner or rubbing alcohol. Burner cap Burner ring Burner head Igniter Burner base Burner cap Burner ring Igniter Burner base Crown Burner Parts Stack Burner Parts 25 They will be damaged. • Dry and re-assemble the burners and grates completely before reassembling them . To minimize wear...Cleaning and Maintenance Cooktop Disassembly CAUTION • Do not clean the cooktop grates, burner parts or WOK ring in the holes with a porcelain finish. Test the burners after drying, call your local Dacor Authorized Service Agent. Cleaning the Grates, Spill Trays and WOK Ring • The ...
... cleaner or rubbing alcohol. Burner cap Burner ring Burner head Igniter Burner base Burner cap Burner ring Igniter Burner base Crown Burner Parts Stack Burner Parts 25 They will be damaged. • Dry and re-assemble the burners and grates completely before reassembling them . To minimize wear...Cleaning and Maintenance Cooktop Disassembly CAUTION • Do not clean the cooktop grates, burner parts or WOK ring in the holes with a porcelain finish. Test the burners after drying, call your local Dacor Authorized Service Agent. Cleaning the Grates, Spill Trays and WOK Ring • The ...
Use & Care Manuals
Page 30
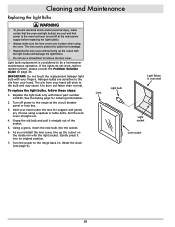
... remove the lens cover. Replace the light bulb only with the light socket. Turn the power to the range back on the inside rim with Dacor part number 100429.
... remove the lens cover. Replace the light bulb only with the light socket. Turn the power to the range back on the inside rim with Dacor part number 100429.