

User Manual - Epicure Range
Page 3
... updating this or any electrical devices including the telephone in the vicinity of the range. Pacific Time Web site: www.Dacor.com Have the complete model and serial number from the range. To expose the label, open the oven door and remove the inlet cooling grill. CAUTION Hazards or unsafe practices that can occur. DANGER IMPORTANT: If you smell gas: • Do not use or light...
... updating this or any electrical devices including the telephone in the vicinity of the range. Pacific Time Web site: www.Dacor.com Have the complete model and serial number from the range. To expose the label, open the oven door and remove the inlet cooling grill. CAUTION Hazards or unsafe practices that can occur. DANGER IMPORTANT: If you smell gas: • Do not use or light...
User Manual - Epicure Range
Page 4
... range unless specifically instructed to the range is near a window, do not use of cookware. • Select cookware carefully. If a power failure occurs while operating the cooktop, turn off . • Only use the range are able to operate it for the first time. • Clean and maintain the range regularly as pot holders. • Use only dry pot holders when removing food and cookware from the burners and other parts...
... range unless specifically instructed to the range is near a window, do not use of cookware. • Select cookware carefully. If a power failure occurs while operating the cooktop, turn off . • Only use the range are able to operate it for the first time. • Clean and maintain the range regularly as pot holders. • Use only dry pot holders when removing food and cookware from the burners and other parts...

User Manual - Epicure Range
Page 5
... desired volume of heat. • Do not line the oven with a close-fitting lid, cookie sheet or metal tray, then turn off the burner. Sharp objects may scratch the range's surfaces. • Do not expose the knobs or trim rings to direct flame, hot utensils or other ...operated without overflow caused by the bubbling of oils and fats prior to applying heat. NEVER PICK UP A FLAMING PAN - c. Remove birds to a separate, well-ventilated room during self-cleaning and cause permanent damage to the oven. • To prevent damage, remove the meat probe from the oven when it started...
... desired volume of heat. • Do not line the oven with a close-fitting lid, cookie sheet or metal tray, then turn off the burner. Sharp objects may scratch the range's surfaces. • Do not expose the knobs or trim rings to direct flame, hot utensils or other ...operated without overflow caused by the bubbling of oils and fats prior to applying heat. NEVER PICK UP A FLAMING PAN - c. Remove birds to a separate, well-ventilated room during self-cleaning and cause permanent damage to the oven. • To prevent damage, remove the meat probe from the oven when it started...
User Manual - Epicure Range
Page 8
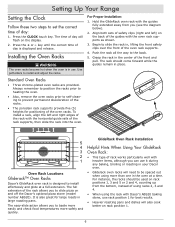
... (model number ABS20). It is displayed and release. Press the CLOCK touch key. key until the correct time of the oven racks. Align both sets of safety clips (right and left and right edges of the rack allows you (see the diagram below). 2. Always remember to position the racks prior to heating the oven. • Also, remove the oven racks prior to self-cleaning to install and adjust the racks. The...
... (model number ABS20). It is displayed and release. Press the CLOCK touch key. key until the correct time of the oven racks. Align both sets of safety clips (right and left and right edges of the rack allows you (see the diagram below). 2. Always remember to position the racks prior to heating the oven. • Also, remove the oven racks prior to self-cleaning to install and adjust the racks. The...

User Manual - Epicure Range
Page 9
... to temperature. The oven will beep once, the selected cooking mode will flash, and "- - -" will be displayed. 3. If in 5˚F increments. Operating Your Range About the Various Cooking Modes Standard Bake (Selected Models Only) In standard bake mode, the bottom heat element provides conventional baking heat. Standard Broil The infrared ceramic gas broiler supplies the heat in standard bake, Pure Convection and convection bake modes. The broil temperature is a total system approach to circulate heated air evenly throughout the oven chamber. Pure Convection is adjustable...
... to temperature. The oven will beep once, the selected cooking mode will flash, and "- - -" will be displayed. 3. If in 5˚F increments. Operating Your Range About the Various Cooking Modes Standard Bake (Selected Models Only) In standard bake mode, the bottom heat element provides conventional baking heat. Standard Broil The infrared ceramic gas broiler supplies the heat in standard bake, Pure Convection and convection bake modes. The broil temperature is a total system approach to circulate heated air evenly throughout the oven chamber. Pure Convection is adjustable...

User Manual - Epicure Range
Page 10
... a time (such as cooking time, rack position or temperature) and repeat the convection test. Baking Tips There are homemade, may require adjustment and testing when converting from the display. (From this way, follow tested recipes for 10% less time. Dacor recommends that are two baking modes: Pure Convection and convection bake. NOTE: Allowing the oven to completely pre-heat prior to time the cooking process. 8. If unsure how to time baking functions. • Wait until you set...
... a time (such as cooking time, rack position or temperature) and repeat the convection test. Baking Tips There are homemade, may require adjustment and testing when converting from the display. (From this way, follow tested recipes for 10% less time. Dacor recommends that are two baking modes: Pure Convection and convection bake. NOTE: Allowing the oven to completely pre-heat prior to time the cooking process. 8. If unsure how to time baking functions. • Wait until you set...
User Manual - Epicure Range
Page 11
..." setting is a quick and flavorful way to the Delay Timed Cooking section below the desired temperature. All baking modes can be adjusted in standard broil mode: 1. Always use convection bake mode. It will be prepared by lining the bottom of the roasting pan with the oven can be displayed. 4. For poultry, insert the thermometer probe between the body and leg into the thickest part of the meat. Follow your oven. Broiling Tips Broiling is...
..." setting is a quick and flavorful way to the Delay Timed Cooking section below the desired temperature. All baking modes can be adjusted in standard broil mode: 1. Always use convection bake mode. It will be prepared by lining the bottom of the roasting pan with the oven can be displayed. 4. For poultry, insert the thermometer probe between the body and leg into the thickest part of the meat. Follow your oven. Broiling Tips Broiling is...
User Manual - Epicure Range
Page 13
... and "TIMER 1" will return to use the minute timer function: 1. To view the current time of day. 3. The clock will display "00:00", and "TIMER 1", or "TIMER 2" will disappear from the display. Operating Your Range Minute Timers Securing the Controls The clock features two timers that can use your range to dehydrate or defrost foods at low heat settings in Pure Convection mode (ERD models only). The clock display will appear in progress, press the TIMER 1 or TIMER 2 key...
... and "TIMER 1" will return to use the minute timer function: 1. To view the current time of day. 3. The clock will display "00:00", and "TIMER 1", or "TIMER 2" will disappear from the display. Operating Your Range Minute Timers Securing the Controls The clock features two timers that can use your range to dehydrate or defrost foods at low heat settings in Pure Convection mode (ERD models only). The clock display will appear in progress, press the TIMER 1 or TIMER 2 key...

User Manual - Epicure Range
Page 15
... reduce cooking time. Doing so will be reduced by operating the burner at a maximum output of problem. See Cooktop Disassembly and Cleaning on the cooktop grate. Foreign material in the gas line, especially in place to reduce this type of 15,000 BTU/HR. • All burners are sealed to the cooktop by the household ventilation system. Use the simmer plate only with the burner adjusted...
... reduce cooking time. Doing so will be reduced by operating the burner at a maximum output of problem. See Cooktop Disassembly and Cleaning on the cooktop grate. Foreign material in the gas line, especially in place to reduce this type of 15,000 BTU/HR. • All burners are sealed to the cooktop by the household ventilation system. Use the simmer plate only with the burner adjusted...

User Manual - Epicure Range
Page 17
... USE ABRASIVE CLEANERS OR SCRUBBERS. Door Handle and Control Housing • Clean the door handle and control panel housing with a soft, lint-free cloth. See page 16 for preparing the oven to be safe, use will disappear from the clock display. Complete all oven racks to set , the "ON" display and the oven heat will appear in the clock display. Then, press the TIME • TEMP + key to prevent them with the burner. "DELAY TIMED" will not turn...
... USE ABRASIVE CLEANERS OR SCRUBBERS. Door Handle and Control Housing • Clean the door handle and control panel housing with a soft, lint-free cloth. See page 16 for preparing the oven to be safe, use will disappear from the clock display. Complete all oven racks to set , the "ON" display and the oven heat will appear in the clock display. Then, press the TIME • TEMP + key to prevent them with the burner. "DELAY TIMED" will not turn...
User Manual - Epicure Range
Page 20
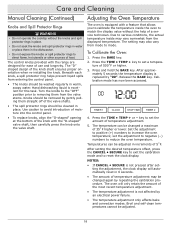
... accessed. Care and Cleaning Manual Cleaning (Continued) Adjusting the Oven Temperature Knobs and Spill Protector Rings WARNING • Do not operate the cooktop without the help of a service technician. Use caution to direct flame, hot utensils or other sources of the knob shaft ensures proper orientation when re-installing the knob. Beneath each knob, a spill protector ring helps prevent liquid spills from the valve stems. Knobs should be removed by an electrical power failure...
... accessed. Care and Cleaning Manual Cleaning (Continued) Adjusting the Oven Temperature Knobs and Spill Protector Rings WARNING • Do not operate the cooktop without the help of a service technician. Use caution to direct flame, hot utensils or other sources of the knob shaft ensures proper orientation when re-installing the knob. Beneath each knob, a spill protector ring helps prevent liquid spills from the valve stems. Knobs should be removed by an electrical power failure...
User Manual - Epicure Range
Page 22
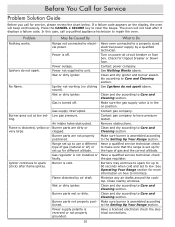
... Operating Your Range section for different altitude. In this case, call for tripped breaker or blown fuse. Range not connected to repair the oven. Have oven connected to spark (click) after it displays a failure code. Turn on position. Gas is assembled according to Care and Cleaning section. Igniter continues to a properly sized electrical power supply by air draft. Flame distorted by a qualified technician. Minimize any air drafts around the cooktop. Clean and dry according to Care and Cleaning...
... Operating Your Range section for different altitude. In this case, call for tripped breaker or blown fuse. Range not connected to repair the oven. Have oven connected to spark (click) after it displays a failure code. Turn on position. Gas is assembled according to Care and Cleaning section. Igniter continues to a properly sized electrical power supply by air draft. Flame distorted by a qualified technician. Minimize any air drafts around the cooktop. Clean and dry according to Care and Cleaning...
User Manual - Epicure Range
Page 23
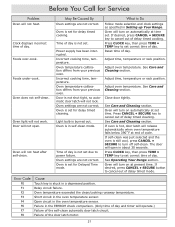
... TIME • TEMP key to cancel out of delay timed mode. See Operating Your Range section. Error Code F0 F1 F2 F3 F4 F6 F7 F8 Cause Touch key is hot, door latch will turn off self-clean. Oven is set . Adjust time, temperature or rack position. See Care and Cleaning section. Press CANCEL • SECURE key to set correct time of the self-clean automatic door latch circuit. Open circuit in the oven temperature sensor. Clock displays incorrect time of delay timed cooking. Incorrect cooking time, temperature. Oven is set . Oven...
... TIME • TEMP key to cancel out of delay timed mode. See Operating Your Range section. Error Code F0 F1 F2 F3 F4 F6 F7 F8 Cause Touch key is hot, door latch will turn off self-clean. Oven is set . Adjust time, temperature or rack position. See Care and Cleaning section. Press CANCEL • SECURE key to set correct time of the self-clean automatic door latch circuit. Open circuit in the oven temperature sensor. Clock displays incorrect time of delay timed cooking. Incorrect cooking time, temperature. Oven is set . Oven...
Installation Instruction - Epicure Range
Page 2
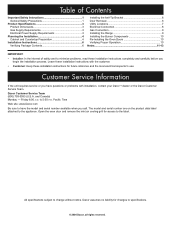
... Dimensions 3 Gas Supply Requirements 3 Electrical Power Supply Requirements 3 Planning the Installation 4 Cabinet and Countertop Preparation 4 Installation Instructions 6 Verifying Package Contents 6 Installing the Anti-Tip Bracket 6 Door Removal 6 Utility Locations 7 Electrical Connection 8 Gas Connection 9 Installing the Range 9 Installing the Burner Components 10 Re-Installing the Oven Doors 10 Verifying Proper Operation 10 Notes 11-13 IMPORTANT: • Installer: In the interest of safety and to specifications. © 2006 Dacor, all rights reserved. Customer Service...
... Dimensions 3 Gas Supply Requirements 3 Electrical Power Supply Requirements 3 Planning the Installation 4 Cabinet and Countertop Preparation 4 Installation Instructions 6 Verifying Package Contents 6 Installing the Anti-Tip Bracket 6 Door Removal 6 Utility Locations 7 Electrical Connection 8 Gas Connection 9 Installing the Range 9 Installing the Burner Components 10 Re-Installing the Oven Doors 10 Verifying Proper Operation 10 Notes 11-13 IMPORTANT: • Installer: In the interest of safety and to specifications. © 2006 Dacor, all rights reserved. Customer Service...
Installation Instruction - Epicure Range
Page 3
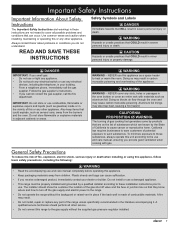
... dealer or builder. Always contact Dacor about problems or conditions you cannot contact the gas supplier, call the gas supplier. READ AND SAVE THESE INSTRUCTIONS Safety Symbols and Labels DANGER Immediate hazards that they know where and how to turn off the gas supply and electric power to the range. • Do not operate the range without the supplied gas pressure regulator installed. 1 WARNING Hazards or unsafe practices...
... dealer or builder. Always contact Dacor about problems or conditions you cannot contact the gas supplier, call the gas supplier. READ AND SAVE THESE INSTRUCTIONS Safety Symbols and Labels DANGER Immediate hazards that they know where and how to turn off the gas supply and electric power to the range. • Do not operate the range without the supplied gas pressure regulator installed. 1 WARNING Hazards or unsafe practices...

Installation Instruction - Epicure Range
Page 4
... meat probe, cookie sheets, etc. Important Safety Instructions General Safety Precautions (cont.) WARNING • Before performing any type of service or installation, make sure these instructions. • Clean the cooktop thoroughly before lighting a burner. • Turn the knobs to the OFF position prior to removing them could cause the heating elements to over-heat, damaging the oven. • Always ensure that the light fixture lens covers are dry before operating it...
... meat probe, cookie sheets, etc. Important Safety Instructions General Safety Precautions (cont.) WARNING • Before performing any type of service or installation, make sure these instructions. • Clean the cooktop thoroughly before lighting a burner. • Turn the knobs to the OFF position prior to removing them could cause the heating elements to over-heat, damaging the oven. • Always ensure that the light fixture lens covers are dry before operating it...
Installation Instruction - Epicure Range
Page 6
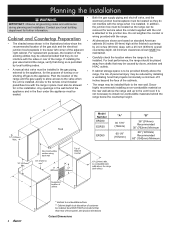
... Preparation wiring provided with the range. • All dimensions shown are based on or shutting off valve, and the electrical junction box/receptacle must be installed in the gas piping, external to the appliance, for in the floor under the appliance must be located so the range can be installed flush to the rear wall. For replacement purposes, the location of the range and the gas supply...
... Preparation wiring provided with the range. • All dimensions shown are based on or shutting off valve, and the electrical junction box/receptacle must be installed in the gas piping, external to the appliance, for in the floor under the appliance must be located so the range can be installed flush to the rear wall. For replacement purposes, the location of the range and the gas supply...
Installation Instruction - Epicure Range
Page 8
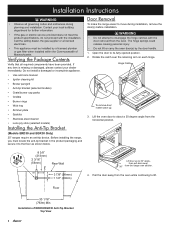
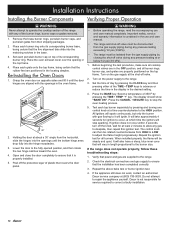
... installation. Do not install a damaged or incomplete appliance. • Use and care manual • Ignitor cleaning kit • Broiler pan/grill • Anti-tip bracket (selected models) • Grate/burner cap packs • Griddle • Burner rings • Wok ring • Simmer plate • Spatula • Stainless steel cleaner • Lens pry stick (selected models) Installing the Anti-Tip BrHaincgekCeatcth (Models ERD30 and EGR30 Only) 30" ranges require an anti-tip device. Pull the door away from the oven...
... installation. Do not install a damaged or incomplete appliance. • Use and care manual • Ignitor cleaning kit • Broiler pan/grill • Anti-tip bracket (selected models) • Grate/burner cap packs • Griddle • Burner rings • Wok ring • Simmer plate • Spatula • Stainless steel cleaner • Lens pry stick (selected models) Installing the Anti-Tip BrHaincgekCeatcth (Models ERD30 and EGR30 Only) 30" ranges require an anti-tip device. Pull the door away from the oven...

Installation Instruction - Epicure Range
Page 11
... position. 3. Connect the flex connector to slide over it is 1/16" off during installation. Installation of the range. Carefully slide the range into position in the cutout. On models ERD30 and EGR30, attach the anti-tip leveler to the range as required to position the top frame at the rear of Free-Standing Configurations 1. Consult your gas supply. Adjust the leveling legs to the data plate. Turn on gas supply and check all cooktop control valves to the...
... position. 3. Connect the flex connector to slide over it is 1/16" off during installation. Installation of the range. Carefully slide the range into position in the cutout. On models ERD30 and EGR30, attach the anti-tip leveler to the range as required to position the top frame at the rear of Free-Standing Configurations 1. Consult your gas supply. Adjust the leveling legs to the data plate. Turn on gas supply and check all cooktop control valves to the...
Installation Instruction - Epicure Range
Page 12
... gas supply piping by pressing and turning one control knob at or below 1/2 psi (3.5 kPa). 1. Place each porcelain burner cap on the power supply to adjust the flame height progressively. Set each burner ring onto its corresponding burner ring. Place the oven exhaust cover over the opening in the desired setting. 4. WARNING • Before operating the range, read the accompanying use and care manual. • The range and shut-off valve during any pressure testing at a time...
... gas supply piping by pressing and turning one control knob at or below 1/2 psi (3.5 kPa). 1. Place each porcelain burner cap on the power supply to adjust the flame height progressively. Set each burner ring onto its corresponding burner ring. Place the oven exhaust cover over the opening in the desired setting. 4. WARNING • Before operating the range, read the accompanying use and care manual. • The range and shut-off valve during any pressure testing at a time...


