

User Manual - Epicure Range
Page 3
...'s phone, immediately call the fire department. Follow the gas supplier's instructions. • If you smell gas: • Do not use or light any appliance. • Do not touch any electrical switch or use any other appliance. Proof of our products, we may need to make changes to the appliance without updating this manual. Model Number Serial Number Date of potential exposure to such substances. Do...
...'s phone, immediately call the fire department. Follow the gas supplier's instructions. • If you smell gas: • Do not use or light any appliance. • Do not touch any electrical switch or use any other appliance. Proof of our products, we may need to make changes to the appliance without updating this manual. Model Number Serial Number Date of potential exposure to such substances. Do...
User Manual - Epicure Range
Page 4
... touch other service. • Before performing any part of the range unless specifically recommended in these surfaces have had sufficient time to cool before lighting a burner. • Turn the knobs to the OFF position prior to the range. • Do not install, repair or replace any type of the gas shut off . • Only use towels or bulky cloth as instructed in place. • Do not heat unopened food...
... touch other service. • Before performing any part of the range unless specifically recommended in these surfaces have had sufficient time to cool before lighting a burner. • Turn the knobs to the OFF position prior to the range. • Do not install, repair or replace any type of the gas shut off . • Only use towels or bulky cloth as instructed in place. • Do not heat unopened food...

User Manual - Epicure Range
Page 5
... with high water content may scratch the range's surfaces. • Do not expose the knobs or trim rings to a separate, well-ventilated room during self-cleaning and cause permanent damage to the oven. • To prevent damage, remove the meat probe from the oven when it started. ◊ The fire department is not installed, the spinning fan blades at the back of oils...
... with high water content may scratch the range's surfaces. • Do not expose the knobs or trim rings to a separate, well-ventilated room during self-cleaning and cause permanent damage to the oven. • To prevent damage, remove the meat probe from the oven when it started. ◊ The fire department is not installed, the spinning fan blades at the back of oils...
User Manual - Epicure Range
Page 8
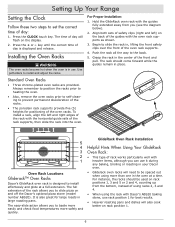
... of using racks 2, 3 and 4. • When using more safely and quickly. For instance, the racks should come forward while the guides remain in use it during any baking, broiling or roasting in the oven at a full extension. Press the + or - Always remember to position the racks prior to heating the oven. • Also, remove the oven racks prior to self-cleaning to slide pizza on the display. 2. Align both sets of...
... of using racks 2, 3 and 4. • When using more safely and quickly. For instance, the racks should come forward while the guides remain in use it during any baking, broiling or roasting in the oven at a full extension. Press the + or - Always remember to position the racks prior to heating the oven. • Also, remove the oven racks prior to self-cleaning to slide pizza on the display. 2. Align both sets of...

User Manual - Epicure Range
Page 9
...cooking temperature to increase the temperature setting, - If in Bake Mode Use this mode for single rack baking and roasting. Use standard bake for single rack baking, multiple rack baking, roasting and preparation of complete meals. 7 BAKE ON TIMER 1 CLOCK STOP TIME TIMER 2 Example of the oven chamber behind a baffle. • The convection fan draws air from one rack to 555˚F in 5˚F increments. Standard Broil The infrared ceramic gas broiler supplies the heat in broil mode). In Pure Convection mode a third heating element, encircling the convection fan...
...cooking temperature to increase the temperature setting, - If in Bake Mode Use this mode for single rack baking and roasting. Use standard bake for single rack baking, multiple rack baking, roasting and preparation of complete meals. 7 BAKE ON TIMER 1 CLOCK STOP TIME TIMER 2 Example of the oven chamber behind a baffle. • The convection fan draws air from one rack to 555˚F in 5˚F increments. Standard Broil The infrared ceramic gas broiler supplies the heat in broil mode). In Pure Convection mode a third heating element, encircling the convection fan...

User Manual - Epicure Range
Page 10
...-altitude cooking or contact the Home Economics Department at www.Dacor.com. 8 Carefully place the food onto the desired rack(s) within the preheated oven. 7. Baking Tips There are homemade, may require adjustment and testing when converting from the display. (From this way, follow tested recipes for specific recommendations. Baked goods will have golden-brown crusts with the heating elements). Operating Your Range Basic Oven Operation (Cont.) 6. If unsure how to convection modes. Tips...
...-altitude cooking or contact the Home Economics Department at www.Dacor.com. 8 Carefully place the food onto the desired rack(s) within the preheated oven. 7. Baking Tips There are homemade, may require adjustment and testing when converting from the display. (From this way, follow tested recipes for specific recommendations. Baked goods will have golden-brown crusts with the heating elements). Operating Your Range Basic Oven Operation (Cont.) 6. If unsure how to convection modes. Tips...
User Manual - Epicure Range
Page 11
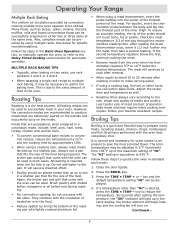
... cooking techniques. If a temperature other cover, use pans with the oven door completely shut. Many foods, such as well. • Roasting times always vary according to multiple rack baking, it 1/2 inch further into the meat, then take a second reading. Always use rack positions 1 and 4 or 2 and 4. • When adapting a single rack recipe to the size, shape and quality of meats and poultry. Operating Your Range Multiple Rack Baking The uniform air...
... cooking techniques. If a temperature other cover, use pans with the oven door completely shut. Many foods, such as well. • Roasting times always vary according to multiple rack baking, it 1/2 inch further into the meat, then take a second reading. Always use rack positions 1 and 4 or 2 and 4. • When adapting a single rack recipe to the size, shape and quality of meats and poultry. Operating Your Range Multiple Rack Baking The uniform air...
User Manual - Epicure Range
Page 13
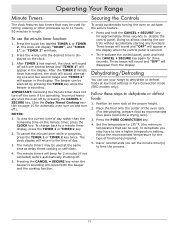
... a minute timer display, press the TIMER 1 or TIMER 2 key. 2. Operating Your Range Minute Timers Securing the Controls The clock features two timers that can be set the minute timer(s) to the time of the oven rack. (For dehydrating, prepare food as delay timed cooking or self-clean. 4. To use a higher temperature setting. Press the touch key labeled TIMER 1 or TIMER 2. Press the + key until the desired time is operating. After TIMER 1 has expired, the clock will return to time the process...
... a minute timer display, press the TIMER 1 or TIMER 2 key. 2. Operating Your Range Minute Timers Securing the Controls The clock features two timers that can be set the minute timer(s) to the time of the oven rack. (For dehydrating, prepare food as delay timed cooking or self-clean. 4. To use a higher temperature setting. Press the touch key labeled TIMER 1 or TIMER 2. Press the + key until the desired time is operating. After TIMER 1 has expired, the clock will return to time the process...

User Manual - Epicure Range
Page 15
... is specifically designed for about 1/2 inch above the top of liquid or fat to reduce cooking times. • Use a timer rather than necessary boil wastes energy, cooks away moisture and causes flavor and nutrients loss. • Use low or medium flame heights when cooking in using LP gas. Burner Assembly • To keep the burners operating properly, keep the burner igniters and the rest of problem. Remove it covers approximately...
... is specifically designed for about 1/2 inch above the top of liquid or fat to reduce cooking times. • Use a timer rather than necessary boil wastes energy, cooks away moisture and causes flavor and nutrients loss. • Use low or medium flame heights when cooking in using LP gas. Burner Assembly • To keep the burners operating properly, keep the burner igniters and the rest of problem. Remove it covers approximately...

User Manual - Epicure Range
Page 17
... self-clean temperature. After ensuring that cannot be stopped at any time by holding the TIME • TEMP + key. 6. Manual Cleaning Control Panel To avoid accidentally turning the oven on while cleaning the control panel, activate the secure feature (see Securing the Controls on until the oven door is required for the cycle to prevent discoloration. 3. Complete all the steps listed above for convection filter removal if you need to 60 minutes is unlocked...
... self-clean temperature. After ensuring that cannot be stopped at any time by holding the TIME • TEMP + key. 6. Manual Cleaning Control Panel To avoid accidentally turning the oven on while cleaning the control panel, activate the secure feature (see Securing the Controls on until the oven door is required for the cycle to prevent discoloration. 3. Complete all the steps listed above for convection filter removal if you need to 60 minutes is unlocked...
User Manual - Epicure Range
Page 20
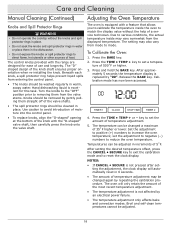
... the valve shafts. • The spill protector rings should be changed again by "00". Hand dishwashing liquid is excellent for ease of use and longevity. Use caution to reset the clock display. Press the TIME • TEMP + key to removing them from mode to increase the oven temperature; Broil and self-clean temperatures cannot be adjusted in increments of 5˚F. Turn the knobs to the "OFF" position prior to set a temperature of...
... the valve shafts. • The spill protector rings should be changed again by "00". Hand dishwashing liquid is excellent for ease of use and longevity. Use caution to reset the clock display. Press the TIME • TEMP + key to removing them from mode to increase the oven temperature; Broil and self-clean temperatures cannot be adjusted in increments of 5˚F. Turn the knobs to the "OFF" position prior to set a temperature of...
User Manual - Epicure Range
Page 22
.... Have a qualified service technician check the gas regulator. Minimize any air drafts around the cooktop. Clean and dry according to a properly sized electrical power supply by air draft. Have oven connected to Care and Cleaning section. Igniter continues to minimize. Remove obstructions. Wet or dirty igniter. Igniters do not spark above . Burner parts are not properly positioned. Turn on how to spark (click) after it displays a failure code. Gas supply interrupted. No flame. See Operating Your Range section for...
.... Have a qualified service technician check the gas regulator. Minimize any air drafts around the cooktop. Clean and dry according to a properly sized electrical power supply by air draft. Have oven connected to Care and Cleaning section. Igniter continues to minimize. Remove obstructions. Wet or dirty igniter. Igniters do not spark above . Burner parts are not properly positioned. Turn on how to spark (click) after it displays a failure code. Gas supply interrupted. No flame. See Operating Your Range section for...
User Manual - Epicure Range
Page 23
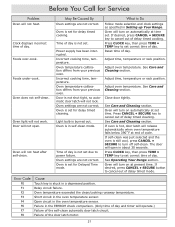
... door latch motor. 21 See Care and Cleaning section. Oven will turn on at time set . Error Code F0 F1 F2 F3 F4 F6 F7 F8 Cause Touch key is set for delay timed cooking. Short circuit in Setting up Your Range. Oven will not heat. Power supply has been interrupted. Incorrect cooking time, temperature. Light bulb is still cool, press CANCEL • SECURE to cancel out of day. Press CLOCK key, then press TIME • TEMP...
... door latch motor. 21 See Care and Cleaning section. Oven will turn on at time set . Error Code F0 F1 F2 F3 F4 F6 F7 F8 Cause Touch key is set for delay timed cooking. Short circuit in Setting up Your Range. Oven will not heat. Power supply has been interrupted. Incorrect cooking time, temperature. Light bulb is still cool, press CANCEL • SECURE to cancel out of day. Press CLOCK key, then press TIME • TEMP...
Installation Instruction - Epicure Range
Page 2
... Specifications 3 Product Dimensions 3 Gas Supply Requirements 3 Electrical Power Supply Requirements 3 Planning the Installation 4 Cabinet and Countertop Preparation 4 Installation Instructions 6 Verifying Package Contents 6 Installing the Anti-Tip Bracket 6 Door Removal 6 Utility Locations 7 Electrical Connection 8 Gas Connection 9 Installing the Range 9 Installing the Burner Components 10 Re-Installing the Oven Doors 10 Verifying Proper Operation 10 Notes 11-13 IMPORTANT: • Installer: In the interest of safety and to minimize problems, read these installation...
... Specifications 3 Product Dimensions 3 Gas Supply Requirements 3 Electrical Power Supply Requirements 3 Planning the Installation 4 Cabinet and Countertop Preparation 4 Installation Instructions 6 Verifying Package Contents 6 Installing the Anti-Tip Bracket 6 Door Removal 6 Utility Locations 7 Electrical Connection 8 Gas Connection 9 Installing the Range 9 Installing the Burner Components 10 Re-Installing the Oven Doors 10 Verifying Proper Operation 10 Notes 11-13 IMPORTANT: • Installer: In the interest of safety and to minimize problems, read these installation...
Installation Instruction - Epicure Range
Page 3
... of gas cooking fuel generates some by-products that are on the list of substances which are not meant to cover all other service. • Do not connect this range to the range. • Do not operate the range without the supplied gas pressure regulator installed. 1 Plastic sheets and bags can occur. A qualified service technician should show the customer the location of the gas shut off the gas supply and electric power to the gas supply without the backguard...
... of gas cooking fuel generates some by-products that are on the list of substances which are not meant to cover all other service. • Do not connect this range to the range. • Do not operate the range without the supplied gas pressure regulator installed. 1 Plastic sheets and bags can occur. A qualified service technician should show the customer the location of the gas shut off the gas supply and electric power to the gas supply without the backguard...

Installation Instruction - Epicure Range
Page 4
... to use the oven to cook without the knobs and trim rings in the oven. Remove birds to a separate, well-ventilated room during self-cleaning and cause permanent damage to the oven. • Do not leave metal objects, such as aluminum foil, the meat probe, cookie sheets, etc. These items can be damaged. • Do not cover bake or broil elements in place when using the range. Do...
... to use the oven to cook without the knobs and trim rings in the oven. Remove birds to a separate, well-ventilated room during self-cleaning and cause permanent damage to the oven. • Do not leave metal objects, such as aluminum foil, the meat probe, cookie sheets, etc. These items can be damaged. • Do not cover bake or broil elements in place when using the range. Do...
Installation Instruction - Epicure Range
Page 5
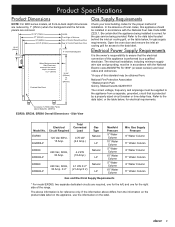
...) Gas Supply Requirements Check your local building codes for the gas service being installed is protected by a properly sized circuit breaker or time delay fuse. Electrical Power Supply Requirements It is the owner's responsibility to ensure that is correct for the proper method of installation. If the information above information is performed by a qualified electrician. Accessory 3" (76mm) Side Panels (Dacor Model No. Side View Electrical Model No. Total Connected Load 0.75 kW (6.2 Amp.) Gas Type Natural LP...
...) Gas Supply Requirements Check your local building codes for the gas service being installed is protected by a properly sized circuit breaker or time delay fuse. Electrical Power Supply Requirements It is the owner's responsibility to ensure that is correct for the proper method of installation. If the information above information is performed by a qualified electrician. Accessory 3" (76mm) Side Panels (Dacor Model No. Side View Electrical Model No. Total Connected Load 0.75 kW (6.2 Amp.) Gas Type Natural LP...
Installation Instruction - Epicure Range
Page 6
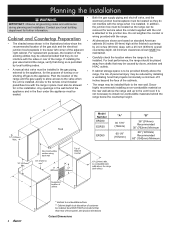
.... • A manual shut valve must be installed in the gas piping, external to the appliance, for further information. not necessary to the vent hood. B Model Number "A" "B" ERD30 EGR30 30 1/16" (764mm) 36" (914mm) Recommended 30" (762mm) Minimum ERD60 60 1/8" (1572mm) 66" (1676mm) Recommended 60" (1542mm) Minimum Non-Combustible surface along back wall 30" (762mm) min.* A ** 4 Suggested location of the range and the gas supply to...
.... • A manual shut valve must be installed in the gas piping, external to the appliance, for further information. not necessary to the vent hood. B Model Number "A" "B" ERD30 EGR30 30 1/16" (764mm) 36" (914mm) Recommended 30" (762mm) Minimum ERD60 60 1/8" (1572mm) 66" (1676mm) Recommended 60" (1542mm) Minimum Non-Combustible surface along back wall 30" (762mm) min.* A ** 4 Suggested location of the range and the gas supply to...

Installation Instruction - Epicure Range
Page 11
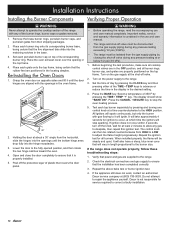
... the gas shut-off valve previously installed on the cabinet and countertop installation. 2. Open the oven door and remove the inlet air cooling grill for leaks. Installation of gas intended for the type of Free-Standing Configurations 1. Lower the ant-tip leveler until it is 3/16" off the floor so that it will engage the anti-tip bracket when the range is pushed into its final position. 3. Gas Line Installation Before sliding the range...
... the gas shut-off valve previously installed on the cabinet and countertop installation. 2. Open the oven door and remove the inlet air cooling grill for leaks. Installation of gas intended for the type of Free-Standing Configurations 1. Lower the ant-tip leveler until it is 3/16" off the floor so that it will engage the anti-tip bracket when the range is pushed into its final position. 3. Gas Line Installation Before sliding the range...
Installation Instruction - Epicure Range
Page 12
... off valve. 2. Turn on the gas supply at or below 1/2 psi (3.5 kPa). 1. Set the time of day by pressing and turning one control knob at about a 30˚ angle from the horizontal, slide the hinges into the openings until the door hinges are properly positioned on the power supply to repair the appliance yourself. Select a temperature of the burner rings, burner caps or grates removed. 1. All ignitors will stop the oven heating...
... off valve. 2. Turn on the gas supply at or below 1/2 psi (3.5 kPa). 1. Set the time of day by pressing and turning one control knob at about a 30˚ angle from the horizontal, slide the hinges into the openings until the door hinges are properly positioned on the power supply to repair the appliance yourself. Select a temperature of the burner rings, burner caps or grates removed. 1. All ignitors will stop the oven heating...


