Planning Guides
Page 1
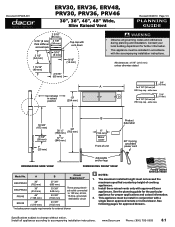
... must be install in conjunction with a single Dacor approved remote or in raised position 10" (254 mm) warning • Observe all appliances according to 120 Vac, 60 Hz, 15 Amp. Document # PG08-001 ERV30, ERV36, ERV48, PRV30, PRV36...3/8" (1102 mm) Three prong electrical outlet connected to accompanying installation instructions. grounded, dedicated, circuit * Includes power supply requirements for further information. • This appliance must be installed in accordance with approved Dacor appliances. www.Dacor.com Phone: (800) 793-0093 8.1 side view 7/16...
... must be install in conjunction with a single Dacor approved remote or in raised position 10" (254 mm) warning • Observe all appliances according to 120 Vac, 60 Hz, 15 Amp. Document # PG08-001 ERV30, ERV36, ERV48, PRV30, PRV36...3/8" (1102 mm) Three prong electrical outlet connected to accompanying installation instructions. grounded, dedicated, circuit * Includes power supply requirements for further information. • This appliance must be installed in accordance with approved Dacor appliances. www.Dacor.com Phone: (800) 793-0093 8.1 side view 7/16...

Planning Guides
Page 2
...in-line blower used with model and configuration. www.Dacor.com Phone: (800) 793-0093 8.2 Calculating the Maximum Duct Run Length ■■ Do not use duct work , subtract all appliances according to accompanying installation instructions. Raised Vent Model No. To determine the ...maximum allowable length of the duct work that is smaller in cross-sectional area than one 90°. ERV/PRV30 ERV/PRV36 PRV46 ERV48 Approved Dacor Blowers* Remote blowers: REMP3 or...
...in-line blower used with model and configuration. www.Dacor.com Phone: (800) 793-0093 8.2 Calculating the Maximum Duct Run Length ■■ Do not use duct work , subtract all appliances according to accompanying installation instructions. Raised Vent Model No. To determine the ...maximum allowable length of the duct work that is smaller in cross-sectional area than one 90°. ERV/PRV30 ERV/PRV36 PRV46 ERV48 Approved Dacor Blowers* Remote blowers: REMP3 or...

Planning Guides
Page 3
Install all appliances according to change without notice. www.Dacor.com Phone: (800) 793-0093 8.3 out is offset 3" Side Exhaust Knock Outs (1 5/8"... wiring access hole in bottom Wiring/conduit connections for rEmote/in-line blower Specifications subject to accompanying installation instructions. out lines up with vertical center line of chassis On 30" and 36"... wide models, the vertical center line of bottom knock- Document # PG08-001 ERV30, ERV36, ERV48, PRV30, PRV36, PRV46 30", 36", 46", 48" Wide, Slim Raised Vent All tolerances: ±1/16" (&#...
Install all appliances according to change without notice. www.Dacor.com Phone: (800) 793-0093 8.3 out is offset 3" Side Exhaust Knock Outs (1 5/8"... wiring access hole in bottom Wiring/conduit connections for rEmote/in-line blower Specifications subject to accompanying installation instructions. out lines up with vertical center line of chassis On 30" and 36"... wide models, the vertical center line of bottom knock- Document # PG08-001 ERV30, ERV36, ERV48, PRV30, PRV36, PRV46 30", 36", 46", 48" Wide, Slim Raised Vent All tolerances: ±1/16" (&#...

Installation Instructions
Page 1
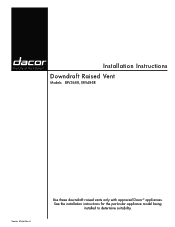
See the installation instructions for the particular appliance model being installed to determine suitability. L Use these downdraft raised vents only with approved Dacor ® appliances. Installation Instructions Downdraft Raised Vent Models: ERV30, ERV36, ERV48 PRV30, PRV36, PRV46 Part No. 65335 Rev.
See the installation instructions for the particular appliance model being installed to determine suitability. L Use these downdraft raised vents only with approved Dacor ® appliances. Installation Instructions Downdraft Raised Vent Models: ERV30, ERV36, ERV48 PRV30, PRV36, PRV46 Part No. 65335 Rev.
Installation Instructions
Page 2
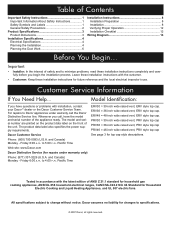
...for repairs under warranty call , have questions or problems with installation, contact your Dacor ® dealer or the Dacor Customer Service Team. Tested in accordance with the customer. • Customer: Keep these installation instructions for future reference and the local electrical inspector's use...specifies the power supply requirements. and Canada) Monday - Friday 6:00 a.m. ERV48 = 48-inch wide raised vent, ERV style top cap. Model Identification: If you begin the installation process. Dacor assumes no liability for Household Electric Cooking and Liquid Heating Appliances, and ...
...for repairs under warranty call , have questions or problems with installation, contact your Dacor ® dealer or the Dacor Customer Service Team. Tested in accordance with the customer. • Customer: Keep these installation instructions for future reference and the local electrical inspector's use...specifies the power supply requirements. and Canada) Monday - Friday 6:00 a.m. ERV48 = 48-inch wide raised vent, ERV style top cap. Model Identification: If you begin the installation process. Dacor assumes no liability for Household Electric Cooking and Liquid Heating Appliances, and ...
Installation Instructions
Page 3
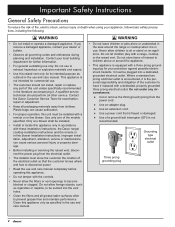
.... c) When cutting or drilling into wall or ceiling, do not damage electrical wiring and other appliance. • Always contact the Dacor Customer Service Team about problems and conditions that COULD result in minor personal injury or property damage. Do not store flammable or explosive ...flammable or explosive vapors and liquids (such as aerosol cans, away from the range or cooktop. Use common sense and caution when installing, maintaining or operating this or any other hidden utilities. warning Hazards or unsafe practices that WILL result in severe personal injury or death...
.... c) When cutting or drilling into wall or ceiling, do not damage electrical wiring and other appliance. • Always contact the Dacor Customer Service Team about problems and conditions that COULD result in minor personal injury or property damage. Do not store flammable or explosive ...flammable or explosive vapors and liquids (such as aerosol cans, away from the range or cooktop. Use common sense and caution when installing, maintaining or operating this or any other hidden utilities. warning Hazards or unsafe practices that WILL result in severe personal injury or death...
Installation Instructions
Page 4
...Read the use and care manual. Contact the Dacor Customer Service Team for its intended purpose as cigarettes or napkins, to become blocked or clogged. Do not allow the filters or vent openings to be installed. • Install or locate this appliance. • Do not ... This appliance is equipped with a dedicated, properly grounded three prong electrical outlet. Do not let children play with these installation instructions, the Dacor range/ cooktop installation instructions and the remote or in accordance with a range, cooktop or the raised vent. Where a standard two prong ...
...Read the use and care manual. Contact the Dacor Customer Service Team for its intended purpose as cigarettes or napkins, to become blocked or clogged. Do not allow the filters or vent openings to be installed. • Install or locate this appliance. • Do not ... This appliance is equipped with a dedicated, properly grounded three prong electrical outlet. Do not let children play with these installation instructions, the Dacor range/ cooktop installation instructions and the remote or in accordance with a range, cooktop or the raised vent. Where a standard two prong ...

Installation Instructions
Page 5
... 2 9/16" (6.5 cm) Top cap with vent down 9/16" (1.4 cm) Tolerances: ±1/16" (±1.6 mm) unless otherwise stated Model Number ERV30 PRV30 ERV36 PRV36 PRV46 ERV48 A - side view 18 5/8" (47.3 cm) 3 3/4" (9.5 cm) 1" (2.5 cm) 30 1/4" (76.8 cm) 30" (76.2 cm) 37 t1o/4"* (94.6 cm)... cord See page 6 for exhaust locations and dimensions. * Maximum height of raised vent must not exceed maximum specified counter height for cooking appliance. 3 See installation instructions for cooking appliance. Chassis Width 27 3/8" (69.5 cm) 33 3/8" (84.8 cm) 43 3/8" (110.2 cm) 43 3/8" (110.2 cm...
... 2 9/16" (6.5 cm) Top cap with vent down 9/16" (1.4 cm) Tolerances: ±1/16" (±1.6 mm) unless otherwise stated Model Number ERV30 PRV30 ERV36 PRV36 PRV46 ERV48 A - side view 18 5/8" (47.3 cm) 3 3/4" (9.5 cm) 1" (2.5 cm) 30 1/4" (76.8 cm) 30" (76.2 cm) 37 t1o/4"* (94.6 cm)... cord See page 6 for exhaust locations and dimensions. * Maximum height of raised vent must not exceed maximum specified counter height for cooking appliance. 3 See installation instructions for cooking appliance. Chassis Width 27 3/8" (69.5 cm) 33 3/8" (84.8 cm) 43 3/8" (110.2 cm) 43 3/8" (110.2 cm...
Installation Instructions
Page 6
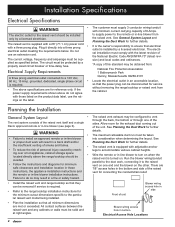
... prong electrical outlet meeting the requirements below . plied as specified below . If the power supply requirements shown above the range/cooktop should be installed only by a properly sized circuit breaker or time-delay fuse. *A copy of this standard may be obtained from: Electrical Supply Requirements National ...run must comply with the latest revision of personal injury caused by a licensed electrician. Front of the raised vent itself and a single Dacor approved remote or in -line blower from the cabinet. to supply power to vent through the back, the bottom or through one end...
... prong electrical outlet meeting the requirements below . plied as specified below . If the power supply requirements shown above the range/cooktop should be installed only by a properly sized circuit breaker or time-delay fuse. *A copy of this standard may be obtained from: Electrical Supply Requirements National ...run must comply with the latest revision of personal injury caused by a licensed electrician. Front of the raised vent itself and a single Dacor approved remote or in -line blower from the cabinet. to supply power to vent through the back, the bottom or through one end...

Installation Instructions
Page 7
...rear wall Vertical non-combustible surface rear wall Countertop overhang Notches required for some rasied vent installations, see cooktop installation instructions See the cooktop installation instructions for exact countertop and cabinet dimensions Cooktop Cabinet/Countertop Cutout - Top View REMP series... of cabinet front Notches required for some raised vent installations, see range installation instructions Notches for self-rimming style installations, see range installation instructions See the range installation instructions for exact countertop and cabinet dimensions Flush with ...
...rear wall Vertical non-combustible surface rear wall Countertop overhang Notches required for some rasied vent installations, see cooktop installation instructions See the cooktop installation instructions for exact countertop and cabinet dimensions Cooktop Cabinet/Countertop Cutout - Top View REMP series... of cabinet front Notches required for some raised vent installations, see range installation instructions Notches for self-rimming style installations, see range installation instructions See the range installation instructions for exact countertop and cabinet dimensions Flush with ...
Installation Instructions
Page 8
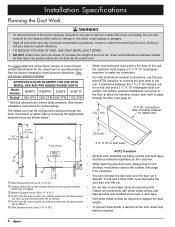
...must install one of the Dacor remote or in the floor to allow the transition and/or duct work to pass through the back, the bottom or either side by removing the appropriate exhaust knock out shown below for the raised vent to operate properly. See the blower installation instructions ... house or building. Doing so will also improve system efficiency. • TO REDUCE THE RISK OF FIRE, USE ONLY METAL DUCT WORK. • DO NOT install more than one blower shall be required. 6 out is offset 3" weight. Side Exhaust Knock Outs (1 5/8" X 16") • To prevent back-drafts,...
...must install one of the Dacor remote or in the floor to allow the transition and/or duct work to pass through the back, the bottom or either side by removing the appropriate exhaust knock out shown below for the raised vent to operate properly. See the blower installation instructions ... house or building. Doing so will also improve system efficiency. • TO REDUCE THE RISK OF FIRE, USE ONLY METAL DUCT WORK. • DO NOT install more than one blower shall be required. 6 out is offset 3" weight. Side Exhaust Knock Outs (1 5/8" X 16") • To prevent back-drafts,...

Installation Instructions
Page 9
... possible. To determine the maximum allowable length of the duct work that can be subtracted from the Blower Maximum Duct Straight Length. Installation Specifications • On side exhaust installations, allow five inches of space on the model of remote or in-line blower used with the vent system and the number of...
... possible. To determine the maximum allowable length of the duct work that can be subtracted from the Blower Maximum Duct Straight Length. Installation Specifications • On side exhaust installations, allow five inches of space on the model of remote or in-line blower used with the vent system and the number of...
Installation Instructions
Page 10
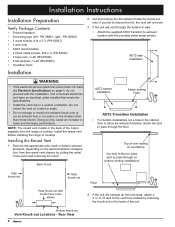
... of vent resting on countertop Cut hole in a location on the back of unit ADT2 bottom installation Attach sealing foam ADT2 Transition Installation • For bottom installations cut an exhaust hole in floor to allow the exhaust transition and/or the duct to pass ...the floor. If the unit will exhaust air from the raised vent chassis by removing the knock-out on the chassis other than those shown. Installation Instructions Installation Preparation Verify Package Contents • Product literature • Anchoring legs (left - PN 36861, right - PN 36862) • 2 wood ...
... of vent resting on countertop Cut hole in a location on the back of unit ADT2 bottom installation Attach sealing foam ADT2 Transition Installation • For bottom installations cut an exhaust hole in floor to allow the exhaust transition and/or the duct to pass ...the floor. If the unit will exhaust air from the raised vent chassis by removing the knock-out on the chassis other than those shown. Installation Instructions Installation Preparation Verify Package Contents • Product literature • Anchoring legs (left - PN 36861, right - PN 36862) • 2 wood ...

Installation Instructions
Page 11
Anchor leg Front of the raised vent using the provided keps nuts and washers. 7. Secure the anchoring legs to the Installation Specifications section. Install the duct work between raised vent and remote blower Range Raised vent configured for rear exhaust Floor Wiring/conduit that the end ... and 45° adjustable elbow REMP series remote blower Floor 6. Top of the countertop cutout with the electrical access panel toward the front. Install the remote or in-line blower according to the studs on the left and right sides of raised vent Put nuts/ washers on countertop...
Anchor leg Front of the raised vent using the provided keps nuts and washers. 7. Secure the anchoring legs to the Installation Specifications section. Install the duct work between raised vent and remote blower Range Raised vent configured for rear exhaust Floor Wiring/conduit that the end ... and 45° adjustable elbow REMP series remote blower Floor 6. Top of the countertop cutout with the electrical access panel toward the front. Install the remote or in-line blower according to the studs on the left and right sides of raised vent Put nuts/ washers on countertop...

Installation Instructions
Page 12
... panel Raised Vent Front View Ground GREEN Attach ground wire as shown. Connect other end of wires to ensure a proper installation. Installation Instructions Electrical Installation warning • ELECTRIC SHOCK HAZARD - Follow the wiring diagrams carefully to blower terminal block. Match wire colors to the duct...functional system. Raised Vent Electrical Access Panel 10 Do not connect the raised vent power plug to the electrical outlet until installation is disconnected from the raised vent to the blower parallel to terminals as shown To power wiring/conduit. Do not ...
... panel Raised Vent Front View Ground GREEN Attach ground wire as shown. Connect other end of wires to ensure a proper installation. Installation Instructions Electrical Installation warning • ELECTRIC SHOCK HAZARD - Follow the wiring diagrams carefully to blower terminal block. Match wire colors to the duct...functional system. Raised Vent Electrical Access Panel 10 Do not connect the raised vent power plug to the electrical outlet until installation is disconnected from the raised vent to the blower parallel to terminals as shown To power wiring/conduit. Do not ...
Installation Instructions
Page 13
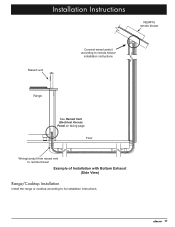
Installation Instructions REMP16 remote blower Raised vent Connect wires/conduit according to remote blower installation instructions Range See Raised Vent Electrical Access Panel on facing page Floor Wiring/conduit from raised vent to remote blower Example of Installation with Bottom Exhaust (Side View) Range/Cooktop Installation Install the range or cooktop according to its installation instructions. 11
Installation Instructions REMP16 remote blower Raised vent Connect wires/conduit according to remote blower installation instructions Range See Raised Vent Electrical Access Panel on facing page Floor Wiring/conduit from raised vent to remote blower Example of Installation with Bottom Exhaust (Side View) Range/Cooktop Installation Install the range or cooktop according to its installation instructions. 11
Installation Instructions
Page 14
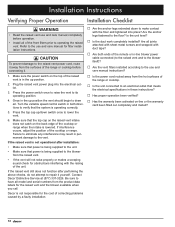
... position. 2. Is the unit level? □□ Is the duct work completely installed? If the raised vent is not operational after performing the above checks, do not attempt to the vent. Contact Dacor Distinctive Service at (877) 337-3226. Dacor is lowered. Are all joints attached with sheet metal screws and wrapped with...
... position. 2. Is the unit level? □□ Is the duct work completely installed? If the raised vent is not operational after performing the above checks, do not attempt to the vent. Contact Dacor Distinctive Service at (877) 337-3226. Dacor is lowered. Are all joints attached with sheet metal screws and wrapped with...
Installation Instructions
Page 1
Installation Instructions Downdraft Raised Vent Models: ERV36-ER, ERV48-ER Part No. 103106 Rev. See the installation instructions for the particular appliance model being installed to determine suitability. H Use these downdraft raised vents only with approved Dacor ® appliances.
Installation Instructions Downdraft Raised Vent Models: ERV36-ER, ERV48-ER Part No. 103106 Rev. See the installation instructions for the particular appliance model being installed to determine suitability. H Use these downdraft raised vents only with approved Dacor ® appliances.

Installation Instructions
Page 2
... Identification: ERV36-ER = 36-inch wide raised vent ERV48-ER = 48-inch wide raised vent Tested in accordance with the customer. • Customer: Keep these installation instructions for changes to change without notice. Leave these installation instructions completely and carefully before you call the Dacor Distinctive Service line. All specifications subject to specifications. ©...
... Identification: ERV36-ER = 36-inch wide raised vent ERV48-ER = 48-inch wide raised vent Tested in accordance with the customer. • Customer: Keep these installation instructions for changes to change without notice. Leave these installation instructions completely and carefully before you call the Dacor Distinctive Service line. All specifications subject to specifications. ©...
Installation Instructions
Page 3
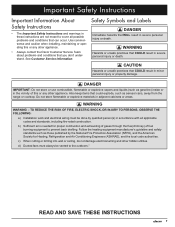
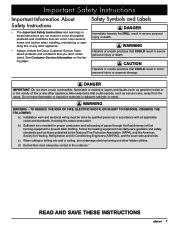
...- c) When cutting or drilling into wall or ceiling, do not damage electrical wiring and other appliance. • Always contact the Dacor Customer Service Team about problems and conditions that can occur. Important Safety Instructions Important Information About Safety Instructions • The Important Safety ...conditions that you don't understand. d) Ducted fans must be vented to prevent back drafting. Use common sense and caution when installing, maintaining or operating this or any other hidden utilities. TO REDUCE THE RISK OF FIRE, ELECTRIC SHOCK, OR INJURY TO PERSONS,...
...- c) When cutting or drilling into wall or ceiling, do not damage electrical wiring and other appliance. • Always contact the Dacor Customer Service Team about problems and conditions that can occur. Important Safety Instructions Important Information About Safety Instructions • The Important Safety ...conditions that you don't understand. d) Ducted fans must be vented to prevent back drafting. Use common sense and caution when installing, maintaining or operating this or any other hidden utilities. TO REDUCE THE RISK OF FIRE, ELECTRIC SHOCK, OR INJURY TO PERSONS,...
