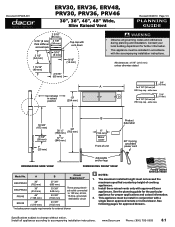
Planning Guides
Page 1
... cutout information. 3. Specifications subject to 120 Vac, 60 Hz, 15 Amp. A B Circuit Requirement* ERV/PRV30 ERV/PRV36 PRV46 ERV48 30" (762 mm) 36" (914 mm) 46" (1168 mm) 48" (1219 mm) 27 3/8" (695 mm) 33 3/8" 848 mm) 43 3/8" (1102 mm) 43 3/8" (1102 mm) Three prong electrical outlet connected to change without notice. Contact your local building department for approved blowers. Install...
... cutout information. 3. Specifications subject to 120 Vac, 60 Hz, 15 Amp. A B Circuit Requirement* ERV/PRV30 ERV/PRV36 PRV46 ERV48 30" (762 mm) 36" (914 mm) 46" (1168 mm) 48" (1219 mm) 27 3/8" (695 mm) 33 3/8" 848 mm) 43 3/8" (1102 mm) 43 3/8" (1102 mm) Three prong electrical outlet connected to change without notice. Contact your local building department for approved blowers. Install...

Planning Guides
Page 2
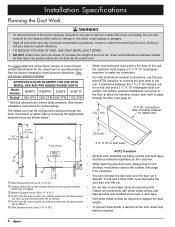
... remote/in -line blower used . Two staggered 45° angles are used, try to 10" round transition 4 feet Roof cap * Wall cap * * The equivalent lengths of roof and wall caps vary with model and configuration. Document # PG08-001 ERV30, ERV36, ERV48, PRV30, PRV36, PRV46 30", 36", 46", 48" Wide, Slim Raised Vent Revised 03/29/10 Page 2/3 PLANNING GUIDE Duct Work Design Tips ■■ Wherever possible, reduce the number of transitions and turns...
... remote/in -line blower used . Two staggered 45° angles are used, try to 10" round transition 4 feet Roof cap * Wall cap * * The equivalent lengths of roof and wall caps vary with model and configuration. Document # PG08-001 ERV30, ERV36, ERV48, PRV30, PRV36, PRV46 30", 36", 46", 48" Wide, Slim Raised Vent Revised 03/29/10 Page 2/3 PLANNING GUIDE Duct Work Design Tips ■■ Wherever possible, reduce the number of transitions and turns...

Planning Guides
Page 3
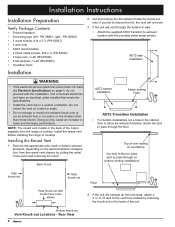
... of bottom knock- out is offset 3" Side Exhaust Knock Outs (1 5/8" X 16") 5" (127 mm) 2" X 16", connects to side or bottom exhaust on raised vent 1" (25 mm) 3 1/4" X 10" to duct work ADT2 transition (included) NOTE: See the appliance planning guide page for cutout dimensions Front of unit Blower wiring access hole in side Blower wiring access hole in bottom Wiring/conduit connections for rEmote/in-line blower Specifications subject to accompanying installation instructions.
... of bottom knock- out is offset 3" Side Exhaust Knock Outs (1 5/8" X 16") 5" (127 mm) 2" X 16", connects to side or bottom exhaust on raised vent 1" (25 mm) 3 1/4" X 10" to duct work ADT2 transition (included) NOTE: See the appliance planning guide page for cutout dimensions Front of unit Blower wiring access hole in side Blower wiring access hole in bottom Wiring/conduit connections for rEmote/in-line blower Specifications subject to accompanying installation instructions.
Installation Instructions
Page 2
...model and serial number are printed on the product data label on the front of Contents Important Safety Instructions 1 Important Information About Safety Instructions 1 Safety Symbols and Labels 1 General Safety Precautions 2 Product Specifications 3 Product Dimensions 3 Installation Specifications 4 Electrical Specifications 4 Planning the Installation 4 Planning the Duct Work 6 Installation Instructions 8 Installation Preparation 8 Installation 8 Verifying Proper Operation 12 Installation Checklist 12 Wiring Diagram 13 Before You Begin... Friday 6:00 a.m. Customer Service...
...model and serial number are printed on the product data label on the front of Contents Important Safety Instructions 1 Important Information About Safety Instructions 1 Safety Symbols and Labels 1 General Safety Precautions 2 Product Specifications 3 Product Dimensions 3 Installation Specifications 4 Electrical Specifications 4 Planning the Installation 4 Planning the Duct Work 6 Installation Instructions 8 Installation Preparation 8 Installation 8 Verifying Proper Operation 12 Installation Checklist 12 Wiring Diagram 13 Before You Begin... Friday 6:00 a.m. Customer Service...
Installation Instructions
Page 4
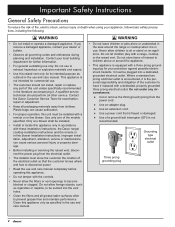
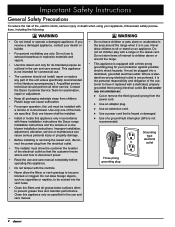
... other service. Use only one blower shall be installed with the controls. • Never allow the filters or vent openings to prevent grease fires and maintain performance. Only one of the customer to sit or stand on an appliance. Improper installation, adjustment, alteration, service or maintenance can cause suffocation. • For proper operation, this unit must be installed. • Install or locate this unit unless specifically recommended...
... other service. Use only one blower shall be installed with the controls. • Never allow the filters or vent openings to prevent grease fires and maintain performance. Only one of the customer to sit or stand on an appliance. Improper installation, adjustment, alteration, service or maintenance can cause suffocation. • For proper operation, this unit must be installed. • Install or locate this unit unless specifically recommended...
Installation Instructions
Page 6
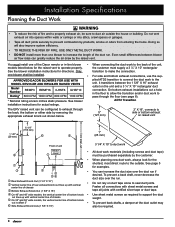
... raised vent for the minimum cutout dimensions specific to turn on when the raised vent is turned on. See Planning the Duct Work for further details. Wire the remote or in-line blower to the particular raised vent model being installed. • Plan the installation so that they can be removed if service is required. • Refer to the range/cooktop installation instructions for connecting the conduit/strain relief. Front of the unit. The electrical installation must...
... raised vent for the minimum cutout dimensions specific to turn on when the raised vent is turned on. See Planning the Duct Work for further details. Wire the remote or in-line blower to the particular raised vent model being installed. • Plan the installation so that they can be removed if service is required. • Refer to the range/cooktop installation instructions for connecting the conduit/strain relief. Front of the unit. The electrical installation must...

Installation Instructions
Page 7
...10" to round transition and 45° adjustable elbow Wall board Duct work between raised vent and remote blower Backsplash Cooktop Raised vent Range Floor Raised vent configured for rear exhaust Wiring/conduit from raised vent to remote blower Wiring/conduit from raised vent to round transition Floor Wall cap on outside wall Duct work Duct work ILHSF series in-line blower Example of cabinet front Notches required for some rasied vent installations, see cooktop installation instructions See the cooktop installation instructions for exact countertop and cabinet dimensions Flush...
...10" to round transition and 45° adjustable elbow Wall board Duct work between raised vent and remote blower Backsplash Cooktop Raised vent Range Floor Raised vent configured for rear exhaust Wiring/conduit from raised vent to remote blower Wiring/conduit from raised vent to round transition Floor Wall cap on outside wall Duct work Duct work ILHSF series in-line blower Example of cabinet front Notches required for some rasied vent installations, see cooktop installation instructions See the cooktop installation instructions for exact countertop and cabinet dimensions Flush...
Installation Instructions
Page 8
... to duct air outside . APPROVED DACOR BLOWERS FOR USE WITH MODEL ERV AND PRV SERIES RAISED VENTS Model Number REMP3 REMP16 ILHSF8 ILHSF10 Rating* 600 CFM 1000 CFM 600 CFM 1100 CFM • When connecting the duct work to the back of the unit, the customer must supply a 3 ¼" X 10" rectangular transition to make the connection. • For side and bottom exhaust connections, use the supplied ATD2 transition to connect the duct work materials (including screws and duct tape) must install one blower to the outside...
... to duct air outside . APPROVED DACOR BLOWERS FOR USE WITH MODEL ERV AND PRV SERIES RAISED VENTS Model Number REMP3 REMP16 ILHSF8 ILHSF10 Rating* 600 CFM 1000 CFM 600 CFM 1100 CFM • When connecting the duct work to the back of the unit, the customer must supply a 3 ¼" X 10" rectangular transition to make the connection. • For side and bottom exhaust connections, use the supplied ATD2 transition to connect the duct work materials (including screws and duct tape) must install one blower to the outside...

Installation Instructions
Page 9
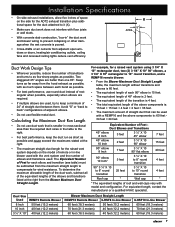
.... • The maximum amount of roof and wall caps vary with a REMP16 and the above components is poured. • Cross-drafts or air currents from the hood exhaust as possible, with the vent system and the number of elbows and transitions used with as much space between them. For example, for wind resistance. Duct Size Used 8 Inch 10 Inch 3 ¼" X 10" REMP3 Remote Blower 50 feet (15.2 meters) 40...
.... • The maximum amount of roof and wall caps vary with a REMP16 and the above components is poured. • Cross-drafts or air currents from the hood exhaust as possible, with the vent system and the number of elbows and transitions used with as much space between them. For example, for wind resistance. Duct Size Used 8 Inch 10 Inch 3 ¼" X 10" REMP3 Remote Blower 50 feet (15.2 meters) 40...
Installation Instructions
Page 10
... of unit ADT2 bottom installation Attach sealing foam ADT2 Transition Installation • For bottom installations cut an exhaust hole in the cabinet floor to allow duct to the vent hole created by cutting the metal cross overs and removing the insert. Installation Instructions Installation Preparation Verify Package Contents • Product literature • Anchoring legs (left - ADT2 side installation warning • If the electrical service (electrical outlet) does not meet the Electrical Specifications...
... of unit ADT2 bottom installation Attach sealing foam ADT2 Transition Installation • For bottom installations cut an exhaust hole in the cabinet floor to allow duct to the vent hole created by cutting the metal cross overs and removing the insert. Installation Instructions Installation Preparation Verify Package Contents • Product literature • Anchoring legs (left - ADT2 side installation warning • If the electrical service (electrical outlet) does not meet the Electrical Specifications...
Installation Instructions
Page 14
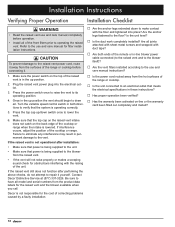
... vent power cord, route it away from the product data labels for filter installation instructions. Contact Dacor Distinctive Service at (877) 337-3226. caution To prevent damage to draw air. Plug the raised vent power plug into place? If interference occurs, adjust the position of the cooktop or range when the intake is operating correctly. 5. Is the unit level? □□ Is the duct work completely installed? Press the power switch...
... vent power cord, route it away from the product data labels for filter installation instructions. Contact Dacor Distinctive Service at (877) 337-3226. caution To prevent damage to draw air. Plug the raised vent power plug into place? If interference occurs, adjust the position of the cooktop or range when the intake is operating correctly. 5. Is the unit level? □□ Is the duct work completely installed? Press the power switch...

Installation Instructions
Page 2
... 2 Product Specifications 3 Product Dimensions 3 Installation Specifications 4 Electrical Specifications 4 Planning the Installation 4 Planning the Duct Work 6 Installation Instructions 8 Installation Preparation 8 Installation 8 Verifying Proper Operation 12 Installation Checklist 12 Wiring Diagram 13 Before You Begin... Dacor Customer Service Phone: (800) 793-0093 (U.S.A. and Canada) Monday - and Canada) Monday - Table of the unit. Leave these installation instructions with the customer. • Customer: Keep these installation instructions completely and carefully before...
... 2 Product Specifications 3 Product Dimensions 3 Installation Specifications 4 Electrical Specifications 4 Planning the Installation 4 Planning the Duct Work 6 Installation Instructions 8 Installation Preparation 8 Installation 8 Verifying Proper Operation 12 Installation Checklist 12 Wiring Diagram 13 Before You Begin... Dacor Customer Service Phone: (800) 793-0093 (U.S.A. and Canada) Monday - and Canada) Monday - Table of the unit. Leave these installation instructions with the customer. • Customer: Keep these installation instructions completely and carefully before...
Installation Instructions
Page 4
...; Do not install or operate a damaged appliance. Use only one blower shall be installed. • Install or locate this unit must be plugged into the vent holes. • Clean the filters and all packaging materials away from children. A qualified service technician should not install, repair or replace any circumstances: ♦♦ Cut or remove the third (ground) prong from the electrical outlet. • The installer must be installed with...
...; Do not install or operate a damaged appliance. Use only one blower shall be installed. • Install or locate this unit must be plugged into the vent holes. • Clean the filters and all packaging materials away from children. A qualified service technician should not install, repair or replace any circumstances: ♦♦ Cut or remove the third (ground) prong from the electrical outlet. • The installer must be installed with...
Installation Instructions
Page 6
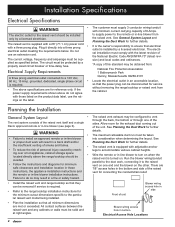
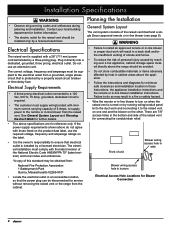
... minimum safe clearances and installation location in these instructions, the appliance installation instructions and the remote or in -line blower to turn on by a properly sized circuit breaker or time-delay fuse. Electrical Specifications The raised vent is turned on when the raised vent is supplied with minimum current carrying capacity of the raised vent for reference only. The electrical installation must supply wiring/conduit with a 28" (711 mm) power cord terminated...
... minimum safe clearances and installation location in these instructions, the appliance installation instructions and the remote or in -line blower to turn on by a properly sized circuit breaker or time-delay fuse. Electrical Specifications The raised vent is turned on when the raised vent is supplied with minimum current carrying capacity of the raised vent for reference only. The electrical installation must supply wiring/conduit with a 28" (711 mm) power cord terminated...
Installation Instructions
Page 8
... ILHSF10 Rating* 600 CFM 1000 CFM 600 CFM 1100 CFM plied ATD2 transition to connect the duct work , always look for directions. To prevent a back draft, never decrease the duct size over the duct run if desired. Use sheet metal screws as required to make the connection. Installation Specifications Planning the Duct Work warning • To reduce the risk of fire and to properly exhaust air, be purchased separately by the customer. Only transition to support the duct weight. See blower ADT2 Transition installation instructions...
... ILHSF10 Rating* 600 CFM 1000 CFM 600 CFM 1100 CFM plied ATD2 transition to connect the duct work , always look for directions. To prevent a back draft, never decrease the duct size over the duct run if desired. Use sheet metal screws as required to make the connection. Installation Specifications Planning the Duct Work warning • To reduce the risk of fire and to properly exhaust air, be purchased separately by the customer. Only transition to support the duct weight. See blower ADT2 Transition installation instructions...
Installation Instructions
Page 9
... 8" round transition 25 feet 3 ¼" X 10 to prevent collapsing or other damage when the wet concrete is 60 feet. • The equivalent length of each bend as possible. • For best performance, use flexible metal duct. Installation Specifications • On side exhaust installations, allow five inches of space on the model of remote or in-line blower used with the vent system and the number of elbows and transitions used...
... 8" round transition 25 feet 3 ¼" X 10 to prevent collapsing or other damage when the wet concrete is 60 feet. • The equivalent length of each bend as possible. • For best performance, use flexible metal duct. Installation Specifications • On side exhaust installations, allow five inches of space on the model of remote or in-line blower used with the vent system and the number of elbows and transitions used...
Installation Instructions
Page 14
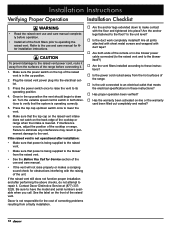
... with duct tape? □□ Are both ends of the remote or in-line blower power cable connected (to the raised vent and to the blower itself?) □□ Are the vent filters installed according to the floor? Once in the up position. 2. Is the unit level? □□ Is the duct work completely installed? Installation Instructions Verifying Proper Operation Installation Checklist warning • Read the raised vent use and care manual completely before connecting...
... with duct tape? □□ Are both ends of the remote or in-line blower power cable connected (to the raised vent and to the blower itself?) □□ Are the vent filters installed according to the floor? Once in the up position. 2. Is the unit level? □□ Is the duct work completely installed? Installation Instructions Verifying Proper Operation Installation Checklist warning • Read the raised vent use and care manual completely before connecting...
Use & Care Manuals
Page 3
... make changes to the appliance without updating this appliance. Keep items that COULD result in adjacent cabinets or areas. Do not allow the filters or vent openings to 5:00 p.m. BE CAREFUL TO PREVENT BURNS. READ AND SAVE THESE INSTRUCTIONS 1 Pacific Time Web site: www.Dacor.com Have the complete model and serial number for warranty service. Use common sense and caution when installing, maintaining or operating this manual...
... make changes to the appliance without updating this appliance. Keep items that COULD result in adjacent cabinets or areas. Do not allow the filters or vent openings to 5:00 p.m. BE CAREFUL TO PREVENT BURNS. READ AND SAVE THESE INSTRUCTIONS 1 Pacific Time Web site: www.Dacor.com Have the complete model and serial number for warranty service. Use common sense and caution when installing, maintaining or operating this manual...

Use & Care Manuals
Page 4
... AFTER USE. • Never operate the vent without the filters in this raised vent only for your dealer or builder. This unit is not working properly. • Use this use . Power cord with a dedicated, properly grounded three-prong wall receptacle. Always use cookware appropriate for commercial use this unit unless specifically recommended in accordance with all applicable codes and standards, including fire-rated construction. • Keep all other service...
... AFTER USE. • Never operate the vent without the filters in this raised vent only for your dealer or builder. This unit is not working properly. • Use this use . Power cord with a dedicated, properly grounded three-prong wall receptacle. Always use cookware appropriate for commercial use this unit unless specifically recommended in accordance with all applicable codes and standards, including fire-rated construction. • Keep all other service...

Use & Care Manuals
Page 5
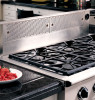
... turn off ceiling fans and closing adjacent heating and air conditioning outlets. • Place your largest frying pans, skillets and stock pots on the top cap when the vent intake is a normal occurrence with powerful vent systems, especially when installed with the movement of the vent intake in the down cycle before changing directions. • To operate the downdraft vent, press the switch located on the rear...
... turn off ceiling fans and closing adjacent heating and air conditioning outlets. • Place your largest frying pans, skillets and stock pots on the top cap when the vent intake is a normal occurrence with powerful vent systems, especially when installed with the movement of the vent intake in the down cycle before changing directions. • To operate the downdraft vent, press the switch located on the rear...


