Planning Guides
Page 1
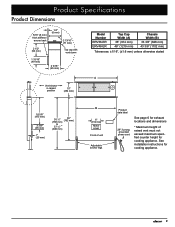
...ERV48 30" (762 mm) 36" (914 mm) 46" (1168 mm) 48" (1219 mm) 27 3/8" (695 mm) 33 3/8" 848 mm) 43 3/8" (1102 mm) 43 3/8" (1102 mm) Three prong electrical outlet connected to 37 ¼" (946 mm) B 6" (152 mm) Motor cover Front of cooking appliances. 2. Install these raised vents only with a single Dacor... approved remote or in raised position 10" (254 mm) warning • Observe all appliances according to change without notice. See following ...
...ERV48 30" (762 mm) 36" (914 mm) 46" (1168 mm) 48" (1219 mm) 27 3/8" (695 mm) 33 3/8" 848 mm) 43 3/8" (1102 mm) 43 3/8" (1102 mm) Three prong electrical outlet connected to 37 ¼" (946 mm) B 6" (152 mm) Motor cover Front of cooking appliances. 2. Install these raised vents only with a single Dacor... approved remote or in raised position 10" (254 mm) warning • Observe all appliances according to change without notice. See following ...

Planning Guides
Page 2
...rectangular duct, two (2) 3 1/4" X 10" 90° elbows, a 3 1/4" X 10" rectangular to the blower installation instructions. Raised Vent Model No. ERV/PRV30 ERV/PRV36 PRV46 ERV48 Approved Dacor Blowers* Remote blowers: REMP3 or REMP16 In-line blowers: ILHSF8 or ILHSF10 For example, for each 90° elbow is 15 feet... 10 to as few sharp angles as much space between them. Document # PG08-001 ERV30, ERV36, ERV48, PRV30, PRV36, PRV46 30", 36", 46", 48" Wide, Slim Raised Vent Revised 03/29/10 Page 2/3 PLANNING GUIDE Duct Work Design Tips ■■ Wherever possible, reduce ...
...rectangular duct, two (2) 3 1/4" X 10" 90° elbows, a 3 1/4" X 10" rectangular to the blower installation instructions. Raised Vent Model No. ERV/PRV30 ERV/PRV36 PRV46 ERV48 Approved Dacor Blowers* Remote blowers: REMP3 or REMP16 In-line blowers: ILHSF8 or ILHSF10 For example, for each 90° elbow is 15 feet... 10 to as few sharp angles as much space between them. Document # PG08-001 ERV30, ERV36, ERV48, PRV30, PRV36, PRV46 30", 36", 46", 48" Wide, Slim Raised Vent Revised 03/29/10 Page 2/3 PLANNING GUIDE Duct Work Design Tips ■■ Wherever possible, reduce ...

Planning Guides
Page 3
Document # PG08-001 ERV30, ERV36, ERV48, PRV30, PRV36, PRV46 30", 36", 46", 48" Wide, Slim Raised Vent All tolerances: ±1/16" (±1.6 mm) unless otherwise stated Exhaust outlet location options side view front view Revised 03/29/10 Page 3/3 PLANNING GUIDE...Front of bottom knock- out is offset 3" Side Exhaust Knock Outs (1 5/8" X 16") 5" (127 mm) 2" X 16", connects to side or bottom exhaust on raised vent 1" (25 mm) 3 1/4" X 10" to accompanying installation instructions. out lines up with vertical center line of chassis On 30" and 36" wide models, the ...
Document # PG08-001 ERV30, ERV36, ERV48, PRV30, PRV36, PRV46 30", 36", 46", 48" Wide, Slim Raised Vent All tolerances: ±1/16" (±1.6 mm) unless otherwise stated Exhaust outlet location options side view front view Revised 03/29/10 Page 3/3 PLANNING GUIDE...Front of bottom knock- out is offset 3" Side Exhaust Knock Outs (1 5/8" X 16") 5" (127 mm) 2" X 16", connects to side or bottom exhaust on raised vent 1" (25 mm) 3 1/4" X 10" to accompanying installation instructions. out lines up with vertical center line of chassis On 30" and 36" wide models, the ...

Installation Instructions
Page 1
Installation Instructions Downdraft Raised Vent Models: ERV30, ERV36, ERV48 PRV30, PRV36, PRV46 Part No. 65335 Rev. See the installation instructions for the particular appliance model being installed to determine suitability. L Use these downdraft raised vents only with approved Dacor ® appliances.
Installation Instructions Downdraft Raised Vent Models: ERV30, ERV36, ERV48 PRV30, PRV36, PRV46 Part No. 65335 Rev. See the installation instructions for the particular appliance model being installed to determine suitability. L Use these downdraft raised vents only with approved Dacor ® appliances.
Installation Instructions
Page 2
... Service Team. The product data label also specifies the power supply requirements. to specifications. © 2007 Dacor, all rights reserved. to change without notice. ERV48 = 48-inch wide raised vent, ERV style top cap. All specifications subject to 4:00 p.m. Whenever you begin the installation process. Table of the appliance ready. Important: • Installer: In...
... Service Team. The product data label also specifies the power supply requirements. to specifications. © 2007 Dacor, all rights reserved. to change without notice. ERV48 = 48-inch wide raised vent, ERV style top cap. All specifications subject to 4:00 p.m. Whenever you begin the installation process. Table of the appliance ready. Important: • Installer: In...
Installation Instructions
Page 4
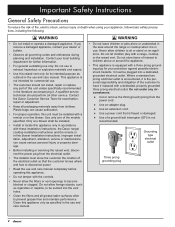
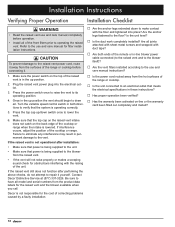
...outlined in the use and care manual completely before operating this appliance. • Do not tamper with these installation instructions, the Dacor range/ cooktop installation instructions and the remote or in use and care manual. Do not let children play with a dedicated, ...contact your appliance, follow basic safety precautions, including the following: Warning • Do not install or operate a damaged appliance. Clean this raised vent only for examination, repair or adjustment. • Keep all other service. Do not use to become blocked or clogged. Plastic bags can...
...outlined in the use and care manual completely before operating this appliance. • Do not tamper with these installation instructions, the Dacor range/ cooktop installation instructions and the remote or in use and care manual. Do not let children play with a dedicated, ...contact your appliance, follow basic safety precautions, including the following: Warning • Do not install or operate a damaged appliance. Clean this raised vent only for examination, repair or adjustment. • Keep all other service. Do not use to become blocked or clogged. Plastic bags can...

Installation Instructions
Page 5
...ERV48 A - side view 18 5/8" (47.3 cm) 3 3/4" (9.5 cm) 1" (2.5 cm) 30 1/4" (76.8 cm) 30" (76.2 cm) 37 t1o/4"* (94.6 cm) B 6" (15.2 cm) Motor cover Front of unit Adjustable anchor legs Product data label 28" 3-prong grounded power cord See page 6 for exhaust locations and dimensions. * Maximum height of raised vent... must not exceed maximum specified counter height for cooking appliance. 3 Chassis Width 27 3/8" (69.5 cm) 33 3/8" (84.8 cm) 43 3/8" (110.2 cm) 43 3/8" (110.2 cm) A Vent shown in raised position 1.0" (2.5 cm) 3/8" (1.0 ...
...ERV48 A - side view 18 5/8" (47.3 cm) 3 3/4" (9.5 cm) 1" (2.5 cm) 30 1/4" (76.8 cm) 30" (76.2 cm) 37 t1o/4"* (94.6 cm) B 6" (15.2 cm) Motor cover Front of unit Adjustable anchor legs Product data label 28" 3-prong grounded power cord See page 6 for exhaust locations and dimensions. * Maximum height of raised vent... must not exceed maximum specified counter height for cooking appliance. 3 Chassis Width 27 3/8" (69.5 cm) 33 3/8" (84.8 cm) 43 3/8" (110.2 cm) 43 3/8" (110.2 cm) A Vent shown in raised position 1.0" (2.5 cm) 3/8" (1.0 ...
Installation Instructions
Page 6
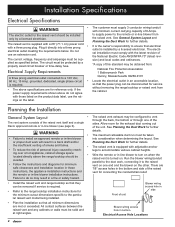
... with minimum current carrying capacity of the raised vent itself and a single Dacor approved remote or in-line blower (see page 6). to supply power to a 120 Vac, 60 Hz, 15 Amp. Planning the Installation General System Layout • The vent system consists of 8 Amps. The maximum...bottom Electrical Access Hole Locations 4 The electric outlet for connecting the conduit/strain relief. Plug it to the raised vent on one of the raised vent for the raised vent should be removed if service is equipped with a three prong plug. The circuit must be installed only by...
... with minimum current carrying capacity of the raised vent itself and a single Dacor approved remote or in-line blower (see page 6). to supply power to a 120 Vac, 60 Hz, 15 Amp. Planning the Installation General System Layout • The vent system consists of 8 Amps. The maximum...bottom Electrical Access Hole Locations 4 The electric outlet for connecting the conduit/strain relief. Plug it to the raised vent on one of the raised vent for the raised vent should be removed if service is equipped with a three prong plug. The circuit must be installed only by...

Installation Instructions
Page 7
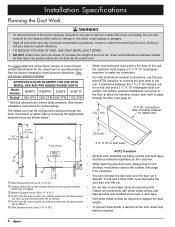
... and 45° adjustable elbow Wall board Duct work between raised vent and remote blower Backsplash Cooktop Raised vent Range Floor Raised vent configured for rear exhaust Wiring/conduit from raised vent to remote blower Wiring/conduit from raised vent to in -line blower Example of cabinet front Notches required ... for exact countertop and cabinet dimensions Flush with back side of Layout with Cooktop and Rear Exhaust Cabinet back Raised vent Outside wall Raised vent configured for bottom exhaust 3 ¼" X 10" to round transition Floor Wall cap on outside wall Duct...
... and 45° adjustable elbow Wall board Duct work between raised vent and remote blower Backsplash Cooktop Raised vent Range Floor Raised vent configured for rear exhaust Wiring/conduit from raised vent to remote blower Wiring/conduit from raised vent to in -line blower Example of cabinet front Notches required ... for exact countertop and cabinet dimensions Flush with back side of Layout with Cooktop and Rear Exhaust Cabinet back Raised vent Outside wall Raised vent configured for bottom exhaust 3 ¼" X 10" to round transition Floor Wall cap on outside wall Duct...
Installation Instructions
Page 8
... for examples. • You can greatly reduce the air draw by -products, smoke or odors from entering the home. APPROVED DACOR BLOWERS FOR USE WITH MODEL ERV AND PRV SERIES RAISED VENTS Model Number REMP3 REMP16 ILHSF8 ILHSF10 Rating* 600 CFM 1000 CFM 600 CFM 1100 CFM • When connecting the duct work...
... for examples. • You can greatly reduce the air draw by -products, smoke or odors from entering the home. APPROVED DACOR BLOWERS FOR USE WITH MODEL ERV AND PRV SERIES RAISED VENTS Model Number REMP3 REMP16 ILHSF8 ILHSF10 Rating* 600 CFM 1000 CFM 600 CFM 1100 CFM • When connecting the duct work...

Installation Instructions
Page 9
... poured. • Cross-drafts or air currents from adjacent open windows or doors, heating/air conditioning outlets, ceiling fans and recessed ceiling lights reduce vent efficiency. Duct Size Used 8 Inch 10 Inch 3 ¼" X 10" REMP3 Remote Blower 50 feet (15.2 meters) 40 feet (12.2 ... Number of the elbows and transitions listed at the right. • The maximum straight duct length for the raised vent system depends on the side for the ADT2 exhaust transition plus additional space for a raised vent system using 3 ¼" X 10" rectangular duct, two (2) 3 ¼" X 10" 90° elbows, a 3 ...
... poured. • Cross-drafts or air currents from adjacent open windows or doors, heating/air conditioning outlets, ceiling fans and recessed ceiling lights reduce vent efficiency. Duct Size Used 8 Inch 10 Inch 3 ¼" X 10" REMP3 Remote Blower 50 feet (15.2 meters) 40 feet (12.2 ... Number of the elbows and transitions listed at the right. • The maximum straight duct length for the raised vent system depends on the side for the ADT2 exhaust transition plus additional space for a raised vent system using 3 ¼" X 10" rectangular duct, two (2) 3 ¼" X 10" 90° elbows, a 3 ...
Installation Instructions
Page 10
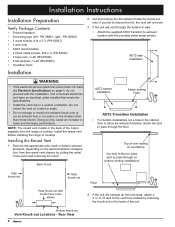
...For bottom installations cut an exhaust hole in the back of the cutout, separate from the raised vent chassis by removing the knock-out on the back of vent resting on bottom venting installations Side knock-out Side knock-out Rear knock-out with metal cross overs shown Floor 4.... ¼" X 10 duct to exhaust location with the installation. If the unit will vent through the floor. Do not mount the vent on the desired exhaust configuration, from the range or cooktop. NOTE: The raised vent installs in a location on page 4, do not proceed with the provided sheet metal screws....
...For bottom installations cut an exhaust hole in the back of the cutout, separate from the raised vent chassis by removing the knock-out on the back of vent resting on bottom venting installations Side knock-out Side knock-out Rear knock-out with metal cross overs shown Floor 4.... ¼" X 10 duct to exhaust location with the installation. If the unit will vent through the floor. Do not mount the vent on the desired exhaust configuration, from the range or cooktop. NOTE: The raised vent installs in a location on page 4, do not proceed with the provided sheet metal screws....

Installation Instructions
Page 11
... all of the pieces. Secure the anchoring legs to the Installation Specifications section. Install the duct work between raised vent and remote blower Range Raised vent configured for rear exhaust Floor Wiring/conduit that the end caps are gently resting on the left and right ...that supplies power to the blower installation instructions. 2. Loosely attach the anchoring legs to ensure sealed joints. Wall board Backsplash Raised vent Duct work according to the cabinet floor with the electrical access panel toward the front. Installation Instructions 5. Install the remote...
... all of the pieces. Secure the anchoring legs to the Installation Specifications section. Install the duct work between raised vent and remote blower Range Raised vent configured for rear exhaust Floor Wiring/conduit that the end caps are gently resting on the left and right ...that supplies power to the blower installation instructions. 2. Loosely attach the anchoring legs to ensure sealed joints. Wall board Backsplash Raised vent Duct work according to the cabinet floor with the electrical access panel toward the front. Installation Instructions 5. Install the remote...

Installation Instructions
Page 12
... the wiring diagrams carefully to blower terminal block. Replace the electrical access panel. Make sure all wiring away from the raised vent electrical access panel. 4. Make sure the raised vent power plug is complete. • Failure to supply power from the electrical outlet. 3. Do not modify. Do not... change the factory wired terminal connections inside the electrical access panel for the raised vent or the blower. • To avoid an electric shock hazard and to the duct work. 2. Pre-wired at factory. Connect other ...
... the wiring diagrams carefully to blower terminal block. Replace the electrical access panel. Make sure all wiring away from the raised vent electrical access panel. 4. Make sure the raised vent power plug is complete. • Failure to supply power from the electrical outlet. 3. Do not modify. Do not... change the factory wired terminal connections inside the electrical access panel for the raised vent or the blower. • To avoid an electric shock hazard and to the duct work. 2. Pre-wired at factory. Connect other ...
Installation Instructions
Page 13
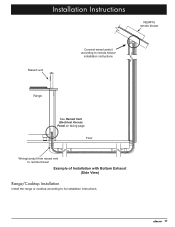
Installation Instructions REMP16 remote blower Raised vent Connect wires/conduit according to remote blower installation instructions Range See Raised Vent Electrical Access Panel on facing page Floor Wiring/conduit from raised vent to remote blower Example of Installation with Bottom Exhaust (Side View) Range/Cooktop Installation Install the range or cooktop according to its installation instructions. 11
Installation Instructions REMP16 remote blower Raised vent Connect wires/conduit according to remote blower installation instructions Range See Raised Vent Electrical Access Panel on facing page Floor Wiring/conduit from raised vent to remote blower Example of Installation with Bottom Exhaust (Side View) Range/Cooktop Installation Install the range or cooktop according to its installation instructions. 11
Installation Instructions
Page 14
...or in the up /down to make contact with the raising of the front filters prior to the blower from the surfaces of the raised vent is in the up position. 2. Dacor is operating correctly. 5. Refer to the vent. Contact Dacor Distinctive Service at (877) 337-3226. Be sure to... proper operation been verified? □□ Has the warranty been activated on the back edge of the cooktop or range. Plug the raised vent power plug into place? Make sure that the system is not responsible for obstructions interfering with the floor and tightened into the electrical outlet...
...or in the up /down to make contact with the raising of the front filters prior to the blower from the surfaces of the raised vent is in the up position. 2. Dacor is operating correctly. 5. Refer to the vent. Contact Dacor Distinctive Service at (877) 337-3226. Be sure to... proper operation been verified? □□ Has the warranty been activated on the back edge of the cooktop or range. Plug the raised vent power plug into place? Make sure that the system is not responsible for obstructions interfering with the floor and tightened into the electrical outlet...
Installation Instructions
Page 1
H Use these downdraft raised vents only with approved Dacor ® appliances. Installation Instructions Downdraft Raised Vent Models: ERV36-ER, ERV48-ER Part No. 103106 Rev. See the installation instructions for the particular appliance model being installed to determine suitability.
H Use these downdraft raised vents only with approved Dacor ® appliances. Installation Instructions Downdraft Raised Vent Models: ERV36-ER, ERV48-ER Part No. 103106 Rev. See the installation instructions for the particular appliance model being installed to determine suitability.

Installation Instructions
Page 2
... , have questions or problems with installation, contact your Dacor dealer or the Dacor Customer Service Team. Dacor Customer Service Phone: (800) 793-0093 (U.S.A. Friday 6:00 a.m. If you begin the installation process. For repairs to 4:00 p.m. Model Identification: ERV36-ER = 36-inch wide raised vent ERV48-ER = 48-inch wide raised vent Tested in accordance with the customer. •...
... , have questions or problems with installation, contact your Dacor dealer or the Dacor Customer Service Team. Dacor Customer Service Phone: (800) 793-0093 (U.S.A. Friday 6:00 a.m. If you begin the installation process. For repairs to 4:00 p.m. Model Identification: ERV36-ER = 36-inch wide raised vent ERV48-ER = 48-inch wide raised vent Tested in accordance with the customer. •...
Installation Instructions
Page 4
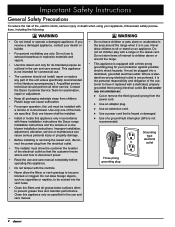
... stand on an appliance. Improper installation, adjustment, alteration, service or maintenance can cause suffocation. • For proper operation, this raised vent only for its intended purpose as outlined in the literature accompanying it is not intended for commercial use . It must be installed...-line blower installation instructions. Where a standard two-prong electrical outlet is encountered, it replaced with these installation instructions the Dacor range installation instructions and the remote or in the area around the range. • This appliance is not recommended. Clean...
... stand on an appliance. Improper installation, adjustment, alteration, service or maintenance can cause suffocation. • For proper operation, this raised vent only for its intended purpose as outlined in the literature accompanying it is not intended for commercial use . It must be installed...-line blower installation instructions. Where a standard two-prong electrical outlet is encountered, it replaced with these installation instructions the Dacor range installation instructions and the remote or in the area around the range. • This appliance is not recommended. Clean...
Installation Instructions
Page 5
... 5/16" (8 mm) thick stiffener across back 2 1/2" (64 mm) 1/4" (6 mm) 2 13/16" (71 mm) Top cap with vent down 1 15/16" (49 mm) 2 9/16" (65 mm) Vent shown in raised position 10" (254 mm) Model Number ERV36-ER ERV48-ER Top Cap Width (A) 36" (914 mm) 48" (1219 mm) Chassis Width (B) 33 3/8" (848 mm) 43... cover Front of unit Adjustable anchor legs Product data label 28" 3 prong grounded power cord See page 6 for exhaust locations and dimensions * Maximum height of raised vent must not exceed maximum specified counter height for cooking appliance. 3
... 5/16" (8 mm) thick stiffener across back 2 1/2" (64 mm) 1/4" (6 mm) 2 13/16" (71 mm) Top cap with vent down 1 15/16" (49 mm) 2 9/16" (65 mm) Vent shown in raised position 10" (254 mm) Model Number ERV36-ER ERV48-ER Top Cap Width (A) 36" (914 mm) 48" (1219 mm) Chassis Width (B) 33 3/8" (848 mm) 43... cover Front of unit Adjustable anchor legs Product data label 28" 3 prong grounded power cord See page 6 for exhaust locations and dimensions * Maximum height of raised vent must not exceed maximum specified counter height for cooking appliance. 3


