
Installation Instructions
Page 6
...it. If installing the cooktop with a raised vent, install only the following approved Dacor model numbers: Cooktop Models ETT304-1 MET304 Approved Raised Vent Models ERV30, PRV30 or RV30 ETT365-2 METB365-1 ERV36, PRV36 or RV36 Raised vent installation must install ventilation duct kit ATD323... to clear stiffener RV series raised vent: Check raised vent dimensions/specifications to combustible A surfaces Cooktop Models ETT304-1, MET304 ETT365-2, METB365-1 A - Install the vent hood or raised vent according to the accompanying installation instructions. Locate the junction box...
...it. If installing the cooktop with a raised vent, install only the following approved Dacor model numbers: Cooktop Models ETT304-1 MET304 Approved Raised Vent Models ERV30, PRV30 or RV30 ETT365-2 METB365-1 ERV36, PRV36 or RV36 Raised vent installation must install ventilation duct kit ATD323... to clear stiffener RV series raised vent: Check raised vent dimensions/specifications to combustible A surfaces Cooktop Models ETT304-1, MET304 ETT365-2, METB365-1 A - Install the vent hood or raised vent according to the accompanying installation instructions. Locate the junction box...
Installation Instructions
Page 10
... go through a self-check routine. They are not locked (see step 2). ◊ Repeat the above tests. ◊ If the appliance still does not work, contact Dacor Distinctive Service at the circuit breaker or fuse box. ON/OFF ON/OFF ON/OFF ON/OFF 8 9 10 7 56 1 2 34 8 9 10 56 7 234 1 8 9 .../OFF ON/OFF 8 9 10 56 7 234 1 8 9 10 67 5 1 2 34 7 8 9 10 56 234 1 8 9 10 67 5 234 1 7 8 9 10 56 234 1 Outer element key Cooktop Controls - Model ETT365-2 8 Clean the cooking surface according to the use and care manual prior to the cooktop at (877) 337-3226. Press the 8 setting key (on the...
... go through a self-check routine. They are not locked (see step 2). ◊ Repeat the above tests. ◊ If the appliance still does not work, contact Dacor Distinctive Service at the circuit breaker or fuse box. ON/OFF ON/OFF ON/OFF ON/OFF 8 9 10 7 56 1 2 34 8 9 10 56 7 234 1 8 9 .../OFF ON/OFF 8 9 10 56 7 234 1 8 9 10 67 5 1 2 34 7 8 9 10 56 234 1 8 9 10 67 5 234 1 7 8 9 10 56 234 1 Outer element key Cooktop Controls - Model ETT365-2 8 Clean the cooking surface according to the use and care manual prior to the cooktop at (877) 337-3226. Press the 8 setting key (on the...
Use & Care Manuals
Page 6
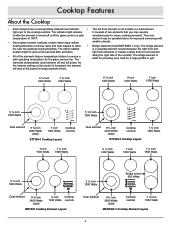
...flexibility. The indicator light remains It consists of two elements that you may be operated alone for improved simmering with • Dacor glass ceramic cooktops contain ribbon type radiant smaller utensils. The along the right side of 140ºF. As the numeric setting... 1500 Watts ETT304-1 Cooktop Layout Cooktop controls 7 inch 1500 Watts 7 ½ inch 1800 Watts Dual element 9 ¾ inch 2400 Watts (total) Cooktop controls ETT365-2 Cooktop Layout 7 ¾ inch 1800 Watts 6 ½ inch 1200 Watts 7 inch 1500 Watts 7 ½ inch 1800 Watts 5 ½ inch ON/...
...flexibility. The indicator light remains It consists of two elements that you may be operated alone for improved simmering with • Dacor glass ceramic cooktops contain ribbon type radiant smaller utensils. The along the right side of 140ºF. As the numeric setting... 1500 Watts ETT304-1 Cooktop Layout Cooktop controls 7 inch 1500 Watts 7 ½ inch 1800 Watts Dual element 9 ¾ inch 2400 Watts (total) Cooktop controls ETT365-2 Cooktop Layout 7 ¾ inch 1800 Watts 6 ½ inch 1200 Watts 7 inch 1500 Watts 7 ½ inch 1800 Watts 5 ½ inch ON/...
Use & Care Manuals
Page 7
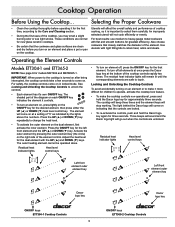
..., then press either the UP (▲) or DOWN (▼) heat level control key. Operating the Element Controls Models ETT304-1 and ETT365-2 NOTE: See page 6 for new glass ceramic cooktops. See Locking and Unlocking the Cooktop Controls to select them carefully. Also choose...75 6 7 8 9 8 9 10 5 8 9 10 67 5 234 1 10 Left front element outer element key 9 10 78 56 1 2 34 8 9 10 67 5 1 2 34 Dacor logo key ON/OFF keys ETT304-1 Cooktop Controls ON/OFF keys ETT365-2 Cooktop Controls 5 cooking, so it controls. • To turn an element on, press lightly on the cooktop.
..., then press either the UP (▲) or DOWN (▼) heat level control key. Operating the Element Controls Models ETT304-1 and ETT365-2 NOTE: See page 6 for new glass ceramic cooktops. See Locking and Unlocking the Cooktop Controls to select them carefully. Also choose...75 6 7 8 9 8 9 10 5 8 9 10 67 5 234 1 10 Left front element outer element key 9 10 78 56 1 2 34 8 9 10 67 5 1 2 34 Dacor logo key ON/OFF keys ETT304-1 Cooktop Controls ON/OFF keys ETT365-2 Cooktop Controls 5 cooking, so it controls. • To turn an element on, press lightly on the cooktop.

Planning Guides
Page 1
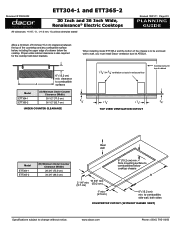
...- The cooktop is no neutral connection. Do not connect the ground wire to change without notice. These cooktops are copper. www.dacor.com Phone: (800) 7933-0.4093 Contact your local building department for exact specifications. Electrical Circuit Required Total Connected Load* Minimum Supply ...with stainless steel trim, other units may be up to the right corner of ANSI Z21.1 and U.L. 858 Standard for recessed installation. ETT365-2 * For units with the latest edition of the cooktop. The conduit is connected to 1/8" less. Electrical Supply Requirements NOTES: 1. ...
...- The cooktop is no neutral connection. Do not connect the ground wire to change without notice. These cooktops are copper. www.dacor.com Phone: (800) 7933-0.4093 Contact your local building department for exact specifications. Electrical Circuit Required Total Connected Load* Minimum Supply ...with stainless steel trim, other units may be up to the right corner of ANSI Z21.1 and U.L. 858 Standard for recessed installation. ETT365-2 * For units with the latest edition of the cooktop. The conduit is connected to 1/8" less. Electrical Supply Requirements NOTES: 1. ...
Planning Guides
Page 2
... below the cooktop. from mounting surface to combustible A surfaces Model (A) Minimum Under Counter Clearance (Width) ETT304-1 ETT365-2 30 1/2" (77.5 cm) 36 1/2" (92.7 cm) 3/4" under -cabinet clearance is to be enclosed wall to change without notice. www.dacor.com Phone: (800) 7933-0.5093 Proper under counter clearance 7 3/4" X 4 3/8" ventilation cut-outs in enclosure floor...
... below the cooktop. from mounting surface to combustible A surfaces Model (A) Minimum Under Counter Clearance (Width) ETT304-1 ETT365-2 30 1/2" (77.5 cm) 36 1/2" (92.7 cm) 3/4" under -cabinet clearance is to be enclosed wall to change without notice. www.dacor.com Phone: (800) 7933-0.5093 Proper under counter clearance 7 3/4" X 4 3/8" ventilation cut-outs in enclosure floor...
Planning Guides
Page 3
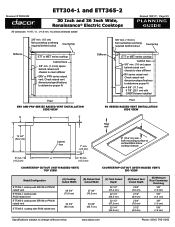
Document # PG03-002 ETT304-1 and ETT365-2 30 Inch and 36 Inch Wide, Renaissance® Electric Cooktops All tolerances: +1/16", -0, (+1.6 mm, -0) unless otherwise stated Revised 10/01/11 Page 3/3 PLANNING GUIDE 3/8" min. (1.0 ... cutoUT (with raised vent) ISO view Model/Configuration ETT304-1 cooktop with ERV30 or PRV30 raised vent ETT304-1 cooktop with RV30 raised vent ETT365-2 cooktop with ERV36 or PRV36 raised vent ETT365-2 cooktop with CABP3 blower installed Floor RV series raised vent installation side view Rear wall C 19 3/4" (50.2 cm) Cabinet face 1" min...
Document # PG03-002 ETT304-1 and ETT365-2 30 Inch and 36 Inch Wide, Renaissance® Electric Cooktops All tolerances: +1/16", -0, (+1.6 mm, -0) unless otherwise stated Revised 10/01/11 Page 3/3 PLANNING GUIDE 3/8" min. (1.0 ... cutoUT (with raised vent) ISO view Model/Configuration ETT304-1 cooktop with ERV30 or PRV30 raised vent ETT304-1 cooktop with RV30 raised vent ETT365-2 cooktop with ERV36 or PRV36 raised vent ETT365-2 cooktop with CABP3 blower installed Floor RV series raised vent installation side view Rear wall C 19 3/4" (50.2 cm) Cabinet face 1" min...


