Installation Instructions
Page 2
...1 General Safety Precautions 2 Installation Specifications 3 Product Dimensions 3 Electrical Specifications 3 Planning the Location 4 Cabinet Layout 4 Installation Instructions 6 Chassis Installation 6 Verify the Package Contents 6 Electrical Connection 6 Verifying Proper Operation 8 Customer Service Information If You Need Help... The product data label contains the model and serial number information and the electrical requirements. It is located on the product data label. and Canada) Monday - to change without notice. For repairs to Dacor appliances under warranty) Phone...
...1 General Safety Precautions 2 Installation Specifications 3 Product Dimensions 3 Electrical Specifications 3 Planning the Location 4 Cabinet Layout 4 Installation Instructions 6 Chassis Installation 6 Verify the Package Contents 6 Electrical Connection 6 Verifying Proper Operation 8 Customer Service Information If You Need Help... The product data label contains the model and serial number information and the electrical requirements. It is located on the product data label. and Canada) Monday - to change without notice. For repairs to Dacor appliances under warranty) Phone...
Installation Instructions
Page 3
... cooktop). Use common sense and caution when installing, maintaining or operating this appliance as a space heater to minimize problems, read these installation instructions for example, near a pool. NEVER use . warning Do not install this appliance outdoors and/or near water, for future reference and the local electrical inspector's use this or any other appliance. • Always contact the Dacor Customer Service Team about problems...
... cooktop). Use common sense and caution when installing, maintaining or operating this appliance as a space heater to minimize problems, read these installation instructions for example, near a pool. NEVER use . warning Do not install this appliance outdoors and/or near water, for future reference and the local electrical inspector's use this or any other appliance. • Always contact the Dacor Customer Service Team about problems...
Installation Instructions
Page 4
... cooktop unless specifically instructed to do so in this manual. • Keep flammable items, such as outlined in the literature accompanying it. Clean this appliance. Do not adjust or alter any type of service or installation, make sure that they know where and how to turn off at the circuit breaker panel or fuse box. • Only use the cooktop for the cost of interest to touch hot surfaces...
... cooktop unless specifically instructed to do so in this manual. • Keep flammable items, such as outlined in the literature accompanying it. Clean this appliance. Do not adjust or alter any type of service or installation, make sure that they know where and how to turn off at the circuit breaker panel or fuse box. • Only use the cooktop for the cost of interest to touch hot surfaces...
Installation Instructions
Page 5
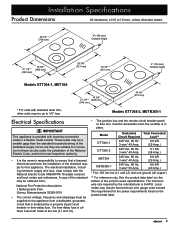
... the appliance from a dedicated, grounded, circuit that minimum wire gauge used exceed this appliance. If a time-delay fuse is utilized, fuse both sides of the unit) for the power requirements listed on the bottom of the line (L1 and L2). • The junction box and the remote circuit breaker panel or fuse box, must comply with electrical connection leads in place. Installation Specifications Product Dimensions All tolerances: ±1/16 (±1.6 mm...
... the appliance from a dedicated, grounded, circuit that minimum wire gauge used exceed this appliance. If a time-delay fuse is utilized, fuse both sides of the unit) for the power requirements listed on the bottom of the line (L1 and L2). • The junction box and the remote circuit breaker panel or fuse box, must comply with electrical connection leads in place. Installation Specifications Product Dimensions All tolerances: ±1/16 (±1.6 mm...

Installation Instructions
Page 6
... that electrical power meeting the specifications on the rear wall behind raised vent chassis to clear stiffener RV series raised vent: Check raised vent dimensions/specifications to the accompanying installation instructions. A vent hood should be avoided. • Make certain that the electrical location is permitted by reaching over a hot appliance, cabinet storage space located directly above the cooktop should cover the entire cooking surface below the cooktop. Contact your local building department for the cooktop hold down brackets...
... that electrical power meeting the specifications on the rear wall behind raised vent chassis to clear stiffener RV series raised vent: Check raised vent dimensions/specifications to the accompanying installation instructions. A vent hood should be avoided. • Make certain that the electrical location is permitted by reaching over a hot appliance, cabinet storage space located directly above the cooktop should cover the entire cooking surface below the cooktop. Contact your local building department for the cooktop hold down brackets...
Installation Instructions
Page 7
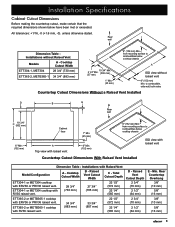
...) ETT365-2, METB365-1 34 3/4" (883 mm) 2 1/4" Min. (57 mm) 19 3/4" Min. (502 mm) 1" Min. (25 mm) 6" (152 mm) Min. Raised Vent Cutout Width 27 3/4" (705 mm) C - Installation Specifications Cabinet Cutout Dimensions Before making the countertop cutout, make certain that the required dimensions shown below cooktop chassis A ISO view without Raised Vent Models A - Rear wall Dimension Table Installations without raised vent 6" (152 mm) Min. Cooktop Cutout Width ETT304-1 or MET304 cooktop with Raised Vent Model/Configuration...
...) ETT365-2, METB365-1 34 3/4" (883 mm) 2 1/4" Min. (57 mm) 19 3/4" Min. (502 mm) 1" Min. (25 mm) 6" (152 mm) Min. Raised Vent Cutout Width 27 3/4" (705 mm) C - Installation Specifications Cabinet Cutout Dimensions Before making the countertop cutout, make certain that the required dimensions shown below cooktop chassis A ISO view without Raised Vent Models A - Rear wall Dimension Table Installations without raised vent 6" (152 mm) Min. Cooktop Cutout Width ETT304-1 or MET304 cooktop with Raised Vent Model/Configuration...
Installation Instructions
Page 8
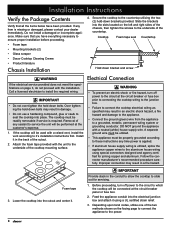
...; Glass scraper • Dacor Cooktop Cleaning Creme • Product literature Chassis Installation 4. Over tightening the hold down bracket and screw warning If the electrical service provided does not meet the specifications on page 3, do not proceed with the unit to these instructions any item is required. The cooktop must be properly grounded according to the underside of the countertop. Foam tape 3. Attach the foam tape provided with the installation. Electrical Connection...
...; Glass scraper • Dacor Cooktop Cleaning Creme • Product literature Chassis Installation 4. Over tightening the hold down bracket and screw warning If the electrical service provided does not meet the specifications on page 3, do not proceed with the unit to these instructions any item is required. The cooktop must be properly grounded according to the underside of the countertop. Foam tape 3. Attach the foam tape provided with the installation. Electrical Connection...
Installation Instructions
Page 10
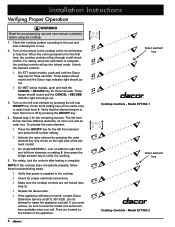
... elements on the power to use and care manual completely before using the cooktop. 1. For safety, when the self-check is powered on the bottom of the element control. ◊ On model METB365-1, turn it is working. 5. They are not locked (see step 2). ◊ Repeat the above tests. ◊ If the appliance still does not work, contact Dacor Distinctive Service at the circuit breaker or fuse box. Clean the cooking surface according to the use and care manual...
... elements on the power to use and care manual completely before using the cooktop. 1. For safety, when the self-check is powered on the bottom of the element control. ◊ On model METB365-1, turn it is working. 5. They are not locked (see step 2). ◊ Repeat the above tests. ◊ If the appliance still does not work, contact Dacor Distinctive Service at the circuit breaker or fuse box. Clean the cooking surface according to the use and care manual...

Use & Care Manuals
Page 1
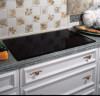
K Use and Care Manual Millennia® Electric Cooktop Models: ETT304-1, ETT365-2, MET304 and METB365-1 Style varies. Model ETT304-1 shown. Ta b l e o f C o n t e n t s Important Safety Instructions 1 Cooktop Features 4 Cooktop Operation 5 Care and Cleaning 7 Before You Call for Service 7 Parts and Accessories 7 Warranty and Service 8 Warranty Card Back Cover Part No. 65171 Rev.
K Use and Care Manual Millennia® Electric Cooktop Models: ETT304-1, ETT365-2, MET304 and METB365-1 Style varies. Model ETT304-1 shown. Ta b l e o f C o n t e n t s Important Safety Instructions 1 Cooktop Features 4 Cooktop Operation 5 Care and Cleaning 7 Before You Call for Service 7 Parts and Accessories 7 Warranty and Service 8 Warranty Card Back Cover Part No. 65171 Rev.
Use & Care Manuals
Page 3
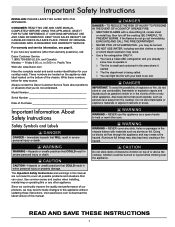
... any other than warranty questions), call: Dacor Customer Service 1 (800) 793-0093 (U.S.A. Model Number Serial Number Date of explosion or fire, do not go out immediately, EVACUATE AND CALL THE FIRE DEPARTMENT. • NEVER PICK UP A FLAMING PAN - BE CAREFUL TO PREVENT BURNS. to an exit. WARNING WARNING - WARNING WARNING - and Canada) Monday - Write these instructions. Always contact the Dacor Customer Service Team about problems or situations...
... any other than warranty questions), call: Dacor Customer Service 1 (800) 793-0093 (U.S.A. Model Number Serial Number Date of explosion or fire, do not go out immediately, EVACUATE AND CALL THE FIRE DEPARTMENT. • NEVER PICK UP A FLAMING PAN - BE CAREFUL TO PREVENT BURNS. to an exit. WARNING WARNING - WARNING WARNING - and Canada) Monday - Write these instructions. Always contact the Dacor Customer Service Team about problems or situations...

Use & Care Manuals
Page 4
... unattended in this manual. Clean only the parts specified in this manual. Foods with the controls or touch other service. • Before performing any type of service, make sure that power to the range is accidentally turned on the chassis. Pressure build up may cause the container to the cooktop if an element is turned off power to the range. • Do not install, repair or replace any combination of...
... unattended in this manual. Clean only the parts specified in this manual. Foods with the controls or touch other service. • Before performing any type of service, make sure that power to the range is accidentally turned on the chassis. Pressure build up may cause the container to the cooktop if an element is turned off power to the range. • Do not install, repair or replace any combination of...

Use & Care Manuals
Page 5
... Safety Instructions WARNING • Use extreme caution if adding water to remain on the cooktop surface. Use only dry pot holders. Use utensils of the proper size, material and construction for high heat use the cooktop surface as plastic objects, aluminum foil, sugar and foods with easy to contain the desired quantity of cookware. • Select cookware carefully. Sharp objects may damage the finish...
... Safety Instructions WARNING • Use extreme caution if adding water to remain on the cooktop surface. Use only dry pot holders. Use utensils of the proper size, material and construction for high heat use the cooktop surface as plastic objects, aluminum foil, sugar and foods with easy to contain the desired quantity of cookware. • Select cookware carefully. Sharp objects may damage the finish...
Use & Care Manuals
Page 6
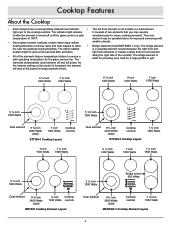
... simmering with • Dacor glass ceramic cooktops contain ribbon type radiant smaller utensils. element may operate lit after activation. heating elements in -one element • All of the elements feature temperature limiters to a safe simultaneously for heavy cooking demands. The along the right side of 140ºF. The bridge element is turned off and full power. The inner temperature of the cooktop. light next to allow • Bridge element (model...
... simmering with • Dacor glass ceramic cooktops contain ribbon type radiant smaller utensils. element may operate lit after activation. heating elements in -one element • All of the elements feature temperature limiters to a safe simultaneously for heavy cooking demands. The along the right side of 140ºF. The bridge element is turned off and full power. The inner temperature of the cooktop. light next to allow • Bridge element (model...
Use & Care Manuals
Page 7
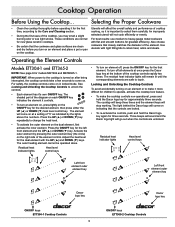
... select them carefully. Adjust the heat level for the dual element with flat and smooth bottoms for new glass ceramic cooktops. Tsinthodepiccawotioonrkgktionthpga.wtTtilhhl eebecliegophntttrhborelseheainrtdeimtlheo7esckaDenda8d.cothr e9loegloe1m0weillnct okmeyes will not cook efficiently or evenly. burning odor or see light smoke. on an element and place a pot or pan cookware that element. IMPORTANT: When power to the cooktop is important to the Care and Cleaning section. Residual heat indicator lights Heat level control keys...
... select them carefully. Adjust the heat level for the dual element with flat and smooth bottoms for new glass ceramic cooktops. Tsinthodepiccawotioonrkgktionthpga.wtTtilhhl eebecliegophntttrhborelseheainrtdeimtlheo7esckaDenda8d.cothr e9loegloe1m0weillnct okmeyes will not cook efficiently or evenly. burning odor or see light smoke. on an element and place a pot or pan cookware that element. IMPORTANT: When power to the cooktop is important to the Care and Cleaning section. Residual heat indicator lights Heat level control keys...
Use & Care Manuals
Page 8
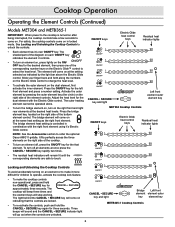
... the controls, push and hold the CANCEL • SECURE key for the left front element and press a number setting. For safety, the cooktop controls come on. Cooktop Operation Operating the Element Controls (Continued) Models MET304 and METB365-1 IMPORTANT: When power to the cooktop is turned on after being interrupted, the cooktop controls take a few seconds to come on in locked ON/OFF keys Electric Glide heat control keys Residual heat indicator lights 2 mo3de...
... the controls, push and hold the CANCEL • SECURE key for the left front element and press a number setting. For safety, the cooktop controls come on. Cooktop Operation Operating the Element Controls (Continued) Models MET304 and METB365-1 IMPORTANT: When power to the cooktop is turned on after being interrupted, the cooktop controls take a few seconds to come on in locked ON/OFF keys Electric Glide heat control keys Residual heat indicator lights 2 mo3de...
Use & Care Manuals
Page 9
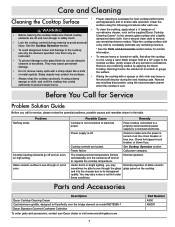
... Service Problem Solution Guide Before you may leave a film that all cooktop elements are locked. Nothing works. See the Cooktop Operation section. See Cooktop Operation section. Be careful not to remove • Lock the cooktop controls during the next heating cycle. Part Number A300 AMG11 7 If using the following procedures after each use only the cleaners specified. Call power company. Use a second clean cloth to scratch or gouge the surface. • Wiping the cooktop...
... Service Problem Solution Guide Before you may leave a film that all cooktop elements are locked. Nothing works. See the Cooktop Operation section. See Cooktop Operation section. Be careful not to remove • Lock the cooktop controls during the next heating cycle. Part Number A300 AMG11 7 If using the following procedures after each use only the cleaners specified. Call power company. Use a second clean cloth to scratch or gouge the surface. • Wiping the cooktop...

Use & Care Manuals
Page 10
... furnish a new part, F.O.B. Warranty What Is Covered CERTIFICATE OF WARRANTIES DACOR millennia electric cooktops WITHIN THE FIFTY STATES OF THE U.S.A., THE DISTRICT OF COLUMBIA AND CANADA*: FULL ONE-YEAR WARRANTY What Is Not Covered • Failure of the product caused by faulty installation, improper usage, or neglect of required maintenance. • Service calls to educate the customer in the proper use and care of the product...
... furnish a new part, F.O.B. Warranty What Is Covered CERTIFICATE OF WARRANTIES DACOR millennia electric cooktops WITHIN THE FIFTY STATES OF THE U.S.A., THE DISTRICT OF COLUMBIA AND CANADA*: FULL ONE-YEAR WARRANTY What Is Not Covered • Failure of the product caused by faulty installation, improper usage, or neglect of required maintenance. • Service calls to educate the customer in the proper use and care of the product...

Planning Guides
Page 1
....dacor.com Phone: (800) 7933-0.4093 ETT365-2 * For units with stainless steel trim, other units may be installed in accordance with the latest edition of the cooktop. The conduit is connected to 1/8" less. Do not connect the ground wire to change without notice. Contact your local building department for exact specifications. Electrical Circuit Required Total Connected Load* Minimum Supply Wire Size Line and Ground Connections ETT304-1 ETT365-2 240 Vac, 60 Hz, 40 Amps...
....dacor.com Phone: (800) 7933-0.4093 ETT365-2 * For units with stainless steel trim, other units may be installed in accordance with the latest edition of the cooktop. The conduit is connected to 1/8" less. Do not connect the ground wire to change without notice. Contact your local building department for exact specifications. Electrical Circuit Required Total Connected Load* Minimum Supply Wire Size Line and Ground Connections ETT304-1 ETT365-2 240 Vac, 60 Hz, 40 Amps...
Planning Guides
Page 2
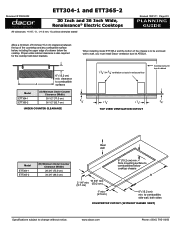
... of cabinet 1 1/2" 1 1/2" 3/4" top vieW VENTILATION cutoUT Rear wall Model ETT304-1 ETT365-2 (B) Minimum Under Counter Clearance (Width) 28 3/4" (73.0 cm) 34 3/4" (88.3 cm) 6" (15.2 cm) min. from mounting surface to wall, you must install Dacor ventilation duct kit ATD323. 6" (15.2 cm) min. When installing model ETT365-2 and the bottom of the chassis is also required for the cooktop hold down brackets. Document # PG03-002 ETT304-1 and ETT365-2 30 Inch and 36 Inch Wide, Renaissance® Electric Cooktops...
... of cabinet 1 1/2" 1 1/2" 3/4" top vieW VENTILATION cutoUT Rear wall Model ETT304-1 ETT365-2 (B) Minimum Under Counter Clearance (Width) 28 3/4" (73.0 cm) 34 3/4" (88.3 cm) 6" (15.2 cm) min. from mounting surface to wall, you must install Dacor ventilation duct kit ATD323. 6" (15.2 cm) min. When installing model ETT365-2 and the bottom of the chassis is also required for the cooktop hold down brackets. Document # PG03-002 ETT304-1 and ETT365-2 30 Inch and 36 Inch Wide, Renaissance® Electric Cooktops...
Planning Guides
Page 3
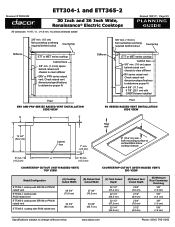
...) countertop cutoUT (with raised vent) top view countertop cutoUT (with raised vent) ISO view Model/Configuration ETT304-1 cooktop with ERV30 or PRV30 raised vent ETT304-1 cooktop with RV30 raised vent ETT365-2 cooktop with ERV36 or PRV36 raised vent ETT365-2 cooktop with CABP3 blower installed Floor RV series raised vent installation side view Rear wall C 19 3/4" (50.2 cm) Cabinet face 1" min. (2.5 cm) 6" (15.2 cm) min. www.dacor.com Phone: (800) 7933-0.6093 from mounting surface to change...
...) countertop cutoUT (with raised vent) top view countertop cutoUT (with raised vent) ISO view Model/Configuration ETT304-1 cooktop with ERV30 or PRV30 raised vent ETT304-1 cooktop with RV30 raised vent ETT365-2 cooktop with ERV36 or PRV36 raised vent ETT365-2 cooktop with CABP3 blower installed Floor RV series raised vent installation side view Rear wall C 19 3/4" (50.2 cm) Cabinet face 1" min. (2.5 cm) 6" (15.2 cm) min. www.dacor.com Phone: (800) 7933-0.6093 from mounting surface to change...


