
Installation Instructions
Page 6
...vent hood or raised vent according to combustible A surfaces Cooktop Models ETT304-1, MET304 ETT365-2, METB365-1 A - If installing the cooktop with a raised vent, install only the following approved Dacor model numbers: Cooktop Models ETT304-1 MET304 Approved Raised Vent Models ERV30, PRV30 or ...RV30 ETT365-2 METB365-1 ERV36, PRV36 or RV36 Raised vent installation must install ventilation duct kit ATD323...
...vent hood or raised vent according to combustible A surfaces Cooktop Models ETT304-1, MET304 ETT365-2, METB365-1 A - If installing the cooktop with a raised vent, install only the following approved Dacor model numbers: Cooktop Models ETT304-1 MET304 Approved Raised Vent Models ERV30, PRV30 or ...RV30 ETT365-2 METB365-1 ERV36, PRV36 or RV36 Raised vent installation must install ventilation duct kit ATD323...
Installation Instructions
Page 10
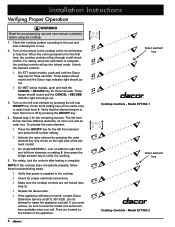
... for the left front element and press the 8 number setting. ◊ Activate the outer element by pressing the ON/OFF key. 4. Model ETT365-2 8 Installation Instructions Verifying Proper Operation warning Read the accompanying use and care manual prior to repair the appliance yourself. Repeat step 3 for three ... cooktop controls are not locked (see step 2). ◊ Repeat the above tests. ◊ If the appliance still does not work, contact Dacor Distinctive Service at the circuit breaker or fuse box. If you need service, be sure to select heat level 8. For safety, when the self...
... for the left front element and press the 8 number setting. ◊ Activate the outer element by pressing the ON/OFF key. 4. Model ETT365-2 8 Installation Instructions Verifying Proper Operation warning Read the accompanying use and care manual prior to repair the appliance yourself. Repeat step 3 for three ... cooktop controls are not locked (see step 2). ◊ Repeat the above tests. ◊ If the appliance still does not work, contact Dacor Distinctive Service at the circuit breaker or fuse box. If you need service, be sure to select heat level 8. For safety, when the self...
Use & Care Manuals
Page 6
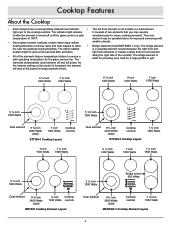
...ceramic top. The indicator light remains It consists of two elements that you may be operated alone for improved simmering with • Dacor glass ceramic cooktops contain ribbon type radiant smaller utensils. right rear elements. It creates a large three-in various sizes and heat...inch 1500 Watts ETT304-1 Cooktop Layout Cooktop controls 7 inch 1500 Watts 7 ½ inch 1800 Watts Dual element 9 ¾ inch 2400 Watts (total) Cooktop controls ETT365-2 Cooktop Layout 7 ¾ inch 1800 Watts 6 ½ inch 1200 Watts 7 inch 1500 Watts 7 ½ inch 1800 Watts 5 ½ inch ON/...
...ceramic top. The indicator light remains It consists of two elements that you may be operated alone for improved simmering with • Dacor glass ceramic cooktops contain ribbon type radiant smaller utensils. right rear elements. It creates a large three-in various sizes and heat...inch 1500 Watts ETT304-1 Cooktop Layout Cooktop controls 7 inch 1500 Watts 7 ½ inch 1800 Watts Dual element 9 ¾ inch 2400 Watts (total) Cooktop controls ETT365-2 Cooktop Layout 7 ¾ inch 1800 Watts 6 ½ inch 1200 Watts 7 inch 1500 Watts 7 ½ inch 1800 Watts 5 ½ inch ON/...
Use & Care Manuals
Page 7
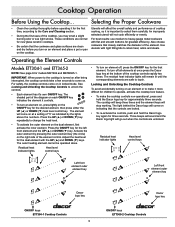
... feature. 1 • To make the cooktop controls non-operational, press and hold the Dacor logo key for approximately three seconds. Operating the Element Controls Models ETT304-1 and ETT365-2 NOTE: See page 6 for greatest efficiency. For safety, the cooktop controls come on... 10 67 5 234 1 10 Left front element outer element key 9 10 78 56 1 2 34 8 9 10 67 5 1 2 34 Dacor logo key ON/OFF keys ETT304-1 Cooktop Controls ON/OFF keys ETT365-2 Cooktop Controls 5 IMPORTANT: When power to the cooktop is important to the Care and Cleaning section. Residual heat indicator lights...
... feature. 1 • To make the cooktop controls non-operational, press and hold the Dacor logo key for approximately three seconds. Operating the Element Controls Models ETT304-1 and ETT365-2 NOTE: See page 6 for greatest efficiency. For safety, the cooktop controls come on... 10 67 5 234 1 10 Left front element outer element key 9 10 78 56 1 2 34 8 9 10 67 5 1 2 34 Dacor logo key ON/OFF keys ETT304-1 Cooktop Controls ON/OFF keys ETT365-2 Cooktop Controls 5 IMPORTANT: When power to the cooktop is important to the Care and Cleaning section. Residual heat indicator lights...

Planning Guides
Page 1
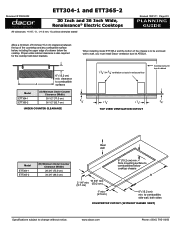
...49.5 cm) (54.0 cm) 4" (10.2 cm) Chassis height 34 3/8" (87.3 cm) Product dimensions - Electrical Supply Requirements NOTES: 1. www.dacor.com Phone: (800) 7933-0.4093 The cooktop is no neutral connection. All leads are not approved for exact specifications. Specifications subject to neutral. 2. Document... # PG03-002 ETT304-1 and ETT365-2 30 Inch and 36 Inch Wide, Renaissance® Electric Cooktops Revised 10/01/11 Page 1/3 PLANNING GUIDE Product tolerances...
...49.5 cm) (54.0 cm) 4" (10.2 cm) Chassis height 34 3/8" (87.3 cm) Product dimensions - Electrical Supply Requirements NOTES: 1. www.dacor.com Phone: (800) 7933-0.4093 The cooktop is no neutral connection. All leads are not approved for exact specifications. Specifications subject to neutral. 2. Document... # PG03-002 ETT304-1 and ETT365-2 30 Inch and 36 Inch Wide, Renaissance® Electric Cooktops Revised 10/01/11 Page 1/3 PLANNING GUIDE Product tolerances...
Planning Guides
Page 2
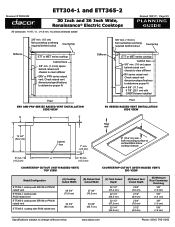
...to combustibles below the cooktop. clearance to wall, you must install Dacor ventilation duct kit ATD323. 6" (15.2 cm) min. www.dacor.com Phone: (800) 7933-0.5093 When installing model ETT365-2 and the bottom of the chassis is also required for the...sides Countertop cutout (without notice. Proper under-cabinet clearance is to be enclosed wall to combustible A surfaces Model (A) Minimum Under Counter Clearance (Width) ETT304-1 ETT365-2 30 1/2" (77.5 cm) 36 1/2" (92.7 cm) 3/4" under counter clearance 7 3/4" X 4 3/8" ventilation cut-outs in enclosure floor Cooktop cutout...
...to combustibles below the cooktop. clearance to wall, you must install Dacor ventilation duct kit ATD323. 6" (15.2 cm) min. www.dacor.com Phone: (800) 7933-0.5093 When installing model ETT365-2 and the bottom of the chassis is also required for the...sides Countertop cutout (without notice. Proper under-cabinet clearance is to be enclosed wall to combustible A surfaces Model (A) Minimum Under Counter Clearance (Width) ETT304-1 ETT365-2 30 1/2" (77.5 cm) 36 1/2" (92.7 cm) 3/4" under counter clearance 7 3/4" X 4 3/8" ventilation cut-outs in enclosure floor Cooktop cutout...
Planning Guides
Page 3
...) ISO view Model/Configuration ETT304-1 cooktop with ERV30 or PRV30 raised vent ETT304-1 cooktop with RV30 raised vent ETT365-2 cooktop with ERV36 or PRV36 raised vent ETT365-2 cooktop with CABP3 blower installed Floor RV series raised vent installation side view Rear wall C 19 3/4" (50....2 cm) Cabinet face 1" min. (2.5 cm) 6" (15.2 cm) min. www.dacor.com Phone: (800) 7933-0.6093 from mounting surface to change without notice. Document # PG03-002 ETT304-1 and ETT365-2 30 Inch and 36 Inch Wide, Renaissance® Electric Cooktops All tolerances: +1/16", -0, (+1.6 mm,...
...) ISO view Model/Configuration ETT304-1 cooktop with ERV30 or PRV30 raised vent ETT304-1 cooktop with RV30 raised vent ETT365-2 cooktop with ERV36 or PRV36 raised vent ETT365-2 cooktop with CABP3 blower installed Floor RV series raised vent installation side view Rear wall C 19 3/4" (50....2 cm) Cabinet face 1" min. (2.5 cm) 6" (15.2 cm) min. www.dacor.com Phone: (800) 7933-0.6093 from mounting surface to change without notice. Document # PG03-002 ETT304-1 and ETT365-2 30 Inch and 36 Inch Wide, Renaissance® Electric Cooktops All tolerances: +1/16", -0, (+1.6 mm,...


