
Planning Guides
Page 1
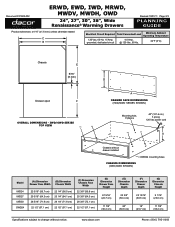
...) Handle Dimensions - Document # PG02-002 ERWD, EWD, IWD, MRWD, MWDV, MWDH, OWD 24", 27", 30", 36", Wide Renaissance® Warming Drawers Revised 10/01/11 Page 1/3 PLANNING GUIDE Product tolerances: ±1/16" (±1.6 mm) unless otherwise stated ERWD 3 1/2" (8.9 cm) EWD 3 7/16" (8.7 cm) Electrical Circuit Required Total Connected Load Minimum Ambient Operating Temperature 120 Vac, 60 Hz, 15 Amp. Model ERWD27 ERWD30 EWD24 EWD27 EWD30 EWD36...
...) Handle Dimensions - Document # PG02-002 ERWD, EWD, IWD, MRWD, MWDV, MWDH, OWD 24", 27", 30", 36", Wide Renaissance® Warming Drawers Revised 10/01/11 Page 1/3 PLANNING GUIDE Product tolerances: ±1/16" (±1.6 mm) unless otherwise stated ERWD 3 1/2" (8.9 cm) EWD 3 7/16" (8.7 cm) Electrical Circuit Required Total Connected Load Minimum Ambient Operating Temperature 120 Vac, 60 Hz, 15 Amp. Model ERWD27 ERWD30 EWD24 EWD27 EWD30 EWD36...
Planning Guides
Page 2
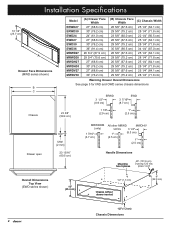
... C B Electrical Circuit Required Total Connected Load Minimum Ambient Operating Temperature 120 Vac, 60 Hz, 15 Amp. www.dacor.com Phone: (800) 7932-0.2093 grounded, dedicated circuit 4.0 Amp. @ 120 Vac, 60 Hz. 32°F (0°C) Chassis E 5/16" (8 mm) D Drawer open F Overall Dimensions - IWD/OWD Series Top View ** ** A Drawer Face Dimensions (IWD/OWD Series Shown) Mounting hole, 9 places 40" (101.6 cm) 3 prong 120 Vac power cord ** ** G Chassis without drawer installed ** = OWD24 mounting holes Chassis Dimensions (IWD...
... C B Electrical Circuit Required Total Connected Load Minimum Ambient Operating Temperature 120 Vac, 60 Hz, 15 Amp. www.dacor.com Phone: (800) 7932-0.2093 grounded, dedicated circuit 4.0 Amp. @ 120 Vac, 60 Hz. 32°F (0°C) Chassis E 5/16" (8 mm) D Drawer open F Overall Dimensions - IWD/OWD Series Top View ** ** A Drawer Face Dimensions (IWD/OWD Series Shown) Mounting hole, 9 places 40" (101.6 cm) 3 prong 120 Vac power cord ** ** G Chassis without drawer installed ** = OWD24 mounting holes Chassis Dimensions (IWD...
Planning Guides
Page 3
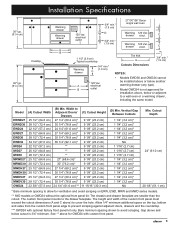
... panel must exceed the appropriate cutout dimensions (A and C above or below another warming drawer (any type). Document # PG02-002 ERWD, EWD, IWD, MRWD, MWDV, MWDH, OWD 24", 27", 30", 36", Wide Renaissance® Warming Drawers Revised 10/01/11 Page 3/3 PLANNING GUIDE Cabinet/countertop tolerances: +1/16" (+1.6 mm) -0 unless otherwise stated 36" typ. (91.4 cm) Warming drawer Warming drawer A B 27"/30"/36" Dacor single wall oven D Warming 120 Vac drawer...
... panel must exceed the appropriate cutout dimensions (A and C above or below another warming drawer (any type). Document # PG02-002 ERWD, EWD, IWD, MRWD, MWDV, MWDH, OWD 24", 27", 30", 36", Wide Renaissance® Warming Drawers Revised 10/01/11 Page 3/3 PLANNING GUIDE Cabinet/countertop tolerances: +1/16" (+1.6 mm) -0 unless otherwise stated 36" typ. (91.4 cm) Warming drawer Warming drawer A B 27"/30"/36" Dacor single wall oven D Warming 120 Vac drawer...
Installation Instructions
Page 3
...Pacific Time Web site: www.Dacor.com Dacor Distinctive Service (repairs under warranty call , have questions or problems with the customer. Use common sense and caution when installing, maintaining or operating this or any other appliance. • Always contact the Dacor Customer Service Team about problems and conditions that COULD result in Cabinet 6 Electrical and Environmental Specifications 6 Installation Instructions 7 Remove the Drawer 7 Installing the Chassis 7 Re-installing the Drawer 8 Towel Rack Installation 8 Verify Warming Drawer Operation 9 Installation...
...Pacific Time Web site: www.Dacor.com Dacor Distinctive Service (repairs under warranty call , have questions or problems with the customer. Use common sense and caution when installing, maintaining or operating this or any other appliance. • Always contact the Dacor Customer Service Team about problems and conditions that COULD result in Cabinet 6 Electrical and Environmental Specifications 6 Installation Instructions 7 Remove the Drawer 7 Installing the Chassis 7 Re-installing the Drawer 8 Towel Rack Installation 8 Verify Warming Drawer Operation 9 Installation...

Installation Instructions
Page 4
... materials inside. • If materials inside the warming drawer should be burned or injured while climbing on this manual. Heating elements may be hot, even though they may be installed indoors and have had sufficient time to sit, stand or climb on until turned off the power at the circuit breaker panel or fuse box. • Exercise caution when opening the warming drawer. Wet pot holders can cause steam burns...
... materials inside. • If materials inside the warming drawer should be burned or injured while climbing on this manual. Heating elements may be hot, even though they may be installed indoors and have had sufficient time to sit, stand or climb on until turned off the power at the circuit breaker panel or fuse box. • Exercise caution when opening the warming drawer. Wet pot holders can cause steam burns...
Installation Instructions
Page 5
...; Carefully check the location where the drawer is to ensure a proper installation before proceeding. • A custom front panel is required for IWD series models and optional for OWD24. • An optional Epicure® style front panel kit is in the open F Overall Dimensions - Dimensions shown provide minimum clearances, unless otherwise noted. IWD/OWD Series Top View Mounting hole, 9 places 40" (101.6 cm) 3 prong 120 Vac power cord...
...; Carefully check the location where the drawer is to ensure a proper installation before proceeding. • A custom front panel is required for IWD series models and optional for OWD24. • An optional Epicure® style front panel kit is in the open F Overall Dimensions - Dimensions shown provide minimum clearances, unless otherwise noted. IWD/OWD Series Top View Mounting hole, 9 places 40" (101.6 cm) 3 prong 120 Vac power cord...
Installation Instructions
Page 6
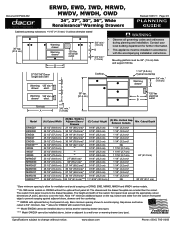
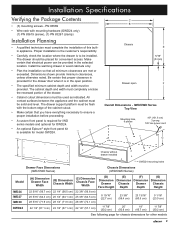
Installation Specifications 10 1/8" (25.7 cm) A Drawer Face Dimensions (MWD series shown) B C Chassis Model ERWD27 (A) Drawer Face ...Warming Drawer Overall Dimensions See page 3 for IWD and OWD series chassis dimensions 23 3/8" (59.4 cm) ERWD 3 1/2" (8.9 cm) EWD 3 7/16" (8.7 cm) 1 1/8" (2.9 cm) 1" (2.5 cm) Drawer open 5/64" (2 mm) 23 13/16" (60.5 cm) MRWD30B (only) 1 7/16" (3.7 cm) All other MRWD MWDH/V series 3 1/4" 1" (8.3 cm) (2.5 cm) 1" (2.5 cm) Handle Dimensions Mounting hole 9 places 40" (101.6 cm) 3-prong 120 Vac power cord Overall Dimensions Top View (EWD series...
Installation Specifications 10 1/8" (25.7 cm) A Drawer Face Dimensions (MWD series shown) B C Chassis Model ERWD27 (A) Drawer Face ...Warming Drawer Overall Dimensions See page 3 for IWD and OWD series chassis dimensions 23 3/8" (59.4 cm) ERWD 3 1/2" (8.9 cm) EWD 3 7/16" (8.7 cm) 1 1/8" (2.9 cm) 1" (2.5 cm) Drawer open 5/64" (2 mm) 23 13/16" (60.5 cm) MRWD30B (only) 1 7/16" (3.7 cm) All other MRWD MWDH/V series 3 1/4" 1" (8.3 cm) (2.5 cm) 1" (2.5 cm) Handle Dimensions Mounting hole 9 places 40" (101.6 cm) 3-prong 120 Vac power cord Overall Dimensions Top View (EWD series...
Installation Instructions
Page 7
... Toe kick A Cutouts Dimensions 3/4" min.* (1.9 cm) NOTES: • Models EWD36 and OWD24 cannot be installed above or below or adjacent to avoid scraping. Installation Specifications 36" typ. (91.4 cm) Cooktop 36" typ. (91.4 cm) Warming drawer Warming drawer A B 120 Vac electrical outlet 27"/30"/36" Dacor 3/4" min.* single wall oven C (1.9 cm) D D C Warming 120 Vac drawer elect. C 3/4" min.* D (1.9 cm) Warming 120 Vac drawer elect. Bare minimum spacing shown to a wall oven or a warming drawer, including the...
... Toe kick A Cutouts Dimensions 3/4" min.* (1.9 cm) NOTES: • Models EWD36 and OWD24 cannot be installed above or below or adjacent to avoid scraping. Installation Specifications 36" typ. (91.4 cm) Cooktop 36" typ. (91.4 cm) Warming drawer Warming drawer A B 120 Vac electrical outlet 27"/30"/36" Dacor 3/4" min.* single wall oven C (1.9 cm) D D C Warming 120 Vac drawer elect. C 3/4" min.* D (1.9 cm) Warming 120 Vac drawer elect. Bare minimum spacing shown to a wall oven or a warming drawer, including the...
Installation Instructions
Page 8
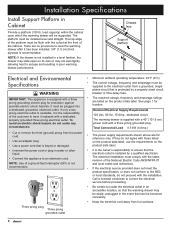
... plugged into a dedicated, grounded, electrical outlet. Total Connected Load 0.5 kW (4 Amp.) • The power supply requirements shown above are no provisions to level the warming drawer after it replaced with those listed on the product data label, use the requirements on the product data label. • It is the owner's responsibility to have it has been installed. 3/4" (1.9 cm) thick plywood is installed by a properly sized circuit breaker or time-delay fuse. • The required...
... plugged into a dedicated, grounded, electrical outlet. Total Connected Load 0.5 kW (4 Amp.) • The power supply requirements shown above are no provisions to level the warming drawer after it replaced with those listed on the product data label, use the requirements on the product data label. • It is the owner's responsibility to have it has been installed. 3/4" (1.9 cm) thick plywood is installed by a properly sized circuit breaker or time-delay fuse. • The required...
Installation Instructions
Page 9
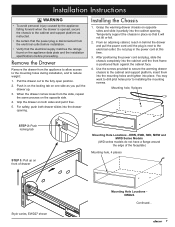
... fully open position. 2. Installing the Chassis 1. Do not plug in on the locking tab on one side as instructed. • Be certain that the power plug is positioned flush against the cabinet face. 4. After positioning the power cord and plug, slide the chassis completely into place. Use the screws provided to secure the warming drawer chassis to installing the mounting screws. Push in the power cord at this time...
... fully open position. 2. Installing the Chassis 1. Do not plug in on the locking tab on one side as instructed. • Be certain that the power plug is positioned flush against the cabinet face. 4. After positioning the power cord and plug, slide the chassis completely into place. Use the screws provided to secure the warming drawer chassis to installing the mounting screws. Push in the power cord at this time...
Installation Instructions
Page 10
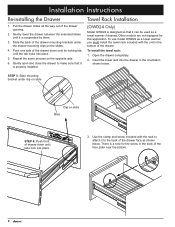
... the orientation shown below . Push one side of drawer down onto its locking tab, until tabs lock into place. 5. Towel Rack Installation (OWD24 Only) Model OWD24 is designed so that it is properly installed. Open the drawer completely. 2. Installation Instructions Re-installing the Drawer 1. STEP 3: Slide mounting bracket under the drawer mounting clips on the opposite side. 6. Use the clamp and screw included with the unit in the...
... the orientation shown below . Push one side of drawer down onto its locking tab, until tabs lock into place. 5. Towel Rack Installation (OWD24 Only) Model OWD24 is designed so that it is properly installed. Open the drawer completely. 2. Installation Instructions Re-installing the Drawer 1. STEP 3: Slide mounting bracket under the drawer mounting clips on the opposite side. 6. Use the clamp and screw included with the unit in the...
Installation Instructions
Page 11
... tripped. When you call. Each time you have the model and serial numbers available when you press each in turn. See page 1 for use as towel warmer: The towel rack has been installed. The indicator light above tests. • If the appliance still does not work, contact Dacor Distinctive Service at (877) 337-3226. Leave the control panel set to repair the appliance yourself. You should...
... tripped. When you call. Each time you have the model and serial numbers available when you press each in turn. See page 1 for use as towel warmer: The towel rack has been installed. The indicator light above tests. • If the appliance still does not work, contact Dacor Distinctive Service at (877) 337-3226. Leave the control panel set to repair the appliance yourself. You should...
Use & Care Manuals
Page 3
... manual. Save it replaced with a three prong grounding electric plug for your sales receipt or canceled check. For service and warranty information see page 8. If you call : Dacor Customer Service (800) 793-0093 (U.S.A. to download the latest version of our products, we may need to make changes to have any other than warranty questions), call , have the complete model and serial number for protection against possible electric...
... manual. Save it replaced with a three prong grounding electric plug for your sales receipt or canceled check. For service and warranty information see page 8. If you call : Dacor Customer Service (800) 793-0093 (U.S.A. to download the latest version of our products, we may need to make changes to have any other than warranty questions), call , have the complete model and serial number for protection against possible electric...

Use & Care Manuals
Page 4
... those parts listed in this manual. Wet pot holders can cause steam burns. • Do not put items like whole eggs, sealed containers or closed and shut off the power at the circuit breaker panel or fuse box. • Exercise caution when opening the drawer. Do not use aerosol cleaners, because they are able to operate it for the first time. • Make sure the warming drawer is used...
... those parts listed in this manual. Wet pot holders can cause steam burns. • Do not put items like whole eggs, sealed containers or closed and shut off the power at the circuit breaker panel or fuse box. • Exercise caution when opening the drawer. Do not use aerosol cleaners, because they are able to operate it for the first time. • Make sure the warming drawer is used...

Use & Care Manuals
Page 6
Excessive heat buildup can also use . Preheat times vary depending on the control panel. The warming drawer can also be positioned anywhere between the MOIST and CRISP settings. 2. Select the humidity level. To increase humidity inside the drawer, slide the lever closer to the CRISP symbol. The lever can be less chance of water due to turn the unit on plates to keep the...
Excessive heat buildup can also use . Preheat times vary depending on the control panel. The warming drawer can also be positioned anywhere between the MOIST and CRISP settings. 2. Select the humidity level. To increase humidity inside the drawer, slide the lever closer to the CRISP symbol. The lever can be less chance of water due to turn the unit on plates to keep the...
Use & Care Manuals
Page 8
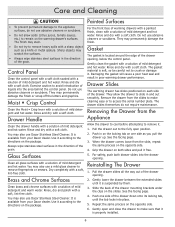
... stainless steel surfaces in the direction of the drawer mounting brackets under the clips on one side of the drawer. Use it . Push in poor warming drawer performance. Rinse and dry with a soft cloth. Brass and Chrome Surfaces Clean brass and chrome surfaces with a solution of the drawer opening , below the control panel. Damaging the gasket will cause a poor heat seal and result in...
... stainless steel surfaces in the direction of the drawer mounting brackets under the clips on one side of the drawer. Use it . Push in poor warming drawer performance. Rinse and dry with a soft cloth. Brass and Chrome Surfaces Clean brass and chrome surfaces with a solution of the drawer opening , below the control panel. Damaging the gasket will cause a poor heat seal and result in...

Use & Care Manuals
Page 9
... 32°F (0°C). Sensor error #3 - Control error what to DO Connect plug to the Operating Instructions section. Check the circuit breaker panel or fuse box tripped breaker or blown fuse. Remount drawer into slide, per instructions above freezing. Preheat the warming drawer before each use. Timer is unbalanced. Excessive condensation. Warming drawer not preheated. Key pad error #4 - Temperature around warming drawer must be caused by Power plug disconnected. Redistribute drawer contents. Pull up on drawer front Care and Cleaning Slide mounting bracket under clip on slide...
... 32°F (0°C). Sensor error #3 - Control error what to DO Connect plug to the Operating Instructions section. Check the circuit breaker panel or fuse box tripped breaker or blown fuse. Remount drawer into slide, per instructions above freezing. Preheat the warming drawer before each use. Timer is unbalanced. Excessive condensation. Warming drawer not preheated. Key pad error #4 - Temperature around warming drawer must be caused by Power plug disconnected. Redistribute drawer contents. Pull up on drawer front Care and Cleaning Slide mounting bracket under clip on slide...
Use & Care Manuals
Page 10
... use . • Replacement of house fuses or fuse boxes, or resetting of circuit breakers. • Breakage, discoloration or damage to glass, metal surfaces, plastic components, trim, paint or other rights that of purchase, due to a defect in material or workmanship, DACOR will do not allow the exclusion or limitation of God. All delivery, installation, and labor costs are the responsibility of the numbers...
... use . • Replacement of house fuses or fuse boxes, or resetting of circuit breakers. • Breakage, discoloration or damage to glass, metal surfaces, plastic components, trim, paint or other rights that of purchase, due to a defect in material or workmanship, DACOR will do not allow the exclusion or limitation of God. All delivery, installation, and labor costs are the responsibility of the numbers...
Use & Care Manuals
Page 12
... mailing list purposes. Appliance Dealer Showroom H. Oven D. cut here Web site: Corporate phone: www.Dacor.com (800) 793-0093 Owner's Name: Street: City: Purchase Date: Dealer: City: Last (Please Print or Type) Email: First State: Telephone: State: Middle Zip: Zip: Your willingness to take a few seconds to Dacor products? (Please check one envelope or activate the warranty...
... mailing list purposes. Appliance Dealer Showroom H. Oven D. cut here Web site: Corporate phone: www.Dacor.com (800) 793-0093 Owner's Name: Street: City: Purchase Date: Dealer: City: Last (Please Print or Type) Email: First State: Telephone: State: Middle Zip: Zip: Your willingness to take a few seconds to Dacor products? (Please check one envelope or activate the warranty...

Reference Guides
Page 1
.... Dacor's Warming Drawers Make your customer. weight capacity. • New silicone gasket construction for temperature and humidity control setting on . • Four timer settings give customer precision performance at their fingertips. • One button on/off switch • Four temperature settings - able only in mind. • 500 watt heating element is not available with integrated, just leave drawer slightly ajar. Design Options Electronic Touch Controls Four Timer settings plus...
.... Dacor's Warming Drawers Make your customer. weight capacity. • New silicone gasket construction for temperature and humidity control setting on . • Four timer settings give customer precision performance at their fingertips. • One button on/off switch • Four temperature settings - able only in mind. • 500 watt heating element is not available with integrated, just leave drawer slightly ajar. Design Options Electronic Touch Controls Four Timer settings plus...


