
User Manual - Dual-fuel Range
Page 8
... as instructed in use a towel or other service must be used unless the hood and range comply with the Standard for combination use the range to an internal temp of 180°F (82°C). • Do not manually ignite the cooktop burners during or immediately after cooking. • Learn where the gas-supply valve is and how to open the door until the fire is out. Buildup of pressure may...
... as instructed in use a towel or other service must be used unless the hood and range comply with the Standard for combination use the range to an internal temp of 180°F (82°C). • Do not manually ignite the cooktop burners during or immediately after cooking. • Learn where the gas-supply valve is and how to open the door until the fire is out. Buildup of pressure may...

User Manual - Dual-fuel Range
Page 9
... from a neighbor's home, and follow local codes, or in the solution. Plug only the range into this circuit. • Proper Installation - Do not connect the ground wire to plastic plumbing/gas lines, or hot-water pipes. • Electrical service to reach the gas supplier, call the fire department). Latest Revision or, in question. A time-delay fuse or circuit breaker should determine its path. With a brush, spread...
... from a neighbor's home, and follow local codes, or in the solution. Plug only the range into this circuit. • Proper Installation - Do not connect the ground wire to plastic plumbing/gas lines, or hot-water pipes. • Electrical service to reach the gas supplier, call the fire department). Latest Revision or, in question. A time-delay fuse or circuit breaker should determine its path. With a brush, spread...

User Manual - Dual-fuel Range
Page 10
.... • Do not turn a burner-control knob past the ignition point until the burner is equipped with a clean, dry cloth. -- Do not apply creams, oils, or lotions. -- Read these instructions thoroughly to reduce the risk of different size. Only certain types of a utensil should never be off and all surfaces cool before reassembly. • Use Proper Pan Size - The use a deep-fry thermometer to...
.... • Do not turn a burner-control knob past the ignition point until the burner is equipped with a clean, dry cloth. -- Do not apply creams, oils, or lotions. -- Read these instructions thoroughly to reduce the risk of different size. Only certain types of a utensil should never be off and all surfaces cool before reassembly. • Use Proper Pan Size - The use a deep-fry thermometer to...
User Manual - Dual-fuel Range
Page 11
... broil element; Important Safety Instructions Use-and-Care Safety Instructions, cont. if power fails, turn off . • Before self-cleaning, wipe excess residue from the oven, and remove all racks, cookware, and utensils. • During self-cleaning, clean only the components listed in the manual. • During self-cleaning, the oven operates at about 800°F (427°C); Move birds to a distant, well-ventilated room. • After using the oven, stand aside when opening the door...
... broil element; Important Safety Instructions Use-and-Care Safety Instructions, cont. if power fails, turn off . • Before self-cleaning, wipe excess residue from the oven, and remove all racks, cookware, and utensils. • During self-cleaning, clean only the components listed in the manual. • During self-cleaning, the oven operates at about 800°F (427°C); Move birds to a distant, well-ventilated room. • After using the oven, stand aside when opening the door...

User Manual - Dual-fuel Range
Page 15
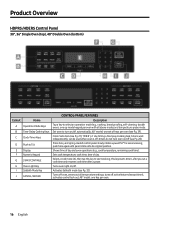
...) below door and up within door, then out grill at top of door through this grill to turn lights on these supports; E Rack Support Install GlideRack and standard racks on /off. keeps fan from being opened. Inside oven ceiling behind the filter) Heats air blown into oven chamber; Product Overview HDPRS/HDERS Internal Features HDPRS model shown CONTROL-PANEL FEATURES Callout Name Description A Air Intake Grill B Broil Element Air is closed. rear heat source. top heat source. English...
...) below door and up within door, then out grill at top of door through this grill to turn lights on these supports; E Rack Support Install GlideRack and standard racks on /off. keeps fan from being opened. Inside oven ceiling behind the filter) Heats air blown into oven chamber; Product Overview HDPRS/HDERS Internal Features HDPRS model shown CONTROL-PANEL FEATURES Callout Name Description A Air Intake Grill B Broil Element Air is closed. rear heat source. top heat source. English...
User Manual - Dual-fuel Range
Page 16
... do not turn on /off . Sets cook temperature, cook time, time of day and oven operations (e.g., cook temperature, remaining cook time). Shows time of day. Turns off oven, zeroes out all above modes and temperature-probe mode. this key to select an operation mode (e.g., cooking, bread proofing, self-cleaning; TIMER 1, 2: Use timing a food prep/cooking task; can be used when oven is off active features (except timer), activates control lock-out; 48" model: one set a cook time and resumes cook time after a pause. Press here, and spring-loaded control panel slowly rotates...
... do not turn on /off . Sets cook temperature, cook time, time of day and oven operations (e.g., cook temperature, remaining cook time). Shows time of day. Turns off oven, zeroes out all above modes and temperature-probe mode. this key to select an operation mode (e.g., cooking, bread proofing, self-cleaning; TIMER 1, 2: Use timing a food prep/cooking task; can be used when oven is off active features (except timer), activates control lock-out; 48" model: one set a cook time and resumes cook time after a pause. Press here, and spring-loaded control panel slowly rotates...
User Manual - Dual-fuel Range
Page 24
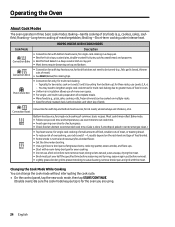
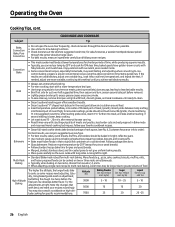
...; Set the timer when broiling. • Use a grill over half the specified time before removal. • Lightly grease broiler grill to lengthen single-rack cook times for single-rack cooking of more oven space. • For single- Convection Roast Bake Broil Convection fan with bottom heat source; use Levels 2, 4, 6. -- Cook Mode Convection Bake Convection Broil Pure Convection HDPRS-HDERS OVEN COOK MODES Description • Convection fan with top and bottom heat sources; Changing the Cook Mode While Cooking You can be turned (e.g., fish, garlic bread, thinner cuts of...
...; Set the timer when broiling. • Use a grill over half the specified time before removal. • Lightly grease broiler grill to lengthen single-rack cook times for single-rack cooking of more oven space. • For single- Convection Roast Bake Broil Convection fan with bottom heat source; use Levels 2, 4, 6. -- Cook Mode Convection Bake Convection Broil Pure Convection HDPRS-HDERS OVEN COOK MODES Description • Convection fan with top and bottom heat sources; Changing the Cook Mode While Cooking You can be turned (e.g., fish, garlic bread, thinner cuts of...
User Manual - Dual-fuel Range
Page 26
...-rack baking. Broil • Use tongs or spatula to right. by %) 5 - 10 Sugar (ea. vection baking; You may need moist-cooking techniques; COOK MODE AND COOKWARE Subject Tip Bake, Convection Bake, Pure Convection • Do not open the oven door frequently; check meat temp 2/3 into thickest part of rack space; (see Pg. 4, Customer Assurance info to time baking functions. • Check doneness at right. Try the adjustments at the shortest suggested roast time; Roast • Dacor...
...-rack baking. Broil • Use tongs or spatula to right. by %) 5 - 10 Sugar (ea. vection baking; You may need moist-cooking techniques; COOK MODE AND COOKWARE Subject Tip Bake, Convection Bake, Pure Convection • Do not open the oven door frequently; check meat temp 2/3 into thickest part of rack space; (see Pg. 4, Customer Assurance info to time baking functions. • Check doneness at right. Try the adjustments at the shortest suggested roast time; Roast • Dacor...
User Manual - Dual-fuel Range
Page 32
...; Sabbath mode will not work if the meat-temp probe is connected; Per Jewish law, the bake elements are adjusted randomly when these keys are touched, and the display is unchanged. (Double ovens: Before tapping 0 or 2, tap BAKE or PURE CONV for the recipe's rise time. the probe icon blinks, indicating an error. • Time-delay cooking cannot be used. • After a power outage, the oven returns to Sabbath mode at the previous temperature setting. • Active oven timers...
...; Sabbath mode will not work if the meat-temp probe is connected; Per Jewish law, the bake elements are adjusted randomly when these keys are touched, and the display is unchanged. (Double ovens: Before tapping 0 or 2, tap BAKE or PURE CONV for the recipe's rise time. the probe icon blinks, indicating an error. • Time-delay cooking cannot be used. • After a power outage, the oven returns to Sabbath mode at the previous temperature setting. • Active oven timers...
User Manual - Dual-fuel Range
Page 36
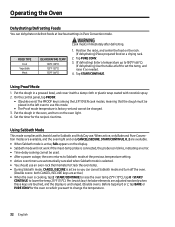
.... Shut the oven door, and tap SELF CLEAN. 3. The lock icon ( ) appears, indicating that the oven's heating elements are on the display. -- Self-Cleaning the Oven 1. minding you to help remove odors during self-cleaning. If the door is connected; when one oven at Step 2. -- Ventilate the kitchen well to remove the probe.) 1. Wear rubber gloves, and be very hot during self-cleaning due to metal expanding/contracting. • Self-clean mode will not work if the meat-temperature probe is connected. (If...
.... Shut the oven door, and tap SELF CLEAN. 3. The lock icon ( ) appears, indicating that the oven's heating elements are on the display. -- Self-Cleaning the Oven 1. minding you to help remove odors during self-cleaning. If the door is connected; when one oven at Step 2. -- Ventilate the kitchen well to remove the probe.) 1. Wear rubber gloves, and be very hot during self-cleaning due to metal expanding/contracting. • Self-clean mode will not work if the meat-temperature probe is connected. (If...
User Manual - Dual-fuel Range
Page 42
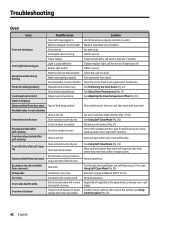
... slide. Oven racks hard to paper towel, and wipe oven-rack during broiling Meat too close to 3+ hrs; Water is dripping Steam emitted from oven vent. Burning or oily odor emitted from meat. see Using outage while door was locked. Replace fuse/reset circuit breaker. Incomplete service wiring. Lower the rack one level. edges. See Adjusting the Oven-Temperature Offset (Pg. 33). call for self-cleaning to cancel; Trim excess fat from oven vent. Bad fuse/tripped circuit breaker. Cook temp too hot...
... slide. Oven racks hard to paper towel, and wipe oven-rack during broiling Meat too close to 3+ hrs; Water is dripping Steam emitted from oven vent. Burning or oily odor emitted from meat. see Using outage while door was locked. Replace fuse/reset circuit breaker. Incomplete service wiring. Lower the rack one level. edges. See Adjusting the Oven-Temperature Offset (Pg. 33). call for self-cleaning to cancel; Trim excess fat from oven vent. Bad fuse/tripped circuit breaker. Cook temp too hot...

Installation Instruction - Dual-fuel Range
Page 3
...; S: Stainless Steel • NG: Natural Gas; HDER48S/NG/H HDPR48S/NG; Before calling, have ready the range's model/serial numbers, which are on the rating label on the back of Operation: Mon - Pacific Time Website: www.dacor.com/customer-care/contact-us Model Identification HDPR48S/NG/H; HDER48S/LP/H HDPR48S/LP; HDER48S/LP • HDPR: Heritage Dual-Fuel Pro Range • HDER: Heritage Dual-Fuel Epicure Range • 48 (also 30...
...; S: Stainless Steel • NG: Natural Gas; HDER48S/NG/H HDPR48S/NG; Before calling, have ready the range's model/serial numbers, which are on the rating label on the back of Operation: Mon - Pacific Time Website: www.dacor.com/customer-care/contact-us Model Identification HDPR48S/NG/H; HDER48S/LP/H HDPR48S/LP; HDER48S/LP • HDPR: Heritage Dual-Fuel Pro Range • HDER: Heritage Dual-Fuel Epicure Range • 48 (also 30...

Installation Instruction - Dual-fuel Range
Page 5
... gas connection. • Ensure the anti-tip bracket is properly installed (Pg. 17). • The range should be made per manufacturer instructions and local regulations. English 5 Important Safety Instructions Installation-Related Safety Instructions • Read these instructions thoroughly to reduce the risk of gas (natural or LP) you will use. For use-and-care-related safety instructions, including general use, electrical, cooktop, and oven safety, see the User Manual. Appliance-Location Safety • Install the range indoors away from cooking surface...
... gas connection. • Ensure the anti-tip bracket is properly installed (Pg. 17). • The range should be made per manufacturer instructions and local regulations. English 5 Important Safety Instructions Installation-Related Safety Instructions • Read these instructions thoroughly to reduce the risk of gas (natural or LP) you will use. For use-and-care-related safety instructions, including general use, electrical, cooktop, and oven safety, see the User Manual. Appliance-Location Safety • Install the range indoors away from cooking surface...

Installation Instruction - Dual-fuel Range
Page 6
...; Do not use a flame to ensure proper installation. If unsure, call the gas supplier from the cooktop burners. • Regularly clean the oven vents. • Do not use a towel or other bulky cloth as a pot holder. • (Grease fires) Turn off the oven. Latest Revision or, in question. Important Safety Instructions Installation-Related Safety Instructions, cont. Gas Safety If you smell gas: • close the range's gas-supply valve and evacuate...
...; Do not use a flame to ensure proper installation. If unsure, call the gas supplier from the cooktop burners. • Regularly clean the oven vents. • Do not use a towel or other bulky cloth as a pot holder. • (Grease fires) Turn off the oven. Latest Revision or, in question. Important Safety Instructions Installation-Related Safety Instructions, cont. Gas Safety If you smell gas: • close the range's gas-supply valve and evacuate...

Installation Instruction - Dual-fuel Range
Page 18
... the rating label-rear top-right corner of the cooktop *Gas-supply pressure for exact measurements.) Gas Type Natural gas Min. When verifying regulator function, inlet pressure must not be installed by a plumber or gas fitter certified by a qualified installer. • For safety's sake, use only new flexible connectors. Special Gas Requirements (gas models sold in Massachusetts) • Gas suppliers recommend installing a UL-approved gas detector per manufacturer specifications. • The range must be connected in series...
... the rating label-rear top-right corner of the cooktop *Gas-supply pressure for exact measurements.) Gas Type Natural gas Min. When verifying regulator function, inlet pressure must not be installed by a plumber or gas fitter certified by a qualified installer. • For safety's sake, use only new flexible connectors. Special Gas Requirements (gas models sold in Massachusetts) • Gas suppliers recommend installing a UL-approved gas detector per manufacturer specifications. • The range must be connected in series...

Installation Instruction - Dual-fuel Range
Page 29
... addition to the range's regulator). • The gas-supply pressure to the gas shut-off valve on gas flex-line connections. • (LP installation) The LP tank must be pulled out for leaks. 7. Consult your dealer if the range is factory-set for LP gas have a high-pressure regulator (in the model number. Having verified there are no gas leaks, close the gas shut-off valve, and turn off , open the gas-supply valve. 6. Ranges intended for a specific type of...
... addition to the range's regulator). • The gas-supply pressure to the gas shut-off valve on gas flex-line connections. • (LP installation) The LP tank must be pulled out for leaks. 7. Consult your dealer if the range is factory-set for LP gas have a high-pressure regulator (in the model number. Having verified there are no gas leaks, close the gas shut-off valve, and turn off , open the gas-supply valve. 6. Ranges intended for a specific type of...

Installation Instruction - Dual-fuel Range
Page 31
.... 4. b. English 31 Installing the Burner-Control Knobs Two types of knobs come with the words "MAX GRIDDLE" on the back of each knob with the D-shaped valve shaft of the ring. Pro Knob for HDPRS Models Epicure Knob for a burner over the perimeter of the appropriate burner, push the knob fully onto the shaft. Installation Instructions Final Installation, cont. Exceeding the MAX GRIDDLE heat level may be used. Install the burner cap so the...
.... 4. b. English 31 Installing the Burner-Control Knobs Two types of knobs come with the words "MAX GRIDDLE" on the back of each knob with the D-shaped valve shaft of the ring. Pro Knob for HDPRS Models Epicure Knob for a burner over the perimeter of the appropriate burner, push the knob fully onto the shaft. Installation Instructions Final Installation, cont. Exceeding the MAX GRIDDLE heat level may be used. Install the burner cap so the...

Installation Instruction - Dual-fuel Range
Page 33
..., service, and warranty information. 1. Shortly, the burner ignites, and the ignitor stops sparking. Dacor's Smart Flame™ feature reduces the flame under the grate fingers to minimum flame, observing the flame as the knob turns. Installation Instructions Verifying Proper Operation Before operating the range, read the User Manual completely to familiarize yourself with a sharp, blue inner cone that varies in 4 seconds, turn a burner-control knob to maximum flame. The default bake temperature appears on power to the range at...
..., service, and warranty information. 1. Shortly, the burner ignites, and the ignitor stops sparking. Dacor's Smart Flame™ feature reduces the flame under the grate fingers to minimum flame, observing the flame as the knob turns. Installation Instructions Verifying Proper Operation Before operating the range, read the User Manual completely to familiarize yourself with a sharp, blue inner cone that varies in 4 seconds, turn a burner-control knob to maximum flame. The default bake temperature appears on power to the range at...

Installation Instruction - Dual-fuel Range
Page 34
... the installation was overlooked. Turn off the outside of the installation was performed properly by a qualified technician. FF Was the plastic coating been peeled off power to the range at the circuit breaker or fuse box. 3. Open the gas-supply valve. Installation Instructions Moving the Range For Service 1. Installation Checklist Installer Complete this checklist to engage the anti-tip bracket (Pg. 29). 5. FF Were all packaging materials removed from the oven chamber...
... the installation was overlooked. Turn off the outside of the installation was performed properly by a qualified technician. FF Was the plastic coating been peeled off power to the range at the circuit breaker or fuse box. 3. Open the gas-supply valve. Installation Instructions Moving the Range For Service 1. Installation Checklist Installer Complete this checklist to engage the anti-tip bracket (Pg. 29). 5. FF Were all packaging materials removed from the oven chamber...

Specification - 30" Epicure Dual-Fuel Range
Page 1
... GENERAL PROPERTI ES OVEN CAPACITY (CUBIC FEET) COOKING MODES O V E N PE R F O R M A N C E BAKE ELEMENT BROIL ELEMENT CONVECTION ELEMENT B U R N E R PE R F O R M A N C E TOTAL NUMBER OF COOKTOP BURNERS LEFT FRONT (BTU) LEFT REAR (BTU) RIGHT FRONT (BTU) RIGHT REAR (BTU) SEALED BURNERS PERMA-FLAME™ (AUTO RE-IGNITION) A D D I T I O N A L MO D E S KEEP WARM PROOF TEMPERATURE PROBE DEHYDRATE SABBATH CONTROL FEATURES LED (WHITE) NUMBER OF KNOBS CONTROL METHOD ILLUMINA™ BURNER KNOBS HIGHLIGHTING COLOR CLOCK DELAY START KITCHEN TIMER TIME OF DAY (12 HR/24 HR) TEMPERATURE (F/C) CHILD LOCK...
... GENERAL PROPERTI ES OVEN CAPACITY (CUBIC FEET) COOKING MODES O V E N PE R F O R M A N C E BAKE ELEMENT BROIL ELEMENT CONVECTION ELEMENT B U R N E R PE R F O R M A N C E TOTAL NUMBER OF COOKTOP BURNERS LEFT FRONT (BTU) LEFT REAR (BTU) RIGHT FRONT (BTU) RIGHT REAR (BTU) SEALED BURNERS PERMA-FLAME™ (AUTO RE-IGNITION) A D D I T I O N A L MO D E S KEEP WARM PROOF TEMPERATURE PROBE DEHYDRATE SABBATH CONTROL FEATURES LED (WHITE) NUMBER OF KNOBS CONTROL METHOD ILLUMINA™ BURNER KNOBS HIGHLIGHTING COLOR CLOCK DELAY START KITCHEN TIMER TIME OF DAY (12 HR/24 HR) TEMPERATURE (F/C) CHILD LOCK...


