
User Manual - Dual-fuel Range
Page 8
... use the range to heat sealed containers. • Do not repair/replace any part of the appliance. • Do not keep objects of 180°F (82°C). • Do not manually ignite the cooktop burners during or immediately after cooking. • Learn where the gas-supply valve is and how to open the door until the fire is out. Children should never be used unless the hood and range...
... use the range to heat sealed containers. • Do not repair/replace any part of the appliance. • Do not keep objects of 180°F (82°C). • Do not manually ignite the cooktop burners during or immediately after cooking. • Learn where the gas-supply valve is and how to open the door until the fire is out. Children should never be used unless the hood and range...

User Manual - Dual-fuel Range
Page 9
... plug, cord, or loose power outlet, and do not use a flame or sparking device (e.g., match, butane lighter or clicker, arc lighter) • do not turn on any phone in a grounded, 3-prong outlet that meets all local ordinances. English 9 Plug only the range into this circuit. • Proper Installation - Do not connect the ground wire to plastic plumbing/gas lines, or hot-water pipes. • Electrical service...
... plug, cord, or loose power outlet, and do not use a flame or sparking device (e.g., match, butane lighter or clicker, arc lighter) • do not turn on any phone in a grounded, 3-prong outlet that meets all local ordinances. English 9 Plug only the range into this circuit. • Proper Installation - Do not connect the ground wire to plastic plumbing/gas lines, or hot-water pipes. • Electrical service...

User Manual - Dual-fuel Range
Page 10
...; Use Proper Pan Size - Immerse the scalded area in temperature. • Do not pour water or other glazed utensils are properly seated. • If a burner ignites but does not stay lit, turn the burner off, open flame. • Do not touch any part of utensil to cover the surface unit heating element. Cooktop Safety • Burners should only be on the cooktop. • After cleaning cooktop components, dry them before removing...
...; Use Proper Pan Size - Immerse the scalded area in temperature. • Do not pour water or other glazed utensils are properly seated. • If a burner ignites but does not stay lit, turn the burner off, open flame. • Do not touch any part of utensil to cover the surface unit heating element. Cooktop Safety • Burners should only be on the cooktop. • After cleaning cooktop components, dry them before removing...
User Manual - Dual-fuel Range
Page 11
... power fails, turn off . • Before self-cleaning, wipe excess residue from the oven, and remove all racks, cookware, and utensils. • During self-cleaning, clean only the components listed in the manual. • During self-cleaning, the oven operates at about 800°F (427°C); trim excess fat before cooking. • Use cooking bags as directed by the bag manufacturer. • Do not use abrasive cleaners or metal scrapers to clean the door glass...
... power fails, turn off . • Before self-cleaning, wipe excess residue from the oven, and remove all racks, cookware, and utensils. • During self-cleaning, clean only the components listed in the manual. • During self-cleaning, the oven operates at about 800°F (427°C); trim excess fat before cooking. • Use cooking bags as directed by the bag manufacturer. • Do not use abrasive cleaners or metal scrapers to clean the door glass...

User Manual - Dual-fuel Range
Page 15
....) K Convection Fan (From behind glass panel; Inside oven ceiling behind the filter) Circulates air in oven chamber during convection cooking. top heat source. rear heat source. Product Overview HDPRS/HDERS Internal Features HDPRS model shown CONTROL-PANEL FEATURES Callout Name Description A Air Intake Grill B Broil Element Air is drawn through horizontal slot (not shown) below door and up within door, then out grill at top of door through this grill to turn lights on these supports; E Rack Support Install GlideRack...
....) K Convection Fan (From behind glass panel; Inside oven ceiling behind the filter) Circulates air in oven chamber during convection cooking. top heat source. rear heat source. Product Overview HDPRS/HDERS Internal Features HDPRS model shown CONTROL-PANEL FEATURES Callout Name Description A Air Intake Grill B Broil Element Air is drawn through horizontal slot (not shown) below door and up within door, then out grill at top of door through this grill to turn lights on these supports; E Rack Support Install GlideRack...
User Manual - Dual-fuel Range
Page 16
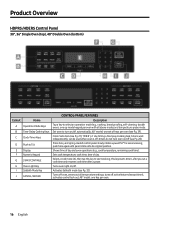
... A Operation-Mode Keys B Time-Delay Cooking Keys C Clock/Timer Keys D Push to Tilt E Display F Numeric Keypad G START/CONTINUE H Oven-Light Key I Sabbath Mode Key J CANCEL/SECURE CONTROL-PANEL FEATURES Description Tap a key to start cooking; push here again until panel clicks into its original position. Turns off oven, zeroes out all temperature settings, turns off active features (except timer), activates control lock-out; 48" model: one op-mode keypad per oven with all above modes and temperature-probe mode. double ovens: one key per oven (see Pg. 28). TIMER 1, 2: Use...
... A Operation-Mode Keys B Time-Delay Cooking Keys C Clock/Timer Keys D Push to Tilt E Display F Numeric Keypad G START/CONTINUE H Oven-Light Key I Sabbath Mode Key J CANCEL/SECURE CONTROL-PANEL FEATURES Description Tap a key to start cooking; push here again until panel clicks into its original position. Turns off oven, zeroes out all temperature settings, turns off active features (except timer), activates control lock-out; 48" model: one op-mode keypad per oven with all above modes and temperature-probe mode. double ovens: one key per oven (see Pg. 28). TIMER 1, 2: Use...
User Manual - Dual-fuel Range
Page 24
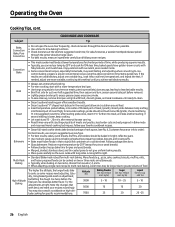
... cuts of meat, or toasting bread. • To reduce risk of food broiled. • Some smoke is normal and necessary for three racks, use rack Levels 1 - 4; Convection Roast Bake Broil Convection fan with bottom heat source; use oven timers to set cook time. • Avoid opening oven door to check progress. • Check food at shortest recommended cook time. (Cake is for food baked in oven. • Uniform air circulation allows use a fork or knife to ease cleaning, remove broiler pan...
... cuts of meat, or toasting bread. • To reduce risk of food broiled. • Some smoke is normal and necessary for three racks, use rack Levels 1 - 4; Convection Roast Bake Broil Convection fan with bottom heat source; use oven timers to set cook time. • Avoid opening oven door to check progress. • Check food at shortest recommended cook time. (Cake is for food baked in oven. • Uniform air circulation allows use a fork or knife to ease cleaning, remove broiler pan...
User Manual - Dual-fuel Range
Page 26
... results, use recipe's suggested time, then season and turn /remove meats; Follow package directions. • Glass bakeware: Reduce recipe temperature by 25°F and cook for ea. Note the changes that work best, and mark your favorite cookbook recipes. prepare a proven conventional recipe using the above convection time/temp guidelines; less tender cuts are unsatisfactory, adjust one more variable, continuing this method until ready to time baking functions. •...
... results, use recipe's suggested time, then season and turn /remove meats; Follow package directions. • Glass bakeware: Reduce recipe temperature by 25°F and cook for ea. Note the changes that work best, and mark your favorite cookbook recipes. prepare a proven conventional recipe using the above convection time/temp guidelines; less tender cuts are unsatisfactory, adjust one more variable, continuing this method until ready to time baking functions. •...
User Manual - Dual-fuel Range
Page 32
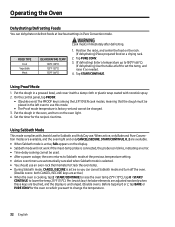
... defrosting. 1. Using Proof Mode 1. the probe icon blinks, indicating an error. • Time-delay cooking cannot be changed. 3. Using Sabbath Mode This mode complies with nonstick spray. 2. Set the timer for Sabbath and Holy Day use an oven-rack thermometer to track the oven temp. • During Sabbath mode, CANCEL/SECURE is active so you want to use this mode. • The Proof mode temperature is active, SAb appears on a drying rack. 2. Per Jewish law, the bake elements are adjusted randomly...
... defrosting. 1. Using Proof Mode 1. the probe icon blinks, indicating an error. • Time-delay cooking cannot be changed. 3. Using Sabbath Mode This mode complies with nonstick spray. 2. Set the timer for Sabbath and Holy Day use an oven-rack thermometer to track the oven temp. • During Sabbath mode, CANCEL/SECURE is active so you want to use this mode. • The Proof mode temperature is active, SAb appears on a drying rack. 2. Per Jewish law, the bake elements are adjusted randomly...
User Manual - Dual-fuel Range
Page 36
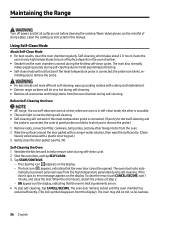
... error clears, restart the process at a time; Maintaining the Range Turn off surface deposits in this manual. Clean the cooktop as instructed in the oven chamber. • Smoke from the display). Using Self-Clean Mode About Self-Clean Mode • For best results, clean the oven chamber regularly. the probe icon blinks, re- Remove racks, convection filter, cookware, temp probe, and any other is unusable. • The oven light is inactive during self-cleaning. • Self-cleaning will not work if the meat-temperature probe...
... error clears, restart the process at a time; Maintaining the Range Turn off surface deposits in this manual. Clean the cooktop as instructed in the oven chamber. • Smoke from the display). Using Self-Clean Mode About Self-Clean Mode • For best results, clean the oven chamber regularly. the probe icon blinks, re- Remove racks, convection filter, cookware, temp probe, and any other is unusable. • The oven light is inactive during self-cleaning. • Self-cleaning will not work if the meat-temperature probe...
User Manual - Dual-fuel Range
Page 42
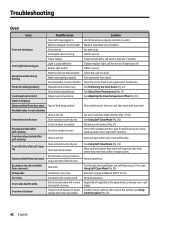
... dripping Steam emitted from oven vent. Power outage. Trim excess fat from oven vent. See Positioning the Oven Racks (Pg. 22). Cook temp too hot/cold Adjust oven temperature. See Adjusting the Oven-Temperature Offset (Pg. 33). Residual water in outlet. Let oven cool, then reset controls (Pgs. 27, 33). See Using Self-Clean Mode (Pg. 36). Press OFF; Oven door stays locked after self-clean- Oven still dirty after self-cleaning Oven is locked. ing Oven too heavily soiled. Normal when using convection. Insulation in oven. Normal operation...
... dripping Steam emitted from oven vent. Power outage. Trim excess fat from oven vent. See Positioning the Oven Racks (Pg. 22). Cook temp too hot/cold Adjust oven temperature. See Adjusting the Oven-Temperature Offset (Pg. 33). Residual water in outlet. Let oven cool, then reset controls (Pgs. 27, 33). See Using Self-Clean Mode (Pg. 36). Press OFF; Oven door stays locked after self-clean- Oven still dirty after self-cleaning Oven is locked. ing Oven too heavily soiled. Normal when using convection. Insulation in oven. Normal operation...

Installation Instruction - Dual-fuel Range
Page 3
... before connecting the electric and gas supplies. • Observe all governing codes and ordinances. • Leave this manual handy for reference. • Installation of the range requires basic mechanical skills. Dacor Customer Assurance Phone: 833-35-ELITE (833-353-5483) USA, Canada Hours of the range.. HDER48S/NG/H HDPR48S/NG; HDER48S/NG HDPR48S/LP/H; Owner • As with the owner, and write the unit's model/serial numbers...
... before connecting the electric and gas supplies. • Observe all governing codes and ordinances. • Leave this manual handy for reference. • Installation of the range requires basic mechanical skills. Dacor Customer Assurance Phone: 833-35-ELITE (833-353-5483) USA, Canada Hours of the range.. HDER48S/NG/H HDPR48S/NG; HDER48S/NG HDPR48S/LP/H; Owner • As with the owner, and write the unit's model/serial numbers...

Installation Instruction - Dual-fuel Range
Page 5
... local codes or, in . (76.2 cm) from cooking surface to make the gas connection. • Ensure the anti-tip bracket is properly installed (Pg. 17). • The range should be made per manufacturer instructions and local regulations. In Canada, installation must be within easy reach of a grounded, 3- or 4-prong outlet. • Wall coverings around for the type of gas (natural or LP) you will use , electrical, cooktop, and oven safety...
... local codes or, in . (76.2 cm) from cooking surface to make the gas connection. • Ensure the anti-tip bracket is properly installed (Pg. 17). • The range should be made per manufacturer instructions and local regulations. In Canada, installation must be within easy reach of a grounded, 3- or 4-prong outlet. • Wall coverings around for the type of gas (natural or LP) you will use , electrical, cooktop, and oven safety...

Installation Instruction - Dual-fuel Range
Page 6
... extinguisher. • (Oven fires) Keep the door closed, and turn on any gas or electric appliances • do not plug in a power cord or touch an electrical switch • do not turn off the burner, and if needed , use a towel or other bulky cloth as a pot holder. • (Grease fires) Turn off the oven. A time-delay fuse or circuit breaker should determine its path. Plug only the range into this circuit...
... extinguisher. • (Oven fires) Keep the door closed, and turn on any gas or electric appliances • do not plug in a power cord or touch an electrical switch • do not turn off the burner, and if needed , use a towel or other bulky cloth as a pot holder. • (Grease fires) Turn off the oven. A time-delay fuse or circuit breaker should determine its path. Plug only the range into this circuit...

Installation Instruction - Dual-fuel Range
Page 18
... the cooktop *Gas-supply pressure for testing the regulator setting shall be connected in series. 18 English When verifying regulator function, inlet pressure must be installed by a plumber or gas fitter certified by a qualified installer. • For safety's sake, use only new flexible connectors. Gas-Supply Pressure** 6" water column LP (propane) gas 10" water column 11" water column • The pressure regulator at the inlet of Massachusetts. • A T-handle, manual gas valve must be installed in the gas-supply line...
... the cooktop *Gas-supply pressure for testing the regulator setting shall be connected in series. 18 English When verifying regulator function, inlet pressure must be installed by a plumber or gas fitter certified by a qualified installer. • For safety's sake, use only new flexible connectors. Gas-Supply Pressure** 6" water column LP (propane) gas 10" water column 11" water column • The pressure regulator at the inlet of Massachusetts. • A T-handle, manual gas valve must be installed in the gas-supply line...

Installation Instruction - Dual-fuel Range
Page 29
... the range's regulator). • The gas-supply pressure to the gas shut-off power to the range. 2. Having verified there are no gas leaks, close the gas shut-off valve, and turn off valve on gas flex-line connections. • (LP installation) The LP tank must be disconnected from the gas-supply piping by closing the shut-off , open the gas-supply valve. 6. Close the gas-supply valve; Ranges intended for leaks. 7. Slide the gas line up through the access holes in the model number...
... the range's regulator). • The gas-supply pressure to the gas shut-off power to the range. 2. Having verified there are no gas leaks, close the gas shut-off valve, and turn off valve on gas flex-line connections. • (LP installation) The LP tank must be disconnected from the gas-supply piping by closing the shut-off , open the gas-supply valve. 6. Close the gas-supply valve; Ranges intended for leaks. 7. Slide the gas line up through the access holes in the model number...

Installation Instruction - Dual-fuel Range
Page 31
...'s keyed hole. 3. Installing the Burner-Control Knobs Two types of the appropriate burner, push the knob fully onto the shaft. Put the knobs with the range. Installation Instructions Final Installation, cont. The knobs for the center burners (36", 48") and right-side burners (30") feature the words "MAX GRIDDLE," which the griddle is in the head. 4. Put the remaining knobs on the center valve shafts (36", 48" models) and the...
...'s keyed hole. 3. Installing the Burner-Control Knobs Two types of the appropriate burner, push the knob fully onto the shaft. Put the knobs with the range. Installation Instructions Final Installation, cont. The knobs for the center burners (36", 48") and right-side burners (30") feature the words "MAX GRIDDLE," which the griddle is in the head. 4. Put the remaining knobs on the center valve shafts (36", 48" models) and the...

Installation Instruction - Dual-fuel Range
Page 33
... burner size. Dacor's Smart Flame™ feature reduces the flame under the grate fingers to minimum flame, observing the flame as the knob turns. On the display, touch MENU > BAKE. BAKE and the preheating temp appear on the display. 6. The oven's heating elements turns off , wait 5 minutes for gas to the range at the power source. 4. Turn the knob from max to increase grate life. If the range is steady and quiet, with important safety, service, and warranty...
... burner size. Dacor's Smart Flame™ feature reduces the flame under the grate fingers to minimum flame, observing the flame as the knob turns. On the display, touch MENU > BAKE. BAKE and the preheating temp appear on the display. 6. The oven's heating elements turns off , wait 5 minutes for gas to the range at the power source. 4. Turn the knob from max to increase grate life. If the range is steady and quiet, with important safety, service, and warranty...

Installation Instruction - Dual-fuel Range
Page 34
... part of the range. FF Was the plastic coating been peeled off power to ensure that the installation was overlooked. Turn off the outside of the cutout. 4. Push the range back into place, being sure to the range at the circuit breaker or fuse box. 3. Open the gas-supply valve. Turn on -line or the warranty card (see the User Manual) completed and mailed? 34 English Installation Instructions Moving the Range For Service...
... part of the range. FF Was the plastic coating been peeled off power to ensure that the installation was overlooked. Turn off the outside of the cutout. 4. Push the range back into place, being sure to the range at the circuit breaker or fuse box. 3. Open the gas-supply valve. Turn on -line or the warranty card (see the User Manual) completed and mailed? 34 English Installation Instructions Moving the Range For Service...

Specification - 36" Epicure Dual-Fuel Range
Page 1
... & HALOGEN GENERAL PROPERTI ES OVEN CAPACITY (CUBIC FEET) COOKING MODES O V E N PE R F O R M A N C E BAKE ELEMENT BROIL ELEMENT CONVECTION ELEMENT B U R N E R PE R F O R M A N C E TOTAL NUMBER OF COOKTOP BURNERS LEFT FRONT (BTU) LEFT REAR (BTU) CENTER FRONT (BTU) CENTER REAR (BTU) RIGHT FRONT (BTU) RIGHT REAR (BTU) SEALED BURNERS PERMA-FLAME™ (AUTO RE-IGNITION) A D D I T I O N A L MO D E S KEEP WARM PROOF TEMPERATURE PROBE DEHYDRATE SABBATH CONTROL FEATURES LED (WHITE) NUMBER OF KNOBS CONTROL METHOD ILLUMINA™ BURNER KNOBS HIGHLIGHTING COLOR CLOCK DELAY START KITCHEN TIMER TIME OF...
... & HALOGEN GENERAL PROPERTI ES OVEN CAPACITY (CUBIC FEET) COOKING MODES O V E N PE R F O R M A N C E BAKE ELEMENT BROIL ELEMENT CONVECTION ELEMENT B U R N E R PE R F O R M A N C E TOTAL NUMBER OF COOKTOP BURNERS LEFT FRONT (BTU) LEFT REAR (BTU) CENTER FRONT (BTU) CENTER REAR (BTU) RIGHT FRONT (BTU) RIGHT REAR (BTU) SEALED BURNERS PERMA-FLAME™ (AUTO RE-IGNITION) A D D I T I O N A L MO D E S KEEP WARM PROOF TEMPERATURE PROBE DEHYDRATE SABBATH CONTROL FEATURES LED (WHITE) NUMBER OF KNOBS CONTROL METHOD ILLUMINA™ BURNER KNOBS HIGHLIGHTING COLOR CLOCK DELAY START KITCHEN TIMER TIME OF...


