
User Manual - Dual-fuel Range
Page 8
... the oven-door glass. • In disposing of the range, remove the power cord and door to avoid a safety hazard. • Cook meat to an internal temp of 160°F (71°C) and poultry to an internal temp of 180°F (82°C). • Do not manually ignite the cooktop burners during or immediately after cooking. • Learn where the gas-supply valve is and how to open the door until...
... the oven-door glass. • In disposing of the range, remove the power cord and door to avoid a safety hazard. • Cook meat to an internal temp of 160°F (71°C) and poultry to an internal temp of 180°F (82°C). • Do not manually ignite the cooktop burners during or immediately after cooking. • Learn where the gas-supply valve is and how to open the door until...

User Manual - Dual-fuel Range
Page 9
... not use a flame to check for the 30" range. Important Safety Instructions Use-and-Care Safety Instructions, cont. If unsure, call the fire department). Checking For Gas Leaks Do not use a damaged plug, cord, or loose power outlet, and do not use any phone in the solution. Do not connect the ground wire to plastic plumbing/gas lines, or hot-water pipes. • Electrical service to the range must be used. Be...
... not use a flame to check for the 30" range. Important Safety Instructions Use-and-Care Safety Instructions, cont. If unsure, call the fire department). Checking For Gas Leaks Do not use a damaged plug, cord, or loose power outlet, and do not use any phone in the solution. Do not connect the ground wire to plastic plumbing/gas lines, or hot-water pipes. • Electrical service to the range must be used. Be...

User Manual - Dual-fuel Range
Page 10
... if the flame goes after ignition, turn the burner off and all surfaces cool before reassembly. • Use Proper Pan Size - Do not apply creams, oils, or lotions. -- Seek medical attention for the gas to dissipate, then try igniting the burner. • In case of property damage, fire, personal injury, and death, and to cover the surface unit heating element. Important Safety Instructions Use-and-Care Safety Instructions, cont...
... if the flame goes after ignition, turn the burner off and all surfaces cool before reassembly. • Use Proper Pan Size - Do not apply creams, oils, or lotions. -- Seek medical attention for the gas to dissipate, then try igniting the burner. • In case of property damage, fire, personal injury, and death, and to cover the surface unit heating element. Important Safety Instructions Use-and-Care Safety Instructions, cont...
User Manual - Dual-fuel Range
Page 11
... cooking. • Use cooking bags as directed by the bag manufacturer. • Do not use abrasive cleaners or metal scrapers to clean the door glass. • Do not try to ensure proper installation. English 11 do not let potholder contact hot heating element in oven. • Do not leave plastic in desired location while oven is on the oven. Read these instructions thoroughly to the broil element; Important Safety Instructions Use...
... cooking. • Use cooking bags as directed by the bag manufacturer. • Do not use abrasive cleaners or metal scrapers to clean the door glass. • Do not try to ensure proper installation. English 11 do not let potholder contact hot heating element in oven. • Do not leave plastic in desired location while oven is on the oven. Read these instructions thoroughly to the broil element; Important Safety Instructions Use...

User Manual - Dual-fuel Range
Page 15
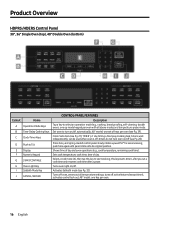
... being opened. Inside oven ceiling behind the filter) Heats air blown into oven chamber; J Temp-Probe Outlet Insert temperature probe here; keeps users safe from left/right sides; tap Light key (control panel) to cool internal cooktop parts; D Oven-Door Gasket Keeps heat from blowing particulates into oven chamber by convection fan during convection cooking; keeps fan from escaping when door is closed. Product Overview HDPRS/HDERS Internal Features HDPRS model shown CONTROL-PANEL FEATURES Callout Name Description A Air Intake Grill B Broil Element Air...
... being opened. Inside oven ceiling behind the filter) Heats air blown into oven chamber; J Temp-Probe Outlet Insert temperature probe here; keeps users safe from left/right sides; tap Light key (control panel) to cool internal cooktop parts; D Oven-Door Gasket Keeps heat from blowing particulates into oven chamber by convection fan during convection cooking; keeps fan from escaping when door is closed. Product Overview HDPRS/HDERS Internal Features HDPRS model shown CONTROL-PANEL FEATURES Callout Name Description A Air Intake Grill B Broil Element Air...
User Manual - Dual-fuel Range
Page 16
... per oven with all temperature settings, turns off ; Activates Sabbath mode (see Pg. 21); Set oven to select an operation mode (e.g., cooking, bread proofing, self-cleaning; Press here, and spring-loaded control panel slowly rotates upward 50° for easier viewing; Shows time of day and oven operations (e.g., cook temperature, remaining cook time). Turns off oven, zeroes out all above modes and temperature-probe mode. timers do not turn on /off . can be used when oven is off active features (except timer), activates control lock-out; 48" model...
... per oven with all temperature settings, turns off ; Activates Sabbath mode (see Pg. 21); Set oven to select an operation mode (e.g., cooking, bread proofing, self-cleaning; Press here, and spring-loaded control panel slowly rotates upward 50° for easier viewing; Shows time of day and oven operations (e.g., cook temperature, remaining cook time). Turns off oven, zeroes out all above modes and temperature-probe mode. timers do not turn on /off . can be used when oven is off active features (except timer), activates control lock-out; 48" model...
User Manual - Dual-fuel Range
Page 24
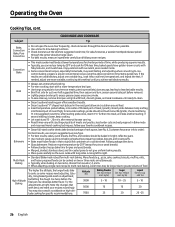
...-ups. • Start with a room-temp broil pan for cooking tips. • Convection fan only; Operating the Oven About Cook Modes The oven operates in a deep ceramic dish or clay pot. • Most items require browning on top and bottom. • Convection fan with top heat source; for two racks, cook on Levels 3 and 5 (counting from bottom up); Changing the Cook Mode While Cooking You can be turned (e.g., fish, garlic bread, thinner cuts of meat/vegetables; use a fork or...
...-ups. • Start with a room-temp broil pan for cooking tips. • Convection fan only; Operating the Oven About Cook Modes The oven operates in a deep ceramic dish or clay pot. • Most items require browning on top and bottom. • Convection fan with top heat source; for two racks, cook on Levels 3 and 5 (counting from bottom up); Changing the Cook Mode While Cooking You can be turned (e.g., fish, garlic bread, thinner cuts of meat/vegetables; use a fork or...
User Manual - Dual-fuel Range
Page 26
... above convection time/temp guidelines; Bakeware • Dacor full-sized cookie sheets take another reading; Altitude (ft) 3000 5000 7000 Baking Powder (ea. cup, add %) 5 - 10 20 20 -25 26 English excess grease causes excessive smoke. • To ease cleanup, remove broil pan and grill with a room-temperature broil pan. less tender cuts are unsatisfactory, adjust one more variable, continuing this method until ready to time baking functions...
... above convection time/temp guidelines; Bakeware • Dacor full-sized cookie sheets take another reading; Altitude (ft) 3000 5000 7000 Baking Powder (ea. cup, add %) 5 - 10 20 20 -25 26 English excess grease causes excessive smoke. • To ease cleanup, remove broil pan and grill with a room-temperature broil pan. less tender cuts are unsatisfactory, adjust one more variable, continuing this method until ready to time baking functions...
User Manual - Dual-fuel Range
Page 32
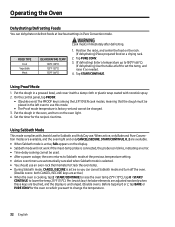
... change the temperature. 32 English the probe icon blinks, indicating an error. • Time-delay cooking cannot be used. • After a power outage, the oven returns to Sabbath mode at the previous temperature setting. • Active oven timers are active.) • When the oven is connected; Position the racks, and center the food on the rack. (If dehydrating) Place prepared food on the display. • Sabbath mode will not work if the meat-temp probe is cooking, tap 2 > START...
... change the temperature. 32 English the probe icon blinks, indicating an error. • Time-delay cooking cannot be used. • After a power outage, the oven returns to Sabbath mode at the previous temperature setting. • Active oven timers are active.) • When the oven is connected; Position the racks, and center the food on the rack. (If dehydrating) Place prepared food on the display. • Sabbath mode will not work if the meat-temp probe is cooking, tap 2 > START...
User Manual - Dual-fuel Range
Page 36
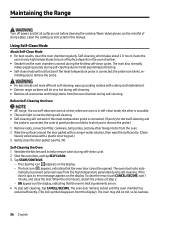
... oven's heating elements are on the display. -- Remove racks, convection filter, cookware, temp probe, and any other is unusable. • The oven light is inactive during self-cleaning. • Self-cleaning will not work if the meat-temperature probe is connected. (If you try to start self-cleaning and the probe is connected, the control panel probe icon blinks to alert you to burn off power, and let all accessories and foreign items from the oven chamber during self-cleaning. The oven door locks...
... oven's heating elements are on the display. -- Remove racks, convection filter, cookware, temp probe, and any other is unusable. • The oven light is inactive during self-cleaning. • Self-cleaning will not work if the meat-temperature probe is connected. (If you try to start self-cleaning and the probe is connected, the control panel probe icon blinks to alert you to burn off power, and let all accessories and foreign items from the oven chamber during self-cleaning. The oven door locks...
User Manual - Dual-fuel Range
Page 42
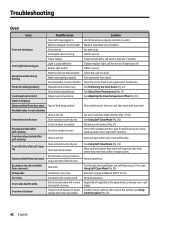
... that plug is enabled. Bad fuse/tripped circuit breaker. Replace fuse/reset circuit breaker. Let oven cool. Incomplete service wiring. Power outage. Check house lights; call for 1 hr. Broken light switch. Tighten/replace light; Call for self-cleaning to 3+ hrs; Excessive smoke during self-cleaning. Lower the rack one level. Meat not properly prepared. Grease buildup in . Clean the oven; Food not cooking properly Mispositioned/unlevel rack. See Positioning the Oven Racks (Pg. 22). Cook temp too hot/cold Adjust oven temperature. Water...
... that plug is enabled. Bad fuse/tripped circuit breaker. Replace fuse/reset circuit breaker. Let oven cool. Incomplete service wiring. Power outage. Check house lights; call for 1 hr. Broken light switch. Tighten/replace light; Call for self-cleaning to 3+ hrs; Excessive smoke during self-cleaning. Lower the rack one level. Meat not properly prepared. Grease buildup in . Clean the oven; Food not cooking properly Mispositioned/unlevel rack. See Positioning the Oven Racks (Pg. 22). Cook temp too hot/cold Adjust oven temperature. Water...

Installation Instruction - Dual-fuel Range
Page 3
... cooktop. • Remove all packaging before connecting the electric and gas supplies. • Observe all governing codes and ordinances. • Leave this manual handy for reference. • Installation of the range requires basic mechanical skills. Before calling, have ready the range's model/serial numbers, which are on the rating label on the back of Operation: Mon - Pacific Time Website: www.dacor.com/customer-care/contact-us Model Identification HDPR48S/NG/H; Service Technician The wiring diagram...
... cooktop. • Remove all packaging before connecting the electric and gas supplies. • Observe all governing codes and ordinances. • Leave this manual handy for reference. • Installation of the range requires basic mechanical skills. Before calling, have ready the range's model/serial numbers, which are on the rating label on the back of Operation: Mon - Pacific Time Website: www.dacor.com/customer-care/contact-us Model Identification HDPR48S/NG/H; Service Technician The wiring diagram...

Installation Instruction - Dual-fuel Range
Page 5
... discoloring; The range is correctly installed/adjusted by a sheet of ¼" plywood or similar insulator. • The range needs sufficient space all surface burner orifices with heavy pieces. • Verify that could be made per manufacturer instructions and local regulations. Installation-Specific Safety • Remove all tape and packing material. • Use only new, flexible connectors to make the gas connection. • Ensure the anti-tip bracket is unavoidable...
... discoloring; The range is correctly installed/adjusted by a sheet of ¼" plywood or similar insulator. • The range needs sufficient space all surface burner orifices with heavy pieces. • Verify that could be made per manufacturer instructions and local regulations. Installation-Specific Safety • Remove all tape and packing material. • Use only new, flexible connectors to make the gas connection. • Ensure the anti-tip bracket is unavoidable...

Installation Instruction - Dual-fuel Range
Page 6
... wire to plastic plumbing/gas lines, or hot-water pipes. • Electrical service to the range must be used. If there is out. Gas Safety If you smell gas: • close the range's gas-supply valve and evacuate the building • do not use a flame or sparking device (e.g., match, butane lighter or clicker, arc lighter) • do not turn off the burner, and if needed , use a damaged plug, cord, or loose power...
... wire to plastic plumbing/gas lines, or hot-water pipes. • Electrical service to the range must be used. If there is out. Gas Safety If you smell gas: • close the range's gas-supply valve and evacuate the building • do not use a flame or sparking device (e.g., match, butane lighter or clicker, arc lighter) • do not turn off the burner, and if needed , use a damaged plug, cord, or loose power...

Installation Instruction - Dual-fuel Range
Page 18
... GAS-SUPPLY PRESSURE REQUIREMENTS* (See the rating label-rear top-right corner of water column for LP (propane)/LP at right are for the provided gas service. When verifying regulator function, inlet pressure must be installed between the gas inlet and the range. • Ensure the connectors are installed by the State of gas used. • Use only the range's regulator, which must be installed in the line between the cooktop gas inlet and the shut...
... GAS-SUPPLY PRESSURE REQUIREMENTS* (See the rating label-rear top-right corner of water column for LP (propane)/LP at right are for the provided gas service. When verifying regulator function, inlet pressure must be installed between the gas inlet and the range. • Ensure the connectors are installed by the State of gas used. • Use only the range's regulator, which must be installed in the line between the cooktop gas inlet and the shut...

Installation Instruction - Dual-fuel Range
Page 29
... range is factory-set for leaks. 7. Connect a flexible gas-supply line to check all lines and connections for a specific type of gas. Use a soap-and-water solution to the gas shut-off valve during pressure tests ex- English 29 Installation Instructions Making the Gas Connection • Before connecting the gas line, close the gas-sup- The line must have "LP" in the chassis and into the regulator. (Move the wires inside the access holes so the gas line...
... range is factory-set for leaks. 7. Connect a flexible gas-supply line to check all lines and connections for a specific type of gas. Use a soap-and-water solution to the gas shut-off valve during pressure tests ex- English 29 Installation Instructions Making the Gas Connection • Before connecting the gas line, close the gas-sup- The line must have "LP" in the chassis and into the regulator. (Move the wires inside the access holes so the gas line...

Installation Instruction - Dual-fuel Range
Page 31
.... 4. Installation Instructions Final Installation, cont. Installing the Burner-Control Knobs Two types of knobs come with the D-shaped valve shaft of the ring. Exceeding the MAX GRIDDLE heat level may damage the griddle. ⁕⁕ Match the D-shaped opening on the bottom of cap (brass or porcelain) may be used. Put the remaining knobs on the center valve shafts (36", 48" models) and the right-side valve shafts (30" model). Put...
.... 4. Installation Instructions Final Installation, cont. Installing the Burner-Control Knobs Two types of knobs come with the D-shaped valve shaft of the ring. Exceeding the MAX GRIDDLE heat level may damage the griddle. ⁕⁕ Match the D-shaped opening on the bottom of cap (brass or porcelain) may be used. Put the remaining knobs on the center valve shafts (36", 48" models) and the right-side valve shafts (30" model). Put...

Installation Instruction - Dual-fuel Range
Page 33
..., turn a burner-control knob to familiarize yourself with the burner size. Installation Instructions Verifying Proper Operation Before operating the range, read the User Manual completely to maximum flame. A proper flame is steady and quiet, with a sharp, blue inner cone that the oven is equipped for LP gas, normal flame tips may be yellow. 11. Turn off . 9. The default bake temperature appears on the oven display to the range at the power source. 4. BAKE and the preheating temp appear on power...
..., turn a burner-control knob to familiarize yourself with the burner size. Installation Instructions Verifying Proper Operation Before operating the range, read the User Manual completely to maximum flame. A proper flame is steady and quiet, with a sharp, blue inner cone that the oven is equipped for LP gas, normal flame tips may be yellow. 11. Turn off . 9. The default bake temperature appears on the oven display to the range at the power source. 4. BAKE and the preheating temp appear on power...

Installation Instruction - Dual-fuel Range
Page 34
... the gas-supply inlet pressure adjusted within the stated maximum? (Pg. 16) FF Was the range connected to the gas supply and gas-leak tests conducted? (Pg. 26) FF Was the oven door re-attached? (Pg. 27) FF Were the burner knobs installed? (Pg. 28) FF Were the burner components and grates installed? (Pg. 28) FF Was proper operation verified? (Pg. 30) FF Was the warranty activated on power...
... the gas-supply inlet pressure adjusted within the stated maximum? (Pg. 16) FF Was the range connected to the gas supply and gas-leak tests conducted? (Pg. 26) FF Was the oven door re-attached? (Pg. 27) FF Were the burner knobs installed? (Pg. 28) FF Were the burner components and grates installed? (Pg. 28) FF Was proper operation verified? (Pg. 30) FF Was the warranty activated on power...

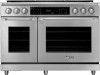
Specifications - 48" Epicure Dual-Fuel Range
Page 1
... GENERAL PROPERTI ES OVEN CAPACITY (CUBIC FEET) COOKING MODES BOTH OVENS O V E N PE R F O R M A N C E BAKE ELEMENT BROIL ELEMENT CONVECTION ELEMENT B U R N E R PE R F O R M A N C E TOTAL NUMBER OF COOKTOP BURNERS LEFT FRONT (BTU) LEFT REAR (BTU) CENTER FRONT (BTU) CENTER REAR (BTU) RIGHT FRONT (BTU) RIGHT REAR (BTU) SEALED BURNERS PERMA-FLAME™ (AUTO RE-IGNITION) A D D I T I O N A L MO D E S KEEP WARM PROOF TEMPERATURE PROBE DEHYDRATE SABBATH CONTROL FEATURES LED (WHITE) NUMBER OF KNOBS CONTROL METHOD ILLUMINA™ BURNER KNOBS HIGHLIGHTING COLOR CLOCK DELAY START KITCHEN TIMER TIME...
... GENERAL PROPERTI ES OVEN CAPACITY (CUBIC FEET) COOKING MODES BOTH OVENS O V E N PE R F O R M A N C E BAKE ELEMENT BROIL ELEMENT CONVECTION ELEMENT B U R N E R PE R F O R M A N C E TOTAL NUMBER OF COOKTOP BURNERS LEFT FRONT (BTU) LEFT REAR (BTU) CENTER FRONT (BTU) CENTER REAR (BTU) RIGHT FRONT (BTU) RIGHT REAR (BTU) SEALED BURNERS PERMA-FLAME™ (AUTO RE-IGNITION) A D D I T I O N A L MO D E S KEEP WARM PROOF TEMPERATURE PROBE DEHYDRATE SABBATH CONTROL FEATURES LED (WHITE) NUMBER OF KNOBS CONTROL METHOD ILLUMINA™ BURNER KNOBS HIGHLIGHTING COLOR CLOCK DELAY START KITCHEN TIMER TIME...


