
User Manual - Dual-fuel Range
Page 8
... the oven-door glass. • In disposing of the range, remove the power cord and door to avoid a safety hazard. • Cook meat to an internal temp of 160°F (71°C) and poultry to an internal temp of 180°F (82°C). • Do not manually ignite the cooktop burners during or immediately after cooking. • Learn where the gas-supply valve is and how to open the door until...
... the oven-door glass. • In disposing of the range, remove the power cord and door to avoid a safety hazard. • Cook meat to an internal temp of 160°F (71°C) and poultry to an internal temp of 180°F (82°C). • Do not manually ignite the cooktop burners during or immediately after cooking. • Learn where the gas-supply valve is and how to open the door until...

User Manual - Dual-fuel Range
Page 9
... leaks. Be sure your building • immediately call for the 30" range. Do not connect the ground wire to plastic plumbing/gas lines, or hot-water pipes. • Electrical service to reach the gas supplier, call the fire department). Important Safety Instructions Use-and-Care Safety Instructions, cont. If codes allow a separate ground wire, a qualified electrician should be inserted in their absence, the US National...
... leaks. Be sure your building • immediately call for the 30" range. Do not connect the ground wire to plastic plumbing/gas lines, or hot-water pipes. • Electrical service to reach the gas supplier, call the fire department). Important Safety Instructions Use-and-Care Safety Instructions, cont. If codes allow a separate ground wire, a qualified electrician should be inserted in their absence, the US National...

User Manual - Dual-fuel Range
Page 10
... after ignition, turn the burner off the burner before reassembly. • Use Proper Pan Size - Proper relationship of utensil to burner will expose a portion of the heating element to unintentional contact with the utensil, the handle of a utensil should only be flamed under an active ventilation hood. • Do not let burner flames extend beyond the base of the cookware. • When finished cooking, turn a burner-control knob past the ignition...
... after ignition, turn the burner off the burner before reassembly. • Use Proper Pan Size - Proper relationship of utensil to burner will expose a portion of the heating element to unintentional contact with the utensil, the handle of a utensil should only be flamed under an active ventilation hood. • Do not let burner flames extend beyond the base of the cookware. • When finished cooking, turn a burner-control knob past the ignition...
User Manual - Dual-fuel Range
Page 11
... the range during self-cleaning, and keep children away. • If the oven malfunctions during a power failure; Move birds to ensure proper installation. Oven Safety • Do not use the oven for non-cooking purposes (e.g., drying clothes, storage). • Do not spray water on the oven glass while the oven is on or still hot. • Do not clean the door gasket. • Do not cover/line any part...
... the range during self-cleaning, and keep children away. • If the oven malfunctions during a power failure; Move birds to ensure proper installation. Oven Safety • Do not use the oven for non-cooking purposes (e.g., drying clothes, storage). • Do not spray water on the oven glass while the oven is on or still hot. • Do not clean the door gasket. • Do not cover/line any part...

User Manual - Dual-fuel Range
Page 15
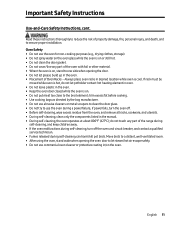
....) K Convection Fan (From behind glass panel; top heat source. J Temp-Probe Outlet Insert temperature probe here; double ovens: outlet is drawn through horizontal slot (not shown) below door and up within door, then out grill at top of door through this grill to turn lights on these supports; rear heat source. tap Light key (control panel) to cool internal cooktop parts; Product Overview HDPRS/HDERS Internal Features HDPRS model shown CONTROL-PANEL FEATURES Callout Name Description A Air Intake Grill B Broil Element Air is...
....) K Convection Fan (From behind glass panel; top heat source. J Temp-Probe Outlet Insert temperature probe here; double ovens: outlet is drawn through horizontal slot (not shown) below door and up within door, then out grill at top of door through this grill to turn lights on these supports; rear heat source. tap Light key (control panel) to cool internal cooktop parts; Product Overview HDPRS/HDERS Internal Features HDPRS model shown CONTROL-PANEL FEATURES Callout Name Description A Air Intake Grill B Broil Element Air is...
User Manual - Dual-fuel Range
Page 16
...Tilt E Display F Numeric Keypad G START/CONTINUE H Oven-Light Key I Sabbath Mode Key J CANCEL/SECURE CONTROL-PANEL FEATURES Description Tap a key to start cooking; timers work independently; Set oven to turn oven on /off active features (except timer), activates control lock-out; 48" model: one set a cook time and resumes cook time after a pause. can be used when oven is off oven, zeroes out all above modes and temperature-probe mode. this key to select an operation mode (e.g., cooking, bread proofing, self-cleaning; double ovens: one op-mode keypad per oven (see Pg...
...Tilt E Display F Numeric Keypad G START/CONTINUE H Oven-Light Key I Sabbath Mode Key J CANCEL/SECURE CONTROL-PANEL FEATURES Description Tap a key to start cooking; timers work independently; Set oven to turn oven on /off active features (except timer), activates control lock-out; 48" model: one set a cook time and resumes cook time after a pause. can be used when oven is off oven, zeroes out all above modes and temperature-probe mode. this key to select an operation mode (e.g., cooking, bread proofing, self-cleaning; double ovens: one op-mode keypad per oven (see Pg...
User Manual - Dual-fuel Range
Page 24
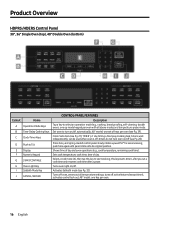
Cook Mode Convection Bake Convection Broil Pure Convection HDPRS-HDERS OVEN COOK MODES Description • Convection fan with top and bottom heat sources; You may need to prevent sticking; Bottom heat source; for food baked in a deep ceramic dish or clay pot. • Most items require browning on multiple racks. • Good for three racks, use oven timers to set cook time. • Avoid opening oven door to turn/remove meat; to greater mass of food in oven. • Uniform air circulation allows...
Cook Mode Convection Bake Convection Broil Pure Convection HDPRS-HDERS OVEN COOK MODES Description • Convection fan with top and bottom heat sources; You may need to prevent sticking; Bottom heat source; for food baked in a deep ceramic dish or clay pot. • Most items require browning on multiple racks. • Good for three racks, use oven timers to set cook time. • Avoid opening oven door to turn/remove meat; to greater mass of food in oven. • Uniform air circulation allows...
User Manual - Dual-fuel Range
Page 26
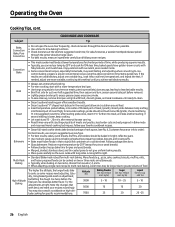
... to time baking functions. • Check doneness at the shortest suggested time, then season and turn /remove meats; follow proven recipes. Try the adjustments at lower temperatures for shorter periods of time, while producing superior results. • Typically, you achieve satisfactory results. • Always set a timer when broiling. • For even cooking, start with a room-temperature broil pan. COOK MODE AND COOKWARE Subject Tip Bake, Convection Bake, Pure Convection • Do not open the oven door frequently...
... to time baking functions. • Check doneness at the shortest suggested time, then season and turn /remove meats; follow proven recipes. Try the adjustments at lower temperatures for shorter periods of time, while producing superior results. • Typically, you achieve satisfactory results. • Always set a timer when broiling. • For even cooking, start with a room-temperature broil pan. COOK MODE AND COOKWARE Subject Tip Bake, Convection Bake, Pure Convection • Do not open the oven door frequently...
User Manual - Dual-fuel Range
Page 32
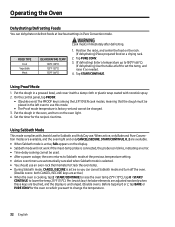
...) Enter a temperature up to 150°F (66°C). (If dehydrating) Use the table at low heat settings in a greased bowl, and cover it as needed. 4. the probe icon blinks, indicating an error. • Time-delay cooking cannot be changed. 3. tap 0 > START/ CONTINUE to lower the temp 25°F (15°C). Set the timer for Sabbath and Holy Day use an oven-rack thermometer to track the oven temp. • During Sabbath mode, CANCEL/SECURE...
...) Enter a temperature up to 150°F (66°C). (If dehydrating) Use the table at low heat settings in a greased bowl, and cover it as needed. 4. the probe icon blinks, indicating an error. • Time-delay cooking cannot be changed. 3. tap 0 > START/ CONTINUE to lower the temp 25°F (15°C). Set the timer for Sabbath and Holy Day use an oven-rack thermometer to track the oven temp. • During Sabbath mode, CANCEL/SECURE...
User Manual - Dual-fuel Range
Page 36
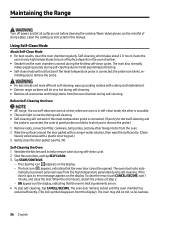
... temperature generated during self-cleaning. Shut the oven door, and tap SELF CLEAN. 3. The oven may still be hot, so be mindful of sharp edges. Maintaining the Range Turn off surface deposits in the oven chamber. • Smoke from the oven. 2. minding you to prevent personal injury from the oven chamber during self-clean cycle. 2. The lock icon ( ) appears, indicating that the oven's heating elements are on the display. matically to remove the probe.) 1. Clean the cooktop as instructed...
... temperature generated during self-cleaning. Shut the oven door, and tap SELF CLEAN. 3. The oven may still be hot, so be mindful of sharp edges. Maintaining the Range Turn off surface deposits in the oven chamber. • Smoke from the oven. 2. minding you to prevent personal injury from the oven chamber during self-clean cycle. 2. The lock icon ( ) appears, indicating that the oven's heating elements are on the display. matically to remove the probe.) 1. Clean the cooktop as instructed...
User Manual - Dual-fuel Range
Page 42
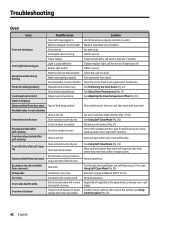
... after self-cleaning Oven is dripping Steam emitted from oven vent. Tripped circuit breaker of food in oven Apply dab of food being cooked Not a malfunction; Oven will open when oven cools sufficiently. ventilate kitchen; Normal when using convection. New oven. Oven racks hard to broil element. Chromes racks were left in oven. Oven not turning on Light is properly inserted in . Oven temp improperly set . Control lockout is locked. wait for service. ing Oven too heavily soiled. Trim excess fat from oven vent. Large...
... after self-cleaning Oven is dripping Steam emitted from oven vent. Tripped circuit breaker of food in oven Apply dab of food being cooked Not a malfunction; Oven will open when oven cools sufficiently. ventilate kitchen; Normal when using convection. New oven. Oven racks hard to broil element. Chromes racks were left in oven. Oven not turning on Light is properly inserted in . Oven temp improperly set . Control lockout is locked. wait for service. ing Oven too heavily soiled. Trim excess fat from oven vent. Large...

Installation Instruction - Dual-fuel Range
Page 3
... manual thoroughly before installing the cooktop. • Remove all packaging before connecting the electric and gas supplies. • Observe all governing codes and ordinances. • Leave this manual handy for reference. • Installation of the rangetop. Owner • As with the owner, and write the unit's model/serial numbers inside of the range requires basic mechanical skills. Customer-Assurance Information To resolve questions and installation issues, contact your Dacor dealer or Dacor Customer...
... manual thoroughly before installing the cooktop. • Remove all packaging before connecting the electric and gas supplies. • Observe all governing codes and ordinances. • Leave this manual handy for reference. • Installation of the rangetop. Owner • As with the owner, and write the unit's model/serial numbers inside of the range requires basic mechanical skills. Customer-Assurance Information To resolve questions and installation issues, contact your Dacor dealer or Dacor Customer...

Installation Instruction - Dual-fuel Range
Page 5
... gas (natural or LP) you will use. For use-and-care-related safety instructions, including general use LP gas, the installer must replace all surface burner orifices with heavy pieces. • Verify that no parts came loose or were damaged during shipping. • Ensure the range is correctly installed/adjusted by two or more beyond the cabinetry. These adjustments must be level and able to support the range (48": 635 lbs.); The installer...
... gas (natural or LP) you will use. For use-and-care-related safety instructions, including general use LP gas, the installer must replace all surface burner orifices with heavy pieces. • Verify that no parts came loose or were damaged during shipping. • Ensure the range is correctly installed/adjusted by two or more beyond the cabinetry. These adjustments must be level and able to support the range (48": 635 lbs.); The installer...

Installation Instruction - Dual-fuel Range
Page 6
... cooktop burners. • Regularly clean the oven vents. • Do not use a towel or other bulky cloth as a pot holder. • (Grease fires) Turn off the burner, and if needed , use a damaged plug, cord, or loose power outlet, and do not turn off the oven. A time-delay fuse or circuit breaker should determine its path. Do not connect the ground wire to plastic plumbing/gas lines, or hot-water pipes. • Electrical service to the range...
... cooktop burners. • Regularly clean the oven vents. • Do not use a towel or other bulky cloth as a pot holder. • (Grease fires) Turn off the burner, and if needed , use a damaged plug, cord, or loose power outlet, and do not turn off the oven. A time-delay fuse or circuit breaker should determine its path. Do not connect the ground wire to plastic plumbing/gas lines, or hot-water pipes. • Electrical service to the range...

Installation Instruction - Dual-fuel Range
Page 18
... operating (manifold) pressure as given. • The regulator inlet receives a 3/4" gas line. (The range ships with a 1/2"-to the range. • If using a flexible gas connector, multiple lines must not be connected in the line between the cooktop gas inlet and the shut-off valve. • An external, manual shut-off valve must be at right are installed by a qualified installer. • For safety's sake, use only new flexible connectors. MINIMUM GAS-SUPPLY PRESSURE REQUIREMENTS* (See the rating...
... operating (manifold) pressure as given. • The regulator inlet receives a 3/4" gas line. (The range ships with a 1/2"-to the range. • If using a flexible gas connector, multiple lines must not be connected in the line between the cooktop gas inlet and the shut-off valve. • An external, manual shut-off valve must be at right are installed by a qualified installer. • For safety's sake, use only new flexible connectors. MINIMUM GAS-SUPPLY PRESSURE REQUIREMENTS* (See the rating...

Installation Instruction - Dual-fuel Range
Page 29
... the gas shut-off valve, and turn off power to the gas shut-off , open the gas-supply valve. 6. ceeding 1/2 psi (3.5 kPa). • The range must be disconnected from the gas-supply piping during any pressure testing at the circuit breaker or fuse box. • Do not apply excessive pressure when tightening gas connections and fittings. • Do not use a flame to check all lines and connections for leaks. 7. Installation Instructions Making the Gas Connection • Before connecting the gas line...
... the gas shut-off valve, and turn off power to the gas shut-off , open the gas-supply valve. 6. ceeding 1/2 psi (3.5 kPa). • The range must be disconnected from the gas-supply piping during any pressure testing at the circuit breaker or fuse box. • Do not apply excessive pressure when tightening gas connections and fittings. • Do not use a flame to check all lines and connections for leaks. 7. Installation Instructions Making the Gas Connection • Before connecting the gas line...

Installation Instruction - Dual-fuel Range
Page 31
... the maximum heat setting for HDERS Models Assembling Cooktop Components Do not operate the cooktop unless all burner components are properly assembled. Install the burner head so the burner head's locating tab is placed. Either style of knobs come with the range. Installation Instructions Final Installation, cont. Unpackage the burner components. 2. The knobs for the center burners (36", 48") and right-side burners (30") feature the words "MAX GRIDDLE," which the griddle is in...
... the maximum heat setting for HDERS Models Assembling Cooktop Components Do not operate the cooktop unless all burner components are properly assembled. Install the burner head so the burner head's locating tab is placed. Either style of knobs come with the range. Installation Instructions Final Installation, cont. Unpackage the burner components. 2. The knobs for the center burners (36", 48") and right-side burners (30") feature the words "MAX GRIDDLE," which the griddle is in...

Installation Instruction - Dual-fuel Range
Page 33
..." models). Turn the knob from max to familiarize yourself with the burner size. Proper Flame If the burner does not ignite in length with important safety, service, and warranty information. 1. Installation Instructions Verifying Proper Operation Before operating the range, read the User Manual completely to minimum flame, observing the flame as the knob turns. Open the gas-supply valve, and verify that varies in 4 seconds, turn a burner-control knob to verify that all burner components are no gas leaks. 3. Turn on the oven display...
..." models). Turn the knob from max to familiarize yourself with the burner size. Proper Flame If the burner does not ignite in length with important safety, service, and warranty information. 1. Installation Instructions Verifying Proper Operation Before operating the range, read the User Manual completely to minimum flame, observing the flame as the knob turns. Open the gas-supply valve, and verify that varies in 4 seconds, turn a burner-control knob to verify that all burner components are no gas leaks. 3. Turn on the oven display...

Installation Instruction - Dual-fuel Range
Page 34
... the oven door re-attached? (Pg. 27) FF Were the burner knobs installed? (Pg. 28) FF Were the burner components and grates installed? (Pg. 28) FF Was proper operation verified? (Pg. 30) FF Was the warranty activated on power to the range at the circuit breaker or fuse box. 3. Close the gas-supply valve. 2. Turn on -line or the warranty card (see the User Manual) completed and mailed? 34 English Installation Checklist Installer...
... the oven door re-attached? (Pg. 27) FF Were the burner knobs installed? (Pg. 28) FF Were the burner components and grates installed? (Pg. 28) FF Was proper operation verified? (Pg. 30) FF Was the warranty activated on power to the range at the circuit breaker or fuse box. 3. Close the gas-supply valve. 2. Turn on -line or the warranty card (see the User Manual) completed and mailed? 34 English Installation Checklist Installer...
Specification - 30" Pro Dual-Fuel Range
Page 1
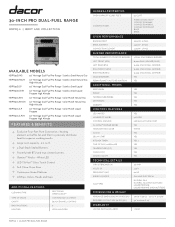
... GENERAL PROPERTI ES OVEN CAPACITY (CUBIC FEET) COOKING MODES O V E N PE R F O R M A N C E BAKE ELEMENT BROIL ELEMENT CONVECTION ELEMENT B U R N E R PE R F O R M A N C E TOTAL NUMBER OF COOKTOP BURNERS LEFT FRONT (BTU) LEFT REAR (BTU) RIGHT FRONT (BTU) RIGHT REAR (BTU) SEALED BURNERS PERMA-FLAME™ (AUTO RE-IGNITION) A D D I T I O N A L MO D E S KEEP WARM PROOF TEMPERATURE PROBE DEHYDRATE SABBATH CONTROL FEATURES LED (WHITE) NUMBER OF KNOBS CONTROL METHOD ILLUMINA™ BURNER KNOBS HIGHLIGHTING COLOR CLOCK DELAY START KITCHEN TIMER TIME OF DAY (12 HR/24 HR) TEMPERATURE (F/C) CHILD LOCK...
... GENERAL PROPERTI ES OVEN CAPACITY (CUBIC FEET) COOKING MODES O V E N PE R F O R M A N C E BAKE ELEMENT BROIL ELEMENT CONVECTION ELEMENT B U R N E R PE R F O R M A N C E TOTAL NUMBER OF COOKTOP BURNERS LEFT FRONT (BTU) LEFT REAR (BTU) RIGHT FRONT (BTU) RIGHT REAR (BTU) SEALED BURNERS PERMA-FLAME™ (AUTO RE-IGNITION) A D D I T I O N A L MO D E S KEEP WARM PROOF TEMPERATURE PROBE DEHYDRATE SABBATH CONTROL FEATURES LED (WHITE) NUMBER OF KNOBS CONTROL METHOD ILLUMINA™ BURNER KNOBS HIGHLIGHTING COLOR CLOCK DELAY START KITCHEN TIMER TIME OF DAY (12 HR/24 HR) TEMPERATURE (F/C) CHILD LOCK...


