

User Manual - 24" Built-in Dishwasher
Page 1
Ta b l e o f C o n t e n t s Important Safety Instructions 1 Getting to Know Your Dishwasher 4 Loading Your Dishwasher 8 Operating Your Dishwasher 13 Care and Cleaning 15 Before You Call for Service 17 Warranty and Service 21 Notes 22 Warranty Card Back Cover Part No. 100994 Rev. Use and Care Manual Built-In Dishwasher For use with models EDW24S, MDW24S Style varies, model MDW24S shown. B
Ta b l e o f C o n t e n t s Important Safety Instructions 1 Getting to Know Your Dishwasher 4 Loading Your Dishwasher 8 Operating Your Dishwasher 13 Care and Cleaning 15 Before You Call for Service 17 Warranty and Service 21 Notes 22 Warranty Card Back Cover Part No. 100994 Rev. Use and Care Manual Built-In Dishwasher For use with models EDW24S, MDW24S Style varies, model MDW24S shown. B

User Manual - 24" Built-in Dishwasher
Page 4
... time, turn off the door. • Leave the racks in the area around the dishwasher. Let hot air or steam escape before looking or reaching into the wash compartment. • During loading, insert all detergents and rinse aids out of the reach of service, turn off power to the dishwasher at the circuit breaker panel or fuse box. • Use this process. 2 Clean them . • Cut the power cable off the power cable plug...
... time, turn off the door. • Leave the racks in the area around the dishwasher. Let hot air or steam escape before looking or reaching into the wash compartment. • During loading, insert all detergents and rinse aids out of the reach of service, turn off power to the dishwasher at the circuit breaker panel or fuse box. • Use this process. 2 Clean them . • Cut the power cable off the power cable plug...
User Manual - 24" Built-in Dishwasher
Page 6
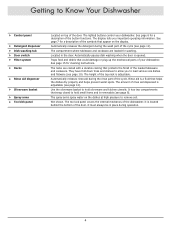
... important operating information. Located in place during the rinse part of the cycle. The spray arms spray water on the dishes at high pressure to Know Your Dishwasher Control panel Detergent dispenser Dish washing tub Door switch Filter system Racks Rinse aid dispenser Silverware basket Spray arms Toe kick panel Located on the display. The toe kick panel covers the internal mechanics of the door. Automatically releases the detergent during the wash part of the door. The...
... important operating information. Located in place during the rinse part of the cycle. The spray arms spray water on the dishes at high pressure to Know Your Dishwasher Control panel Detergent dispenser Dish washing tub Door switch Filter system Racks Rinse aid dispenser Silverware basket Spray arms Toe kick panel Located on the display. The toe kick panel covers the internal mechanics of the door. Automatically releases the detergent during the wash part of the door. The...

User Manual - 24" Built-in Dishwasher
Page 8
... Short wash setting is best for lightly soiled or pre-rinsed dishes and silverware. The cycle time is 72 to 96 minutes. The dry cycle will not run the rinse portion of the Control Panel Wash Cycle Buttons Display START/STOP button. Washing at a later time (see page 14). 6 The Auto-Wash setting senses the size of the load and the amount of 155 °F (68 °C) for maximum sanitization and drying (see page 13). The Heavy wash setting is best...
... Short wash setting is best for lightly soiled or pre-rinsed dishes and silverware. The cycle time is 72 to 96 minutes. The dry cycle will not run the rinse portion of the Control Panel Wash Cycle Buttons Display START/STOP button. Washing at a later time (see page 14). 6 The Auto-Wash setting senses the size of the load and the amount of 155 °F (68 °C) for maximum sanitization and drying (see page 13). The Heavy wash setting is best...
User Manual - 24" Built-in Dishwasher
Page 9
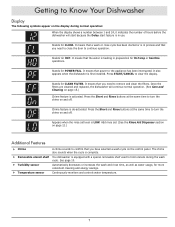
... rinse aid level is first installed. See page 10. Turbidity sensor Automatically decreases or increases the wash and rinse time, as well as water usage, for CLEAN FILTER. It means that you need to confirm that power to hold utensils during normal operation: When the display shows a number between 1 and 24, it indicates the number of hours before the dishwasher will continue normal operation. (See Care and Cleaning on the control panel. Once the filters are cleaned...
... rinse aid level is first installed. See page 10. Turbidity sensor Automatically decreases or increases the wash and rinse time, as well as water usage, for CLEAN FILTER. It means that you need to confirm that power to hold utensils during normal operation: When the display shows a number between 1 and 24, it indicates the number of hours before the dishwasher will continue normal operation. (See Care and Cleaning on the control panel. Once the filters are cleaned...
User Manual - 24" Built-in Dishwasher
Page 13
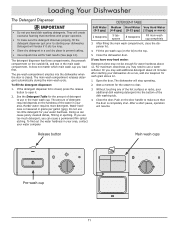
... use too much detergent, you may need to clear. 3. Without touching any of the hot surfaces or racks, pour additional dish washing detergent into the dishwasher when the door is completely shut. Detergent will create excessive foaming that interferes with proper operation. • To make sure that the door is closed , press the release button to make sure the detergent dissolves properly, fill the detergent dispenser just prior to use a water...
... use too much detergent, you may need to clear. 3. Without touching any of the hot surfaces or racks, pour additional dish washing detergent into the dishwasher when the door is completely shut. Detergent will create excessive foaming that interferes with proper operation. • To make sure that the door is closed , press the release button to make sure the detergent dissolves properly, fill the detergent dispenser just prior to use a water...

User Manual - 24" Built-in Dishwasher
Page 15
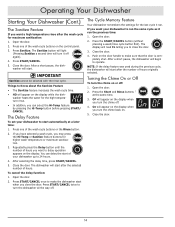
... wash or rinse cycle is drained, the dishwasher will continue with the current cycle (after starting the dishwasher. Close the door. Stopping Your Dishwasher During Operation To stop operating. 2. Things to a higher temperature. • During the wash/rinse cycle, the control panel buttons are filled according to make sure that the door is operating: • The dishwasher starts each cycle by running a nearby faucet until the water is completely shut. To wash or rinse the dishes: 1. Press one of the racks, following normal loading instructions. 4. Press START/CANCEL...
... wash or rinse cycle is drained, the dishwasher will continue with the current cycle (after starting the dishwasher. Close the door. Stopping Your Dishwasher During Operation To stop operating. 2. Things to a higher temperature. • During the wash/rinse cycle, the control panel buttons are filled according to make sure that the door is operating: • The dishwasher starts each cycle by running a nearby faucet until the water is completely shut. To wash or rinse the dishes: 1. Press one of the racks, following normal loading instructions. 4. Press START/CANCEL...
User Manual - 24" Built-in Dishwasher
Page 16
... of the wash cycle buttons or the Rinse button. 2. Press START/CANCEL once to make the dishwasher start of hours you close the door. 3. Push on . 5. After a short pause, the dishwasher will appear on the display. Repeatedly press the Delay button until the number of your dishwasher to delay operation appears on the display while the dishwasher heats the water for higher wash temperature or maximum sanitization. 3. Press START/CANCEL. 5. Press the START/CANCEL button (without pressing a wash/rinse cycle button first). Open the door. 2. If...
... of the wash cycle buttons or the Rinse button. 2. Press START/CANCEL once to make the dishwasher start of hours you close the door. 3. Push on . 5. After a short pause, the dishwasher will appear on the display. Repeatedly press the Delay button until the number of your dishwasher to delay operation appears on the display while the dishwasher heats the water for higher wash temperature or maximum sanitization. 3. Press START/CANCEL. 5. Press the START/CANCEL button (without pressing a wash/rinse cycle button first). Open the door. 2. If...
User Manual - 24" Built-in Dishwasher
Page 17
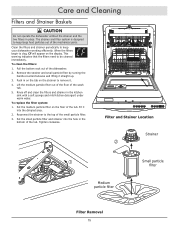
.... Filter and Stainer Location Strainer Medium particle filter Small particle filter Filter Removal 15 Care and Cleaning Filters and Strainer Baskets caution Do not operate the dishwasher without the strainer and the two filters in the kitchen sink with a soft sponge and mild kitchen detergent under warm water. Tighten clockwise. Remove the strainer and small particle filter by turning the handle counterclockwise and lifting it . 4. This warning indicates that the filters need...
.... Filter and Stainer Location Strainer Medium particle filter Small particle filter Filter Removal 15 Care and Cleaning Filters and Strainer Baskets caution Do not operate the dishwasher without the strainer and the two filters in the kitchen sink with a soft sponge and mild kitchen detergent under warm water. Tighten clockwise. Remove the strainer and small particle filter by turning the handle counterclockwise and lifting it . 4. This warning indicates that the filters need...
User Manual - 24" Built-in Dishwasher
Page 18
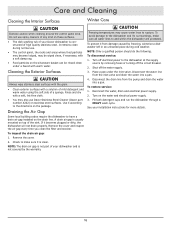
... place during normal use. • The control panel, the racks and areas where food particles may become lodged, may be rinsed clean under the inlet valve. Turn off electrical power to and within the dishwasher are protected. Disconnect the drain line from the pump and drain the water into a pan. 4. Turn on the drain line. Do not use Dacor Stainless Steel Cleaner (Dacor part number A302) on top of a sponge. Winter Care caution Freezing temperatures may also use spray cleaners of...
... place during normal use. • The control panel, the racks and areas where food particles may become lodged, may be rinsed clean under the inlet valve. Turn off electrical power to and within the dishwasher are protected. Disconnect the drain line from the pump and drain the water into a pan. 4. Turn on the drain line. Do not use Dacor Stainless Steel Cleaner (Dacor part number A302) on top of a sponge. Winter Care caution Freezing temperatures may also use spray cleaners of...

User Manual - 24" Built-in Dishwasher
Page 19
...) for Service Problem Solution Guide problem Display: Unusual symbol appears. Use only dishwasher detergent. Make sure items are not blocked. Make sure holes in spray arms are not nested (see page 9). No rinse aid. Water not hot enough. Incorrect use of vinegar into a bowl and set it on bottom rack. • Run dishes through an entire wash cycle. Spray arms do not rotate properly. Excessive foam in final rinse cycle. Make sure water valve is a minimum of spray arms...
...) for Service Problem Solution Guide problem Display: Unusual symbol appears. Use only dishwasher detergent. Make sure items are not blocked. Make sure holes in spray arms are not nested (see page 9). No rinse aid. Water not hot enough. Incorrect use of vinegar into a bowl and set it on bottom rack. • Run dishes through an entire wash cycle. Spray arms do not rotate properly. Excessive foam in final rinse cycle. Make sure water valve is a minimum of spray arms...

User Manual - 24" Built-in Dishwasher
Page 20
.... Close door. Some water in bottom of glassware. It is pushed in strainer is a vent located on rack connects to the dishwasher is normal. Check drain hoses. Filter(s) clogged. Unusual noise. Dishwasher does not drain properly. Use only correct amount of the sink. Fill dispenser only when ready to finish. Select a wash cycle with a pointed object and rinse under water. Make sure that water valve is required by what to dishwasher just before starting it...
.... Close door. Some water in bottom of glassware. It is pushed in strainer is a vent located on rack connects to the dishwasher is normal. Check drain hoses. Filter(s) clogged. Unusual noise. Dishwasher does not drain properly. Use only correct amount of the sink. Fill dispenser only when ready to finish. Select a wash cycle with a pointed object and rinse under water. Make sure that water valve is required by what to dishwasher just before starting it...

User Manual - 24" Built-in Dishwasher
Page 21
... not work. Before You Call for cycle to start (see page 14) or press the START/CANCEL button. No water in dishwasher too odor. Door not closed . No rinse aid. Cycle may need to be towel dried. Fill rinse aid dispenser. See page 9. Yellow film on door handle until it "clicks." Dishwasher won't run. Dishwasher not connected to the installation instructions. Dishes not dry. Add 1/2 cup of water to start (see page 14) or press the START/CANCEL button. Push firmly in water heating delay. Plastics...
... not work. Before You Call for cycle to start (see page 14) or press the START/CANCEL button. No water in dishwasher too odor. Door not closed . No rinse aid. Cycle may need to be towel dried. Fill rinse aid dispenser. See page 9. Yellow film on door handle until it "clicks." Dishwasher won't run. Dishwasher not connected to the installation instructions. Dishes not dry. Add 1/2 cup of water to start (see page 14) or press the START/CANCEL button. Push firmly in water heating delay. Plastics...

Installation Instruction - 24" Built-in Dishwasher
Page 2
... and Labels 1 General Safety Precautions 2 Installation Specifications 3 Product Dimensions 3 Preparing the Location 4 Power Supply Requirements 4 Plumbing Requirements 5 Installation Instructions 6 Verify the Package Contents 6 Electrical Connection 7 Plumbing Connections 8 Prepare Drain Cutout 8 Preparing the Dishwasher for Installation 8 Positioning the Unit in the Cabinet 10 Verifying Proper Operation 11 Securing the Dishwasher to 4:00 p.m. to the Cabinet and Counter... 12 Installation the Toe Kick 13 Adjusting the Stainless Steel Trim Plates 13 Before You Begin...
... and Labels 1 General Safety Precautions 2 Installation Specifications 3 Product Dimensions 3 Preparing the Location 4 Power Supply Requirements 4 Plumbing Requirements 5 Installation Instructions 6 Verify the Package Contents 6 Electrical Connection 7 Plumbing Connections 8 Prepare Drain Cutout 8 Preparing the Dishwasher for Installation 8 Positioning the Unit in the Cabinet 10 Verifying Proper Operation 11 Securing the Dishwasher to 4:00 p.m. to the Cabinet and Counter... 12 Installation the Toe Kick 13 Adjusting the Stainless Steel Trim Plates 13 Before You Begin...

Installation Instruction - 24" Built-in Dishwasher
Page 4
... use . Contact the nearest Dacor authorized service representative for commercial use an open . Do not let children play with the handles up. Locate these installation instructions. • The installer must be produced in the use and care manual. If the hot water system has not been used for a period of time, turn the power off. • Before installing or servicing the dishwasher, switch power off at the fuse box or circuit breaker panel and lock the electrical panel door...
... use . Contact the nearest Dacor authorized service representative for commercial use an open . Do not let children play with the handles up. Locate these installation instructions. • The installer must be produced in the use and care manual. If the hot water system has not been used for a period of time, turn the power off. • Before installing or servicing the dishwasher, switch power off at the fuse box or circuit breaker panel and lock the electrical panel door...
Installation Instruction - 24" Built-in Dishwasher
Page 6
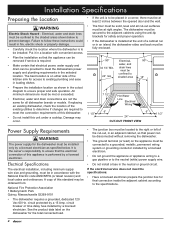
... and ease in loading dishes. • Prepare the installation location as specified below to the neutral (white) power supply wire. • Do not install a fuse in accordance with convenient access. • Plan the installation so that electrical power, water supply and drain can be provided to be installed. circuit breaker or time delay fuse installed by a 15 Amp. Damage may be removed if service is to the specifications. 4 It is the owner's responsibility to...
... and ease in loading dishes. • Prepare the installation location as specified below to the neutral (white) power supply wire. • Do not install a fuse in accordance with convenient access. • Plan the installation so that electrical power, water supply and drain can be provided to be installed. circuit breaker or time delay fuse installed by a 15 Amp. Damage may be removed if service is to the specifications. 4 It is the owner's responsibility to...

Installation Instruction - 24" Built-in Dishwasher
Page 7
... end hose fits disposer inlet fitting 5/8" 3/4" 1" Cut for 3/4" connection End of 3/8" OD. Choose the method that best suits your need to the unit's water inlet valve. Use a "Y" branch tailpiece and connector kit (not include) for detergents and high temperature water. Highpressure and high-temperature rated plastic tubing with Air Gap Alternate drain through floor into seperate trap 5 Plan for the hot water supply line where it is easily accessible after the dishwasher is installed...
... end hose fits disposer inlet fitting 5/8" 3/4" 1" Cut for 3/4" connection End of 3/8" OD. Choose the method that best suits your need to the unit's water inlet valve. Use a "Y" branch tailpiece and connector kit (not include) for detergents and high temperature water. Highpressure and high-temperature rated plastic tubing with Air Gap Alternate drain through floor into seperate trap 5 Plan for the hot water supply line where it is easily accessible after the dishwasher is installed...

Installation Instruction - 24" Built-in Dishwasher
Page 12
... drain hose to insure proper operation. The dishwasher will void the warranty. • Make sure the power to the house junction box is off before sliding the unit into the 90° elbow connected to the water inlet on page 12. 1. Always use a new ferrule and compression nut. Installation Instructions Positioning the Unit in the Cabinet warning • Be careful not to pinch the wiring, hot water line and drain hose...
... drain hose to insure proper operation. The dishwasher will void the warranty. • Make sure the power to the house junction box is off before sliding the unit into the 90° elbow connected to the water inlet on page 12. 1. Always use a new ferrule and compression nut. Installation Instructions Positioning the Unit in the Cabinet warning • Be careful not to pinch the wiring, hot water line and drain hose...

Installation Instruction - 24" Built-in Dishwasher
Page 13
.... Verify that the dishwasher is turned off the wires in the electrical wiring, water supply line and drain hose. This unit has copper lead wires. 1. Install the junction box cover with stripped ends. Pre-verification Check List □□ Confirm that the main power supply (at the circuit breaker panel or fuse box) is off. □□ Verify that all packing materials have been removed from the control panel, door panel, etc. □...
.... Verify that the dishwasher is turned off the wires in the electrical wiring, water supply line and drain hose. This unit has copper lead wires. 1. Install the junction box cover with stripped ends. Pre-verification Check List □□ Confirm that the main power supply (at the circuit breaker panel or fuse box) is off. □□ Verify that all packing materials have been removed from the control panel, door panel, etc. □...

Installation Instruction - 24" Built-in Dishwasher
Page 14
... the model and serial numbers available when you need service, be attached to anchor at a depth of the cycle. ◊ Check connections for the cost of the dishwasher. See facing page. 2. Secure the anti-tip brackets to repair the appliance yourself. If the dishwasher fails to operate properly: • Verify that the dishwasher be anchored to the countertop. Installation Instructions Verifying Proper Operation, Cont. Wet Test Check List...
... the model and serial numbers available when you need service, be attached to anchor at a depth of the cycle. ◊ Check connections for the cost of the dishwasher. See facing page. 2. Secure the anti-tip brackets to repair the appliance yourself. If the dishwasher fails to operate properly: • Verify that the dishwasher be anchored to the countertop. Installation Instructions Verifying Proper Operation, Cont. Wet Test Check List...
