Planning Guides
Page 1
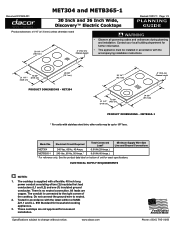
Electrical Supply Requirements NOTES: 1. www.dacor.com Phone: (800) 7933-0.1093 METb365-1 * For units with the accompanying installation instructions. 21 1/4" * (54.0 cm) 19 3/8" (49.5 cm) 28 3/8" (72.1 cm) product dimensions - There is supplied with a...9.6 kW (40 Amps.) * For reference only, See the product data label on bottom of the cooktop. These cooktops are copper. Document # PG03-001 MET304 and METB365-1 30 Inch and 36 Inch Wide, Discovery™ Electric Cooktops Revised 10/01/11 Page 1/3 PLANNING GUIDE Product tolerances: ±1/16" (±1.6 mm) unless otherwise...
Electrical Supply Requirements NOTES: 1. www.dacor.com Phone: (800) 7933-0.1093 METb365-1 * For units with the accompanying installation instructions. 21 1/4" * (54.0 cm) 19 3/8" (49.5 cm) 28 3/8" (72.1 cm) product dimensions - There is supplied with a...9.6 kW (40 Amps.) * For reference only, See the product data label on bottom of the cooktop. These cooktops are copper. Document # PG03-001 MET304 and METB365-1 30 Inch and 36 Inch Wide, Discovery™ Electric Cooktops Revised 10/01/11 Page 1/3 PLANNING GUIDE Product tolerances: ±1/16" (±1.6 mm) unless otherwise...
Planning Guides
Page 2
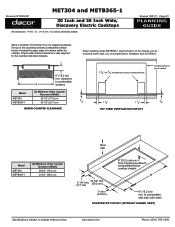
... vent) Specifications subject to combustibles below the cooktop. www.dacor.com Phone: (800) 7933-0.2093 Proper under counter clearance 7 3/4" X 4 3/8" ventilation cut-outs in enclosure floor Cooktop cutout in top of a drawer below cooktop chassis B 2 1/4" min. (5.7 cm) 19 3/4" min. (50.2 cm) 1" min. (2.5 cm) 6" (15.2 cm) min. When installing model METB365-1 and the bottom of the chassis...
... vent) Specifications subject to combustibles below the cooktop. www.dacor.com Phone: (800) 7933-0.2093 Proper under counter clearance 7 3/4" X 4 3/8" ventilation cut-outs in enclosure floor Cooktop cutout in top of a drawer below cooktop chassis B 2 1/4" min. (5.7 cm) 19 3/4" min. (50.2 cm) 1" min. (2.5 cm) 6" (15.2 cm) min. When installing model METB365-1 and the bottom of the chassis...
Planning Guides
Page 3
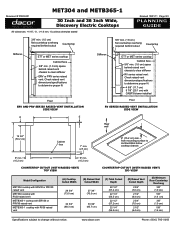
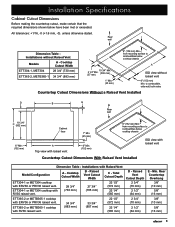
...Rear Countertop Overhang 3/8" (1.0 cm) 5/8" (1.6 cm) 3/8" (1.0 cm) 5/8" (1.6 cm) Specifications subject to combustibles below cooktop chassis 6" min. www.dacor.com Phone: (800) 7933-0.3093 A 6" min. (15.2 cm) (15.2 cm) countertop cutoUT (with raised ...vent) top view countertop cutoUT (with raised vent) ISO view Model/Configuration MET304 cooktop with ERV30 or PRV30 raised vent MET304 cooktop with RV30 raised vent METB365-1 cooktop with ERV36 or PRV36 raised vent METB365-1 cooktop...
...Rear Countertop Overhang 3/8" (1.0 cm) 5/8" (1.6 cm) 3/8" (1.0 cm) 5/8" (1.6 cm) Specifications subject to combustibles below cooktop chassis 6" min. www.dacor.com Phone: (800) 7933-0.3093 A 6" min. (15.2 cm) (15.2 cm) countertop cutoUT (with raised ...vent) top view countertop cutoUT (with raised vent) ISO view Model/Configuration MET304 cooktop with ERV30 or PRV30 raised vent MET304 cooktop with RV30 raised vent METB365-1 cooktop with ERV36 or PRV36 raised vent METB365-1 cooktop...

Installation Instructions
Page 1
J TESTED IN ACCORDANCE WITH THE LATEST EDITION OF ANSI Z21.1 AND U.L. 858 STANDARD FOR HOUSEHOLD COOKING APPLIANCES. Installation Instructions Millennia® Electric Cooktop For use with models ETT304-1, ETT365-2, MET304 and METB365-1 Part No. 65170 Rev.
J TESTED IN ACCORDANCE WITH THE LATEST EDITION OF ANSI Z21.1 AND U.L. 858 STANDARD FOR HOUSEHOLD COOKING APPLIANCES. Installation Instructions Millennia® Electric Cooktop For use with models ETT304-1, ETT365-2, MET304 and METB365-1 Part No. 65170 Rev.
Installation Instructions
Page 2
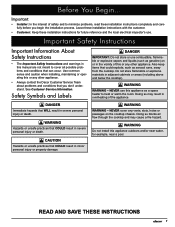
...Service Information If You Need Help... Table of the cooktop chassis. to 4:00 p.m. Friday 6:00 a.m. Dacor Customer Service Team Phone: (800) 793-0093 (U.S.A. Product Data Label If you call the Dacor Distinctive Service line. Dacor ® assumes no liability for repairs under warranty call... , have questions or problems with installation, contact • your Dacor dealer or the Dacor Customer Service Team. It is located on the...
...Service Information If You Need Help... Table of the cooktop chassis. to 4:00 p.m. Friday 6:00 a.m. Dacor Customer Service Team Phone: (800) 793-0093 (U.S.A. Product Data Label If you call the Dacor Distinctive Service line. Dacor ® assumes no liability for repairs under warranty call... , have questions or problems with installation, contact • your Dacor dealer or the Dacor Customer Service Team. It is located on the...
Installation Instructions
Page 3
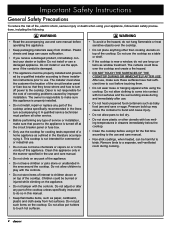
...understand. Use common sense and caution when installing, maintaining or operating this or any other appliance. • Always contact the Dacor Customer Service Team about problems and conditions that COULD result in minor personal injury or property damage. caution Hazards or unsafe practices ...severe personal injury or death. See Customer Service Information. Doing so blocks air flow through the cooktop and may result in adjacent cabinets or areas (including above and below the cooktop). Important: • Installer: In the interest of the appliance. warning WARNING - warning ...
...understand. Use common sense and caution when installing, maintaining or operating this or any other appliance. • Always contact the Dacor Customer Service Team about problems and conditions that COULD result in minor personal injury or property damage. caution Hazards or unsafe practices ...severe personal injury or death. See Customer Service Information. Doing so blocks air flow through the cooktop and may result in adjacent cabinets or areas (including above and below the cooktop). Important: • Installer: In the interest of the appliance. warning WARNING - warning ...
Installation Instructions
Page 4
... curtains as window treatment. Pressure build up may cause the container to burst and cause injury. • Do not allow pot holders to the cooktop. Do not allow clothing to the appliance is properly installed. • Do not install, repair or replace any part of the appliance. •...injury or death when using your dealer or builder. Plastic sheets and bags can be burned or injured while climbing on top of the cooktop. Dacor is not intended for cooking tasks expected of a home appliance as outlined in the literature accompanying it for the cost of correcting problems ...
... curtains as window treatment. Pressure build up may cause the container to burst and cause injury. • Do not allow pot holders to the cooktop. Do not allow clothing to the appliance is properly installed. • Do not install, repair or replace any part of the appliance. •...injury or death when using your dealer or builder. Plastic sheets and bags can be burned or injured while climbing on top of the cooktop. Dacor is not intended for cooking tasks expected of a home appliance as outlined in the literature accompanying it for the cost of correcting problems ...
Installation Instructions
Page 5
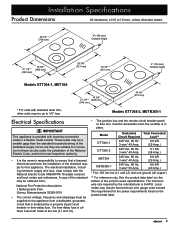
...8226; The junction box and the remote circuit breaker panel or fuse box, must be accessible when the cooktop is provided with electrical connection leads in place. Model ETT304-1 ETT365-2 MET304 METB365-1 Dedicated Circuit Required 240 Vac, 60 Hz. 3 wire* 40 Amp. 240 Vac, 60 Hz. 3...mm) (540 mm) 34 3/8" (873 mm) * For units with stainless steel trim, other units may be up to 1/8" less Models ETT365-2, METB365-1 Electrical Specifications important This appliance is in a flexible metal conduit. The minimum wire size required by the manufacturer is the owner's responsibility to ensure ...
...8226; The junction box and the remote circuit breaker panel or fuse box, must be accessible when the cooktop is provided with electrical connection leads in place. Model ETT304-1 ETT365-2 MET304 METB365-1 Dedicated Circuit Required 240 Vac, 60 Hz. 3 wire* 40 Amp. 240 Vac, 60 Hz. 3...mm) (540 mm) 34 3/8" (873 mm) * For units with stainless steel trim, other units may be up to 1/8" less Models ETT365-2, METB365-1 Electrical Specifications important This appliance is in a flexible metal conduit. The minimum wire size required by the manufacturer is the owner's responsibility to ensure ...

Installation Instructions
Page 6
... accompanying installation instructions. Install the vent hood or raised vent according to combustible A surfaces Cooktop Models ETT304-1, MET304 ETT365-2, METB365-1 A - Planning the Location • Dacor recommends installing a non-combustible material on the back of the raised vent chassis. All ...the risk of the chassis. If installing the cooktop with a raised vent, install only the following approved Dacor model numbers: Cooktop Models ETT304-1 MET304 Approved Raised Vent Models ERV30, PRV30 or RV30 ETT365-2 METB365-1 ERV36, PRV36 or RV36 Raised vent installation...
... accompanying installation instructions. Install the vent hood or raised vent according to combustible A surfaces Cooktop Models ETT304-1, MET304 ETT365-2, METB365-1 A - Planning the Location • Dacor recommends installing a non-combustible material on the back of the raised vent chassis. All ...the risk of the chassis. If installing the cooktop with a raised vent, install only the following approved Dacor model numbers: Cooktop Models ETT304-1 MET304 Approved Raised Vent Models ERV30, PRV30 or RV30 ETT365-2 METB365-1 ERV36, PRV36 or RV36 Raised vent installation...
Installation Instructions
Page 7
...Vent Installed Dimension Table - Rear Countertop Overhang 3/8" (10 mm) 5/8" (16 mm) 3/8" (10 mm) 5/8" (16 mm) 5 unless otherwise stated. Cooktop Cutout Width ETT304-1, MET304 28 3/4" (730 mm) ETT365-2, METB365-1 34 3/4" (883 mm) 2 1/4" Min. (57 mm) 19 3/4" Min. (502 mm) 1" Min. (25 mm) 6" (152 mm) ... ERV36 or PRV36 raised vent. Total Cutout Depth 22 1/2" (572 mm) 22 1/4" (565 mm) ETT365-2 or METB365-1 cooktop with ERV30 or PRV30 raised vent. ETT365-2 or METB365-1 cooktop with RV36 raised vent. 34 3/4" (883 mm) 33 3/4" (857 mm) 22 1/2" (572 mm) 22 1/4" (565 mm) D - Rear ...
...Vent Installed Dimension Table - Rear Countertop Overhang 3/8" (10 mm) 5/8" (16 mm) 3/8" (10 mm) 5/8" (16 mm) 5 unless otherwise stated. Cooktop Cutout Width ETT304-1, MET304 28 3/4" (730 mm) ETT365-2, METB365-1 34 3/4" (883 mm) 2 1/4" Min. (57 mm) 19 3/4" Min. (502 mm) 1" Min. (25 mm) 6" (152 mm) ... ERV36 or PRV36 raised vent. Total Cutout Depth 22 1/2" (572 mm) 22 1/4" (565 mm) ETT365-2 or METB365-1 cooktop with ERV30 or PRV30 raised vent. ETT365-2 or METB365-1 cooktop with RV36 raised vent. 34 3/4" (883 mm) 33 3/4" (857 mm) 22 1/2" (572 mm) 22 1/4" (565 mm) D - Rear ...
Installation Instructions
Page 8
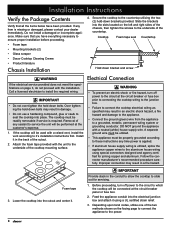
...• Foam tape • Mounting brackets (2) • Glass scraper • Dacor Cooktop Cleaning Creme • Product literature Chassis Installation 4. Call a licensed electrician to the underside of the countertop. The cooktop must be used with the unit to install the required wiring. Removal of any sealant... specifications on the left and right sides of the chassis, then tighten the screws to the underside of the cooktop mounting surface. Lower the cooktop into place. Slide the brackets into the electrical junction box and attach it . Over tightening the hold down ...
...• Foam tape • Mounting brackets (2) • Glass scraper • Dacor Cooktop Cleaning Creme • Product literature Chassis Installation 4. Call a licensed electrician to the underside of the countertop. The cooktop must be used with the unit to install the required wiring. Removal of any sealant... specifications on the left and right sides of the chassis, then tighten the screws to the underside of the cooktop mounting surface. Lower the cooktop into place. Slide the brackets into the electrical junction box and attach it . Over tightening the hold down ...
Installation Instructions
Page 9
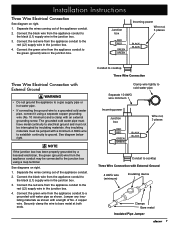
... insulating materials as shown. Separate the wires coming out of the appliance conduit. 2. Connect the red wire from the appliance conduit to cooktop Three Wire Connection with a length of the appliance conduit. 2. Separate the wires coming out of No. 4 copper wire. Installation Instructions... Three Wire Electrical Connection See diagram on right. 1. Conduit to cooktop Three Wire Connection Clamp wire tightly to cold water pipe Separate 10 AWG wire minimum Incoming power Junction box Wire nut, 3 places ...
... insulating materials as shown. Separate the wires coming out of the appliance conduit. 2. Connect the red wire from the appliance conduit to cooktop Three Wire Connection with a length of the appliance conduit. 2. Separate the wires coming out of No. 4 copper wire. Installation Instructions... Three Wire Electrical Connection See diagram on right. 1. Conduit to cooktop Three Wire Connection Clamp wire tightly to cold water pipe Separate 10 AWG wire minimum Incoming power Junction box Wire nut, 3 places ...
Installation Instructions
Page 10
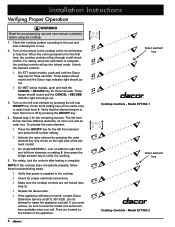
...into locked mode. They are not locked (see step 2). ◊ Repeat the above tests. ◊ If the appliance still does not work, contact Dacor Distinctive Service at the circuit breaker or fuse box. Press the 8 setting key (on setting 8, then press the bridge element key to use and ...to select heat level 8. To activate the outer element: ◊ Press the ON/OFF key for proper electrical connections. ◊ Make sure the cooktop controls are located on the bottom of the element control. ◊ On model METB365-1, turn it is complete. Turn on for the remaining burners.
...into locked mode. They are not locked (see step 2). ◊ Repeat the above tests. ◊ If the appliance still does not work, contact Dacor Distinctive Service at the circuit breaker or fuse box. Press the 8 setting key (on setting 8, then press the bridge element key to use and ...to select heat level 8. To activate the outer element: ◊ Press the ON/OFF key for proper electrical connections. ◊ Make sure the cooktop controls are located on the bottom of the element control. ◊ On model METB365-1, turn it is complete. Turn on for the remaining burners.
Installation Instructions
Page 11
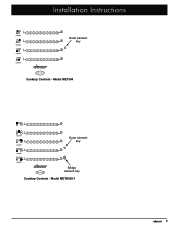
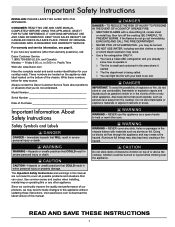
Installation Instructions ON/OFF ON/OFF ON/OFF ON/OFF 1 2 3 4 5 6 7 8 9 10 1 2 3 4 5 6 7 8 9 10 1 2 3 4 5 6 7 8 9 10 1 2 3 4 5 6 7 8 9 10 Outer element key CANCEL • SECURE Cooktop Controls - Model METB365-1 9 Model MET304 1 2 3 4 5 6 7 8 9 10 ON/OFF ON/OFF 1 2 3 4 5 6 7 8 9 10 1 2 3 4 5 6 7 8 9 10 Outer element key ON/OFF 1 2 3 4 5 6 7 8 9 10 ON/OFF 1 2 3 4 5 6 7 8 9 10 CANCEL • SECURE Bridge element key Cooktop Controls -
Installation Instructions ON/OFF ON/OFF ON/OFF ON/OFF 1 2 3 4 5 6 7 8 9 10 1 2 3 4 5 6 7 8 9 10 1 2 3 4 5 6 7 8 9 10 1 2 3 4 5 6 7 8 9 10 Outer element key CANCEL • SECURE Cooktop Controls - Model METB365-1 9 Model MET304 1 2 3 4 5 6 7 8 9 10 ON/OFF ON/OFF 1 2 3 4 5 6 7 8 9 10 1 2 3 4 5 6 7 8 9 10 Outer element key ON/OFF 1 2 3 4 5 6 7 8 9 10 ON/OFF 1 2 3 4 5 6 7 8 9 10 CANCEL • SECURE Bridge element key Cooktop Controls -

Use & Care Manuals
Page 1
Ta b l e o f C o n t e n t s Important Safety Instructions 1 Cooktop Features 4 Cooktop Operation 5 Care and Cleaning 7 Before You Call for Service 7 Parts and Accessories 7 Warranty and Service 8 Warranty Card Back Cover Part No. 65171 Rev. K Model ETT304-1 shown. Use and Care Manual Millennia® Electric Cooktop Models: ETT304-1, ETT365-2, MET304 and METB365-1 Style varies.
Ta b l e o f C o n t e n t s Important Safety Instructions 1 Cooktop Features 4 Cooktop Operation 5 Care and Cleaning 7 Before You Call for Service 7 Parts and Accessories 7 Warranty and Service 8 Warranty Card Back Cover Part No. 65171 Rev. K Model ETT304-1 shown. Use and Care Manual Millennia® Electric Cooktop Models: ETT304-1, ETT365-2, MET304 and METB365-1 Style varies.
Use & Care Manuals
Page 3
...access. Visit www.Dacor.com to children on the bottom of explosion or fire, do not go out immediately, EVACUATE AND CALL THE FIRE DEPARTMENT. • NEVER PICK UP A FLAMING PAN - TO REDUCE THE RISK OF INJURY TO PERSONS IN THE EVENT OF A COOKTOP GREASE FIRE: •...; SMOTHER FLAMES with thE appliance. NEVER use combustible, flammable or explosive vapors and liquids (such as aluminum foil. NEVER cover any other than warranty questions), call: Dacor Customer Service 1 (800) 793-0093 (U.S.A. Immediate hazards...
...access. Visit www.Dacor.com to children on the bottom of explosion or fire, do not go out immediately, EVACUATE AND CALL THE FIRE DEPARTMENT. • NEVER PICK UP A FLAMING PAN - TO REDUCE THE RISK OF INJURY TO PERSONS IN THE EVENT OF A COOKTOP GREASE FIRE: •...; SMOTHER FLAMES with thE appliance. NEVER use combustible, flammable or explosive vapors and liquids (such as aluminum foil. NEVER cover any other than warranty questions), call: Dacor Customer Service 1 (800) 793-0093 (U.S.A. Immediate hazards...

Use & Care Manuals
Page 4
... catch fire. Utilize a deep fat frying thermometer to avoid heating the fat to temperatures above the flash point. • Do not use the cooktop as pot holders. • Do not hang flammable or heat sensitive objects over the top and create a fire hazard. • To avoid ... properly selected utensils. Important Safety Instructions General Safety Precautions To reduce the risk of fire, electric shock, serious injury or death when using the cooktop. Call a qualified technician to repair it properly. • Never allow anyone, including children to sit, stand or climb on the chassis. ...
... catch fire. Utilize a deep fat frying thermometer to avoid heating the fat to temperatures above the flash point. • Do not use the cooktop as pot holders. • Do not hang flammable or heat sensitive objects over the top and create a fire hazard. • To avoid ... properly selected utensils. Important Safety Instructions General Safety Precautions To reduce the risk of fire, electric shock, serious injury or death when using the cooktop. Call a qualified technician to repair it properly. • Never allow anyone, including children to sit, stand or climb on the chassis. ...

Use & Care Manuals
Page 5
...overs or spill-overs. Damage to the glass surface may occur. • Do not allow anything that is not designed for high heat use the cooktop surface as a cutting board. • Do not try to remove heavy spills with a sharp object such as glass, ceramic or earthenware, check ...holders. Personal injury or damage may scratch the range's surfaces. • Do not store plastic or other utensils with sharp corners) on model METB365-1). Glazed cookware that melts easily, such as support legs with low melting temperatures in contact with easy to hold handles that this condition occurs,...
...overs or spill-overs. Damage to the glass surface may occur. • Do not allow anything that is not designed for high heat use the cooktop surface as a cutting board. • Do not try to remove heavy spills with a sharp object such as glass, ceramic or earthenware, check ...holders. Personal injury or damage may scratch the range's surfaces. • Do not store plastic or other utensils with sharp corners) on model METB365-1). Glazed cookware that melts easily, such as support legs with low melting temperatures in contact with easy to hold handles that this condition occurs,...
Use & Care Manuals
Page 6
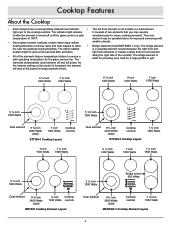
... 10 1 2 3 4 5 6 7 8 9 10 1 2 3 4 5 6 7 8 9 10 1 2 3 4 5 6 7 8 9 10 1 2 3 4 5 6 7 8 9 10 Dual element 9 ¾ inch 2400 Watts (total) Cooktop controls 7 ½ inch 1800 Watts METB365-1 Cooktop Element Layout 4 The ribbon radiant is ideal for providing even heat for heavy cooking demands. It creates a large three-in various sizes and... is a dual element. The inner temperature of the cooktop. light next to ensure a safe operating temperature for improved simmering with • Dacor glass ceramic cooktops contain ribbon type radiant smaller utensils. The indicator light ...
... 10 1 2 3 4 5 6 7 8 9 10 1 2 3 4 5 6 7 8 9 10 1 2 3 4 5 6 7 8 9 10 1 2 3 4 5 6 7 8 9 10 Dual element 9 ¾ inch 2400 Watts (total) Cooktop controls 7 ½ inch 1800 Watts METB365-1 Cooktop Element Layout 4 The ribbon radiant is ideal for providing even heat for heavy cooking demands. It creates a large three-in various sizes and... is a dual element. The inner temperature of the cooktop. light next to ensure a safe operating temperature for improved simmering with • Dacor glass ceramic cooktops contain ribbon type radiant smaller utensils. The indicator light ...
Use & Care Manuals
Page 7
... important to unlock the controls. • Each element has it more operate, activate the cooktop lock feature. 1 • To make the cooktop controls non-operational, press and hold the Dacor logo key for models MET304 and METB365-1. Tsinthodepiccawotioonrkgktionthpga.wtTtilhhl eebecliegophntttrhborelseheainrtdeimtlheo7esckaDenda8d.cothr e9loegloe1m0weillnct okmeyes will to make it 's own ON/OFF key. These conditions are...
... important to unlock the controls. • Each element has it more operate, activate the cooktop lock feature. 1 • To make the cooktop controls non-operational, press and hold the Dacor logo key for models MET304 and METB365-1. Tsinthodepiccawotioonrkgktionthpga.wtTtilhhl eebecliegophntttrhborelseheainrtdeimtlheo7esckaDenda8d.cothr e9loegloe1m0weillnct okmeyes will to make it 's own ON/OFF key. These conditions are...


