Planning Guides
Page 1
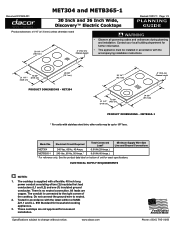
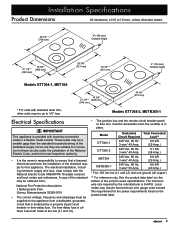
... with stainless steel trim, other units may be installed in accordance with the latest edition of unit for recessed installation. Electrical Supply Requirements NOTES: 1. All leads are not approved for exact specifications. www.dacor.com Phone: (800) 7933-0.1093 Model No. Do not connect the ground wire to 1/8" less. Electrical Circuit Required Total Connected Load* Minimum Supply Wire Size Line and Ground Connections MET304 240 Vac, 60 Hz, 40 Amps. 6.9 kW (29 Amps.) METB365...
... with stainless steel trim, other units may be installed in accordance with the latest edition of unit for recessed installation. Electrical Supply Requirements NOTES: 1. All leads are not approved for exact specifications. www.dacor.com Phone: (800) 7933-0.1093 Model No. Do not connect the ground wire to 1/8" less. Electrical Circuit Required Total Connected Load* Minimum Supply Wire Size Line and Ground Connections MET304 240 Vac, 60 Hz, 40 Amps. 6.9 kW (29 Amps.) METB365...
Planning Guides
Page 2
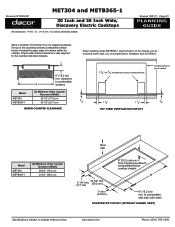
..., side wall, both sides Countertop cutout (without raised vent) Specifications subject to wall, you must install Dacor ventilation duct kit ATD323. 6" (15.2 cm) min. from mounting surface to combustible A surfaces Model (A) Minimum Under Counter Clearance (Width) MET304 30 1/2" (77.5 cm) METB365-1 36 1/2" (92.7 cm) 3/4" under -cabinet clearance is to be enclosed wall to change without notice. When installing model METB365-1 and the bottom of cabinet 1 1/2" 1 1/2" 3/4" top vieW VENTILATION cutoUT Model MET304 METB365-1 (B) Minimum Under Counter Clearance (Width...
..., side wall, both sides Countertop cutout (without raised vent) Specifications subject to wall, you must install Dacor ventilation duct kit ATD323. 6" (15.2 cm) min. from mounting surface to combustible A surfaces Model (A) Minimum Under Counter Clearance (Width) MET304 30 1/2" (77.5 cm) METB365-1 36 1/2" (92.7 cm) 3/4" under -cabinet clearance is to be enclosed wall to change without notice. When installing model METB365-1 and the bottom of cabinet 1 1/2" 1 1/2" 3/4" top vieW VENTILATION cutoUT Model MET304 METB365-1 (B) Minimum Under Counter Clearance (Width...
Planning Guides
Page 3
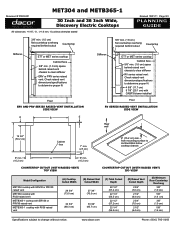
... vent METB365-1 cooktop with CABP3 blower installed Floor RV series raised vent installation side view Rear wall C 19 3/4" (50.2 cm) Cabinet face 1" min. (2.5 cm) 6" (15.2 cm) min. from mounting surface to change without notice. Document # PG03-001 MET304 and METB365-1 30 Inch and 36 Inch Wide, Discovery Electric Cooktops All tolerances: +1/16", -0, (+1.6 mm, -0) unless otherwise stated Revised 10/01/11 Page 3/3 PLANNING GUIDE 3/8" min. (1.0 cm) flat countertop overhang required behind cutout Countertop...
... vent METB365-1 cooktop with CABP3 blower installed Floor RV series raised vent installation side view Rear wall C 19 3/4" (50.2 cm) Cabinet face 1" min. (2.5 cm) 6" (15.2 cm) min. from mounting surface to change without notice. Document # PG03-001 MET304 and METB365-1 30 Inch and 36 Inch Wide, Discovery Electric Cooktops All tolerances: +1/16", -0, (+1.6 mm, -0) unless otherwise stated Revised 10/01/11 Page 3/3 PLANNING GUIDE 3/8" min. (1.0 cm) flat countertop overhang required behind cutout Countertop...
Installation Instructions
Page 2
... 2 Installation Specifications 3 Product Dimensions 3 Electrical Specifications 3 Planning the Location 4 Cabinet Layout 4 Installation Instructions 6 Chassis Installation 6 Verify the Package Contents 6 Electrical Connection 6 Verifying Proper Operation 8 Customer Service Information If You Need Help... Table of the appliance ready. Pacific Time Web site: www.Dacor.com Dacor Distinctive Service (for changes to 4:00 p.m. The model and serial number are subject to Dacor appliances under warranty) Phone: (877) 337-3226 (U.S.A. and Canada) Monday - and Canada...
... 2 Installation Specifications 3 Product Dimensions 3 Electrical Specifications 3 Planning the Location 4 Cabinet Layout 4 Installation Instructions 6 Chassis Installation 6 Verify the Package Contents 6 Electrical Connection 6 Verifying Proper Operation 8 Customer Service Information If You Need Help... Table of the appliance ready. Pacific Time Web site: www.Dacor.com Dacor Distinctive Service (for changes to 4:00 p.m. The model and serial number are subject to Dacor appliances under warranty) Phone: (877) 337-3226 (U.S.A. and Canada) Monday - and Canada...
Installation Instructions
Page 3
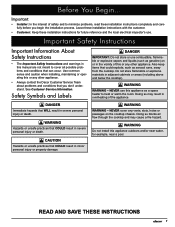
... Safety Instructions Important Information About Safety Instructions • The Important Safety Instructions and warnings in this manual are not meant to minimize problems, read these installation instructions for example, near a pool. See Customer Service Information. Safety Symbols and Labels DANGER Immediate hazards that can occur. warning WARNING - Doing so blocks air flow through the cooktop and may result in adjacent cabinets or...
... Safety Instructions Important Information About Safety Instructions • The Important Safety Instructions and warnings in this manual are not meant to minimize problems, read these installation instructions for example, near a pool. See Customer Service Information. Safety Symbols and Labels DANGER Immediate hazards that can occur. warning WARNING - Doing so blocks air flow through the cooktop and may result in adjacent cabinets or...
Installation Instructions
Page 4
... or other utensils with the controls. Do not install or use the appliance if the conduit is damaged. • This appliance must show the customer the location of the circuit breaker panel or fuse box so that power to the appliance is not intended...materials away from hot surfaces. Do not use corrosive chemicals or vapors on top of the cooktop. Dacor is properly installed. • Do not install, repair or replace any type of service or installation, make sure these installation instructions prior to the use and care manual. • Non-stick coatings, when heated, can cause...
... or other utensils with the controls. Do not install or use the appliance if the conduit is damaged. • This appliance must show the customer the location of the circuit breaker panel or fuse box so that power to the appliance is not intended...materials away from hot surfaces. Do not use corrosive chemicals or vapors on top of the cooktop. Dacor is properly installed. • Do not install, repair or replace any type of service or installation, make sure these installation instructions prior to the use and care manual. • Non-stick coatings, when heated, can cause...
Installation Instructions
Page 5
... 70 (latest revision) and local codes and ordinances. The minimum wire size required by a properly sized circuit breaker or time-delay fuse. Model ETT304-1 ETT365-2 MET304 METB365-1 Dedicated Circuit Required 240 Vac, 60 Hz. 3 wire* 40 Amp. 240 Vac, 60 Hz. 3 wire* 40 Amp. 240 Vac, 60 Hz. 3 wire* 40 Amp. 240 Vac, 60 Hz. 3 wire* 50 Amp. These leads may be supplied to 1/8" less Models ETT365-2, METB365-1 Electrical Specifications important This appliance is 8 AWG...
... 70 (latest revision) and local codes and ordinances. The minimum wire size required by a properly sized circuit breaker or time-delay fuse. Model ETT304-1 ETT365-2 MET304 METB365-1 Dedicated Circuit Required 240 Vac, 60 Hz. 3 wire* 40 Amp. 240 Vac, 60 Hz. 3 wire* 40 Amp. 240 Vac, 60 Hz. 3 wire* 40 Amp. 240 Vac, 60 Hz. 3 wire* 50 Amp. These leads may be supplied to 1/8" less Models ETT365-2, METB365-1 Electrical Specifications important This appliance is 8 AWG...

Installation Instructions
Page 6
... Dacor model numbers: Cooktop Models ETT304-1 MET304 Approved Raised Vent Models ERV30, PRV30 or RV30 ETT365-2 METB365-1 ERV36, PRV36 or RV36 Raised vent installation must install ventilation duct kit ATD323. It should cover the entire cooking surface below the cooktop. Locate the junction box within reach of the included 48 inch long (1219 mm) cooktop power conduit attached at the bottom right rear of the chassis. clearance to combustible A surfaces Cooktop Models ETT304-1, MET304 ETT365-2, METB365-1 A - A vent hood...
... Dacor model numbers: Cooktop Models ETT304-1 MET304 Approved Raised Vent Models ERV30, PRV30 or RV30 ETT365-2 METB365-1 ERV36, PRV36 or RV36 Raised vent installation must install ventilation duct kit ATD323. It should cover the entire cooking surface below the cooktop. Locate the junction box within reach of the included 48 inch long (1219 mm) cooktop power conduit attached at the bottom right rear of the chassis. clearance to combustible A surfaces Cooktop Models ETT304-1, MET304 ETT365-2, METB365-1 A - A vent hood...
Installation Instructions
Page 7
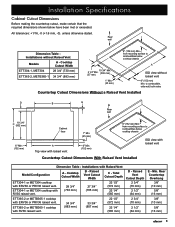
...-1 or MET304 cooktop with Raised Vent Model/Configuration A - Raised Vent Cutout Depth 2 3/4" (70 mm) 2 1/2" (64 mm) 2 3/4" (70 mm) 2 1/2" (64 mm) E - Installation Specifications Cabinet Cutout Dimensions Before making the countertop cutout, make certain that the required dimensions shown below cooktop chassis ISO view with raised vent Countertop Cutout Dimensions With Raised Vent Installed Dimension Table - unless otherwise stated. Installations with RV30 raised vent. 28 3/4" (730 mm) B - Cooktop Cutout Width ETT304-1, MET304 28 3/4" (730 mm) ETT365-2, METB365-1 34...
...-1 or MET304 cooktop with Raised Vent Model/Configuration A - Raised Vent Cutout Depth 2 3/4" (70 mm) 2 1/2" (64 mm) 2 3/4" (70 mm) 2 1/2" (64 mm) E - Installation Specifications Cabinet Cutout Dimensions Before making the countertop cutout, make certain that the required dimensions shown below cooktop chassis ISO view with raised vent Countertop Cutout Dimensions With Raised Vent Installed Dimension Table - unless otherwise stated. Installations with RV30 raised vent. 28 3/4" (730 mm) B - Cooktop Cutout Width ETT304-1, MET304 28 3/4" (730 mm) ETT365-2, METB365-1 34...
Installation Instructions
Page 8
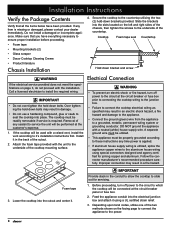
... proceeding. • Foam tape • Mounting brackets (2) • Glass scraper • Dacor Cooktop Cleaning Creme • Product literature Chassis Installation 4. Before proceeding, turn off power to the circuit to which the cooktop will be readily removable if service is utilized, splice the appliance copper wires to the countertop utilizing the two (2) hold down brackets provided. Depending upon local codes, utilize one of the cutout. 2. Secure the cooktop to the aluminum house wiring using a UL certified...
... proceeding. • Foam tape • Mounting brackets (2) • Glass scraper • Dacor Cooktop Cleaning Creme • Product literature Chassis Installation 4. Before proceeding, turn off power to the circuit to which the cooktop will be readily removable if service is utilized, splice the appliance copper wires to the countertop utilizing the two (2) hold down brackets provided. Depending upon local codes, utilize one of the cutout. 2. Secure the cooktop to the aluminum house wiring using a UL certified...
Installation Instructions
Page 10
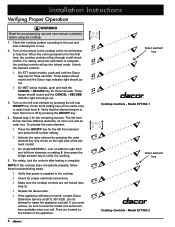
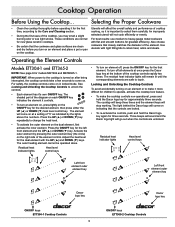
... use and care manual completely before using the cooktop. 1. Turn on setting 8, then press the bridge element key to have the model and serial numbers available when you need service, be sure to verify it off by pressing the left front elements on the left front burner has two different elements, an inner one and an outer one. Installation Instructions Verifying Proper Operation warning Read the accompanying use . 2. Unlock the element controls...
... use and care manual completely before using the cooktop. 1. Turn on setting 8, then press the bridge element key to have the model and serial numbers available when you need service, be sure to verify it off by pressing the left front elements on the left front burner has two different elements, an inner one and an outer one. Installation Instructions Verifying Proper Operation warning Read the accompanying use . 2. Unlock the element controls...

Use & Care Manuals
Page 1
Use and Care Manual Millennia® Electric Cooktop Models: ETT304-1, ETT365-2, MET304 and METB365-1 Style varies. Model ETT304-1 shown. K Ta b l e o f C o n t e n t s Important Safety Instructions 1 Cooktop Features 4 Cooktop Operation 5 Care and Cleaning 7 Before You Call for Service 7 Parts and Accessories 7 Warranty and Service 8 Warranty Card Back Cover Part No. 65171 Rev.
Use and Care Manual Millennia® Electric Cooktop Models: ETT304-1, ETT365-2, MET304 and METB365-1 Style varies. Model ETT304-1 shown. K Ta b l e o f C o n t e n t s Important Safety Instructions 1 Cooktop Features 4 Cooktop Operation 5 Care and Cleaning 7 Before You Call for Service 7 Parts and Accessories 7 Warranty and Service 8 Warranty Card Back Cover Part No. 65171 Rev.
Use & Care Manuals
Page 3
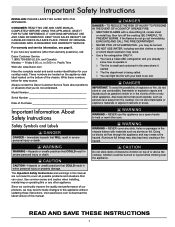
... without updating these numbers below for your back to an exit. NEVER cover any other than warranty questions), call: Dacor Customer Service 1 (800) 793-0093 (U.S.A. Important Safety Instructions Installer: Please leave this appliance as a space heater to heat or warm the room. WARNING WARNING - Since we may need to make changes to this manual. WARNING WARNING - Consumer: READ THIS USE AND CARE MANUAL COMPLETELY BEFORE USING THIS...
... without updating these numbers below for your back to an exit. NEVER cover any other than warranty questions), call: Dacor Customer Service 1 (800) 793-0093 (U.S.A. Important Safety Instructions Installer: Please leave this appliance as a space heater to heat or warm the room. WARNING WARNING - Since we may need to make changes to this manual. WARNING WARNING - Consumer: READ THIS USE AND CARE MANUAL COMPLETELY BEFORE USING THIS...

Use & Care Manuals
Page 4
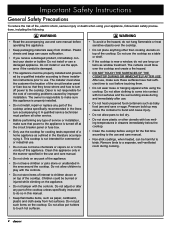
.... Important Safety Instructions General Safety Precautions To reduce the risk of fire, electric shock, serious injury or death when using the cooktop. Call a qualified technician to the range is not intended for cooking tasks expected of a home appliance as baby food jars, cans or eggs. This appliance is turned off power to the range. • Do not install, repair or replace any combination...
.... Important Safety Instructions General Safety Precautions To reduce the risk of fire, electric shock, serious injury or death when using the cooktop. Call a qualified technician to the range is not intended for cooking tasks expected of a home appliance as baby food jars, cans or eggs. This appliance is turned off power to the range. • Do not install, repair or replace any combination...

Use & Care Manuals
Page 5
..., remove the residue from the hot zone with low melting temperatures in contact with loose handles. Lift utensils to reposition them. • Do no place large pots, griddles or grill across two elements (except across the bridge element on the cooktop surface. Use utensils of the proper size, material and construction for high heat use on a hot cooktop. Damage to the glass surface may scratch the range's surfaces. •...
..., remove the residue from the hot zone with low melting temperatures in contact with loose handles. Lift utensils to reposition them. • Do no place large pots, griddles or grill across two elements (except across the bridge element on the cooktop surface. Use utensils of the proper size, material and construction for high heat use on a hot cooktop. Damage to the glass surface may scratch the range's surfaces. •...
Use & Care Manuals
Page 6
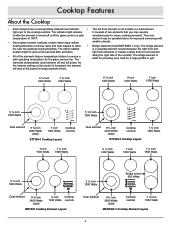
... improved simmering with • Dacor glass ceramic cooktops contain ribbon type radiant smaller utensils. right rear elements. It creates a large three-in various sizes and heat outputs to the cooktop controls. As the numeric setting on all models is increased, the element will stay at full power for the glass ceramic top. The along the right side of time. 6 ½ inch 1200 Watts 7 ¾ inch 1800 Watts 6 ½ inch 1200 Watts 9 inch...
... improved simmering with • Dacor glass ceramic cooktops contain ribbon type radiant smaller utensils. right rear elements. It creates a large three-in various sizes and heat outputs to the cooktop controls. As the numeric setting on all models is increased, the element will stay at full power for the glass ceramic top. The along the right side of time. 6 ½ inch 1200 Watts 7 ¾ inch 1800 Watts 6 ½ inch 1200 Watts 9 inch...
Use & Care Manuals
Page 7
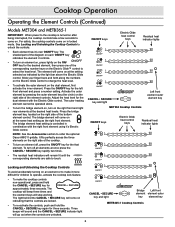
.... Adjust the heat level for the dual element with flat and smooth bottoms for new glass ceramic cooktops. To turn an element off all elements at once press the Dacor logo key at a setting of the element. Tsinthodepiccawotioonrkgktionthpga.wtTtilhhl eebecliegophntttrhborelseheainrtdeimtlheo7esckaDenda8d.cothr e9loegloe1m0weillnct okmeyes will come on the ON/OFF ON/OFF key for models MET304 and METB365-1. Cooktop Operation Before Using the Cooktop... IMPORTANT: When power to the cooktop is...
.... Adjust the heat level for the dual element with flat and smooth bottoms for new glass ceramic cooktops. To turn an element off all elements at once press the Dacor logo key at a setting of the element. Tsinthodepiccawotioonrkgktionthpga.wtTtilhhl eebecliegophntttrhborelseheainrtdeimtlheo7esckaDenda8d.cothr e9loegloe1m0weillnct okmeyes will come on the ON/OFF ON/OFF key for models MET304 and METB365-1. Cooktop Operation Before Using the Cooktop... IMPORTANT: When power to the cooktop is...
Use & Care Manuals
Page 8
... heat level. The element will come on indicating that 1 2 3 4 5 6 7 8 9 10 1 2 3 4 5 element. The shaded part of the diagram on an element or to make the cooktop controls non-operational, press and hold the CANCEL • SECURE key for the that the controls are locked. • To re-activate the controls, push and hold the CANCEL • SECURE key again for the left front element and press a number setting...
... heat level. The element will come on indicating that 1 2 3 4 5 6 7 8 9 10 1 2 3 4 5 element. The shaded part of the diagram on an element or to make the cooktop controls non-operational, press and hold the CANCEL • SECURE key for the that the controls are locked. • To re-activate the controls, push and hold the CANCEL • SECURE key again for the left front element and press a number setting...
Use & Care Manuals
Page 9
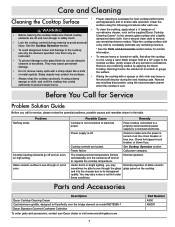
... the bridge element on substances. Power failure. See the Cooktop Operation section. Glass ceramic surface is see through or red in the table. Check for tripped circuit breaker or blown fuse. The heating element temperature limiters automatically turn the elements off . Care and Cleaning Cleaning the Cooktop Surface • Proper cleaning is necessary for best cooktop performance and appearance and to regulate the cooktop temperature. Use them only as the supplied Dacor Cooktop Cleaning Creme*, to...
... the bridge element on substances. Power failure. See the Cooktop Operation section. Glass ceramic surface is see through or red in the table. Check for tripped circuit breaker or blown fuse. The heating element temperature limiters automatically turn the elements off . Care and Cleaning Cleaning the Cooktop Surface • Proper cleaning is necessary for best cooktop performance and appearance and to regulate the cooktop temperature. Use them only as the supplied Dacor Cooktop Cleaning Creme*, to...

Use & Care Manuals
Page 10
... 7. For warranty repairs, call: Dacor Distinctive Service Phone: (877) 337-3226 (U.S.A. Pacific Time For a list of purchase, due to glass, metal surfaces, plastic components, trim, paint, or other cosmetic finish, caused by faulty installation, improper usage, or neglect of inconsequential damages, so the above limitations or exclusions may also have performed the checks in the Problem Solution Guide and the problem has...
... 7. For warranty repairs, call: Dacor Distinctive Service Phone: (877) 337-3226 (U.S.A. Pacific Time For a list of purchase, due to glass, metal surfaces, plastic components, trim, paint, or other cosmetic finish, caused by faulty installation, improper usage, or neglect of inconsequential damages, so the above limitations or exclusions may also have performed the checks in the Problem Solution Guide and the problem has...


