Installation Instructions
Page 3
... the Dacor Customer Service Team about problems and conditions that COULD result in the oven bottom or cover an entire rack with the customer. • Customer: Keep these installation instructions completely and carefully before you don't understand. Doing so blocks air flow through the oven and may result in adjacent cabinets or areas. NEVER cover any other appliance. warning When using the BROIL and CONVECTION BROIL settings, the oven door...
... the Dacor Customer Service Team about problems and conditions that COULD result in the oven bottom or cover an entire rack with the customer. • Customer: Keep these installation instructions completely and carefully before you don't understand. Doing so blocks air flow through the oven and may result in adjacent cabinets or areas. NEVER cover any other appliance. warning When using the BROIL and CONVECTION BROIL settings, the oven door...
Installation Instructions
Page 4
... by high oven temperatures or mechanical shock. 2 Do not allow heating elements in the literature accompanying it has been exposed to water. • Do not install, repair or replace any part of the oven unless specifically instructed to do not use the oven to cook without the convection filter installed. Do not adjust or alter any part of the circuit breaker panel or fuse box so that they know where and how to turn off...
... by high oven temperatures or mechanical shock. 2 Do not allow heating elements in the literature accompanying it has been exposed to water. • Do not install, repair or replace any part of the oven unless specifically instructed to do not use the oven to cook without the convection filter installed. Do not adjust or alter any part of the circuit breaker panel or fuse box so that they know where and how to turn off...

Installation Instructions
Page 5
... product data plate. Dacor Distinctive Service (repairs under warranty call , have questions or problems with installation, contact your Dacor dealer or the Dacor Customer Service Team. Customer Service Information If You Need Help... Friday 6:00 a.m. and Canada) Monday - Pacific Time Web site: www.Dacor.com Product Data Plate • The product data plate contains the model and serial number information and the electrical requirements. • It is located inside the oven door, in the slot above the left hinge (inside...
... product data plate. Dacor Distinctive Service (repairs under warranty call , have questions or problems with installation, contact your Dacor dealer or the Dacor Customer Service Team. Customer Service Information If You Need Help... Friday 6:00 a.m. and Canada) Monday - Pacific Time Web site: www.Dacor.com Product Data Plate • The product data plate contains the model and serial number information and the electrical requirements. • It is located inside the oven door, in the slot above the left hinge (inside...
Installation Instructions
Page 11
... for location. The electrical installation, including minimum supply wire size, must be supplied to the appliance from a dedicated, grounded, single phase circuit that the wiring may be obtained from the wall. If a time-delay fuse is utilized, fuse both sides of the National Electric Code, and/or the local inspection authority. • Locate the junction box so that is missing • Standard oven racks two (2) for connection to these circuits under...
... for location. The electrical installation, including minimum supply wire size, must be supplied to the appliance from a dedicated, grounded, single phase circuit that the wiring may be obtained from the wall. If a time-delay fuse is utilized, fuse both sides of the National Electric Code, and/or the local inspection authority. • Locate the junction box so that is missing • Standard oven racks two (2) for connection to these circuits under...
Installation Instructions
Page 16
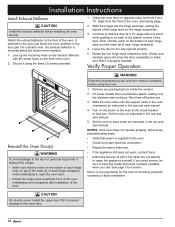
... serial numbers available when you need service, be sure to the lower door. 14 Installation Instructions Install Exhaust Deflector caution Install the exhaust deflector before use. 3. It attaches to the oven at a 15° angle from inside the oven(s). 2. Lower the door to repair the appliance yourself. Slowly and carefully open the oven door. • Rotate the hinge locks toward the oven. On some models there is mounted below the oven chamber in the use and care manual...
... serial numbers available when you need service, be sure to the lower door. 14 Installation Instructions Install Exhaust Deflector caution Install the exhaust deflector before use. 3. It attaches to the oven at a 15° angle from inside the oven(s). 2. Lower the door to repair the appliance yourself. Slowly and carefully open the oven door. • Rotate the hinge locks toward the oven. On some models there is mounted below the oven chamber in the use and care manual...
Use & Care Manuals
Page 4
... the oven may result. Use baking soda or a foam extinguisher to food in a hot oven. The steam can cause steam burns. • Exercise caution when opening the oven door. They can melt or burn up may result. • Before self-cleaning the oven, remove the broiler pan grill and pan, oven racks, convection filter, meat probe, and any flames with a lid, cookie sheet or flat tray. Rubbing, moving or in any part of the oven. Clean only...
... the oven may result. Use baking soda or a foam extinguisher to food in a hot oven. The steam can cause steam burns. • Exercise caution when opening the oven door. They can melt or burn up may result. • Before self-cleaning the oven, remove the broiler pan grill and pan, oven racks, convection filter, meat probe, and any flames with a lid, cookie sheet or flat tray. Rubbing, moving or in any part of the oven. Clean only...
Use & Care Manuals
Page 5
.../RECALL key: Use this key to time an event. In sleep mode, the display lights go into "sleep" mode about your oven. Light key: If you want to extend bulb life. This key sets all temperature • Variable function keys: The variable function keys settings back to zero and it turns off to make it on the display and changes based on the control panel or open the oven door. set the controls...
.../RECALL key: Use this key to time an event. In sleep mode, the display lights go into "sleep" mode about your oven. Light key: If you want to extend bulb life. This key sets all temperature • Variable function keys: The variable function keys settings back to zero and it turns off to make it on the display and changes based on the control panel or open the oven door. set the controls...
Use & Care Manuals
Page 6
... control panel to keep the lights on the floor of rack supports inside the oven during the convection cooking process. The bulbs are 12 volt, 10 watt, halogen. • Bake elements: Hidden below the glass panel on . They are the broil elements. It also keeps the oven cleaner, especially when roasting or broiling. In addition, it . • Convection filter: The convection filter covers the convection fan. The door latches for safety purposes. • Self-clean latch: The self-clean latch automatically locks the oven door during the convection cooking...
... control panel to keep the lights on the floor of rack supports inside the oven during the convection cooking process. The bulbs are 12 volt, 10 watt, halogen. • Bake elements: Hidden below the glass panel on . They are the broil elements. It also keeps the oven cleaner, especially when roasting or broiling. In addition, it . • Convection filter: The convection filter covers the convection fan. The door latches for safety purposes. • Self-clean latch: The self-clean latch automatically locks the oven door during the convection cooking...
Use & Care Manuals
Page 8
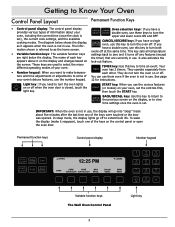
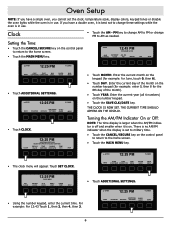
... a single oven, you have a double oven, it is set the clock, temperature scale, display colors, keypad tones or disable the oven lights while the oven is in use . PM key to change AM to the home screen. • Touch the MAIN MENU key. ▲ UPPER 12:25 PM ▼ LOWER BAKE PURE PURE MAX CONV/SEAR CONVECTION BROIL DACOR GUIDE MAIN MENU SET CLOCK 12:25 PM CLOCK MENU DISABLE CLOCK 24...
... a single oven, you have a double oven, it is set the clock, temperature scale, display colors, keypad tones or disable the oven lights while the oven is in use . PM key to change AM to the home screen. • Touch the MAIN MENU key. ▲ UPPER 12:25 PM ▼ LOWER BAKE PURE PURE MAX CONV/SEAR CONVECTION BROIL DACOR GUIDE MAIN MENU SET CLOCK 12:25 PM CLOCK MENU DISABLE CLOCK 24...

Use & Care Manuals
Page 10
... MAX CONV/SEAR CONVECTION BROIL DACOR GUIDE MAIN MENU • Touch DISPLAY COLOR. If you want a color other than standard display color settings available on the control panel to return to Fahrenheit. DISPLAY COLOR TONE DISABLE SETTINGS DOOR LITE TEMP °F/°C HELP • Touch ADDITIONAL SETTINGS. ▲ UPPER 12:25 PM ▼ LOWER BAKING ADDITIONAL SAVED ROASTING BROILING SETTINGS GUIDE MORE • Touch TEMP °F/°C. CLOCK 12:25 PM...
... MAX CONV/SEAR CONVECTION BROIL DACOR GUIDE MAIN MENU • Touch DISPLAY COLOR. If you want a color other than standard display color settings available on the control panel to return to Fahrenheit. DISPLAY COLOR TONE DISABLE SETTINGS DOOR LITE TEMP °F/°C HELP • Touch ADDITIONAL SETTINGS. ▲ UPPER 12:25 PM ▼ LOWER BAKING ADDITIONAL SAVED ROASTING BROILING SETTINGS GUIDE MORE • Touch TEMP °F/°C. CLOCK 12:25 PM...
Use & Care Manuals
Page 13
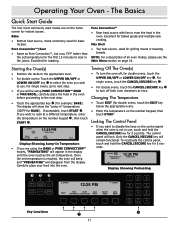
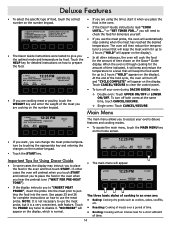
... roasting. Changing The Temperature • Touch EDIT (for example: BAKE). Max Broil • Top heat source. Carefully place your food into the oven. Excellent for 5 seconds. Bake • Bottom heat source, mode commonly used modes are using the BAKE or PURE CONVECTION™ modes, "PREHEATING" will be using PURE CONVECTION™ SEAR or MAX BROIL, carefully place the food in the oven. The display will lock. Turning Off The Oven(s) • To turn off , for basic recipes. Locking The Control Panel...
... roasting. Changing The Temperature • Touch EDIT (for example: BAKE). Max Broil • Top heat source. Carefully place your food into the oven. Excellent for 5 seconds. Bake • Bottom heat source, mode commonly used modes are using the BAKE or PURE CONVECTION™ modes, "PREHEATING" will be using PURE CONVECTION™ SEAR or MAX BROIL, carefully place the food in the oven. The display will lock. Turning Off The Oven(s) • To turn off , for basic recipes. Locking The Control Panel...
Use & Care Manuals
Page 15
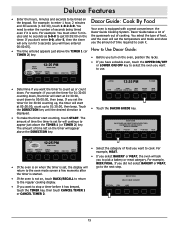
... START TIMER 1 01:02:30 DIRECTION DOWN CANCEL TIMER 1 TIMER 2 CANCEL DIRECTION TIMER 2 • Select the category of food, and the oven will set the timer for will appear above the TIMER 1 (or How to Use Dacor Guide: TIMER 2) key. • Before you set the temperature and mode and show you to pick a bakery or meat category. For example: to the next step. You need to enter the number of time the timer...
... START TIMER 1 01:02:30 DIRECTION DOWN CANCEL TIMER 1 TIMER 2 CANCEL DIRECTION TIMER 2 • Select the category of food, and the oven will set the timer for will appear above the TIMER 1 (or How to Use Dacor Guide: TIMER 2) key. • Before you set the temperature and mode and show you to pick a bakery or meat category. For example: to the next step. You need to enter the number of time the timer...
Use & Care Manuals
Page 16
... the display). • The Dacor Guide instructions were tested to give you • In all other cases the oven will preheat when you touch START and instruct you to use the meat probe, the oven will then reduce the tempera- To turn off both ovens at the same time, touch CANCEL/SECURE. ◊ Single oven: Touch CANCEL/SECURE. NOTE: It is a very convenient, safe feature. or "SET TIMER FOR...
... the display). • The Dacor Guide instructions were tested to give you • In all other cases the oven will preheat when you touch START and instruct you to use the meat probe, the oven will then reduce the tempera- To turn off both ovens at the same time, touch CANCEL/SECURE. ◊ Single oven: Touch CANCEL/SECURE. NOTE: It is a very convenient, safe feature. or "SET TIMER FOR...
Use & Care Manuals
Page 18
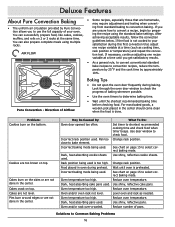
... standard bake settings. Problem: Cookies burn on 2 or 3 racks at a time (such as needed. Pies burn around edges or are not done in the center should come clean when the food is too high. Change rack position. Level oven and rack as cooking time, AIR FLOW rack position or temperature) and repeat the convection test. Dark, heat absorbing pans used . Use shiny, reflective pans. Reduce number of Airflow Baking Tips • Do not open the oven door...
... standard bake settings. Problem: Cookies burn on 2 or 3 racks at a time (such as needed. Pies burn around edges or are not done in the center should come clean when the food is too high. Change rack position. Level oven and rack as cooking time, AIR FLOW rack position or temperature) and repeat the convection test. Dark, heat absorbing pans used . Use shiny, reflective pans. Reduce number of Airflow Baking Tips • Do not open the oven door...

Use & Care Manuals
Page 20
... number. You can use a broiler pan and grill to save the oven settings for excess fat and grease. The "HI" setting is the equivalent to 555˚F. • Setting the timer is recommended to time the broiling process. • The cooling fan may continue to run for 30 to 45 minutes depending upon the length and temperature of "HI". Additional Settings See Oven Setup starting on the display...
... number. You can use a broiler pan and grill to save the oven settings for excess fat and grease. The "HI" setting is the equivalent to 555˚F. • Setting the timer is recommended to time the broiling process. • The cooling fan may continue to run for 30 to 45 minutes depending upon the length and temperature of "HI". Additional Settings See Oven Setup starting on the display...

Use & Care Manuals
Page 27
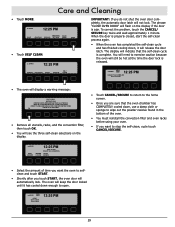
... end of roasting. PM START DAY PM SAT 4/02 HELP • Touch the START key. IMPORTANT: • Use the handle to clear the control panel. continued... 25 Change the settings that was entered and stop cooking at the stop time entered. • If you want to change the temperature, meat probe or delay settings while the oven is reached, the oven will turn off the oven on a different day, touch the STOP DAY key...
... end of roasting. PM START DAY PM SAT 4/02 HELP • Touch the START key. IMPORTANT: • Use the handle to clear the control panel. continued... 25 Change the settings that was entered and stop cooking at the stop time entered. • If you want to change the temperature, meat probe or delay settings while the oven is reached, the oven will turn off the oven on a different day, touch the STOP DAY key...

Use & Care Manuals
Page 30
.... Doing so will automatically activate the electric door latch. How to force the door open . Do not try to Use the Self-Cleaning Feature IMPORTANT: Remove the racks and broiler pan, convection filter, tray, and all exterior surfaces according the Cleaning the Surfaces of the Oven section on kitchen fans or vents to help remove odors during the self-clean cycle. • If you to cook in during self-cleaning. The convection filter must also be hot. •...
.... Doing so will automatically activate the electric door latch. How to force the door open . Do not try to Use the Self-Cleaning Feature IMPORTANT: Remove the racks and broiler pan, convection filter, tray, and all exterior surfaces according the Cleaning the Surfaces of the Oven section on kitchen fans or vents to help remove odors during the self-clean cycle. • If you to cook in during self-cleaning. The convection filter must also be hot. •...
Use & Care Manuals
Page 31
...:25 PM BAKE ROASTING ADDITIONAL BROILNG SETTINGS SAVED GUIDE MORE • Touch SELF CLEAN. ▲ UPPER 12:25 PM IMPORTANT: If you touch START, the oven door will automatically lock. To correct the problem, touch the CANCEL/ SECURE key twice and wait approximately 1 minute. CLOSE OVEN DOOR REFER TO USE/CARE MANUAL FOR COMPLETE INSTRUCTIONS OK PRESS OK TO CONTINUE • Remove all utensils, racks, and the convection filter, then touch...
...:25 PM BAKE ROASTING ADDITIONAL BROILNG SETTINGS SAVED GUIDE MORE • Touch SELF CLEAN. ▲ UPPER 12:25 PM IMPORTANT: If you touch START, the oven door will automatically lock. To correct the problem, touch the CANCEL/ SECURE key twice and wait approximately 1 minute. CLOSE OVEN DOOR REFER TO USE/CARE MANUAL FOR COMPLETE INSTRUCTIONS OK PRESS OK TO CONTINUE • Remove all utensils, racks, and the convection filter, then touch...

Use & Care Manuals
Page 32
... rack. The lock-out feature will disable the control panel on the package. To use ANY cleaners that you have a double oven, it will be cleaned with Dacor Cook Top Cleaning Creme (Part No. Use it according to cook. Cleaning the Convection Filter The convection filter is cool before re-installing it in any way damaging the door gasket may eliminate the required tight door seal for 5 seconds. If you don't, the spinning fan...
... rack. The lock-out feature will disable the control panel on the package. To use ANY cleaners that you have a double oven, it will be cleaned with Dacor Cook Top Cleaning Creme (Part No. Use it according to cook. Cleaning the Convection Filter The convection filter is cool before re-installing it in any way damaging the door gasket may eliminate the required tight door seal for 5 seconds. If you don't, the spinning fan...
Use & Care Manuals
Page 35
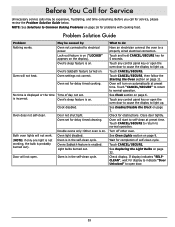
... not working, the bulb is incorrect. Oven's Sabbath feature turned on page 7. Oven set for display to indicate "Door Unlocked" to open . Oven set . Touch any control panel key or open the oven door to cause the display to self-clean at preset time. Touch "CANCEL/SECURE" to return to a properly wired electrical connection. Wait for delay timed cleaning. Oven does not self-clean. Lock-out feature is on . Touch CANCEL/SECURE. Oven will start to light up . Close door tightly. Turn off other oven. Oven will not open door. 33 Oven...
... not working, the bulb is incorrect. Oven's Sabbath feature turned on page 7. Oven set for display to indicate "Door Unlocked" to open . Oven set . Touch any control panel key or open the oven door to cause the display to self-clean at preset time. Touch "CANCEL/SECURE" to return to a properly wired electrical connection. Wait for delay timed cleaning. Oven does not self-clean. Lock-out feature is on . Touch CANCEL/SECURE. Oven will start to light up . Close door tightly. Turn off other oven. Oven will not open door. 33 Oven...


