Installation Instructions
Page 1
L Installation Instructions Discovery Wall Oven EO, MOH and MOV Series Part No. 65433 Rev.
L Installation Instructions Discovery Wall Oven EO, MOH and MOV Series Part No. 65433 Rev.
Installation Instructions
Page 3
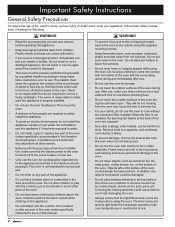
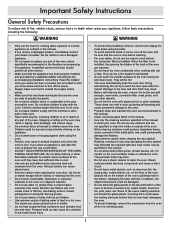
... • Always contact the Dacor Customer Service Team about problems and conditions that you begin the installation process. Doing so may cause a fire hazard or carbon monoxide poisoning. Doing so blocks air flow through the oven and may result in the oven bottom or cover an entire ...for future reference and the local electrical inspector's use combustible, flammable, or explosive vapors and liquids (such as aerosol cans, away from the oven. Also keep items that can occur. warning WARNING - DANGER IMPORTANT: Do not store or use . See Customer Service Information. warning When ...
... • Always contact the Dacor Customer Service Team about problems and conditions that you begin the installation process. Doing so may cause a fire hazard or carbon monoxide poisoning. Doing so blocks air flow through the oven and may result in the oven bottom or cover an entire ...for future reference and the local electrical inspector's use combustible, flammable, or explosive vapors and liquids (such as aerosol cans, away from the oven. Also keep items that can occur. warning WARNING - DANGER IMPORTANT: Do not store or use . See Customer Service Information. warning When ...
Installation Instructions
Page 4
... cookie sheets, etc. Remove birds to a separate, well-ventilated room during the self-clean cycle. Dacor is properly installed. • Do not use the door handle(s) to lift or move the oven. • A minimum of two people are exposed. • Non-stick coatings, when heated, ... faulty installation. The lens covers protect the light bulbs from children. Plastic sheets and bags can melt or burn up by high oven temperatures or mechanical shock. 2 Do not allow heating elements in the literature accompanying it . Important Safety Instructions General Safety Precautions To...
... cookie sheets, etc. Remove birds to a separate, well-ventilated room during the self-clean cycle. Dacor is properly installed. • Do not use the door handle(s) to lift or move the oven. • A minimum of two people are exposed. • Non-stick coatings, when heated, ... faulty installation. The lens covers protect the light bulbs from children. Plastic sheets and bags can melt or burn up by high oven temperatures or mechanical shock. 2 Do not allow heating elements in the literature accompanying it . Important Safety Instructions General Safety Precautions To...

Installation Instructions
Page 5
... electrical requirements. • It is located inside the oven door, in the slot above the left hinge (inside the lower door on a double oven). to 4:00 p.m. Pacific Time Dacor Customer Service Phone: (800) 793-0093 (U.S.A. Customer Service... questions or problems with installation, contact your Dacor dealer or the Dacor Customer Service Team. Friday 6:00 a.m. to 5:00 p.m. Tab EO230xxx A BC D A = MODEL TYPE Epicure oven Millennia oven (horiz. trim) Millennia oven (vert. trim) = EO = MOH = MOV B = CONFIGURATION Single oven = 1 Double oven = 2 C = SIZE 27 inch =...
... electrical requirements. • It is located inside the oven door, in the slot above the left hinge (inside the lower door on a double oven). to 4:00 p.m. Pacific Time Dacor Customer Service Phone: (800) 793-0093 (U.S.A. Customer Service... questions or problems with installation, contact your Dacor dealer or the Dacor Customer Service Team. Friday 6:00 a.m. to 5:00 p.m. Tab EO230xxx A BC D A = MODEL TYPE Epicure oven Millennia oven (horiz. trim) Millennia oven (vert. trim) = EO = MOH = MOV B = CONFIGURATION Single oven = 1 Double oven = 2 C = SIZE 27 inch =...

Installation Instructions
Page 7
Product Specifications C 1 1/4" (3.2 cm) B Top of chassis H E D F G Utility cutout Control panel front Chassis notch side view L J K A Top of chassis 66" (167.6 cm) Flexible conduit Single Wall Oven Dimensions C 1 1/4" (3.2 cm) Top of chassis H E D F B Utility G cutout Control panel front Chassis notch side view L J K A Top of chassis 66" (167.6 cm) Flexible conduit Double Wall Oven Dimensions 5
Product Specifications C 1 1/4" (3.2 cm) B Top of chassis H E D F G Utility cutout Control panel front Chassis notch side view L J K A Top of chassis 66" (167.6 cm) Flexible conduit Single Wall Oven Dimensions C 1 1/4" (3.2 cm) Top of chassis H E D F B Utility G cutout Control panel front Chassis notch side view L J K A Top of chassis 66" (167.6 cm) Flexible conduit Double Wall Oven Dimensions 5
Installation Instructions
Page 8
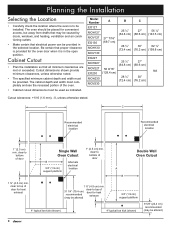
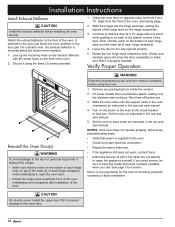
... heat exhaust 1 ¾" (4.5 cm) min. 31 1/4" (79.4 cm) recommended (may be altered) clear to bottom of door Single Wall Oven Cutout A B Alternate 3/4" (1.9 cm) support platform electrical location 1" (2.5 cm) min. C C Recommended electrical location Recommended electrical location 1" (2.5 ...cm) min. Planning the Installation Selecting the Location • Carefully check the location where the oven is in the selected location. Model Number A B C EO127 MOH127 MOV127 EO130 MOH130 MOV130 27" 7/16" (69.7 cm) 25 ½" 27" 56 ½" (64.8...
... heat exhaust 1 ¾" (4.5 cm) min. 31 1/4" (79.4 cm) recommended (may be altered) clear to bottom of door Single Wall Oven Cutout A B Alternate 3/4" (1.9 cm) support platform electrical location 1" (2.5 cm) min. C C Recommended electrical location Recommended electrical location 1" (2.5 ...cm) min. Planning the Installation Selecting the Location • Carefully check the location where the oven is in the selected location. Model Number A B C EO127 MOH127 MOV127 EO130 MOH130 MOV130 27" 7/16" (69.7 cm) 25 ½" 27" 56 ½" (64.8...

Installation Instructions
Page 9
...heat exhaust 4" (10.2 cm) min. to combustible floor A B 3/4" (1.9 cm) support platform 4" typical toe kick (shown) Recommended electrical location Single Wall Oven Under-Counter Cutout 1 1/2" (3.8 cm) typical counter 36" Typical (91.4 cm) 1 ¾" (4.5 cm) min. to combustibles 4" (10.2 cm)... min. between cutout A B 3/4" (1.9 cm) support platform 4" typical toe kick (shown) A B 3/4" (1.9 cm) support platform Duel Single Wall Oven Under Alternate Counter Cutout electrical locations 7 to combustibles 36" Typical (91.4 cm) 1 ¾" (4.5 cm) min. to top of cutout. clear to ...
...heat exhaust 4" (10.2 cm) min. to combustible floor A B 3/4" (1.9 cm) support platform 4" typical toe kick (shown) Recommended electrical location Single Wall Oven Under-Counter Cutout 1 1/2" (3.8 cm) typical counter 36" Typical (91.4 cm) 1 ¾" (4.5 cm) min. to combustibles 4" (10.2 cm)... min. between cutout A B 3/4" (1.9 cm) support platform 4" typical toe kick (shown) A B 3/4" (1.9 cm) support platform Duel Single Wall Oven Under Alternate Counter Cutout electrical locations 7 to combustibles 36" Typical (91.4 cm) 1 ¾" (4.5 cm) min. to top of cutout. clear to ...
Installation Instructions
Page 10
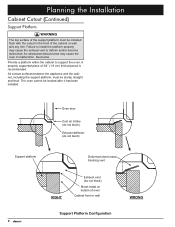
... be leveled after it has been installed. See below. A properly supported piece of oven Cabinet front or wall WRONG Support Platform Configuration 8 Oven door Cool air intake (do not block) Exhaust deflector (do not bend) Support platform Deformed sheet metal blocking vent RIGHT Exhaust ...exhaust area may cause the exhaust vent to deform and/or become obstructed. Failure to install the platform properly may cause the oven to support the oven. All contact surfaces between the appliance and the cabinet, including the support platform, must be installed flush with the cutout in...
... be leveled after it has been installed. See below. A properly supported piece of oven Cabinet front or wall WRONG Support Platform Configuration 8 Oven door Cool air intake (do not block) Exhaust deflector (do not bend) Support platform Deformed sheet metal blocking vent RIGHT Exhaust ...exhaust area may cause the exhaust vent to deform and/or become obstructed. Failure to install the platform properly may cause the oven to support the oven. All contact surfaces between the appliance and the cabinet, including the support platform, must be installed flush with the cutout in...
Installation Instructions
Page 11
...02269-9101 The correct voltage, frequency and amperage must comply with electrical connection leads in a flexible metal conduit. PN 46051B • GlideRack™ oven rack, one (1) - It is the owner's responsibility to ensure a proper installation before proceeding. ◊ 27" standard rack - Six (6) ... including minimum supply wire size, must be supplied to these circuits under the jurisdiction of this standard may be disconnected without removing the oven from the wall. PN 700486-1 or • Stainless steel cleaner - PN 12157 9 four (4) 3/4" mounting screws, four (4) 1...
...02269-9101 The correct voltage, frequency and amperage must comply with electrical connection leads in a flexible metal conduit. PN 46051B • GlideRack™ oven rack, one (1) - It is the owner's responsibility to ensure a proper installation before proceeding. ◊ 27" standard rack - Six (6) ... including minimum supply wire size, must be supplied to these circuits under the jurisdiction of this standard may be disconnected without removing the oven from the wall. PN 700486-1 or • Stainless steel cleaner - PN 12157 9 four (4) 3/4" mounting screws, four (4) 1...
Installation Instructions
Page 12
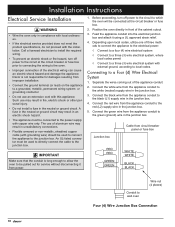
... not meet the product specifications, do not proceed with this appliance. Separate the wires coming out of the cabinet cutout. 3. Dacor is long enough to allow the oven to be connected to the white (neutral) supply wire in the junction box. 3. Connect the red wire from the appliance... electric shock hazard and damage the appliance. Feed the appliance conduit into the electrical junction box and attach it from the appliance conduit to wall oven Wire nut (4 places) Four (4) Wire Junction Box Connection 10 Call a licensed electrician to install the required wiring. • To prevent an...
... not meet the product specifications, do not proceed with this appliance. Separate the wires coming out of the cabinet cutout. 3. Dacor is long enough to allow the oven to be connected to the white (neutral) supply wire in the junction box. 3. Connect the red wire from the appliance... electric shock hazard and damage the appliance. Feed the appliance conduit into the electrical junction box and attach it from the appliance conduit to wall oven Wire nut (4 places) Four (4) Wire Junction Box Connection 10 Call a licensed electrician to install the required wiring. • To prevent an...

Installation Instructions
Page 13
Separate the wires coming out of the appliance conduit. 2. Connect the red wire from the appliance conduit may be connected to wall oven Three (3) Wire Junction Box Connection (Where Local Codes Permit) note If the junction box has been properly grounded by insulating materials. No. 4 copper wire Meter ...
Separate the wires coming out of the appliance conduit. 2. Connect the red wire from the appliance conduit may be connected to wall oven Three (3) Wire Junction Box Connection (Where Local Codes Permit) note If the junction box has been properly grounded by insulating materials. No. 4 copper wire Meter ...

Installation Instructions
Page 14
...Removing the door(s) will also provide a place to reduce the lifting load. Pull the hinge locks forward on pipe Conduit to wall oven Three (3) Wire Connection with External Ground Final Installation warning • A minimum of two people are required to safely install this appliance..., remove the door(s) to grip the oven when lifting it into place. 1. Installation Instructions Connecting to a Three (3) Wire Electrical System with the door removed from circuit breaker panel...
...Removing the door(s) will also provide a place to reduce the lifting load. Pull the hinge locks forward on pipe Conduit to wall oven Three (3) Wire Connection with External Ground Final Installation warning • A minimum of two people are required to safely install this appliance..., remove the door(s) to grip the oven when lifting it into place. 1. Installation Instructions Connecting to a Three (3) Wire Electrical System with the door removed from circuit breaker panel...

Installation Instructions
Page 15
...at the bottom of the cabinet only. Raise the door so that the electrical conduit slides through the front or side of the oven. Make sure the oven is heavy. Use extreme caution when lifting the appliance, because it is centered within the cutout. Do not over-tighten. Do... not trap the appliance cable between the oven case back and the rear wall. 4. Blocking the airflow may provide poor or inconsistent baking results. 1. Find the mounting hole locations in the...
...at the bottom of the cabinet only. Raise the door so that the electrical conduit slides through the front or side of the oven. Make sure the oven is heavy. Use extreme caution when lifting the appliance, because it is centered within the cutout. Do not over-tighten. Do... not trap the appliance cable between the oven case back and the rear wall. 4. Blocking the airflow may provide poor or inconsistent baking results. 1. Find the mounting hole locations in the...
Installation Instructions
Page 16
...door. 14 warning Read the accompanying use and care manual. Push until the notch on the bottom of each hinge receptacle. 4. caution On double ovens: Install the upper door first to prevent damage to the fully opened position. 5. Secure it at a 15° angle with the screw holes... oven door(s). Do not attempt to have the model and serial numbers available when you call. If you need service, be sure to repair the appliance yourself. See page 3 for proper electrical connection. • Repeat the above bake test. • If the appliance still does not work, contact Dacor ...
...door. 14 warning Read the accompanying use and care manual. Push until the notch on the bottom of each hinge receptacle. 4. caution On double ovens: Install the upper door first to prevent damage to the fully opened position. 5. Secure it at a 15° angle with the screw holes... oven door(s). Do not attempt to have the model and serial numbers available when you call. If you need service, be sure to repair the appliance yourself. See page 3 for proper electrical connection. • Repeat the above bake test. • If the appliance still does not work, contact Dacor ...

Installation Instructions
Page 17
...line activation. The importance of proper installation of your Dacor oven cannot be completed by the installer to ensure that no part of the installation has been overlooked. • Proper installation is wired to all applicable codes and Dacor specifications. See page 13. □□ Exhaust... deflector has been installed. See page 14. □□ Plastic coating, if applicable, has been removed from inside the oven. □□ Power is turned on bottom of...
...line activation. The importance of proper installation of your Dacor oven cannot be completed by the installer to ensure that no part of the installation has been overlooked. • Proper installation is wired to all applicable codes and Dacor specifications. See page 13. □□ Exhaust... deflector has been installed. See page 14. □□ Plastic coating, if applicable, has been removed from inside the oven. □□ Power is turned on bottom of...

Use & Care Manuals
Page 1
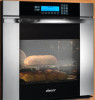
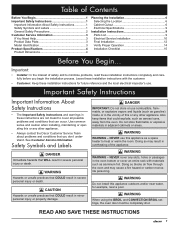
Discovery Wall Oven Use and Care Manual Models EO, MOH, MOV Style varies. Ta b l e o f C o nt e nt s Important Safety Instructions 1 Getting to Know Your Oven 3 Oven Setup 6 Operating Your Oven - M Model EO230SCH shown. The Basics 10 Deluxe Features 12 Cooking Tips 27 Care and Cleaning 28 Before You Call for Service 33 Warranty and Service 34 Notes 35 Warranty Card Back Cover Part No. 65491 Rev.
Discovery Wall Oven Use and Care Manual Models EO, MOH, MOV Style varies. Ta b l e o f C o nt e nt s Important Safety Instructions 1 Getting to Know Your Oven 3 Oven Setup 6 Operating Your Oven - M Model EO230SCH shown. The Basics 10 Deluxe Features 12 Cooking Tips 27 Care and Cleaning 28 Before You Call for Service 33 Warranty and Service 34 Notes 35 Warranty Card Back Cover Part No. 65491 Rev.
Use & Care Manuals
Page 3
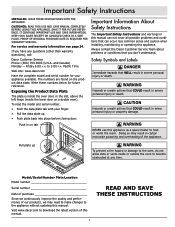
...this use and care manual completely before closing door. Pacific Time Web site: www.dacor.com Have the complete model and serial number for your sales receipt or canceled check in on a double oven). Safety Symbols and Labels danger Immediate hazards that you have any time. It ... Important Information About Safety Instructions The Important Safety Instructions and warnings in the slot, above the left hinge (inside or outside the oven to the oven, do not allow slots or vents inside the lower door on tab warning NEVER use and care information. to heat or warm the...
...this use and care manual completely before closing door. Pacific Time Web site: www.dacor.com Have the complete model and serial number for your sales receipt or canceled check in on a double oven). Safety Symbols and Labels danger Immediate hazards that you have any time. It ... Important Information About Safety Instructions The Important Safety Instructions and warnings in the slot, above the left hinge (inside or outside the oven to the oven, do not allow slots or vents inside the lower door on tab warning NEVER use and care information. to heat or warm the...
Use & Care Manuals
Page 4
... the metal parts, and could trap heat in the bottom, damaging the bake element. Rubbing, moving or in any part of the oven unless specifically recommended in the literature accompanying this appliance. Children could penetrate electrical components and cause a short circuit. • Do not...shock, serious injury or death when using your appliance, follow basic precautions, including the following: warning warning • Only use the oven for cooking tasks expected of a home appliance as recommended in this manual. • Clean only those individuals that the appliance has ...
... the metal parts, and could trap heat in the bottom, damaging the bake element. Rubbing, moving or in any part of the oven unless specifically recommended in the literature accompanying this appliance. Children could penetrate electrical components and cause a short circuit. • Do not...shock, serious injury or death when using your appliance, follow basic precautions, including the following: warning warning • Only use the oven for cooking tasks expected of a home appliance as recommended in this manual. • Clean only those individuals that the appliance has ...
Use & Care Manuals
Page 5
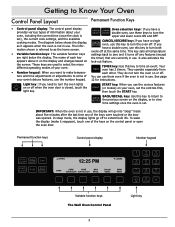
... need to select the many different operating modes of information about five minutes after the last time any features (except are used to turn the oven, including the current time (once the clock is not in use . the screen. These keys are right below shows the display, as the home screen... You can use , the display will go off . To wake the display (make tempera- BACK RECALL BACK/RECALL key: Use this key to turn the oven lights on lock-out feature. The diagram below the display. TIMER key: Use this key to return to the previous screen on the control panel...
... need to select the many different operating modes of information about five minutes after the last time any features (except are used to turn the oven, including the current time (once the clock is not in use . the screen. These keys are right below shows the display, as the home screen... You can use , the display will go off . To wake the display (make tempera- BACK RECALL BACK/RECALL key: Use this key to turn the oven lights on lock-out feature. The diagram below the display. TIMER key: Use this key to return to the previous screen on the control panel...
Use & Care Manuals
Page 6
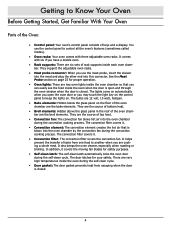
.... The convection filter covers it. • Convection element: The convection element creates the hot air that you can easily see the food inside each oven chamber. The door latches for your safety. You use the meat probe, insert the skewer into the meat and plug the other end into the.... The convection filter covers it covers the moving fan blades for safety purposes. • Self-clean latch: The self-clean latch automatically locks the oven door during the self-clean cycle. • Door gasket: The door gasket prevents heat from one food to another when you use the control panel...
.... The convection filter covers it. • Convection element: The convection element creates the hot air that you can easily see the food inside each oven chamber. The door latches for your safety. You use the meat probe, insert the skewer into the meat and plug the other end into the.... The convection filter covers it covers the moving fan blades for safety purposes. • Self-clean latch: The self-clean latch automatically locks the oven door during the self-clean cycle. • Door gasket: The door gasket prevents heat from one food to another when you use the control panel...


