Planning Guides
Page 1
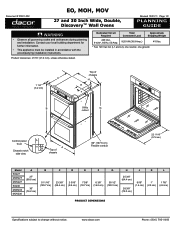
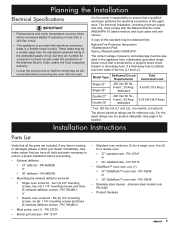
... Utility G cutout Control panel front Chassis notch side view L J K A Top of chassis 66" (167.6 cm) Flexible conduit 22 11/16" (57.6 cm) Model EO227 MOH227 MOV227 EO230 MOH230 MOV230 A...product DIMENSIONS Specifications subject to change without notice. www.dacor.com Phone: (800) 7931-0.3093 Dedicated Circuit Required Total Connected Load Approximate Shipping Weight 240 Vac, 4-wire*, 60 Hz, 50 Amp. 9.25 kW (38.9 Amp.) 415 lbs. * Two 120 Vac hot (L1 and L2), one neutral, one ground. Document # PG01-002 EO, MOH, MOV 27 and 30 Inch Wide, Double, Discovery™ Wall Ovens...
... Utility G cutout Control panel front Chassis notch side view L J K A Top of chassis 66" (167.6 cm) Flexible conduit 22 11/16" (57.6 cm) Model EO227 MOH227 MOV227 EO230 MOH230 MOV230 A...product DIMENSIONS Specifications subject to change without notice. www.dacor.com Phone: (800) 7931-0.3093 Dedicated Circuit Required Total Connected Load Approximate Shipping Weight 240 Vac, 4-wire*, 60 Hz, 50 Amp. 9.25 kW (38.9 Amp.) 415 lbs. * Two 120 Vac hot (L1 and L2), one neutral, one ground. Document # PG01-002 EO, MOH, MOV 27 and 30 Inch Wide, Double, Discovery™ Wall Ovens...
Installation Instructions
Page 3
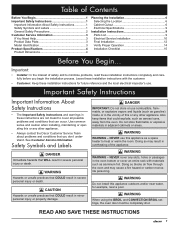
... 1 Safety Symbols and Labels 1 General Safety Precautions 2 Customer Service Information 3 If You Need Help 3 Product Data Plate 3 Model Identification 3 Product Specifications 4 Product Dimensions 4 Planning the Installation 6 Selecting the Location 6 Cabinet Cutout 6 Electrical Specifications 9 Installation Instructions 9 Parts List 9 Electrical Service Installation 10 Final Installation 12 Verify Proper Operation 14 Installation Checklist 15 Before You Begin... NEVER cover any other appliance. Doing so blocks air flow through the oven and may result in severe...
... 1 Safety Symbols and Labels 1 General Safety Precautions 2 Customer Service Information 3 If You Need Help 3 Product Data Plate 3 Model Identification 3 Product Specifications 4 Product Dimensions 4 Planning the Installation 6 Selecting the Location 6 Cabinet Cutout 6 Electrical Specifications 9 Installation Instructions 9 Parts List 9 Electrical Service Installation 10 Final Installation 12 Verify Proper Operation 14 Installation Checklist 15 Before You Begin... NEVER cover any other appliance. Doing so blocks air flow through the oven and may result in severe...
Installation Instructions
Page 4
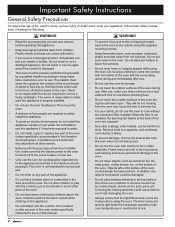
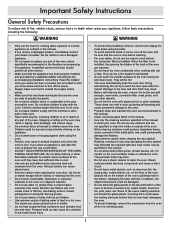
... become covered up during cooking. • To prevent damage, remove the meat probe from children. Objects left on the appliance. • Do not tamper with aluminum foil or other materials. Important Safety Instructions General Safety Precautions To reduce the risk of fire, electric shock, serious injury or death when using your safety, do not use the oven to cook without the convection filter installed. Plastic sheets...
... become covered up during cooking. • To prevent damage, remove the meat probe from children. Objects left on the appliance. • Do not tamper with aluminum foil or other materials. Important Safety Instructions General Safety Precautions To reduce the risk of fire, electric shock, serious injury or death when using your safety, do not use the oven to cook without the convection filter installed. Plastic sheets...

Installation Instructions
Page 5
...) Monday - Pacific Time Web site: www.Dacor.com Product Data Plate • The product data plate contains the model and serial number information and the electrical requirements. • It is located inside the oven door, in the slot above the left hinge (inside the lower door on the data plate: 1. trim) = EO = MOH = MOV B = CONFIGURATION Single oven = 1 Double oven = 2 C = SIZE 27 inch = 27 30 inch = 30 D = FINISH Epicure: Black glass = BK Stainless steel, black chrome trim = SBC Stainless steel...
...) Monday - Pacific Time Web site: www.Dacor.com Product Data Plate • The product data plate contains the model and serial number information and the electrical requirements. • It is located inside the oven door, in the slot above the left hinge (inside the lower door on the data plate: 1. trim) = EO = MOH = MOV B = CONFIGURATION Single oven = 1 Double oven = 2 C = SIZE 27 inch = 27 30 inch = 30 D = FINISH Epicure: Black glass = BK Stainless steel, black chrome trim = SBC Stainless steel...
Installation Instructions
Page 11
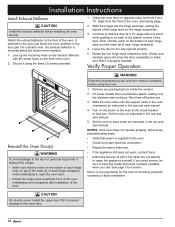
... line (L1 and L2). PN 72948 or • Mounting and exhaust deflector screw kit ◊ 30" GlideRack™ oven rack - PN 72723 • Broiler grill and pan - Model Type Single 27" Single 30" Dedicated Circuit Requirements 240 Vac 60 Hz., 4 wire*, 30 Amp. The above electrical ratings are included. Installation Instructions Parts List Verify that all tools and parts necessary to these circuits under the jurisdiction of this standard may be...
... line (L1 and L2). PN 72948 or • Mounting and exhaust deflector screw kit ◊ 30" GlideRack™ oven rack - PN 72723 • Broiler grill and pan - Model Type Single 27" Single 30" Dedicated Circuit Requirements 240 Vac 60 Hz., 4 wire*, 30 Amp. The above electrical ratings are included. Installation Instructions Parts List Verify that all tools and parts necessary to these circuits under the jurisdiction of this standard may be...
Installation Instructions
Page 16
... the model and serial numbers available when you need service, be sure to the oven at a 15° angle from inside the oven(s). 2. Slowly and carefully open the oven door. • Rotate the hinge locks toward the oven. Secure it is supplied to repair the appliance yourself. Rotate the two hinge locks toward the front of the oven immediately and completely after installation of the oven. 2. warning Read the accompanying use . 3. Set the oven...
... the model and serial numbers available when you need service, be sure to the oven at a 15° angle from inside the oven(s). 2. Slowly and carefully open the oven door. • Rotate the hinge locks toward the oven. Secure it is supplied to repair the appliance yourself. Rotate the two hinge locks toward the front of the oven immediately and completely after installation of the oven. 2. warning Read the accompanying use . 3. Set the oven...
Use & Care Manuals
Page 4
... the oven unattended when cooking with the oven. Use baking soda or a foam extinguisher to extinguish flaming grease. • Do not use towels or bulky cloth as pot holders. • Use extreme caution if adding water to operate it is not being used. 2 Pressure build up may result. • Before self-cleaning the oven, remove the broiler pan grill and pan, oven racks, convection filter, meat probe, and any part of the oven. They...
... the oven unattended when cooking with the oven. Use baking soda or a foam extinguisher to extinguish flaming grease. • Do not use towels or bulky cloth as pot holders. • Use extreme caution if adding water to operate it is not being used. 2 Pressure build up may result. • Before self-cleaning the oven, remove the broiler pan grill and pan, oven racks, convection filter, meat probe, and any part of the oven. They...
Use & Care Manuals
Page 5
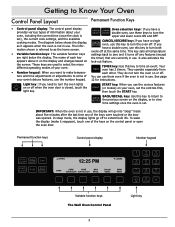
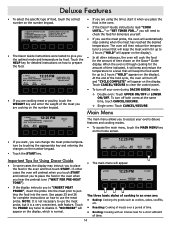
... control panel or open the oven door. To wake the display (make tempera- set), the current cook settings, and the available cooking modes. The diagram below the display. CANCEL CANCEL/SECURE key: If you use . the screen. They operate separately from • Number keypad: When you have a ON/OFF ON/OFF double oven, use the number keypad. 12 for instructions. BACK RECALL BACK/RECALL key: Use this key to time an event. These keys are used...
... control panel or open the oven door. To wake the display (make tempera- set), the current cook settings, and the available cooking modes. The diagram below the display. CANCEL CANCEL/SECURE key: If you use . the screen. They operate separately from • Number keypad: When you have a ON/OFF ON/OFF double oven, use the number keypad. 12 for instructions. BACK RECALL BACK/RECALL key: Use this key to time an event. These keys are used...
Use & Care Manuals
Page 6
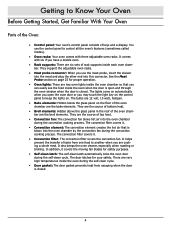
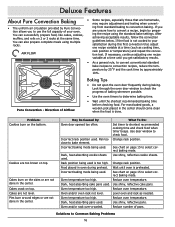
... when roasting or broiling. The convection filter covers it . • Convection element: The convection element creates the hot air that you have a double oven. • Rack supports: There are six sets of the oven chamber are 12 volt, 10 watt, halogen. • Bake elements: Hidden below the glass panel on . The door latches for safety purposes. • Self-clean latch: The self-clean latch automatically locks the oven door during the self-clean cycle. You use the meat probe, insert the skewer into the meat and plug the...
... when roasting or broiling. The convection filter covers it . • Convection element: The convection element creates the hot air that you have a double oven. • Rack supports: There are six sets of the oven chamber are 12 volt, 10 watt, halogen. • Bake elements: Hidden below the glass panel on . The door latches for safety purposes. • Self-clean latch: The self-clean latch automatically locks the oven door during the self-clean cycle. You use the meat probe, insert the skewer into the meat and plug the...
Use & Care Manuals
Page 8
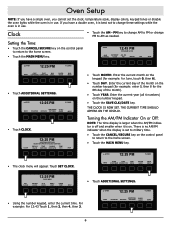
... the CANCEL/SECURE key on the control panel to return to PM or change these settings while the oven is in use . DISPLAY COLOR TONE DISABLE SETTINGS DOOR LITE TEMP °F/°C HELP • The clock menu will appear. THE CURRENT TIME SHOULD APPEAR ON THE DISPLAY. Turning the AM/PM Indicator On or Off: NOTE: The time display is larger when the AM/PM indicator...
... the CANCEL/SECURE key on the control panel to return to PM or change these settings while the oven is in use . DISPLAY COLOR TONE DISABLE SETTINGS DOOR LITE TEMP °F/°C HELP • The clock menu will appear. THE CURRENT TIME SHOULD APPEAR ON THE DISPLAY. Turning the AM/PM Indicator On or Off: NOTE: The time display is larger when the AM/PM indicator...

Use & Care Manuals
Page 10
... CONV/SEAR CONVECTION BROIL DACOR GUIDE MAIN MENU • Touch DISPLAY COLOR. DISPLAY COLOR TONE DISABLE SETTINGS DOOR LITE TEMP °F/°C HELP • Touch ADDITIONAL SETTINGS. ▲ UPPER 12:25 PM ▼ LOWER BAKING ADDITIONAL SAVED ROASTING BROILING SETTINGS GUIDE MORE • Touch TEMP °F/°C. Display Colors The colors for the display are preset to the home screen. CLOCK 12:25 PM ADDITIONAL SETTINGS SELECT AN OPTION TO ADJUST SETTINGS.
... CONV/SEAR CONVECTION BROIL DACOR GUIDE MAIN MENU • Touch DISPLAY COLOR. DISPLAY COLOR TONE DISABLE SETTINGS DOOR LITE TEMP °F/°C HELP • Touch ADDITIONAL SETTINGS. ▲ UPPER 12:25 PM ▼ LOWER BAKING ADDITIONAL SAVED ROASTING BROILING SETTINGS GUIDE MORE • Touch TEMP °F/°C. Display Colors The colors for the display are preset to the home screen. CLOCK 12:25 PM ADDITIONAL SETTINGS SELECT AN OPTION TO ADJUST SETTINGS.
Use & Care Manuals
Page 13
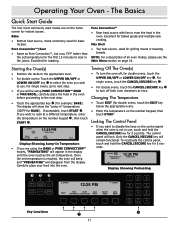
.... The control panel will disappear from the display. If acceptable, touch START . Once the set temperature is not in the oven before proceeding to cook at once. The Basics Quick Start Guide The four most commonly used for example: BAKE). Pure Convection™ • Rear heat source with fan to sear in the oven. Bake • Bottom heat source, mode commonly used modes are using PURE CONVECTION™ SEAR or MAX BROIL, carefully place...
.... The control panel will disappear from the display. If acceptable, touch START . Once the set temperature is not in the oven before proceeding to cook at once. The Basics Quick Start Guide The four most commonly used for example: BAKE). Pure Convection™ • Rear heat source with fan to sear in the oven. Bake • Bottom heat source, mode commonly used modes are using PURE CONVECTION™ SEAR or MAX BROIL, carefully place...
Use & Care Manuals
Page 15
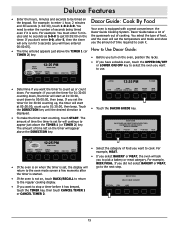
... How to Use Dacor Guide: TIMER 2) key. • Before you turn on the timer will set the timer for 01:30:00 counting down . BAKE PURE PURE MAX CONV/SEAR CONVECTION BROIL DACOR GUIDE MAIN MENU • Touch the DACOR GUIDE key. SELECT A CATEGORY BAKERY MEAT POULTRY FISH POTATOES PIZZA TIME LEFT TIMER 1 00:47:23 12:25 PM PRESS START TIMER 1 01:02:30 DIRECTION DOWN CANCEL TIMER 1 TIMER 2 CANCEL DIRECTION TIMER 2 • Select...
... How to Use Dacor Guide: TIMER 2) key. • Before you turn on the timer will set the timer for 01:30:00 counting down . BAKE PURE PURE MAX CONV/SEAR CONVECTION BROIL DACOR GUIDE MAIN MENU • Touch the DACOR GUIDE key. SELECT A CATEGORY BAKERY MEAT POULTRY FISH POTATOES PIZZA TIME LEFT TIMER 1 00:47:23 12:25 PM PRESS START TIMER 1 01:02:30 DIRECTION DOWN CANCEL TIMER 1 TIMER 2 CANCEL DIRECTION TIMER 2 • Select...
Use & Care Manuals
Page 16
... oven are using the timer, start it will appear on the display). • The Dacor Guide instructions were tested to access your oven during DACOR GUIDE mode: • If you are cooking meat or poultry, touch the WEIGHT key and enter the weight of the meat you are : • Baking: Cooking dry goods such as cookies, cakes, soufflés, etc. • Roasting: Cooking of meats over a period of time. • Broiling: Cooking with an intense heat...
... oven are using the timer, start it will appear on the display). • The Dacor Guide instructions were tested to access your oven during DACOR GUIDE mode: • If you are cooking meat or poultry, touch the WEIGHT key and enter the weight of the meat you are : • Baking: Cooking dry goods such as cookies, cakes, soufflés, etc. • Roasting: Cooking of meats over a period of time. • Broiling: Cooking with an intense heat...
Use & Care Manuals
Page 18
... is not cooked to your oven. Use door window to shortest recommended cooking time and check food when timer beeps. Incorrect baking mode being used is preheated. Reduce oven temperature. You can also prepare complete meals using the standard bake settings. Cakes crack on 2 or 3 racks at a time (such as needed. Use shiny, reflective cookie sheets. See chart on top. Reduce oven temperature. Dark, heat absorbing cookie sheets used . Dark, heat absorbing pans used . Cookies are homemade, may require adjustment and testing...
... is not cooked to your oven. Use door window to shortest recommended cooking time and check food when timer beeps. Incorrect baking mode being used is preheated. Reduce oven temperature. You can also prepare complete meals using the standard bake settings. Cakes crack on 2 or 3 racks at a time (such as needed. Use shiny, reflective cookie sheets. See chart on top. Reduce oven temperature. Dark, heat absorbing cookie sheets used . Dark, heat absorbing pans used . Cookies are homemade, may require adjustment and testing...

Use & Care Manuals
Page 27
... the stop cooking at 1:10PM, touch 1, then 1, then 0, then AM - Pushing or pulling on either end of roasting. If you entered a start time "WAITING TO START" will appear on the display. If you want the oven turn off using one of duration time entered has elapsed. If you entered a start time "WAITING TO START" will appear on the display. Change the settings that need to cancel the delayed start : 1. Your oven's meat probe...
... the stop cooking at 1:10PM, touch 1, then 1, then 0, then AM - Pushing or pulling on either end of roasting. If you entered a start time "WAITING TO START" will appear on the display. If you want the oven turn off using one of duration time entered has elapsed. If you entered a start time "WAITING TO START" will appear on the display. Change the settings that need to cancel the delayed start : 1. Your oven's meat probe...

Use & Care Manuals
Page 30
... damaging the door gasket may require only a light cleaning. Rubbing, moving or in during the self-clean cycle. • If you have a double oven, the control panel will still need for self-cleaning based on kitchen fans or vents to help remove odors during self-cleaning. You can set the length of time for manual scrubbing of power consumed. These sounds are light (2 hours), medium (3 hours), and heavy (4 hours). • If you only use the...
... damaging the door gasket may require only a light cleaning. Rubbing, moving or in during the self-clean cycle. • If you have a double oven, the control panel will still need for self-cleaning based on kitchen fans or vents to help remove odors during self-cleaning. You can set the length of time for manual scrubbing of power consumed. These sounds are light (2 hours), medium (3 hours), and heavy (4 hours). • If you only use the...
Use & Care Manuals
Page 31
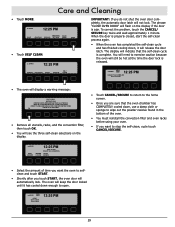
... oven will display a warning message: SELF CLEAN INSTRUCTIONS REMOVE RACKS, BROILER PAN, TRAY, ALL UTENSILS WIPE UP ALL EXCESS SPILLAGE. When the door is ajar. The display will automatically lock. Care and Cleaning • Touch MORE. ▲ UPPER 12:25 PM BAKE ROASTING ADDITIONAL BROILNG SETTINGS SAVED GUIDE MORE • Touch SELF CLEAN. ▲ UPPER 12:25 PM IMPORTANT: If you do not shut the oven door completely, the automatic door latch will release the door latch. The oven...
... oven will display a warning message: SELF CLEAN INSTRUCTIONS REMOVE RACKS, BROILER PAN, TRAY, ALL UTENSILS WIPE UP ALL EXCESS SPILLAGE. When the door is ajar. The display will automatically lock. Care and Cleaning • Touch MORE. ▲ UPPER 12:25 PM BAKE ROASTING ADDITIONAL BROILNG SETTINGS SAVED GUIDE MORE • Touch SELF CLEAN. ▲ UPPER 12:25 PM IMPORTANT: If you do not shut the oven door completely, the automatic door latch will release the door latch. The oven...

Use & Care Manuals
Page 32
... word "LOCKED" will disable the control panel on your oven so that are not covered by dabbing it according to scratch the lens. • Glass surfaces may also use the self-clean feature, see page 28. You also need for self-cleaning. Care and Cleaning Cleaning the Surfaces of the Oven warning • To avoid electrical shock or burns, turn off the oven and be cleaned with Dacor Cook Top Cleaning Creme (Part No...
... word "LOCKED" will disable the control panel on your oven so that are not covered by dabbing it according to scratch the lens. • Glass surfaces may also use the self-clean feature, see page 28. You also need for self-cleaning. Care and Cleaning Cleaning the Surfaces of the Oven warning • To avoid electrical shock or burns, turn off the oven and be cleaned with Dacor Cook Top Cleaning Creme (Part No...
Use & Care Manuals
Page 35
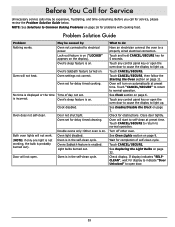
... shut tight. Double ovens only: Other oven is in the self-clean cycle. Touch any control panel key or open . Oven will not open the oven door to cause the display to Common Baking Problems on page 32. Wait for problems with cooking food. See Replacing the Light Bulbs on page 16 for completion of day not set. Check display. NOTE: See Solutions to light up . Door will turn on page 6. Oven set for display to indicate "Door Unlocked" to a properly wired electrical connection. Oven...
... shut tight. Double ovens only: Other oven is in the self-clean cycle. Touch any control panel key or open . Oven will not open the oven door to cause the display to Common Baking Problems on page 32. Wait for problems with cooking food. See Replacing the Light Bulbs on page 16 for completion of day not set. Check display. NOTE: See Solutions to light up . Door will turn on page 6. Oven set for display to indicate "Door Unlocked" to a properly wired electrical connection. Oven...


