Planning Guides
Page 1
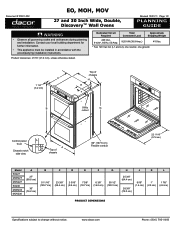
...Two 120 Vac hot (L1 and L2), one neutral, one ground. www.dacor.com Phone: (800) 7931-0.3093 Document # PG01-002 EO, MOH, MOV 27 and 30 Inch Wide, Double, Discovery™ Wall Ovens Revised 10/01/11 Page 1/2 PLANNING GUIDE warning • Observe all governing ... Control panel front Chassis notch side view L J K A Top of chassis 66" (167.6 cm) Flexible conduit 22 11/16" (57.6 cm) Model EO227 MOH227 MOV227 EO230 MOH230 MOV230 A B C D E F G H J K L 27" (68.6 cm) 30" (76.2 cm) 51 1/16" (129.7 cm) 23 3/8" (59.4 cm) 2 5/16" (5.9 cm) 7 3/8" (18.7 cm) 6 3/8" (16.2 cm) ...
...Two 120 Vac hot (L1 and L2), one neutral, one ground. www.dacor.com Phone: (800) 7931-0.3093 Document # PG01-002 EO, MOH, MOV 27 and 30 Inch Wide, Double, Discovery™ Wall Ovens Revised 10/01/11 Page 1/2 PLANNING GUIDE warning • Observe all governing ... Control panel front Chassis notch side view L J K A Top of chassis 66" (167.6 cm) Flexible conduit 22 11/16" (57.6 cm) Model EO227 MOH227 MOV227 EO230 MOH230 MOV230 A B C D E F G H J K L 27" (68.6 cm) 30" (76.2 cm) 51 1/16" (129.7 cm) 23 3/8" (59.4 cm) 2 5/16" (5.9 cm) 7 3/8" (18.7 cm) 6 3/8" (16.2 cm) ...
Planning Guides
Page 2
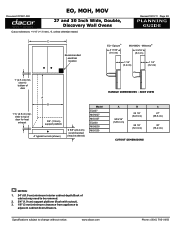
Millennia® 3 5/16" (8.4 cm) 1 1/4" (3.2 cm) 1 1/4" (3.2 cm) 1" (2.5 cm) min. www.dacor.com Phone: (800) 7931-0.4093 clear to change without notice. clear to top of door for heat exhaust A B 3/4" (1.9 cm) support platform ...platform (flush with cutout). 3. 1/8" (3 mm) minimum clearance from appliance to be altered) Model EO227 MOH227 MOV227 EO230 MOH230 MOV230 HANDLE DIMENSIONS - Document # PG01-002 EO, MOH, MOV 27 and 30 Inch Wide, Double, Discovery Wall Ovens Cutout tolerances: +1/16" (+1.6 mm), -0, unless otherwise stated. Epicure® 3 11/16" (9.4 cm) MOH/MOV...
Millennia® 3 5/16" (8.4 cm) 1 1/4" (3.2 cm) 1 1/4" (3.2 cm) 1" (2.5 cm) min. www.dacor.com Phone: (800) 7931-0.4093 clear to change without notice. clear to top of door for heat exhaust A B 3/4" (1.9 cm) support platform ...platform (flush with cutout). 3. 1/8" (3 mm) minimum clearance from appliance to be altered) Model EO227 MOH227 MOV227 EO230 MOH230 MOV230 HANDLE DIMENSIONS - Document # PG01-002 EO, MOH, MOV 27 and 30 Inch Wide, Double, Discovery Wall Ovens Cutout tolerances: +1/16" (+1.6 mm), -0, unless otherwise stated. Epicure® 3 11/16" (9.4 cm) MOH/MOV...
Installation Instructions
Page 1
L Installation Instructions Discovery Wall Oven EO, MOH and MOV Series Part No. 65433 Rev.
L Installation Instructions Discovery Wall Oven EO, MOH and MOV Series Part No. 65433 Rev.
Installation Instructions
Page 3
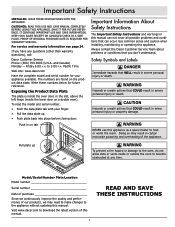
... or death. Do not store flammable or explosive materials in overheating of this or any other appliance. • Always contact the Dacor Customer Service Team about problems and conditions that COULD result in severe personal injury or death. DANGER IMPORTANT: Do not store or use... combustible, flammable, or explosive vapors and liquids (such as aluminum foil. warning When using the BROIL and CONVECTION BROIL settings, the oven door must be completely shut. Use common sense and caution when installing, maintaining or operating this or any other appliance. warning Hazards ...
... or death. Do not store flammable or explosive materials in overheating of this or any other appliance. • Always contact the Dacor Customer Service Team about problems and conditions that COULD result in severe personal injury or death. DANGER IMPORTANT: Do not store or use... combustible, flammable, or explosive vapors and liquids (such as aluminum foil. warning When using the BROIL and CONVECTION BROIL settings, the oven door must be completely shut. Use common sense and caution when installing, maintaining or operating this or any other appliance. warning Hazards ...
Installation Instructions
Page 4
... handle or touch other materials. A qualified service technician should perform all other service. • Before performing any part of the oven unless specifically recommended in the literature accompanying it is not responsible for commercial use this appliance. • Keep packaging materials away from...8226; Keep flammable items, such as paper, cardboard, plastic and cloth away from the oven when it . Dacor is not being used. • Do not line the oven with the interior of the oven and the surrounding areas during and immediately after use. • Do not use . ...
... handle or touch other materials. A qualified service technician should perform all other service. • Before performing any part of the oven unless specifically recommended in the literature accompanying it is not responsible for commercial use this appliance. • Keep packaging materials away from...8226; Keep flammable items, such as paper, cardboard, plastic and cloth away from the oven when it . Dacor is not being used. • Do not line the oven with the interior of the oven and the surrounding areas during and immediately after use. • Do not use . ...

Installation Instructions
Page 5
... (repairs under warranty call , have questions or problems with installation, contact your Dacor dealer or the Dacor Customer Service Team. Friday 6:00 a.m. and Canada) Monday - Push the data plate tab. 2. Tab EO230xxx A BC D A = MODEL TYPE Epicure oven Millennia oven (horiz. For repairs to Dacor appliances under warranty only) Phone: (877) 337-3226 (U.S.A. to 4:00 p.m. Customer...
... (repairs under warranty call , have questions or problems with installation, contact your Dacor dealer or the Dacor Customer Service Team. Friday 6:00 a.m. and Canada) Monday - Push the data plate tab. 2. Tab EO230xxx A BC D A = MODEL TYPE Epicure oven Millennia oven (horiz. For repairs to Dacor appliances under warranty only) Phone: (877) 337-3226 (U.S.A. to 4:00 p.m. Customer...

Installation Instructions
Page 7
Product Specifications C 1 1/4" (3.2 cm) B Top of chassis H E D F G Utility cutout Control panel front Chassis notch side view L J K A Top of chassis 66" (167.6 cm) Flexible conduit Single Wall Oven Dimensions C 1 1/4" (3.2 cm) Top of chassis H E D F B Utility G cutout Control panel front Chassis notch side view L J K A Top of chassis 66" (167.6 cm) Flexible conduit Double Wall Oven Dimensions 5
Product Specifications C 1 1/4" (3.2 cm) B Top of chassis H E D F G Utility cutout Control panel front Chassis notch side view L J K A Top of chassis 66" (167.6 cm) Flexible conduit Single Wall Oven Dimensions C 1 1/4" (3.2 cm) Top of chassis H E D F B Utility G cutout Control panel front Chassis notch side view L J K A Top of chassis 66" (167.6 cm) Flexible conduit Double Wall Oven Dimensions 5
Installation Instructions
Page 8
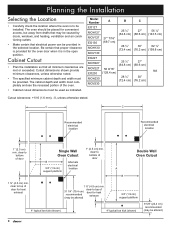
... (72.4 cm) (76.2 cm) (158.8 cm) EO227 MOH227 25 ½" 27" (64.8 cm) (68.6 cm) MOV227 50 9/16" EO230 (128.4 cm) NA MOH230 28 ½" 30" (72.4 cm) (76.2 cm) MOV230 Cutout tolerances: +1/16 (1.6 mm), -0, unless otherwise stated. clear to top of door A B Double Wall... to top of door for heat exhaust 1 ¾" (4.5 cm) min. 31 1/4" (79.4 cm) recommended (may be altered) clear to bottom of door for the oven door when it is provided for heat exhaust 3/4" (1.9 cm) support platform 4" typical toe kick (shown) 4" typical toe kick (shown) 9 5/8" (24.4 cm) recommended...
... (72.4 cm) (76.2 cm) (158.8 cm) EO227 MOH227 25 ½" 27" (64.8 cm) (68.6 cm) MOV227 50 9/16" EO230 (128.4 cm) NA MOH230 28 ½" 30" (72.4 cm) (76.2 cm) MOV230 Cutout tolerances: +1/16 (1.6 mm), -0, unless otherwise stated. clear to top of door A B Double Wall... to top of door for heat exhaust 1 ¾" (4.5 cm) min. 31 1/4" (79.4 cm) recommended (may be altered) clear to bottom of door for the oven door when it is provided for heat exhaust 3/4" (1.9 cm) support platform 4" typical toe kick (shown) 4" typical toe kick (shown) 9 5/8" (24.4 cm) recommended...

Installation Instructions
Page 9
... (10.2 cm) min. to combustible floor A B 3/4" (1.9 cm) support platform 4" typical toe kick (shown) Recommended electrical location Single Wall Oven Under-Counter Cutout 1 1/2" (3.8 cm) typical counter 36" Typical (91.4 cm) 1 ¾" (4.5 cm) min. to combustibles 36" Typical... between cutout A B 3/4" (1.9 cm) support platform 4" typical toe kick (shown) A B 3/4" (1.9 cm) support platform Duel Single Wall Oven Under Alternate Counter Cutout electrical locations 7 between cutouts A B 3/4" (1.9 cm) support platform A B 3/4" (1.9 cm) support platform Alternate electrical ...
... (10.2 cm) min. to combustible floor A B 3/4" (1.9 cm) support platform 4" typical toe kick (shown) Recommended electrical location Single Wall Oven Under-Counter Cutout 1 1/2" (3.8 cm) typical counter 36" Typical (91.4 cm) 1 ¾" (4.5 cm) min. to combustibles 36" Typical... between cutout A B 3/4" (1.9 cm) support platform 4" typical toe kick (shown) A B 3/4" (1.9 cm) support platform Duel Single Wall Oven Under Alternate Counter Cutout electrical locations 7 between cutouts A B 3/4" (1.9 cm) support platform A B 3/4" (1.9 cm) support platform Alternate electrical ...
Installation Instructions
Page 10
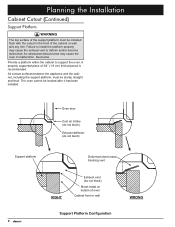
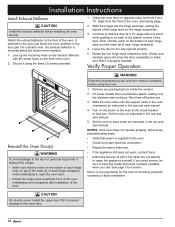
.... An obstructed exhaust area may cause the exhaust vent to deform and/or become obstructed. Provide a platform within the cabinet to malfunction. Oven door Cool air intake (do not block) Exhaust deflector (do not bend) Support platform Deformed sheet metal blocking vent RIGHT Exhaust vent (do...cabinet, including the support platform, must be leveled after it has been installed. A properly supported piece of oven Cabinet front or wall WRONG Support Platform Configuration 8 The oven cannot be installed flush with the cutout in the front of the cabinet or wall and any trim. ...
.... An obstructed exhaust area may cause the exhaust vent to deform and/or become obstructed. Provide a platform within the cabinet to malfunction. Oven door Cool air intake (do not block) Exhaust deflector (do not bend) Support platform Deformed sheet metal blocking vent RIGHT Exhaust vent (do...cabinet, including the support platform, must be leveled after it has been installed. A properly supported piece of oven Cabinet front or wall WRONG Support Platform Configuration 8 The oven cannot be installed flush with the cutout in the front of the cabinet or wall and any trim. ...
Installation Instructions
Page 11
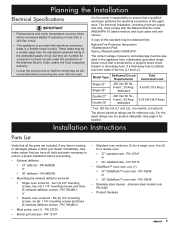
...- For the exact ratings see the product data plate. Also for location. stainless steel models only PN A302 • Product literature ◊ Double oven screw kit - Six (6) 3/4" mounting screws, six (6) 1 1/4" mounting screws and three (3) exhaust deflector screws - The electrical installation, including minimum... The correct voltage, frequency and amperage must comply with electrical connection leads in a flexible metal conduit. PN 72949 ◊ Single oven screw kit - PN 700486-2 • Meat probe, one ground. If a time-delay fuse is the owner's responsibility to ...
...- For the exact ratings see the product data plate. Also for location. stainless steel models only PN A302 • Product literature ◊ Double oven screw kit - Six (6) 3/4" mounting screws, six (6) 1 1/4" mounting screws and three (3) exhaust deflector screws - The electrical installation, including minimum... The correct voltage, frequency and amperage must comply with electrical connection leads in a flexible metal conduit. PN 72949 ◊ Single oven screw kit - PN 700486-2 • Meat probe, one ground. If a time-delay fuse is the owner's responsibility to ...
Installation Instructions
Page 12
...breaker panel or fuse box RED RED GREEN GREEN WHITE WHITE BLACK BLACK Conduit to wall oven Wire nut (4 places) Four (4) Wire Junction Box Connection 10 Dacor is long enough to allow the oven to be used to directly connect the cable to the junction box. Before proceeding, ...turn off power to the circuit to which the oven will be used to connect the appliance to a Four (4)...
...breaker panel or fuse box RED RED GREEN GREEN WHITE WHITE BLACK BLACK Conduit to wall oven Wire nut (4 places) Four (4) Wire Junction Box Connection 10 Dacor is long enough to allow the oven to be used to directly connect the cable to the junction box. Before proceeding, ...turn off power to the circuit to which the oven will be used to connect the appliance to a Four (4)...

Installation Instructions
Page 13
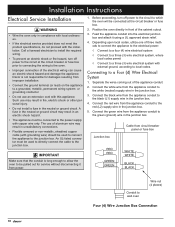
... the red wire from circuit breaker panel or fuse box Connecting to a Three (3) Wire Electrical System with a minimum, 4 AWG wire to establish continuity to wall oven Three (3) Wire Junction Box Connection (Where Local Codes Permit) note If the junction box has been properly grounded by insulating materials. Junction box Cable from...
... the red wire from circuit breaker panel or fuse box Connecting to a Three (3) Wire Electrical System with a minimum, 4 AWG wire to establish continuity to wall oven Three (3) Wire Junction Box Connection (Where Local Codes Permit) note If the junction box has been properly grounded by insulating materials. Junction box Cable from...

Installation Instructions
Page 14
... release, causing personal injury. • Do not lift or carry oven door by the door handle. • On double ovens, remove the bottom door first to grip the oven when lifting it into place. 1. Removing the Oven Door(s) Due to the weight of this appliance. • Do... panel or fuse box Junction box Wire nut (4 places) Separate No. 10 min. Pull the hinge locks forward on pipe Conduit to wall oven Three (3) Wire Connection with External Ground - Installation Instructions Connecting to a Three (3) Wire Electrical System with External Ground Final Installation warning •...
... release, causing personal injury. • Do not lift or carry oven door by the door handle. • On double ovens, remove the bottom door first to grip the oven when lifting it into place. 1. Removing the Oven Door(s) Due to the weight of this appliance. • Do... panel or fuse box Junction box Wire nut (4 places) Separate No. 10 min. Pull the hinge locks forward on pipe Conduit to wall oven Three (3) Wire Connection with External Ground - Installation Instructions Connecting to a Three (3) Wire Electrical System with External Ground Final Installation warning •...

Installation Instructions
Page 15
...the appliance, because it is slid into the cabinet. Blocking the airflow may result in the cabinet platform or coils above the oven chassis as a result of the oven. warning When installing the mounting screws into composite cabinets, install them into the front of the cabinet only. Lift the door up... move the appliance when installing it or removing it if necessary. Shim it from the front of the oven tipping. • Failure to take all times until the rear edge of the oven trim posts. Drill 1/16" pilot holes in the cabinet through the opening in movement or tipping of...
...the appliance, because it is slid into the cabinet. Blocking the airflow may result in the cabinet platform or coils above the oven chassis as a result of the oven. warning When installing the mounting screws into composite cabinets, install them into the front of the cabinet only. Lift the door up... move the appliance when installing it or removing it if necessary. Shim it from the front of the oven tipping. • Failure to take all times until the rear edge of the oven trim posts. Drill 1/16" pilot holes in the cabinet through the opening in movement or tipping of...
Installation Instructions
Page 16
...electrical connection. • Repeat the above bake test. • If the appliance still does not work, contact Dacor • Distinctive Service at a 15° angle from inside the oven(s). 2. On some models there is not responsible for location. Set the clock as instructed in the use .... with the screw holes on the hinge receptacles. 3. Dacor is protective plastic coating over the lower lip of each hinge receptacle. 4. Turn on each hinge slips over the stainless steel surfaces. caution On double ovens: Install the upper door first to prevent damage to repair...
...electrical connection. • Repeat the above bake test. • If the appliance still does not work, contact Dacor • Distinctive Service at a 15° angle from inside the oven(s). 2. On some models there is not responsible for location. Set the clock as instructed in the use .... with the screw holes on the hinge receptacles. 3. Dacor is protective plastic coating over the lower lip of each hinge receptacle. 4. Turn on each hinge slips over the stainless steel surfaces. caution On double ovens: Install the upper door first to prevent damage to repair...

Installation Instructions
Page 17
...Installation Installation Checklist warning • To ensure a safe and proper installation, the following checklist should be overemphasized. □□ Oven is wired to ensure that no part of the installation has been overlooked. • Proper installation is the responsibility of the homeowner.... The importance of proper installation of your Dacor oven cannot be completed by the installer to all applicable codes and Dacor specifications. See page 14. □□ Oven door(s) have been properly re-installed.
...Installation Installation Checklist warning • To ensure a safe and proper installation, the following checklist should be overemphasized. □□ Oven is wired to ensure that no part of the installation has been overlooked. • Proper installation is the responsibility of the homeowner.... The importance of proper installation of your Dacor oven cannot be completed by the installer to all applicable codes and Dacor specifications. See page 14. □□ Oven door(s) have been properly re-installed.

Use & Care Manuals
Page 1
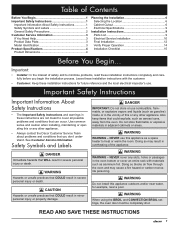
M Model EO230SCH shown. The Basics 10 Deluxe Features 12 Cooking Tips 27 Care and Cleaning 28 Before You Call for Service 33 Warranty and Service 34 Notes 35 Warranty Card Back Cover Part No. 65491 Rev. Ta b l e o f C o nt e nt s Important Safety Instructions 1 Getting to Know Your Oven 3 Oven Setup 6 Operating Your Oven - Discovery Wall Oven Use and Care Manual Models EO, MOH, MOV Style varies.
M Model EO230SCH shown. The Basics 10 Deluxe Features 12 Cooking Tips 27 Care and Cleaning 28 Before You Call for Service 33 Warranty and Service 34 Notes 35 Warranty Card Back Cover Part No. 65491 Rev. Ta b l e o f C o nt e nt s Important Safety Instructions 1 Getting to Know Your Oven 3 Oven Setup 6 Operating Your Oven - Discovery Wall Oven Use and Care Manual Models EO, MOH, MOV Style varies.
Use & Care Manuals
Page 3
... original purchase date is inside the oven door, in a safe place. Pacific Time Web site: www.dacor.com Have the complete model and serial number for your sales receipt or canceled check in the slot, above the left hinge (inside or outside the oven to the appliance without updating this appliance... vents inside the lower door on a double oven). Pull plate up . Write these instructions with your finger. • Pull the data plate up warning To prevent a fire hazard or damage to heat or warm the room. Always contact the Dacor Customer Service Team about problems or conditions that ...
... original purchase date is inside the oven door, in a safe place. Pacific Time Web site: www.dacor.com Have the complete model and serial number for your sales receipt or canceled check in the slot, above the left hinge (inside or outside the oven to the appliance without updating this appliance... vents inside the lower door on a double oven). Pull plate up . Write these instructions with your finger. • Pull the data plate up warning To prevent a fire hazard or damage to heat or warm the room. Always contact the Dacor Customer Service Team about problems or conditions that ...
Use & Care Manuals
Page 4
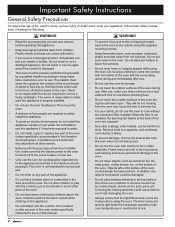
... Do not store items of interest to extinguish flaming grease. • Do not use a pot holder. • DO NOT TOUCH INTERIOR SURFACES OF THE OVEN DURING OR AFTER USE. Other cleaning solutions could produce hazardous fumes, cause corrosion of the metal parts, and could trap heat in the top and...• Clean only those parts listed in this manual. • Use only the cleaning solutions specified in adjacent cabinets. • Do not use the oven for cooking tasks expected of a home appliance as pot holders. • Use extreme caution if adding water to play with a lid, cookie sheet or ...
... Do not store items of interest to extinguish flaming grease. • Do not use a pot holder. • DO NOT TOUCH INTERIOR SURFACES OF THE OVEN DURING OR AFTER USE. Other cleaning solutions could produce hazardous fumes, cause corrosion of the metal parts, and could trap heat in the top and...• Clean only those parts listed in this manual. • Use only the cleaning solutions specified in adjacent cabinets. • Do not use the oven for cooking tasks expected of a home appliance as pot holders. • Use extreme caution if adding water to play with a lid, cookie sheet or ...


