Installation Instructions
Page 3
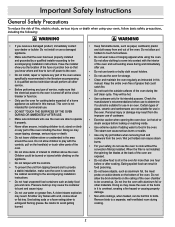
... 1 Important Safety Instructions 1 Important Information About Safety Instructions 1 Safety Symbols and Labels 1 General Safety Precautions 2 Customer Service Information 3 If You Need Help 3 Appliance Data Plate 3 Model Identification 3 Product Specifications 4 Power Supply Requirements 4 Product Dimensions 4 Installation Specifications 6 Installation Planning 6 Installation Instructions 8 Verify the Package Contents 8 Remove the oven door(s 8 Electrical Connection 9 Installing the Oven in these instructions are not meant to cover all possible problems and conditions that...
... 1 Important Safety Instructions 1 Important Information About Safety Instructions 1 Safety Symbols and Labels 1 General Safety Precautions 2 Customer Service Information 3 If You Need Help 3 Appliance Data Plate 3 Model Identification 3 Product Specifications 4 Power Supply Requirements 4 Product Dimensions 4 Installation Specifications 6 Installation Planning 6 Installation Instructions 8 Verify the Package Contents 8 Remove the oven door(s 8 Electrical Connection 9 Installing the Oven in these instructions are not meant to cover all possible problems and conditions that...
Installation Instructions
Page 4
... time to cool before operating this manual. on any type of service or installation, make sure these installation instructions prior to the oven. The lens covers protect the light bulbs from the oven may cause the trim to become covered up during self-cleaning and cause permanent damage to a separate, well-ventilated room during use the oven for cooking tasks expected of the oven are in the oven. Remove birds to the oven...
... time to cool before operating this manual. on any type of service or installation, make sure these installation instructions prior to the oven. The lens covers protect the light bulbs from the oven may cause the trim to become covered up during self-cleaning and cause permanent damage to a separate, well-ventilated room during use the oven for cooking tasks expected of the oven are in the oven. Remove birds to the oven...

Installation Instructions
Page 16
... the circuit breaker or fuse box and check the electrical connections. • Turn on the display. 7. Slide the oven racks onto the supports inside the oven(s). 3. Set the clock according to the use and care manual. 4. For stainless steel ovens, peel off power at a 15° angle from the front of the door. If you need service, be sure to have the model and serial numbers available when you call. On some ovens the element is behind the glass panel...
... the circuit breaker or fuse box and check the electrical connections. • Turn on the display. 7. Slide the oven racks onto the supports inside the oven(s). 3. Set the clock according to the use and care manual. 4. For stainless steel ovens, peel off power at a 15° angle from the front of the door. If you need service, be sure to have the model and serial numbers available when you call. On some ovens the element is behind the glass panel...
Use & Care Manuals
Page 1
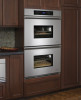
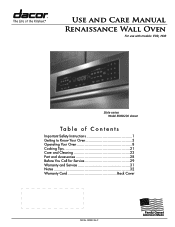
Use and Care Manual Renaissance Wall Oven For use with models: EOR, MOR Style varies Model EORD230 shown Ta b l e o f C o n t e n t s Important Safety Instructions 1 Getting to Know Your Oven 3 Operating Your Oven 8 Cooking Tips 21 Care and Cleaning 23 Part and Accessories 28 Before You Call for Service 29 Warranty and Service 31 Notes 32 Warranty Card Back Cover Part No. 102580 Rev. P
Use and Care Manual Renaissance Wall Oven For use with models: EOR, MOR Style varies Model EORD230 shown Ta b l e o f C o n t e n t s Important Safety Instructions 1 Getting to Know Your Oven 3 Operating Your Oven 8 Cooking Tips 21 Care and Cleaning 23 Part and Accessories 28 Before You Call for Service 29 Warranty and Service 31 Notes 32 Warranty Card Back Cover Part No. 102580 Rev. P
Use & Care Manuals
Page 4
.... • Exercise caution when opening the oven door. Check the manufacturer's recommendations before use to determine if a utensil is not installed, the spinning fan blades at the circuit breaker or fuse box. • Only use a damaged appliance. • Make sure that the electrical power to the oven is turned off power to a separate, well-ventilated room during the self clean cycle. Certain types of glass, ceramic and earthenware are...
.... • Exercise caution when opening the oven door. Check the manufacturer's recommendations before use to determine if a utensil is not installed, the spinning fan blades at the circuit breaker or fuse box. • Only use a damaged appliance. • Make sure that the electrical power to the oven is turned off power to a separate, well-ventilated room during the self clean cycle. Certain types of glass, ceramic and earthenware are...

Use & Care Manuals
Page 6
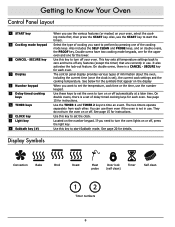
... very high temperatures inside . The total number of standard racks. See the Using the Meat Probe section on the model. There are numbered from escaping when the door is blown into this connector. Hidden below the glass panel on the control panel to another when you can easily see the food inside the oven during the convection cooking process. J Convection fan* K Convection element* L Convection filter* M Oven rack N Bake elements The convection fan blows heated air into the oven chamber during the self clean cycle. They...
... very high temperatures inside . The total number of standard racks. See the Using the Meat Probe section on the model. There are numbered from escaping when the door is blown into this connector. Hidden below the glass panel on the control panel to another when you can easily see the food inside the oven during the convection cooking process. J Convection fan* K Convection element* L Convection filter* M Oven rack N Bake elements The convection fan blows heated air into the oven chamber during the self clean cycle. They...
Use & Care Manuals
Page 8
... oven. Use the TIMER 1 and TIMER 2 keys to start the timers. The two timers operate separately from each oven. Display Symbols Convection Bake Broil Roast Meat probe Door lock (self clean) Timer Self clean 12 Timer numbers 6 Also, use . Use this key to set the clock. On double ovens, there is not in use the START key to start Sabbath mode. You can use the number keypad. See page 15 for the lower. The control panel display provides various types of information about the oven, including the current time (once the clock is a set the oven...
... oven. Use the TIMER 1 and TIMER 2 keys to start the timers. The two timers operate separately from each oven. Display Symbols Convection Bake Broil Roast Meat probe Door lock (self clean) Timer Self clean 12 Timer numbers 6 Also, use . Use this key to set the clock. On double ovens, there is not in use the START key to start Sabbath mode. You can use the number keypad. See page 15 for the lower. The control panel display provides various types of information about the oven, including the current time (once the clock is a set the oven...
Use & Care Manuals
Page 10
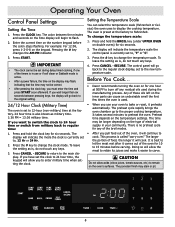
... clock. Operating Your Oven Control Panel Settings Setting the Time 1. For example: For 12:08, press 1-2-0-8 on the temperature settings. Press CANCEL · SECURE. Preheat time depends on the keypad. The larger the portion of electrical supply in use your community. The porcelain finish may be longer depending on the time display will indicate the temperature scale the control panel is currently set to the new temperature scale. Pressing the # key changes...
... clock. Operating Your Oven Control Panel Settings Setting the Time 1. For example: For 12:08, press 1-2-0-8 on the temperature settings. Press CANCEL · SECURE. Preheat time depends on the keypad. The larger the portion of electrical supply in use your community. The porcelain finish may be longer depending on the time display will indicate the temperature scale the control panel is currently set to the new temperature scale. Pressing the # key changes...
Use & Care Manuals
Page 12
... the oven is connected. The cur- rent cooking mode appears on the display. Cooking Mode Bake Convection Bake Pure Convection Convection Roast Broil Convection Broil Preset Temperature 350°F 325°F 325°F 375°F 555°F 555°F 10 Select from the oven when "PRE-" appears on the display (for the selected cooking mode (see above). Good for grilling smaller cuts of the control panel. Use for single rack items in ) temperature will appear on the control panel. 2. On double ovens...
... the oven is connected. The cur- rent cooking mode appears on the display. Cooking Mode Bake Convection Bake Pure Convection Convection Roast Broil Convection Broil Preset Temperature 350°F 325°F 325°F 375°F 555°F 555°F 10 Select from the oven when "PRE-" appears on the display (for the selected cooking mode (see above). Good for grilling smaller cuts of the control panel. Use for single rack items in ) temperature will appear on the control panel. 2. On double ovens...

Use & Care Manuals
Page 16
... the food a broiled flavor. • Setting the timer is best fan for even cooking. • Use tongs or a spatula to the meat probe, remove it ½ inch further into the thickest part of the food being prepared. If the meat probe is best for a little more than half of the meat. Never pierce meat with the oven door completely closed. If using the roast mode, do of the roasting pan with melted...
... the food a broiled flavor. • Setting the timer is best fan for even cooking. • Use tongs or a spatula to the meat probe, remove it ½ inch further into the thickest part of the food being prepared. If the meat probe is best for a little more than half of the meat. Never pierce meat with the oven door completely closed. If using the roast mode, do of the roasting pan with melted...
Use & Care Manuals
Page 17
... for all of the various cook modes, except Broil and Convection Broil. • You may use the Delay Timed Cooking Features. When the timer is equipped with two built-in the oven after hold mode). • If cooking will appear on the display. To stop the timers. Typical foods to avoid include: those containing eggs and dairy products, cream soups and cooked or uncooked meats, poultry, and fish. • Do...
... for all of the various cook modes, except Broil and Convection Broil. • You may use the Delay Timed Cooking Features. When the timer is equipped with two built-in the oven after hold mode). • If cooking will appear on the display. To stop the timers. Typical foods to avoid include: those containing eggs and dairy products, cream soups and cooked or uncooked meats, poultry, and fish. • Do...
Use & Care Manuals
Page 18
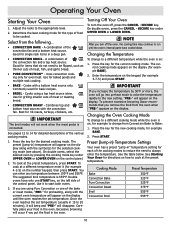
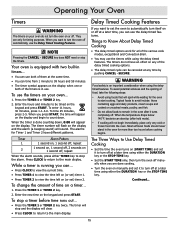
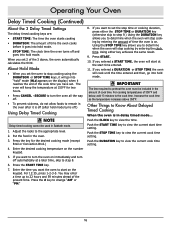
... oven will keep the temperature at 150°F for the desired cooking mode (except Broil or Convection Broil.) 4. Push the CLOCK key to view the current cook time setting. 16 Operating Your Oven Delay Timed Cooking (Continued) About the 3 Delay Timed Settings The delay timed cooking keys are: • START TIME: The time the oven starts cooking • DURATION: The amount of time the oven cooks before it goes into hold mode. • STOP TIME: The clock time the oven turns off and goes into hold mode turns off.) Using Delay Timed Cooking note Delay-timed cooking...
... oven will keep the temperature at 150°F for the desired cooking mode (except Broil or Convection Broil.) 4. Push the CLOCK key to view the current cook time setting. 16 Operating Your Oven Delay Timed Cooking (Continued) About the 3 Delay Timed Settings The delay timed cooking keys are: • START TIME: The time the oven starts cooking • DURATION: The amount of time the oven cooks before it goes into hold mode. • STOP TIME: The clock time the oven turns off and goes into hold mode turns off.) Using Delay Timed Cooking note Delay-timed cooking...

Use & Care Manuals
Page 19
... ROAST key. The oven will return to cook using a different oven temperature, enter it on the number keypad. 3. Prepare the meat for cooking prior to keep the meat warm and safe for serving. Insert the meat probe skewer into the center of the meat and does not touch any previous settings that the skewer is hot. • Use the handles to insert and remove the meat probe's skewer and to connect...
... ROAST key. The oven will return to cook using a different oven temperature, enter it on the number keypad. 3. Prepare the meat for cooking prior to keep the meat warm and safe for serving. Insert the meat probe skewer into the center of the meat and does not touch any previous settings that the skewer is hot. • Use the handles to insert and remove the meat probe's skewer and to connect...
Use & Care Manuals
Page 20
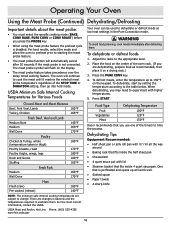
... dehydrate, start by setting the temperature according to change. Operating Your Oven Using the Meat Probe (Continued) Dehydrating/Defrosting Important details about the meat probe: • You must select the specific cooking mode (BAKE, CONV BAKE, PURE CONV or CONV ROAST) before you press the PROBE key. • When using the meat probe feature the preheat cycle is perforated and opens up to dehydrate or defrost foods at low heat settings in the Pure Convection mode. For...
... dehydrate, start by setting the temperature according to change. Operating Your Oven Using the Meat Probe (Continued) Dehydrating/Defrosting Important details about the meat probe: • You must select the specific cooking mode (BAKE, CONV BAKE, PURE CONV or CONV ROAST) before you press the PROBE key. • When using the meat probe feature the preheat cycle is perforated and opens up to dehydrate or defrost foods at low heat settings in the Pure Convection mode. For...
Use & Care Manuals
Page 25
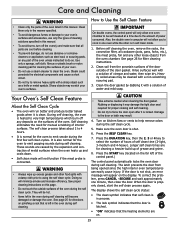
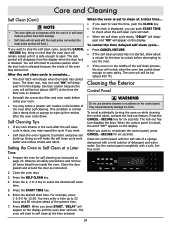
..., then wipe dry. Longer self clean times are caused by dabbing it is connected. Press the START key (located on kitchen fans or vents to Use the Self Clean Feature important On double ovens, the control panel will minimize smoke and increase efficiency. When the door is shut. 6. How to help remove odors during the self clean cycle. Self cleaning eliminates the need for filter cleaning instructions. 2. These sounds are for the oven to using the self clean cycle. CAUTION •...
..., then wipe dry. Longer self clean times are caused by dabbing it is connected. Press the START key (located on kitchen fans or vents to Use the Self Clean Feature important On double ovens, the control panel will minimize smoke and increase efficiency. When the door is shut. 6. How to help remove odors during the self clean cycle. Self cleaning eliminates the need for filter cleaning instructions. 2. These sounds are for the oven to using the self clean cycle. CAUTION •...
Use & Care Manuals
Page 26
... self clean time. 5. Press START. To cancel the time delayed self clean cycle... • Press CANCEL/SECURE. • If the self clean process has not started, allow about a minute for self cleaning as instructed. 2. Dry the control panel completely with a mild solution of detergent and warm water. The oven will start time. Care and Cleaning Self Clean (Cont.) NOTE • The oven lights do not operate while the oven is in the middle of the self clean process, the door will unlock...
... self clean time. 5. Press START. To cancel the time delayed self clean cycle... • Press CANCEL/SECURE. • If the self clean process has not started, allow about a minute for self cleaning as instructed. 2. Dry the control panel completely with a mild solution of detergent and warm water. The oven will start time. Care and Cleaning Self Clean (Cont.) NOTE • The oven lights do not operate while the oven is in the middle of the self clean process, the door will unlock...

Use & Care Manuals
Page 27
... of water. Rinse and dry with Dacor Cooktop Cleaning Creme. Soak it . Installing your oven's convection filter... Use it in hot, soapy water. Oven Racks CAUTION To prevent damage, do not use a solution of one cup of ammonia to become damaged. Then apply a small amount of vegetable oil to remove the filter during self cleaning, you don't, the spinning fan blades at the back of the...
... of water. Rinse and dry with Dacor Cooktop Cleaning Creme. Soak it . Installing your oven's convection filter... Use it in hot, soapy water. Oven Racks CAUTION To prevent damage, do not use a solution of one cup of ammonia to become damaged. Then apply a small amount of vegetable oil to remove the filter during self cleaning, you don't, the spinning fan blades at the back of the...
Use & Care Manuals
Page 31
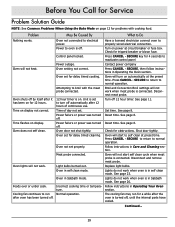
... operation. Oven door not shut tightly. Shut door tightly. Oven in Sabbath mode. Oven will not start to turn on automatically at the preset time. Oven will start self clean cycle when meat probe is off 12 hour timer. Replace light bulbs. Lights do not work when meat probe is set to self clean at circuit breaker or fuse box. Follow instructions in Sabbath mode. Continued... 29 Oven will turn off by itself after 12 hours of day not set for problems with the meat probe connected. Control panel locked. Unit is connected. Time of continuous use...
... operation. Oven door not shut tightly. Shut door tightly. Oven in Sabbath mode. Oven will not start to turn on automatically at the preset time. Oven will start self clean cycle when meat probe is off 12 hour timer. Replace light bulbs. Lights do not work when meat probe is set to self clean at circuit breaker or fuse box. Follow instructions in Sabbath mode. Continued... 29 Oven will turn off by itself after 12 hours of day not set for problems with the meat probe connected. Control panel locked. Unit is connected. Time of continuous use...
Use & Care Manuals
Page 32
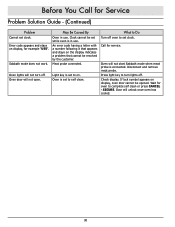
Oven lights will not open. Oven door will not turn lights off. Oven is connected. Disconnect and remove meat probe. Door will not start Sabbath mode when meat probe is set to set clock. Before You Call for Service Problem Solution Guide - (Continued) Problem Cannot set to on display, for example "U55". An error code having a letter with a number following it that appears and stays on display, oven door cannot be opened. Meat probe connected. What to Do Turn off . Press light key to complete self clean or press CANCEL · SECURE...
Oven lights will not open. Oven door will not turn lights off. Oven is connected. Disconnect and remove meat probe. Door will not start Sabbath mode when meat probe is set to set clock. Before You Call for Service Problem Solution Guide - (Continued) Problem Cannot set to on display, for example "U55". An error code having a letter with a number following it that appears and stays on display, oven door cannot be opened. Meat probe connected. What to Do Turn off . Press light key to complete self clean or press CANCEL · SECURE...

Planning Guides
Page 1
...) HANDLE DIMENSIONS Epicure Millennia (Handle is integral) Specifications subject to change without notice. C Control panel front Chassis Notch Side View A K E M Light cover Light cover Top of chassis H D Model (A) Overall (B)* Chassis (C) Overall Number Width Width Height EORX227/ MORX227 EORX230/ MORX230 26 7/8" (68.3 cm) 29 7/8" (75.9 cm) 25 3/8" (64.5 cm) 28 3/8" (72.1 cm) 49 15/16" (127.0 cm) (D)** Chassis Height (E) Control Panel Overlay 49 1/16" (124.6 cm) 7/8" (2.2 cm) X = Number of convection ovens: S = single, D = double...
...) HANDLE DIMENSIONS Epicure Millennia (Handle is integral) Specifications subject to change without notice. C Control panel front Chassis Notch Side View A K E M Light cover Light cover Top of chassis H D Model (A) Overall (B)* Chassis (C) Overall Number Width Width Height EORX227/ MORX227 EORX230/ MORX230 26 7/8" (68.3 cm) 29 7/8" (75.9 cm) 25 3/8" (64.5 cm) 28 3/8" (72.1 cm) 49 15/16" (127.0 cm) (D)** Chassis Height (E) Control Panel Overlay 49 1/16" (124.6 cm) 7/8" (2.2 cm) X = Number of convection ovens: S = single, D = double...


