Installation Instructions
Page 3
... of Contents Before You Begin 1 Important Safety Instructions 1 Important Information About Safety Instructions 1 Safety Symbols and Labels 1 General Safety Precautions 2 Customer Service Information 3 If You Need Help 3 Appliance Data Plate 3 Model Identification 3 Product Specifications 4 Power Supply Requirements 4 Product Dimensions 4 Installation Specifications 6 Installation Planning 6 Installation Instructions 8 Verify the Package Contents 8 Remove the oven door(s 8 Electrical Connection 9 Installing the Oven in overheating of this appliance as aluminum foil...
... of Contents Before You Begin 1 Important Safety Instructions 1 Important Information About Safety Instructions 1 Safety Symbols and Labels 1 General Safety Precautions 2 Customer Service Information 3 If You Need Help 3 Appliance Data Plate 3 Model Identification 3 Product Specifications 4 Power Supply Requirements 4 Product Dimensions 4 Installation Specifications 6 Installation Planning 6 Installation Instructions 8 Verify the Package Contents 8 Remove the oven door(s 8 Electrical Connection 9 Installing the Oven in overheating of this appliance as aluminum foil...
Installation Instructions
Page 4
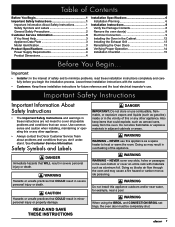
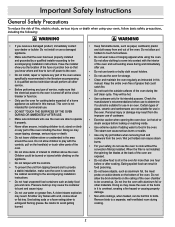
... light bulbs from hot surfaces. Important Safety Instructions General Safety Precautions To reduce the risk of fire, electric shock, serious injury or death when using your safety, do not use the oven to cook without the convection filter installed. These items can melt or burn up during cooking. • To prevent damage, remove the meat probe from the oven may cause the trim to become covered up by high oven temperatures...
... light bulbs from hot surfaces. Important Safety Instructions General Safety Precautions To reduce the risk of fire, electric shock, serious injury or death when using your safety, do not use the oven to cook without the convection filter installed. These items can melt or burn up during cooking. • To prevent damage, remove the meat probe from the oven may cause the trim to become covered up by high oven temperatures...

Installation Instructions
Page 16
.... 2. Set the clock according to the use and care manual. 4. If you need service, be sure to repair the appliance yourself. Turn on the display. 7. Rotate the two hinge locks toward the front of the range immediately after installation of the door. 1. The default bake temperature should appear on the ceiling of the oven. 11. Lower the door to the fully opened position. 3. Installation Instructions Reinstalling the Oven Door (Cont) Verifying Proper Operation To re-install...
.... 2. Set the clock according to the use and care manual. 4. If you need service, be sure to repair the appliance yourself. Turn on the display. 7. Rotate the two hinge locks toward the front of the range immediately after installation of the door. 1. The default bake temperature should appear on the ceiling of the oven. 11. Lower the door to the fully opened position. 3. Installation Instructions Reinstalling the Oven Door (Cont) Verifying Proper Operation To re-install...
Use & Care Manuals
Page 1
Use and Care Manual Renaissance Wall Oven For use with models: EOR, MOR Style varies Model EORD230 shown Ta b l e o f C o n t e n t s Important Safety Instructions 1 Getting to Know Your Oven 3 Operating Your Oven 8 Cooking Tips 21 Care and Cleaning 23 Part and Accessories 28 Before You Call for Service 29 Warranty and Service 31 Notes 32 Warranty Card Back Cover Part No. 102580 Rev. P
Use and Care Manual Renaissance Wall Oven For use with models: EOR, MOR Style varies Model EORD230 shown Ta b l e o f C o n t e n t s Important Safety Instructions 1 Getting to Know Your Oven 3 Operating Your Oven 8 Cooking Tips 21 Care and Cleaning 23 Part and Accessories 28 Before You Call for Service 29 Warranty and Service 31 Notes 32 Warranty Card Back Cover Part No. 102580 Rev. P
Use & Care Manuals
Page 4
... on any part of the oven including the door. Let hot air or steam escape before use the oven for its intended purpose. Keep the entire oven free of grease that the electrical power to the oven is turned off power to determine if a utensil is secured to the cabinet according to cook without the convection filter(s) installed. Have the installer show you the location of the fuse or junction box so that...
... on any part of the oven including the door. Let hot air or steam escape before use the oven for its intended purpose. Keep the entire oven free of grease that the electrical power to the oven is turned off power to determine if a utensil is secured to the cabinet according to cook without the convection filter(s) installed. Have the installer show you the location of the fuse or junction box so that...

Use & Care Manuals
Page 6
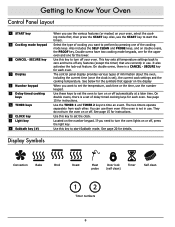
... oven chamber are cooking a whole meal. See the Using the Meat Probe section on page 17 for safety purposes. Press the light key on the control panel to turn them on the model. They are located on the floor of the oven. There are six sets of standard racks. H Broil elements The broil elements are numbered from the bottom up. E Rack supports There are very high temperatures inside each oven chamber. The convection filter covers it . The air...
... oven chamber are cooking a whole meal. See the Using the Meat Probe section on page 17 for safety purposes. Press the light key on the control panel to turn them on the model. They are located on the floor of the oven. There are six sets of standard racks. H Broil elements The broil elements are numbered from the bottom up. E Rack supports There are very high temperatures inside each oven chamber. The convection filter covers it . The air...
Use & Care Manuals
Page 8
...one for instructions. The two timers operate separately from each oven. They do not turn the oven on double ovens, the PROOF key. Double ovens have two cooking mode keypads, one for the upper oven and one of information about the oven, including the current time (once the clock is a set ), the current cook settings and the cooking temperature. On double ovens, there is not in use the number keypad. Display Symbols Convection Bake Broil Roast Meat probe Door lock (self clean) Timer Self clean 12 Timer numbers 6 The control panel display provides various...
...one for instructions. The two timers operate separately from each oven. They do not turn the oven on double ovens, the PROOF key. Double ovens have two cooking mode keypads, one for the upper oven and one of information about the oven, including the current time (once the clock is a set ), the current cook settings and the cooking temperature. On double ovens, there is not in use the number keypad. Display Symbols Convection Bake Broil Roast Meat probe Door lock (self clean) Timer Self clean 12 Timer numbers 6 The control panel display provides various...
Use & Care Manuals
Page 10
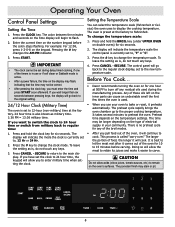
... to Fahrenheit. Pressing the # key changes the AM-PM indicator. 3. If you have set to regular time: 1. The display will indicate the temperature scale the control panel is no preheat cycle for 10 to bake or roast, it preheats automatically. If you want to switch the clock to 24 hour time or switch from military back to , "F" or "C". 3. The oven is called "carry-over." To leave...
... to Fahrenheit. Pressing the # key changes the AM-PM indicator. 3. If you have set to regular time: 1. The display will indicate the temperature scale the control panel is no preheat cycle for 10 to bake or roast, it preheats automatically. If you want to switch the clock to 24 hour time or switch from military back to , "F" or "C". 3. The oven is called "carry-over." To leave...
Use & Care Manuals
Page 12
... display (for example 4-2-5) on the number keypad, then press START. Preset (Jump-in) Temperature Settings Your oven has a preset "jump-in a deep pan. • CONVECTION BROIL - Determine the best cooking mode for the type of food to 14 for each of meat or toasting bread. • CONVECTION ROAST - Good for grilling smaller cuts of the cooking modes to reduce the need to always enter the temperature. Use for single rack items in " temperature setting...
... display (for example 4-2-5) on the number keypad, then press START. Preset (Jump-in) Temperature Settings Your oven has a preset "jump-in a deep pan. • CONVECTION BROIL - Determine the best cooking mode for the type of food to 14 for each of meat or toasting bread. • CONVECTION ROAST - Good for grilling smaller cuts of the cooking modes to reduce the need to always enter the temperature. Use for single rack items in " temperature setting...

Use & Care Manuals
Page 16
... the oven when using a roasting rack. If the second temperature registers below e1tc. Remove meats from the oven. • To prevent sticking, lightly grease the broiler grill. Roasting times always vary according to the pan. Reduce spatter by lining the bottom of the roasting pan with the circulation of the convection fan and a top heat be placed breast side up in Bake mode and may require moist cooking techniques. If the meat probe is...
... the oven when using a roasting rack. If the second temperature registers below e1tc. Remove meats from the oven. • To prevent sticking, lightly grease the broiler grill. Roasting times always vary according to the pan. Reduce spatter by lining the bottom of the roasting pan with the circulation of the convection fan and a top heat be placed breast side up in Bake mode and may require moist cooking techniques. If the meat probe is...
Use & Care Manuals
Page 17
... automatically turn the oven off . When the temperature drops below 140°F, bacteria can time from 1 minute to 99 hours and 59 minutes. • The timer symbol appears on the display when one or both of them at a later time using the delay timed features. While a timer is an important consideration when using either the DURATION key or the STOP TIME key. • Set the START TIME...
... automatically turn the oven off . When the temperature drops below 140°F, bacteria can time from 1 minute to 99 hours and 59 minutes. • The timer symbol appears on the display when one or both of them at a later time using the delay timed features. While a timer is an important consideration when using either the DURATION key or the STOP TIME key. • Set the START TIME...
Use & Care Manuals
Page 18
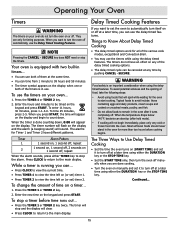
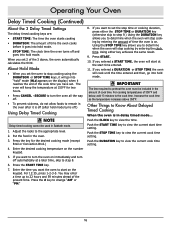
... used in delay timed mode... Press the START TIME key. 7. If you want the oven to stop cooking by entering the clock time. important The time required to view the time. Operating Your Oven Delay Timed Cooking (Continued) About the 3 Delay Timed Settings The delay timed cooking keys are: • START TIME: The time the oven starts cooking • DURATION: The amount of time the oven cooks before it goes into hold mode. • STOP TIME: The clock time the oven turns off and goes into hold " mode (HLd appears on the display...
... used in delay timed mode... Press the START TIME key. 7. If you want the oven to stop cooking by entering the clock time. important The time required to view the time. Operating Your Oven Delay Timed Cooking (Continued) About the 3 Delay Timed Settings The delay timed cooking keys are: • START TIME: The time the oven starts cooking • DURATION: The amount of time the oven cooks before it goes into hold mode. • STOP TIME: The clock time the oven turns off and goes into hold " mode (HLd appears on the display...

Use & Care Manuals
Page 19
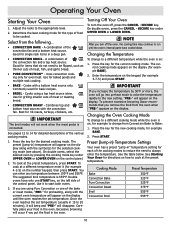
... oven and with Broil or Convection Broil and Sabbath modes. Press CANCEL · SECURE to preheat. Pushing or pulling on the display during cooking... 1. Allow the oven to cancel hold mode. When the meat probe is the temperature measured inside the oven. 6. Press the BAKE, CONV BAKE, PURE CONV or CONV ROAST key. Insert the meat probe plug into the connector inside the meat. If you do not press START, the probe mode will appear on the display. Your oven's meat probe...
... oven and with Broil or Convection Broil and Sabbath modes. Press CANCEL · SECURE to preheat. Pushing or pulling on the display during cooking... 1. Allow the oven to cancel hold mode. When the meat probe is the temperature measured inside the oven. 6. Press the BAKE, CONV BAKE, PURE CONV or CONV ROAST key. Insert the meat probe plug into the connector inside the meat. If you do not press START, the probe mode will appear on the display. Your oven's meat probe...
Use & Care Manuals
Page 20
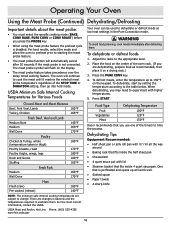
...; Baking rack that fits inside the half sheet pan • Cheesecloth • 4 quart sauce pot with higher temperatures. 5. Press START. The oven will work well. • Slotted spoon • Paper towels • A sharp knife 18 There are subject to change. Operating Your Oven Using the Meat Probe (Continued) Dehydrating/Defrosting Important details about the meat probe: • You must select the specific cooking mode (BAKE, CONV BAKE, PURE CONV or CONV ROAST) before...
...; Baking rack that fits inside the half sheet pan • Cheesecloth • 4 quart sauce pot with higher temperatures. 5. Press START. The oven will work well. • Slotted spoon • Paper towels • A sharp knife 18 There are subject to change. Operating Your Oven Using the Meat Probe (Continued) Dehydrating/Defrosting Important details about the meat probe: • You must select the specific cooking mode (BAKE, CONV BAKE, PURE CONV or CONV ROAST) before...
Use & Care Manuals
Page 25
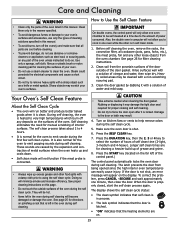
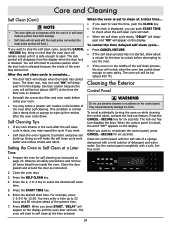
... double oven's computer will be self cleaned at a time due to the amount of your oven. • Do not use a steam cleaner to help remove odors during the first few self clean cycles. Self cleaning eliminates the need for cleaning a heavier build up of the control panel.) The control panel automatically locks the oven door during self cleaning. These sounds are cool before cleaning. • To prevent damage, do so. See proper cleaning instructions on kitchen fans or vents to clean...
... double oven's computer will be self cleaned at a time due to the amount of your oven. • Do not use a steam cleaner to help remove odors during the first few self clean cycles. Self cleaning eliminates the need for cleaning a heavier build up of the control panel.) The control panel automatically locks the oven door during self cleaning. These sounds are cool before cleaning. • To prevent damage, do so. See proper cleaning instructions on kitchen fans or vents to clean...
Use & Care Manuals
Page 26
... precautions and remove all items listed from inside has cooled down. For example, press 1-2-3-0 for six seconds. When you press START, "DELAY" will appear on while cleaning the control panel, activate the lock-out feature. Self Cleaning Tips • If any soil remains in the oven after self cleaning. When the oven is set to clean at the time the door lock is released. • Reinstall the convection filter and oven racks before attempting...
... precautions and remove all items listed from inside has cooled down. For example, press 1-2-3-0 for six seconds. When you press START, "DELAY" will appear on while cleaning the control panel, activate the lock-out feature. Self Cleaning Tips • If any soil remains in the oven after self cleaning. When the oven is set to clean at the time the door lock is released. • Reinstall the convection filter and oven racks before attempting...

Use & Care Manuals
Page 27
... fan blades at the back of the oven will not work properly. You also need to scratch the lens. Glass (Interior and Exterior) Use a mild glass cleaner to become damaged. Door Gasket (Seal) warning Take extreme caution when cleaning the door gasket. Rinse well. Be careful not to the edges so that polishing will become clogged, the oven's convection cooking modes will be exposed. Polish the rack...
... fan blades at the back of the oven will not work properly. You also need to scratch the lens. Glass (Interior and Exterior) Use a mild glass cleaner to become damaged. Door Gasket (Seal) warning Take extreme caution when cleaning the door gasket. Rinse well. Be careful not to the edges so that polishing will become clogged, the oven's convection cooking modes will be exposed. Polish the rack...
Use & Care Manuals
Page 31
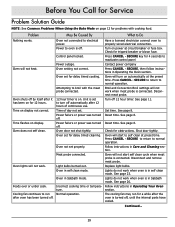
... normal operation. Oven setting not correct. Oven set for delay timed cleaning. Time on display not correct. 12 hour timer is connected. Broil and Convection Broil settings will not work when meat probe is on power at circuit breaker or fuse box. Oven door not shut tightly. Oven lights will not work . Oven will not heat. Cooling fan continues to oven is turned off by itself after the oven is off . Continued... 29 Power to run for a while after it has been on automatically at preset time. Oven will start self clean...
... normal operation. Oven setting not correct. Oven set for delay timed cleaning. Time on display not correct. 12 hour timer is connected. Broil and Convection Broil settings will not work when meat probe is on power at circuit breaker or fuse box. Oven door not shut tightly. Oven lights will not work . Oven will not heat. Cooling fan continues to oven is turned off by itself after the oven is off . Continued... 29 Power to run for a while after it has been on automatically at preset time. Oven will start self clean...
Use & Care Manuals
Page 32
Sabbath mode does not work. Clock cannot be opened. What to Do Turn off oven to set to self clean. Disconnect and remove meat probe. If lock symbol appears on the display indicates a problem that appears and stays on display, oven door cannot be set while oven is connected. Door will not start Sabbath mode when meat probe is in use . May Be Caused By Oven in use . Call for oven to complete self clean or press CANCEL · SECURE. Meat probe connected. Oven is set clock. Check display. An error code having a letter...
Sabbath mode does not work. Clock cannot be opened. What to Do Turn off oven to set to self clean. Disconnect and remove meat probe. If lock symbol appears on the display indicates a problem that appears and stays on display, oven door cannot be set while oven is connected. Door will not start Sabbath mode when meat probe is in use . May Be Caused By Oven in use . Call for oven to complete self clean or press CANCEL · SECURE. Meat probe connected. Oven is set clock. Check display. An error code having a letter...
Planning Guides
Page 1
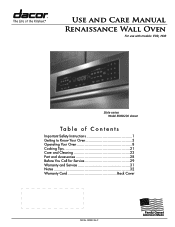
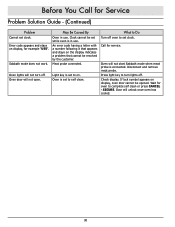
... L J C Utility cutout Top of chassis B* F G H D Light cover A Control panel front Chassis Notch Side View K E M Conduit: 60" (152 cm) Long Top of chassis notch behind control panel (D)** Chassis Height 27 1/2" (69.9 cm) 27 1/4" (69.2 cm) (E) Control Panel Overlay 15/16" (23.8 cm) 7/8" (2.2 cm) Model Number Dedicated Circuit Requirements Total Connected Load EORS127 MORS127 EORS130 MORS130 240 Vac 60 Hz., 4-wire***, 30 Amp. 5.0 kW (20.8 Amp.) EORS136 5.3 kW (22 Amp.) *** Two 120...
... L J C Utility cutout Top of chassis B* F G H D Light cover A Control panel front Chassis Notch Side View K E M Conduit: 60" (152 cm) Long Top of chassis notch behind control panel (D)** Chassis Height 27 1/2" (69.9 cm) 27 1/4" (69.2 cm) (E) Control Panel Overlay 15/16" (23.8 cm) 7/8" (2.2 cm) Model Number Dedicated Circuit Requirements Total Connected Load EORS127 MORS127 EORS130 MORS130 240 Vac 60 Hz., 4-wire***, 30 Amp. 5.0 kW (20.8 Amp.) EORS136 5.3 kW (22 Amp.) *** Two 120...


