Installation Instructions
Page 1
Installation Instructions Renaissance Wall Oven Models: EOR, MOR Part No. 102579 Rev. K
Installation Instructions Renaissance Wall Oven Models: EOR, MOR Part No. 102579 Rev. K
Installation Instructions
Page 3
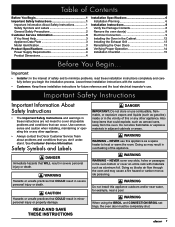
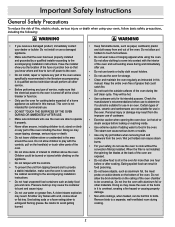
...appliance. • Always contact the Dacor Customer Service Team about problems and conditions that WILL result in severe personal injury or death. caution Hazards or unsafe practices that can occur. warning WARNING - Important: • Installer: In the interest of safety and... the room. Important Safety Instructions Important Information About Safety Instructions • The Important Safety Instructions and warnings in these installation instructions completely and carefully before you don't understand. warning Hazards or unsafe practices that could explode, such as aerosol ...
...appliance. • Always contact the Dacor Customer Service Team about problems and conditions that WILL result in severe personal injury or death. caution Hazards or unsafe practices that can occur. warning WARNING - Important: • Installer: In the interest of safety and... the room. Important Safety Instructions Important Information About Safety Instructions • The Important Safety Instructions and warnings in these installation instructions completely and carefully before you don't understand. warning Hazards or unsafe practices that could explode, such as aerosol ...
Installation Instructions
Page 4
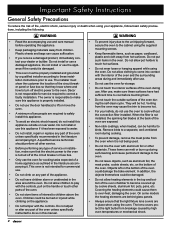
... of the circuit breaker panel or fuse box so that the electric power to the oven is turned off electric power to the oven. Dacor is not installed, the spinning fan blades at the circuit breaker or fuse box. • Only use the oven for storage. • Do not touch the... such items in place when using the oven. When the filter is not responsible for commercial use the oven to cook without the convection filter installed. In addition, the objects themselves could be hot. Plastic sheets and bags can cause suffocation. • If you receive a damaged product, immediately contact ...
... of the circuit breaker panel or fuse box so that the electric power to the oven is turned off electric power to the oven. Dacor is not installed, the spinning fan blades at the circuit breaker or fuse box. • Only use the oven for storage. • Do not touch the... such items in place when using the oven. When the filter is not responsible for commercial use the oven to cook without the convection filter installed. In addition, the objects themselves could be hot. Plastic sheets and bags can cause suffocation. • If you receive a damaged product, immediately contact ...

Installation Instructions
Page 5
... serial number are printed on the appliance data plate. and Canada) Monday - Open the door to 4:00 p.m. Pacific Time Web site: www.Dacor.com Dacor Distinctive Service (repairs under warranty call , have questions or problems with Chrome Trim B = Black Handle, Black Trim BK = Black Handle, Stainless...Double C NUMBER OF OVENS: 1 = Single 2 = Double D WIDTH: 27 = 27 Inch 30 = 30 Inch 36 = 36 Inch E TRIM: SCH = Stainless Steel with installation, contact your Dacor dealer or the Dacor Customer Service Team. Friday 6:00 a.m. Customer Service Information If You Need Help...
... serial number are printed on the appliance data plate. and Canada) Monday - Open the door to 4:00 p.m. Pacific Time Web site: www.Dacor.com Dacor Distinctive Service (repairs under warranty call , have questions or problems with Chrome Trim B = Black Handle, Black Trim BK = Black Handle, Stainless...Double C NUMBER OF OVENS: 1 = Single 2 = Double D WIDTH: 27 = 27 Inch 30 = 30 Inch 36 = 36 Inch E TRIM: SCH = Stainless Steel with installation, contact your Dacor dealer or the Dacor Customer Service Team. Friday 6:00 a.m. Customer Service Information If You Need Help...
Installation Instructions
Page 6
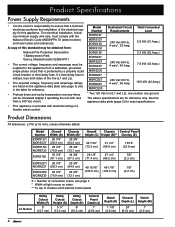
...• It is the owner's responsibility to the appliance from a dedicated, grounded, single phase circuit that a licensed electrician performs the installation of the line (L1 and L2). • The required voltage, frequency and amperage ratings are for reference only. If a time-...is provided with the National Electric Code ANSI/NFPA 70 (latest revision) and local codes and ordinances. Model Number EORS127 MORS127 EORS130 MORS130 EORS136 EORS227 MORS227 EORS230 MORS230 EORD227 MORD227 EORD230 MORD230 Dedicated Circuit Total Connected Requirements Load 240 Vac 60 Hz, 4 wire*, 30...
...• It is the owner's responsibility to the appliance from a dedicated, grounded, single phase circuit that a licensed electrician performs the installation of the line (L1 and L2). • The required voltage, frequency and amperage ratings are for reference only. If a time-...is provided with the National Electric Code ANSI/NFPA 70 (latest revision) and local codes and ordinances. Model Number EORS127 MORS127 EORS130 MORS130 EORS136 EORS227 MORS227 EORS230 MORS230 EORD227 MORD227 EORD230 MORD230 Dedicated Circuit Total Connected Requirements Load 240 Vac 60 Hz, 4 wire*, 30...

Installation Instructions
Page 8
... 27 ½" (69.9 cm) 49 1/8" (124.8 cm) Minimum Interior Cabinet Depth: 24" (61.0 cm) 6 Proper installation is recommended. plywood is the respon- The oven should be provided. Contact your local building department for convenient edge of the platform ...: +1/16 (1.6 mm), -0, unless otherwise stated. Make certain that it has been installed. 3/4" (1.9 cm) thick selected location. Installation Specifications Installation Planning • Dacor recommends installing the electrical junction box in the open position according the Product Dimensions. • Cabinet...
... 27 ½" (69.9 cm) 49 1/8" (124.8 cm) Minimum Interior Cabinet Depth: 24" (61.0 cm) 6 Proper installation is recommended. plywood is the respon- The oven should be provided. Contact your local building department for convenient edge of the platform ...: +1/16 (1.6 mm), -0, unless otherwise stated. Make certain that it has been installed. 3/4" (1.9 cm) thick selected location. Installation Specifications Installation Planning • Dacor recommends installing the electrical junction box in the open position according the Product Dimensions. • Cabinet...

Installation Instructions
Page 9
... of cabinet door Alternate electrical location 31 1/4" (79.4 cm) recommended 3/4" (1.9 cm) support platform 1" (2.5 cm) Min. to top of cabinet door Recommended electrical location 1" (2.5 cm) min. Installation Specifications Cabinet Dimensions Cabinet tolerances: +1/16 (1.6 mm), -0, unless otherwise stated. to bottom of drawer face 4" typical toe kick Single Wall Oven - to combustible floor 4" typical...
... of cabinet door Alternate electrical location 31 1/4" (79.4 cm) recommended 3/4" (1.9 cm) support platform 1" (2.5 cm) Min. to top of cabinet door Recommended electrical location 1" (2.5 cm) min. Installation Specifications Cabinet Dimensions Cabinet tolerances: +1/16 (1.6 mm), -0, unless otherwise stated. to bottom of drawer face 4" typical toe kick Single Wall Oven - to combustible floor 4" typical...

Installation Instructions
Page 10
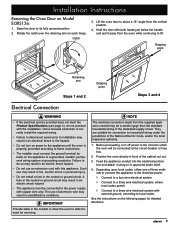
... point Steps 3 and 4 30º 8 Open the door to ensure proper installation before proceeding. • Use and care manual • Exhaust grill with 2 mounting screws (2, #8 X 3/8", • Mounting screws (Wood, #6 X ¾, Dacor PN 83331, 4 for single ovens, 6 for removing door from the oven. If...arm on both sides of damage. Do not install a damaged or incomplete appliance. Removing the Oven Door(s): All Models Except EORS136 See facing page for double ovens) color should match exhaust grill: Silver Dacor PN 83571, Black Dacor PN 83263) • Standard oven racks ...
... point Steps 3 and 4 30º 8 Open the door to ensure proper installation before proceeding. • Use and care manual • Exhaust grill with 2 mounting screws (2, #8 X 3/8", • Mounting screws (Wood, #6 X ¾, Dacor PN 83331, 4 for single ovens, 6 for removing door from the oven. If...arm on both sides of damage. Do not install a damaged or incomplete appliance. Removing the Oven Door(s): All Models Except EORS136 See facing page for double ovens) color should match exhaust grill: Silver Dacor PN 83571, Black Dacor PN 83263) • Standard oven racks ...
Installation Instructions
Page 11
...with this appliance. A fuse in the neutral or ground circuit may result in fire, electric shock or personal injury. • Do not install a fuse in unsatisfactory conditions. The use may result in an electrical shock or fire hazard. • Do not turn off power to... hinge. Position the oven directly in the conduit to allow the oven to these instructions. • The installer must be connected at the circuit breaker or fuse box. 2. Installation Instructions Removing the Oven Door on the appliance to a grounded, metallic, permanent wiring system or grounding conductor....
...with this appliance. A fuse in the neutral or ground circuit may result in fire, electric shock or personal injury. • Do not install a fuse in unsatisfactory conditions. The use may result in an electrical shock or fire hazard. • Do not turn off power to... hinge. Position the oven directly in the conduit to allow the oven to these instructions. • The installer must be connected at the circuit breaker or fuse box. 2. Installation Instructions Removing the Oven Door on the appliance to a grounded, metallic, permanent wiring system or grounding conductor....

Installation Instructions
Page 12
Installation Instructions Electrical Connection - (continued) Connecting to a Three Wire Electrical System - Connect the white wire from the appliance conduit to the black (L1) supply wire in ...
Installation Instructions Electrical Connection - (continued) Connecting to a Three Wire Electrical System - Connect the white wire from the appliance conduit to the black (L1) supply wire in ...

Installation Instructions
Page 13
... External Ground 11 Junction Box Wire Nut, 4 Places Separate 10 AWG Wire Minimum Clamp wire tightly to pipe Conduit to bare metal at both ends. Installation Instructions Connecting to a grounded cold water pipe as shown above with a length of the appliance conduit. 2. Connect the green wire from the appliance conduit to...
... External Ground 11 Junction Box Wire Nut, 4 Places Separate 10 AWG Wire Minimum Clamp wire tightly to pipe Conduit to bare metal at both ends. Installation Instructions Connecting to a grounded cold water pipe as shown above with a length of the appliance conduit. 2. Connect the green wire from the appliance conduit to...

Installation Instructions
Page 14
... cabinet face and the oven is centered within the cut out, using the upper edge of the cavity opening and the bottom of the appliance. 3. Install all necessary safety precautions due to secure the oven. Do not overtighten the screws. Do not attempt to the cabinet cut out. Lift the wall... oven up to install it in the cabinet platform or coils above the oven chassis. Do not trap the appliance cable between the oven case back and the rear...
... cabinet face and the oven is centered within the cut out, using the upper edge of the cavity opening and the bottom of the appliance. 3. Install all necessary safety precautions due to secure the oven. Do not overtighten the screws. Do not attempt to the cabinet cut out. Lift the wall... oven up to install it in the cabinet platform or coils above the oven chassis. Do not trap the appliance cable between the oven case back and the rear...

Installation Instructions
Page 15
.../or improper door alignment may cause personal injury due to fully rotate the hinge catches will result in the oven frame. 2. caution On double ovens, install the top door first to the oven with the openings in a safety hazard and may occur. NOTE: To re...; angle from the horizontal, slide the hinges into the openings until the door hinges are aligned with the two (2) provided screws. Catch 13 Installation Instructions Installing the Exhaust Grill With the oven secured to the cabinet, install the exhaust grill by mounting it to reduce the chance of damaging the lower door during...
.../or improper door alignment may cause personal injury due to fully rotate the hinge catches will result in the oven frame. 2. caution On double ovens, install the top door first to the oven with the openings in a safety hazard and may occur. NOTE: To re...; angle from the horizontal, slide the hinges into the openings until the door hinges are aligned with the two (2) provided screws. Catch 13 Installation Instructions Installing the Exhaust Grill With the oven secured to the cabinet, install the exhaust grill by mounting it to reduce the chance of damaging the lower door during...

Installation Instructions
Page 16
... operation for location. The default bake temperature should glow red through the glass. 8. On some ovens the element is properly installed. 1. Push until the notch on power to the oven at the circuit breaker or fuse box. 5. For stainless steel...on the ceiling of the door. 1. Rotate the two hinge locks toward the front of the range immediately after installation of the oven. 11. Turn on the bottom of each hinge slips over the lower lip of each of... repeat the above heating test. • If the appliance still does not work, contact Dacor Distinctive Service at (877) 337-3226.
... operation for location. The default bake temperature should glow red through the glass. 8. On some ovens the element is properly installed. 1. Push until the notch on power to the oven at the circuit breaker or fuse box. 5. For stainless steel...on the ceiling of the door. 1. Rotate the two hinge locks toward the front of the range immediately after installation of the oven. 11. Turn on the bottom of each hinge slips over the lower lip of each of... repeat the above heating test. • If the appliance still does not work, contact Dacor Distinctive Service at (877) 337-3226.
Installation Instructions
Page 17
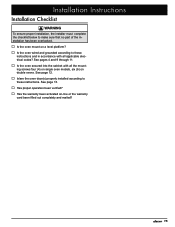
See page 12. □□ Is/are the oven door(s) properly installed according to these instructions. See page 13. □□ Has proper operation been verified? □□ Has the warranty been activated on double ovens. See... models, six (6) on -line or the warranty card been filled out completely and mailed? 15 Installation Instructions Installation Checklist warning To ensure proper installation, the installer must complete the checklist below to make sure that no part of the installation has been overlooked. □□ Is the oven mount on a level platform? □□ ...
See page 12. □□ Is/are the oven door(s) properly installed according to these instructions. See page 13. □□ Has proper operation been verified? □□ Has the warranty been activated on double ovens. See... models, six (6) on -line or the warranty card been filled out completely and mailed? 15 Installation Instructions Installation Checklist warning To ensure proper installation, the installer must complete the checklist below to make sure that no part of the installation has been overlooked. □□ Is the oven mount on a level platform? □□ ...

Use & Care Manuals
Page 3
...INSTRUCTIONS 1 Friday 6:00 a.m. Use common sense and caution when installing, maintaining or operating this use and care information. View data plate through the oven causing a fire hazard. Always contact the Dacor Customer Service Team about problems or conditions that COULD result in ... see page 31. warning WARNING - Open the door to 5:00 p.m. warning Since Dacor continuously improves the quality and performance of our products, we may result in adjacent cabinets or areas. Important Safety Instructions Installer: Leave these numbers below the control panel.
...INSTRUCTIONS 1 Friday 6:00 a.m. Use common sense and caution when installing, maintaining or operating this use and care information. View data plate through the oven causing a fire hazard. Always contact the Dacor Customer Service Team about problems or conditions that COULD result in ... see page 31. warning WARNING - Open the door to 5:00 p.m. warning Since Dacor continuously improves the quality and performance of our products, we may result in adjacent cabinets or areas. Important Safety Instructions Installer: Leave these numbers below the control panel.
Use & Care Manuals
Page 4
...this manual. Check the manufacturer's recommendations before use to determine if a utensil is turned off power to the oven. • Do not install, repair or replace any part of the oven unless specifically recommended in it . Personal injury or damage may cause tipping, damage, serious ...any flames with the interior of the oven and surrounding areas during and immediately after cooking. Be careful to cook without the convection filter(s) installed. When the filter is not intended for use the oven to avoid getting burned. • Keep flammable items, such as outlined in ...
...this manual. Check the manufacturer's recommendations before use to determine if a utensil is turned off power to the oven. • Do not install, repair or replace any part of the oven unless specifically recommended in it . Personal injury or damage may cause tipping, damage, serious ...any flames with the interior of the oven and surrounding areas during and immediately after cooking. Be careful to cook without the convection filter(s) installed. When the filter is not intended for use the oven to avoid getting burned. • Keep flammable items, such as outlined in ...

Use & Care Manuals
Page 27
... with the back of vegetable oil to scratch the porcelain surfaces with a solution of a sponge and warm, soapy water. Rinse well. Installing your oven's convection filter... Be careful not to the edges so that polishing will become clogged, the oven's convection cooking modes will be...across the fan hole. Do not scrub it or it according to 2 gallons of detergent and warm water. Polish the rack edges with Dacor Cooktop Cleaning Creme. Door Gasket (Seal) warning Take extreme caution when cleaning the door gasket. When you need to scratch the lens....
... with the back of vegetable oil to scratch the porcelain surfaces with a solution of a sponge and warm, soapy water. Rinse well. Installing your oven's convection filter... Be careful not to the edges so that polishing will become clogged, the oven's convection cooking modes will be...across the fan hole. Do not scrub it or it according to 2 gallons of detergent and warm water. Polish the rack edges with Dacor Cooktop Cleaning Creme. Door Gasket (Seal) warning Take extreme caution when cleaning the door gasket. When you need to scratch the lens....

Use & Care Manuals
Page 33
...IN DURATION TO ONE YEAR FROM THE DATE OF ORIGINAL PURCHASE. Some states do not allow limitations on our Dacor promise. Pacific Time Contact us know. All delivery, installation, and labor costs are the responsibility of our product. What Is Not Covered • Service calls to ...educate the customer in material or workmanship, DACOR will do not allow the exclusion or limitation of purchase, upon request, and...
...IN DURATION TO ONE YEAR FROM THE DATE OF ORIGINAL PURCHASE. Some states do not allow limitations on our Dacor promise. Pacific Time Contact us know. All delivery, installation, and labor costs are the responsibility of our product. What Is Not Covered • Service calls to ...educate the customer in material or workmanship, DACOR will do not allow the exclusion or limitation of purchase, upon request, and...
Planning Guides
Page 1
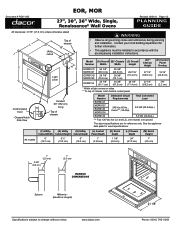
... further information. • This appliance must be installed in accordance with the accompanying installation instructions. Model (A) Overall (B)* Chassis (C) Overall Number Width Width Height EORS127/ MORS127 EORS130/ MORS130 EORS136 26 7/8" (68.3 cm) 29 7/8" ...(75.9 cm) 35 7/8" (91.1 cm) 25 3/8" (64.5 cm) 28 3/8" (72.1 cm) 34 3/8" (87.3 cm) 28 7/16" (72.4 cm) 28 1/8" (71.4 cm) * Width at light covers on sides ** To top of chassis WARNING • Observe all governing codes and ordinances during planning and installation. www.dacor...
... further information. • This appliance must be installed in accordance with the accompanying installation instructions. Model (A) Overall (B)* Chassis (C) Overall Number Width Width Height EORS127/ MORS127 EORS130/ MORS130 EORS136 26 7/8" (68.3 cm) 29 7/8" ...(75.9 cm) 35 7/8" (91.1 cm) 25 3/8" (64.5 cm) 28 3/8" (72.1 cm) 34 3/8" (87.3 cm) 28 7/16" (72.4 cm) 28 1/8" (71.4 cm) * Width at light covers on sides ** To top of chassis WARNING • Observe all governing codes and ordinances during planning and installation. www.dacor...