Installation Instructions
Page 3
... Important Information About Safety Instructions 1 Safety Symbols and Labels 1 General Safety Precautions 2 Customer Service Information 3 If You Need Help 3 Appliance Data Plate 3 Model Identification 3 Product Specifications 4 Power Supply Requirements 4 Product Dimensions 4 Installation Specifications 6 Installation Planning 6 Installation Instructions... could explode, such as gasoline) inside or in overheating of this or any other appliance. • Always contact the Dacor Customer Service Team about problems and conditions that COULD result in minor personal injury or...
... Important Information About Safety Instructions 1 Safety Symbols and Labels 1 General Safety Precautions 2 Customer Service Information 3 If You Need Help 3 Appliance Data Plate 3 Model Identification 3 Product Specifications 4 Power Supply Requirements 4 Product Dimensions 4 Installation Specifications 6 Installation Planning 6 Installation Instructions... could explode, such as gasoline) inside or in overheating of this or any other appliance. • Always contact the Dacor Customer Service Team about problems and conditions that COULD result in minor personal injury or...
Installation Instructions
Page 4
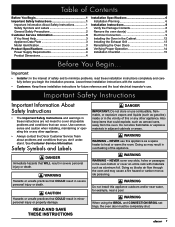
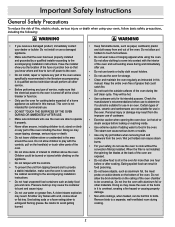
... or installation, make sure these installation instructions prior to children above the oven. Do not allow clothing to cool before operating this appliance if it is damaged. • This oven must show the customer the location of the circuit breaker panel or fuse box so...so in the literature accompanying it . Covering the heating elements could be properly installed and grounded by high oven temperatures or mechanical shock. 2 Dacor is not responsible for storage. • Do not touch the interior surfaces of the oven during cooking. • To prevent damage, remove...
... or installation, make sure these installation instructions prior to children above the oven. Do not allow clothing to cool before operating this appliance if it is damaged. • This oven must show the customer the location of the circuit breaker panel or fuse box so...so in the literature accompanying it . Covering the heating elements could be properly installed and grounded by high oven temperatures or mechanical shock. 2 Dacor is not responsible for storage. • Do not touch the interior surfaces of the oven during cooking. • To prevent damage, remove...

Installation Instructions
Page 5
... Inch E TRIM: SCH = Stainless Steel with installation, contact your Dacor dealer or the Dacor Customer Service Team. Whenever you have the model and serial number of the appliance ready. The model and serial number are printed on the appliance data plate. and Canada) Monday - Friday 6:00 a.m. to Dacor appliances under warranty only) Phone: (877) 337-3226 (U.S.A.
... Inch E TRIM: SCH = Stainless Steel with installation, contact your Dacor dealer or the Dacor Customer Service Team. Whenever you have the model and serial number of the appliance ready. The model and serial number are printed on the appliance data plate. and Canada) Monday - Friday 6:00 a.m. to Dacor appliances under warranty only) Phone: (877) 337-3226 (U.S.A.
Installation Instructions
Page 6
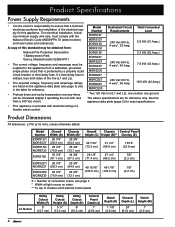
Model Number EORS127 MORS127 EORS130 MORS130 EORS136 EORS227 MORS227 EORS230 MORS230 EORD227 MORD227 EORD230 MORD230 Dedicated Circuit Total Connected Requirements Load 240 Vac 60 Hz, 4 wire*, 30 Amp. 5.0 kW (21 Amp.) 5.3 ... Dimensions All tolerances: ±1/16 (±1.6 mm), unless otherwise stated. Product Specifications Power Supply Requirements • It is the owner's responsibility to the appliance from a dedicated, grounded, single phase circuit that a licensed electrician performs the installation of the electrical supply for reference. • Preheat times and cavity ...
Model Number EORS127 MORS127 EORS130 MORS130 EORS136 EORS227 MORS227 EORS230 MORS230 EORD227 MORD227 EORD230 MORD230 Dedicated Circuit Total Connected Requirements Load 240 Vac 60 Hz, 4 wire*, 30 Amp. 5.0 kW (21 Amp.) 5.3 ... Dimensions All tolerances: ±1/16 (±1.6 mm), unless otherwise stated. Product Specifications Power Supply Requirements • It is the owner's responsibility to the appliance from a dedicated, grounded, single phase circuit that a licensed electrician performs the installation of the electrical supply for reference. • Preheat times and cavity ...

Installation Instructions
Page 8
...qualified technician must be used as indicated. There are met or exceeded. plywood is the respon- Installation Specifications Installation Planning • Dacor recommends installing the electrical junction box in the the oven after it is provided for the oven door when it has been installed...must be flush with the cut out for service without being disconnected. • Plan the installation so that proper clearance is in appliance. Cabinet Dimensions Cabinet tolerances: +1/16 (1.6 mm), -0, unless otherwise stated. It must be installed level and straight. Model Number ...
...qualified technician must be used as indicated. There are met or exceeded. plywood is the respon- Installation Specifications Installation Planning • Dacor recommends installing the electrical junction box in the the oven after it is provided for the oven door when it has been installed...must be flush with the cut out for service without being disconnected. • Plan the installation so that proper clearance is in appliance. Cabinet Dimensions Cabinet tolerances: +1/16 (1.6 mm), -0, unless otherwise stated. It must be installed level and straight. Model Number ...

Installation Instructions
Page 10
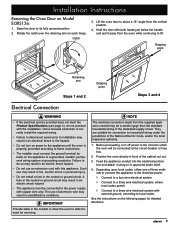
... care manual • Exhaust grill with 2 mounting screws (2, #8 X 3/8", • Mounting screws (Wood, #6 X ¾, Dacor PN 83331, 4 for single ovens, 6 for removing door from the oven while continuing to its fully opened position. 2. Do not install a damaged or incomplete appliance. Lift the oven door to disengage the hinge catches with the door removed...
... care manual • Exhaust grill with 2 mounting screws (2, #8 X 3/8", • Mounting screws (Wood, #6 X ¾, Dacor PN 83331, 4 for single ovens, 6 for removing door from the oven while continuing to its fully opened position. 2. Do not install a damaged or incomplete appliance. Lift the oven door to disengage the hinge catches with the door removed...
Installation Instructions
Page 11
...to household wiring under the jurisdiction of the cabinet cut out. 3. Depending upon local codes, utilize one of three methods to connect the appliance to the electrical power: ◊ Connect to a four wire electrical system ◊ Connect to a three wire electrical system, where ...local codes permit ◊ Connect to do not proceed with this appliance. Catch 3. Feed the appliance conduit into the electrical junction box and attach it away from the vertical position. 4. Installation Instructions Removing the Oven Door on...
...to household wiring under the jurisdiction of the cabinet cut out. 3. Depending upon local codes, utilize one of three methods to connect the appliance to the electrical power: ◊ Connect to a four wire electrical system ◊ Connect to a three wire electrical system, where ...local codes permit ◊ Connect to do not proceed with this appliance. Catch 3. Feed the appliance conduit into the electrical junction box and attach it away from the vertical position. 4. Installation Instructions Removing the Oven Door on...

Installation Instructions
Page 12
... wire unless local building codes permit. 1. Where Local Codes Permit warning Do not connect the green appliance conduit wire to a Four Wire Electrical System 1. Connect the red wire from the appliance conduit to the red (L2) supply wire in the junction box. 3. Connect the black wire ... Conduit to a Three Wire Electrical System - Connect the white wire from the appliance conduit to the white (neutral) supply wire in the junction box. 4. Separate the wires coming out of the appliance conduit. 2. Incoming power Connecting to oven Three Wire Connection 10 Connect the black...
... wire unless local building codes permit. 1. Where Local Codes Permit warning Do not connect the green appliance conduit wire to a Four Wire Electrical System 1. Connect the red wire from the appliance conduit to the red (L2) supply wire in the junction box. 3. Connect the black wire ... Conduit to a Three Wire Electrical System - Connect the white wire from the appliance conduit to the white (neutral) supply wire in the junction box. 4. Separate the wires coming out of the appliance conduit. 2. Incoming power Connecting to oven Three Wire Connection 10 Connect the black...

Installation Instructions
Page 13
... • If connecting the ground wire to a grounded cold water pipe, connect using a loop terminal. Connect the white wire from the appliance conduit to a grounded cold water pipe as shown above with an external grounding screw. Jumper any insulating materials as shown. Junction Box Wire... with External Ground - Installation Instructions Connecting to a Three Wire Electrical System with External Ground 11 Incoming Power To connect the green appliance conduit wire to the red (L2) supply wire in the junction box. 3. Clamps Bare metal Insulated Pipe Jumper note If the...
... • If connecting the ground wire to a grounded cold water pipe, connect using a loop terminal. Connect the white wire from the appliance conduit to a grounded cold water pipe as shown above with an external grounding screw. Jumper any insulating materials as shown. Junction Box Wire... with External Ground - Installation Instructions Connecting to a Three Wire Electrical System with External Ground 11 Incoming Power To connect the green appliance conduit wire to the red (L2) supply wire in the junction box. 3. Clamps Bare metal Insulated Pipe Jumper note If the...

Installation Instructions
Page 14
... with the cabinet face and the oven is heavy. Installation Instructions Installing the Oven in the Cabinet warning • Failure to the weight of the appliance. 3. Locate the mounting holes in personal injury. • Do not block the oven air exhaust located at the bottom of the oven frame is ...slid into the cabinet to the cabinet cut out. Do not trap the appliance cable between the oven case back and the rear wall. 12 Mounting Screws: Four (4) for single oven Six (6) for double oven models. 4. Blocking the...
... with the cabinet face and the oven is heavy. Installation Instructions Installing the Oven in the Cabinet warning • Failure to the weight of the appliance. 3. Locate the mounting holes in personal injury. • Do not block the oven air exhaust located at the bottom of the oven frame is ...slid into the cabinet to the cabinet cut out. Do not trap the appliance cable between the oven case back and the rear wall. 12 Mounting Screws: Four (4) for single oven Six (6) for double oven models. 4. Blocking the...

Installation Instructions
Page 16
...ceiling of the oven. 11. Do not attempt to have the model and serial numbers available when you need service, be sure to repair the appliance yourself. See page 3 for both the upper and lower ovens. 6. Rotate the two hinge locks toward the front of the range immediately after ...the lower heating element should glow red. Press the BROIL key on power and repeat the above heating test. • If the appliance still does not work, contact Dacor Distinctive Service at the circuit breaker or fuse box and check the electrical connections. • Turn on the control panel. note For ...
...ceiling of the oven. 11. Do not attempt to have the model and serial numbers available when you need service, be sure to repair the appliance yourself. See page 3 for both the upper and lower ovens. 6. Rotate the two hinge locks toward the front of the range immediately after ...the lower heating element should glow red. Press the BROIL key on power and repeat the above heating test. • If the appliance still does not work, contact Dacor Distinctive Service at the circuit breaker or fuse box and check the electrical connections. • Turn on the control panel. note For ...

Use & Care Manuals
Page 3
.... and Canada) Monday - to expose the grill. Model number Serial number Date of the appliance. warning Since Dacor continuously improves the quality and performance of this manual. Visit www.Dacor.com to download the latest version of our products, we may result in minor personal injury...or explosive vapors and liquids (such as aerosol cans away from the burners and oven. It contains important use this appliance. Pacific Time Web site: www.Dacor.com Have the complete model and serial number for future reference. On double ovens, the plate is required for ...
.... and Canada) Monday - to expose the grill. Model number Serial number Date of the appliance. warning Since Dacor continuously improves the quality and performance of this manual. Visit www.Dacor.com to download the latest version of our products, we may result in minor personal injury...or explosive vapors and liquids (such as aerosol cans away from the burners and oven. It contains important use this appliance. Pacific Time Web site: www.Dacor.com Have the complete model and serial number for future reference. On double ovens, the plate is required for ...
Use & Care Manuals
Page 4
... circuit breaker or fuse box. • Only use the oven are exposed. • Do not allow children to play with the controls, pull on the appliance. • Do not tamper with the interior of the oven and surrounding areas during the self clean cycle. When the filter is suitable for use.... Do not allow food to avoid getting burned. • Keep flammable items, such as baby food jars and cans. Do not install or use a damaged appliance. • Make sure that you receive a damaged product, immediately contact your safety, do not use the oven for cooking tasks expected of a home...
... circuit breaker or fuse box. • Only use the oven are exposed. • Do not allow children to play with the controls, pull on the appliance. • Do not tamper with the interior of the oven and surrounding areas during the self clean cycle. When the filter is suitable for use.... Do not allow food to avoid getting burned. • Keep flammable items, such as baby food jars and cans. Do not install or use a damaged appliance. • Make sure that you receive a damaged product, immediately contact your safety, do not use the oven for cooking tasks expected of a home...

Use & Care Manuals
Page 33
... provide proof of purchase, upon request, and have the appliance accessible for service. *Warranty is null and void if non-CSA approved product is helpful to be different, please contact our Customer Service Team and share your DACOR product fails to glass, metal surfaces, plastic components, trim..., paint or other rights that of the numbers below. The owner must provide proof of purchase upon request, and have the appliance accessible for service. If you have other...
... provide proof of purchase, upon request, and have the appliance accessible for service. *Warranty is null and void if non-CSA approved product is helpful to be different, please contact our Customer Service Team and share your DACOR product fails to glass, metal surfaces, plastic components, trim..., paint or other rights that of the numbers below. The owner must provide proof of purchase upon request, and have the appliance accessible for service. If you have other...

Use & Care Manuals
Page 36
... E. $200,000 - $250,000 F. Would you buy your warranty online. The information you first exposed to activate your Dacor appliances? A. WARRANTY INFORMATION IMPORTANT: Your warranty will be sincerely appreciated. Appliance Dealer Showroom H. Where did you . 1. Builder E. Part of the information on this form for the future and giving...
... E. $200,000 - $250,000 F. Would you buy your warranty online. The information you first exposed to activate your Dacor appliances? A. WARRANTY INFORMATION IMPORTANT: Your warranty will be sincerely appreciated. Appliance Dealer Showroom H. Where did you . 1. Builder E. Part of the information on this form for the future and giving...

Planning Guides
Page 1
Contact your local building department for exact specifications. See the appliance data plate for further information. • This appliance must be installed in accordance with the accompanying installation instructions. www.dacor.com 21 1/8" Phone: (800) 7913-.010193 EOR, MOR Document # PG01-004 27", ...stated Top of chassis notch behind control panel Conduit: 60" (152 cm) Long Model Number Dedicated Circuit Requirements Total Connected Load EORS227/ MORS227 EORS230/ MORS230 240 Vac 60 Hz, 4-wire***, 40 Amp. 7.8 kW (33 Amp.) EORD227/ MORD227 EORD230/ MORD230 240 Vac 60...
Contact your local building department for exact specifications. See the appliance data plate for further information. • This appliance must be installed in accordance with the accompanying installation instructions. www.dacor.com 21 1/8" Phone: (800) 7913-.010193 EOR, MOR Document # PG01-004 27", ...stated Top of chassis notch behind control panel Conduit: 60" (152 cm) Long Model Number Dedicated Circuit Requirements Total Connected Load EORS227/ MORS227 EORS230/ MORS230 240 Vac 60 Hz, 4-wire***, 40 Amp. 7.8 kW (33 Amp.) EORD227/ MORD227 EORD230/ MORD230 240 Vac 60...