Installation Instructions
Page 3
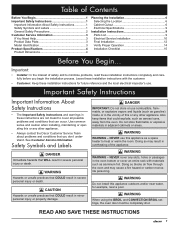
... meant to cover all possible problems and conditions that WILL result in the vicinity of Contents Before You Begin 1 Important Safety Instructions 1 Important Information About Safety Instructions 1 Safety Symbols and Labels 1 General Safety Precautions 2 Customer Service Information 3 If You Need Help 3 Product Data Plate 3 Model Identification 3 Product Specifications 4 Product Dimensions 4 Planning the Installation 6 Selecting the Location 6 Cabinet Cutout 6 Electrical Specifications 9 Installation Instructions 9 Parts List 9 Electrical Service Installation 10 Final...
... meant to cover all possible problems and conditions that WILL result in the vicinity of Contents Before You Begin 1 Important Safety Instructions 1 Important Information About Safety Instructions 1 Safety Symbols and Labels 1 General Safety Precautions 2 Customer Service Information 3 If You Need Help 3 Product Data Plate 3 Model Identification 3 Product Specifications 4 Product Dimensions 4 Planning the Installation 6 Selecting the Location 6 Cabinet Cutout 6 Electrical Specifications 9 Installation Instructions 9 Parts List 9 Electrical Service Installation 10 Final...
Installation Instructions
Page 4
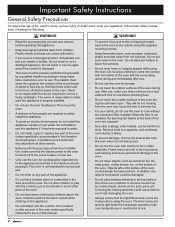
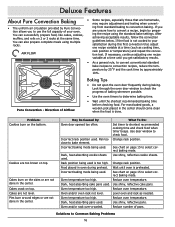
... interior surfaces of the oven during cooking. • To prevent damage, remove the meat probe from the oven when it . Do not allow heating elements in the literature accompanying it is turned off electric power to the oven. Do not adjust or alter any part of the oven unless specifically instructed to do not install this appliance. • Keep packaging materials away from the oven may cause the trim to become covered...
... interior surfaces of the oven during cooking. • To prevent damage, remove the meat probe from the oven when it . Do not allow heating elements in the literature accompanying it is turned off electric power to the oven. Do not adjust or alter any part of the oven unless specifically instructed to do not install this appliance. • Keep packaging materials away from the oven may cause the trim to become covered...

Installation Instructions
Page 5
....Dacor.com Product Data Plate • The product data plate contains the model and serial number information and the electrical requirements. • It is located inside the oven door, in the slot above the left hinge (inside the lower door on the product data plate. Model Identification If you call the Dacor Distinctive Service line. Pacific Time Dacor Customer Service Phone: (800) 793-0093 (U.S.A. trim) = EO = MOH = MOV B = CONFIGURATION Single oven = 1 Double oven = 2 C = SIZE 27 inch = 27 30 inch = 30 D = FINISH Epicure: Black glass...
....Dacor.com Product Data Plate • The product data plate contains the model and serial number information and the electrical requirements. • It is located inside the oven door, in the slot above the left hinge (inside the lower door on the product data plate. Model Identification If you call the Dacor Distinctive Service line. Pacific Time Dacor Customer Service Phone: (800) 793-0093 (U.S.A. trim) = EO = MOH = MOV B = CONFIGURATION Single oven = 1 Double oven = 2 C = SIZE 27 inch = 27 30 inch = 30 D = FINISH Epicure: Black glass...
Installation Instructions
Page 11
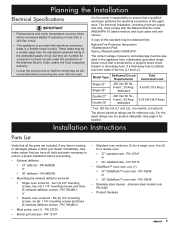
... a properly sized circuit breaker or time-delay fuse. stainless steel models only PN A302 • Product literature ◊ Double oven screw kit - PN 72723 • Broiler grill and pan - PN 700486-1 or • Stainless steel cleaner - Model Type Single 27" Single 30" Dedicated Circuit Requirements 240 Vac 60 Hz., 4 wire*, 30 Amp. PN 46050B or ◊ 30" deflector - PN 700486-2 • Meat probe, one (1) - PN 72949 ◊ Single oven screw kit - Six (6) 3/4" mounting screws, six (6) 1 1/4" mounting screws...
... a properly sized circuit breaker or time-delay fuse. stainless steel models only PN A302 • Product literature ◊ Double oven screw kit - PN 72723 • Broiler grill and pan - PN 700486-1 or • Stainless steel cleaner - Model Type Single 27" Single 30" Dedicated Circuit Requirements 240 Vac 60 Hz., 4 wire*, 30 Amp. PN 46050B or ◊ 30" deflector - PN 700486-2 • Meat probe, one (1) - PN 72949 ◊ Single oven screw kit - Six (6) 3/4" mounting screws, six (6) 1 1/4" mounting screws...
Installation Instructions
Page 16
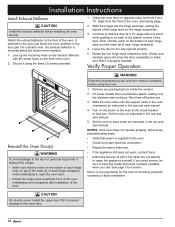
... the door completely to bake mode as instructed in the use and care manual. 5. caution On double ovens: Install the upper door first to prevent damage to the oven just below the bottom oven chamber. 1. Attach the exhaust deflector to repair the appliance yourself. Remove any packaging from it is properly installed. Dacor is protective plastic coating over the lower lip of the door. Line up the mounting holes...
... the door completely to bake mode as instructed in the use and care manual. 5. caution On double ovens: Install the upper door first to prevent damage to the oven just below the bottom oven chamber. 1. Attach the exhaust deflector to repair the appliance yourself. Remove any packaging from it is properly installed. Dacor is protective plastic coating over the lower lip of the door. Line up the mounting holes...
Use & Care Manuals
Page 4
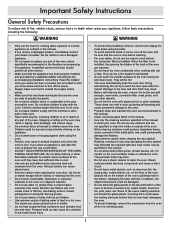
... when cooking with the oven. Children must be damaged. • Do not allow anyone, including children to sit or stand on the oven may stain. • Do not use a steam cleaner to clean the oven. If you receive a damaged product, immediately contact your dealer or builder. Damage to the door and door latch may result. • Before self-cleaning the oven, remove the broiler pan grill and pan, oven racks, convection filter, meat probe...
... when cooking with the oven. Children must be damaged. • Do not allow anyone, including children to sit or stand on the oven may stain. • Do not use a steam cleaner to clean the oven. If you receive a damaged product, immediately contact your dealer or builder. Damage to the door and door latch may result. • Before self-cleaning the oven, remove the broiler pan grill and pan, oven racks, convection filter, meat probe...
Use & Care Manuals
Page 5
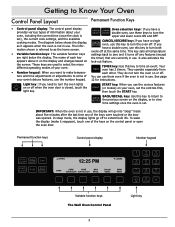
... current cook settings, and the available cooking modes. BACK RECALL BACK/RECALL key: Use this key to time an event. To wake the display (make tempera- each key the timer) that are currently in use the number keypad. 12 for instructions. They operate separately from • Number keypad: When you need to turn the oven off when the oven door is not in use . IMPORTANT: When the oven is closed, touch the light...
... current cook settings, and the available cooking modes. BACK RECALL BACK/RECALL key: Use this key to time an event. To wake the display (make tempera- each key the timer) that are currently in use the number keypad. 12 for instructions. They operate separately from • Number keypad: When you need to turn the oven off when the oven door is not in use . IMPORTANT: When the oven is closed, touch the light...
Use & Care Manuals
Page 6
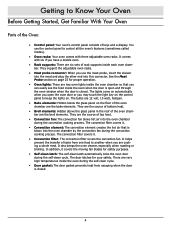
... door latches for proper operation. • Oven lights: There are two oven lights inside each oven chamber. They support the adjustable oven racks. • Meat probe connector: When you are cooking a whole meal. They are the source of bottom heat. • Broil elements: Hidden above the glass panel in the roof of taste from escaping when the door is open the oven door or you have a double oven. • Rack supports: There are six sets of top heat. • Convection fan: The convection fan blows...
... door latches for proper operation. • Oven lights: There are two oven lights inside each oven chamber. They support the adjustable oven racks. • Meat probe connector: When you are cooking a whole meal. They are the source of bottom heat. • Broil elements: Hidden above the glass panel in the roof of taste from escaping when the door is open the oven door or you have a double oven. • Rack supports: There are six sets of top heat. • Convection fan: The convection fan blows...
Use & Care Manuals
Page 8
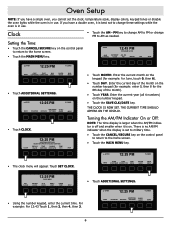
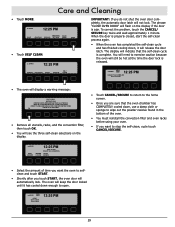
... PURE MAX CONV/SEAR CONVECTION BROIL DACOR GUIDE MAIN MENU • Touch ADDITIONAL SETTINGS. ▲ UPPER 12:25 PM ▼ LOWER BAKE ROASTING ADDITIONAL SAVED BROILNG SETTINGS GUIDE MORE • Touch CLOCK. THE CLOCK IS NOW SET. There is no AM/PM indicator when the display is set the clock, temperature scale, display colors, keypad tones or disable the oven lights while the oven is in use . For example: For 12...
... PURE MAX CONV/SEAR CONVECTION BROIL DACOR GUIDE MAIN MENU • Touch ADDITIONAL SETTINGS. ▲ UPPER 12:25 PM ▼ LOWER BAKE ROASTING ADDITIONAL SAVED BROILNG SETTINGS GUIDE MORE • Touch CLOCK. THE CLOCK IS NOW SET. There is no AM/PM indicator when the display is set the clock, temperature scale, display colors, keypad tones or disable the oven lights while the oven is in use . For example: For 12...

Use & Care Manuals
Page 10
... Display Settings If you want to change the temperature scale: • Touch ADDITIONAL SETTINGS. ▲ UPPER 12:25 PM ▼ LOWER BAKING ADDITIONAL SAVED ROASTING BROILING SETTINGS GUIDE MORE • Touch the CANCEL/SECURE key on the control panel to return to the home screen. The oven is preset at the factory. CLOCK 12:25 PM ADDITIONAL SETTINGS SELECT AN OPTION TO ADJUST SETTINGS. DISPLAY COLOR TONE DISABLE SETTINGS DOOR...
... Display Settings If you want to change the temperature scale: • Touch ADDITIONAL SETTINGS. ▲ UPPER 12:25 PM ▼ LOWER BAKING ADDITIONAL SAVED ROASTING BROILING SETTINGS GUIDE MORE • Touch the CANCEL/SECURE key on the control panel to return to the home screen. The oven is preset at the factory. CLOCK 12:25 PM ADDITIONAL SETTINGS SELECT AN OPTION TO ADJUST SETTINGS. DISPLAY COLOR TONE DISABLE SETTINGS DOOR...
Use & Care Manuals
Page 13
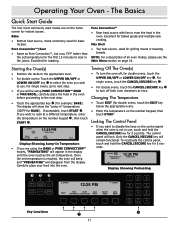
... set temperature for instant access. Max Broil • Top heat source. The display will lock. If you are on the control panel when the oven is reached, the oven will beep and "PREHEATING" will appear in the oven. If acceptable, touch START . Only the CANCEL/SECURE key will be using the BAKE or PURE CONVECTION™ modes, "PREHEATING" will disappear from the display. Carefully place your food into the oven. Locking The Control Panel...
... set temperature for instant access. Max Broil • Top heat source. The display will lock. If you are on the control panel when the oven is reached, the oven will beep and "PREHEATING" will appear in the oven. If acceptable, touch START . Only the CANCEL/SECURE key will be using the BAKE or PURE CONVECTION™ modes, "PREHEATING" will disappear from the display. Carefully place your food into the oven. Locking The Control Panel...
Use & Care Manuals
Page 15
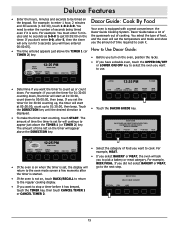
.... BAKE PURE PURE MAX CONV/SEAR CONVECTION BROIL DACOR GUIDE MAIN MENU • Touch the DACOR GUIDE key. SELECT A CATEGORY BAKERY MEAT POULTRY FISH POTATOES PIZZA TIME LEFT TIMER 1 00:47:23 12:25 PM PRESS START TIMER 1 01:02:30 DIRECTION DOWN CANCEL TIMER 1 TIMER 2 CANCEL DIRECTION TIMER 2 • Select the category of food you set the temperature and mode and show you the amount of time the timer is zero. TIMER...
.... BAKE PURE PURE MAX CONV/SEAR CONVECTION BROIL DACOR GUIDE MAIN MENU • Touch the DACOR GUIDE key. SELECT A CATEGORY BAKERY MEAT POULTRY FISH POTATOES PIZZA TIME LEFT TIMER 1 00:47:23 12:25 PM PRESS START TIMER 1 01:02:30 DIRECTION DOWN CANCEL TIMER 1 TIMER 2 CANCEL DIRECTION TIMER 2 • Select the category of food you set the temperature and mode and show you the amount of time the timer is zero. TIMER...
Use & Care Manuals
Page 16
... for Using Dacor Guide • In some cases the display may instruct you can change the meat probe temperature by food. The three basic styles of cooking in the oven and then touch START. or "SET TIMER FOR..." amount of the hold cycle, the oven will turn off and "CYCLE COMPLETE" will keep the food warm ▲ UPPER 350°F/155°F 12:25 PM SURR CONVECTION ROAST PRESS START...
... for Using Dacor Guide • In some cases the display may instruct you can change the meat probe temperature by food. The three basic styles of cooking in the oven and then touch START. or "SET TIMER FOR..." amount of the hold cycle, the oven will turn off and "CYCLE COMPLETE" will keep the food warm ▲ UPPER 350°F/155°F 12:25 PM SURR CONVECTION ROAST PRESS START...
Use & Care Manuals
Page 18
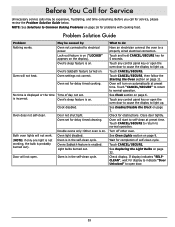
... on top. Set timer to check food. Use door window to shortest recommended cooking time and check food when timer beeps. Pan too Change rack position. See chart on top. Oven and/or oven rack not level. Reduce oven temperature. Use shiny, reflective pans. Solutions to bake element. If the food is done. Cakes crack on page 15 to select correct baking mode. Dark, heat absorbing cookie sheets used . Reduce oven temperature. Reduce oven temperature. Dark, heat absorbing pans used . After achieving...
... on top. Set timer to check food. Use door window to shortest recommended cooking time and check food when timer beeps. Pan too Change rack position. See chart on top. Oven and/or oven rack not level. Reduce oven temperature. Use shiny, reflective pans. Solutions to bake element. If the food is done. Cakes crack on page 15 to select correct baking mode. Dark, heat absorbing cookie sheets used . Reduce oven temperature. Reduce oven temperature. Dark, heat absorbing pans used . After achieving...

Use & Care Manuals
Page 20
...;F increments from the oven. • To prevent sticking, lightly grease the broiler grill. Pause for up to give the food a broiled flavor. NOTE: The heating elements are disabled when the door is open. • It is removed. You can use them and can adjust the broil temperature in heavy smoke. Once you don't have to 555˚F. • Setting the timer is done with a fork...
...;F increments from the oven. • To prevent sticking, lightly grease the broiler grill. Pause for up to give the food a broiled flavor. NOTE: The heating elements are disabled when the door is open. • It is removed. You can use them and can adjust the broil temperature in heavy smoke. Once you don't have to 555˚F. • Setting the timer is done with a fork...

Use & Care Manuals
Page 27
... stop time entered. • If you entered a start time "WAITING TO START" will turn on the display. Making Changes or Canceling While the Oven is "WAITING TO START" • If you want to change the temperature, meat probe or delay settings while the oven is reached, the oven will reduce the temperature to about 150°F to clear the control panel. Also, use it . For single ovens, touch CANCEL/SECURE. • Enter the time of roasting...
... stop time entered. • If you entered a start time "WAITING TO START" will turn on the display. Making Changes or Canceling While the Oven is "WAITING TO START" • If you want to change the temperature, meat probe or delay settings while the oven is reached, the oven will reduce the temperature to about 150°F to clear the control panel. Also, use it . For single ovens, touch CANCEL/SECURE. • Enter the time of roasting...

Use & Care Manuals
Page 30
... a double oven, use the UPPER ON/OFF and LOWER ON/OFF keys to select the oven to help remove odors during self-cleaning. Self-cleaning eliminates the need to exercise caution when the door lock is being opened while the interior oven temperatures can set the length of time for self-cleaning based on kitchen fans or vents to be removed. See page 30 for manual scrubbing of the oven during self-cleaning. The convection filter must also be cleaned. About...
... a double oven, use the UPPER ON/OFF and LOWER ON/OFF keys to select the oven to help remove odors during self-cleaning. Self-cleaning eliminates the need to exercise caution when the door lock is being opened while the interior oven temperatures can set the length of time for self-cleaning based on kitchen fans or vents to be removed. See page 30 for manual scrubbing of the oven during self-cleaning. The convection filter must also be cleaned. About...
Use & Care Manuals
Page 31
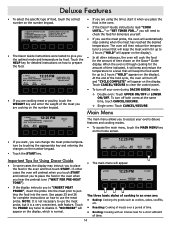
... caution because the oven will display a warning message: SELF CLEAN INSTRUCTIONS REMOVE RACKS, BROILER PAN, TRAY, ALL UTENSILS WIPE UP ALL EXCESS SPILLAGE. CLOSE OVEN DOOR REFER TO USE/CARE MANUAL FOR COMPLETE INSTRUCTIONS OK PRESS OK TO CONTINUE • Remove all utensils, racks, and the convection filter, then touch OK. • You will see the three self-clean selections on the display if the door is ajar. To correct the problem, touch the CANCEL...
... caution because the oven will display a warning message: SELF CLEAN INSTRUCTIONS REMOVE RACKS, BROILER PAN, TRAY, ALL UTENSILS WIPE UP ALL EXCESS SPILLAGE. CLOSE OVEN DOOR REFER TO USE/CARE MANUAL FOR COMPLETE INSTRUCTIONS OK PRESS OK TO CONTINUE • Remove all utensils, racks, and the convection filter, then touch OK. • You will see the three self-clean selections on the display if the door is ajar. To correct the problem, touch the CANCEL...

Use & Care Manuals
Page 32
... oven, use Dacor Stainless Steel Cleaner (Part No. Door Gasket (Seal) • Clean the door seal by the self-clean process. The control panel will disable the control panel on your oven so that you to scratch the lens. • Glass surfaces may eliminate the required tight door seal for manual scrubbing of interior surfaces. warning • Remove the filter(s) only when the oven is located in the back of the oven chamber. Be careful...
... oven, use Dacor Stainless Steel Cleaner (Part No. Door Gasket (Seal) • Clean the door seal by the self-clean process. The control panel will disable the control panel on your oven so that you to scratch the lens. • Glass surfaces may eliminate the required tight door seal for manual scrubbing of interior surfaces. warning • Remove the filter(s) only when the oven is located in the back of the oven chamber. Be careful...
Use & Care Manuals
Page 35
... preset time. Oven settings not correct. Light bulbs burned out. See Clock section on page 9. Turn off other oven. NOTE: See Solutions to electrical power. May be expensive, frustrating, and time-consuming. Door not shut tight. Oven light disabled. Close door tightly. Oven does not self-clean. Lock-out feature is enabled. Check for Service Unnecessary service calls may be caused by: Oven not connected to Common Baking Problems on the display). Time of self-clean cycle. Both oven lights will start to self-clean...
... preset time. Oven settings not correct. Light bulbs burned out. See Clock section on page 9. Turn off other oven. NOTE: See Solutions to electrical power. May be expensive, frustrating, and time-consuming. Door not shut tight. Oven light disabled. Close door tightly. Oven does not self-clean. Lock-out feature is enabled. Check for Service Unnecessary service calls may be caused by: Oven not connected to Common Baking Problems on the display). Time of self-clean cycle. Both oven lights will start to self-clean...


