
Planning Guides
Page 1
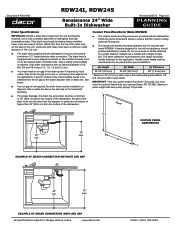
... must be installed in hose Back Water supply line 60" (152.0 cm) long 3 3/8" (8.6 cm) Power cord 44" (112.0 cm) long 2 7/8" (7.3 cm) Utility Connection Dimensions B C B A C A A = 1 3/8" (3.5 cm) B = 23" (58.40 cm) C = 2" (5.1 cm) millennia style handle Dimensions (PN adwM24h) A = 7/8" (2.2 cm) B = 18 1/2" (47.0 cm) C = 2 3/8" (6.0 cm) epicure style handle Dimensions (PN adwe24h) All specifications subject to 36 1/2" (92.7 cm) 22 7/8" (58.1 cm) (D) Handle Depth Varies with required trim kit installed. 5 Without custom front panel installed. www.dacor.com...
... must be installed in hose Back Water supply line 60" (152.0 cm) long 3 3/8" (8.6 cm) Power cord 44" (112.0 cm) long 2 7/8" (7.3 cm) Utility Connection Dimensions B C B A C A A = 1 3/8" (3.5 cm) B = 23" (58.40 cm) C = 2" (5.1 cm) millennia style handle Dimensions (PN adwM24h) A = 7/8" (2.2 cm) B = 18 1/2" (47.0 cm) C = 2 3/8" (6.0 cm) epicure style handle Dimensions (PN adwe24h) All specifications subject to 36 1/2" (92.7 cm) 22 7/8" (58.1 cm) (D) Handle Depth Varies with required trim kit installed. 5 Without custom front panel installed. www.dacor.com...

Planning Guides
Page 2
... access holes for reference only. Extra care must be installed to change without notice. In many cases, when a non-standard size dishwasher has been installed previously, there is enough room inside the right door ■■ Do not modify the power cord or use an extension cord. See diagram. 2" (5.1 cm) min. The electrical outlet/junction box, water supply valve and drain connection must be taken if the feet are...
... access holes for reference only. Extra care must be installed to change without notice. In many cases, when a non-standard size dishwasher has been installed previously, there is enough room inside the right door ■■ Do not modify the power cord or use an extension cord. See diagram. 2" (5.1 cm) min. The electrical outlet/junction box, water supply valve and drain connection must be taken if the feet are...
Planning Guides
Page 3
... air gap All specifications subject to the desired drain connection size. Maximum panel weight with an appliance should produce satisfactory results. A section of drain hose (not provided) needs to be a minimum of 20" (50.8 cm) above the sink trap in the household plumbing. ■■ For proper drainage, the drain line connection must be cut to change without air gap 20" 35" min. Custom Panel/Handle for the application. Instead use...
... air gap All specifications subject to the desired drain connection size. Maximum panel weight with an appliance should produce satisfactory results. A section of drain hose (not provided) needs to be a minimum of 20" (50.8 cm) above the sink trap in the household plumbing. ■■ For proper drainage, the drain line connection must be cut to change without air gap 20" 35" min. Custom Panel/Handle for the application. Instead use...
Installation Instructions
Page 2
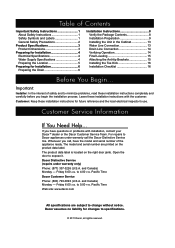
... Service line. The model and serial number are subject to change without notice. Friday 6:00 a.m. Pacific Time Web site: www.dacor.com All specifications are printed on the right door jamb. Open the door to 4:00 p.m. to expose it. to 5:00 p.m. Important: Installer: In the interest of Contents Important Safety Instructions 1 About Safety Instructions 1 Safety Symbols and Labels 1 General Safety Precautions 2 Product Specifications 3 Product Dimensions 3 Preparing for Installation 4 Electrical Specifications 4 Water Supply Specifications 4 Preparing the Location...
... Service line. The model and serial number are subject to change without notice. Friday 6:00 a.m. Pacific Time Web site: www.dacor.com All specifications are printed on the right door jamb. Open the door to 4:00 p.m. to expose it. to 5:00 p.m. Important: Installer: In the interest of Contents Important Safety Instructions 1 About Safety Instructions 1 Safety Symbols and Labels 1 General Safety Precautions 2 Product Specifications 3 Product Dimensions 3 Preparing for Installation 4 Electrical Specifications 4 Water Supply Specifications 4 Preparing the Location...
Installation Instructions
Page 4
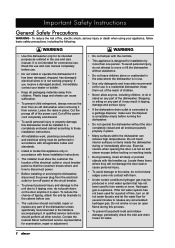
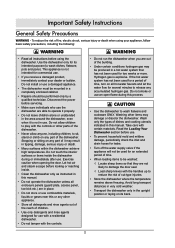
... release any part of the dishwasher. A qualified service technician should not install, repair or replace any part of children. • Never allow anyone, including children, to disconnect power. • Before installing or servicing the dishwasher, disconnect the power plug from service. Exercise caution when opening the door. Leave the racks in accordance with them out of the reach of the dishwasher unless specifically recommended in use. • Use only detergents and rinse aids recommended...
... release any part of the dishwasher. A qualified service technician should not install, repair or replace any part of children. • Never allow anyone, including children, to disconnect power. • Before installing or servicing the dishwasher, disconnect the power plug from service. Exercise caution when opening the door. Leave the racks in accordance with them out of the reach of the dishwasher unless specifically recommended in use. • Use only detergents and rinse aids recommended...
Installation Instructions
Page 6
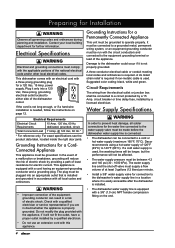
... planning and installation. The plug must be made before the dishwasher water supply line is connected. • The dishwasher can result in a risk of electric shock. Dacor recommends using a hot water supply of 120°F (49°C) to 140°F (60°C). The water supply line and the shut-off valve must supply a flow volume of at least 3 gallons (12 liters) per minute. • Install a 3/8" water supply valve for connection to the dishwasher's water supply line in a location where it...
... planning and installation. The plug must be made before the dishwasher water supply line is connected. • The dishwasher can result in a risk of electric shock. Dacor recommends using a hot water supply of 120°F (49°C) to 140°F (60°C). The water supply line and the shut-off valve must supply a flow volume of at least 3 gallons (12 liters) per minute. • Install a 3/8" water supply valve for connection to the dishwasher's water supply line in a location where it...

Installation Instructions
Page 7
... drain hose shall be no bigger than 2˝ (5.0 cm) in a cabinet adjacent to the kitchen sink for easy water supply and drain connection. Call Dacor for the part number of 2" (5.1 cm) from the cutout. • The electrical wiring, water supply and drain lines must enclose the dishwasher on the top, back and both sides. • Carefully check the location where the dishwasher is installed in diameter. In many cases, when a non-standard size dishwasher...
... drain hose shall be no bigger than 2˝ (5.0 cm) in a cabinet adjacent to the kitchen sink for easy water supply and drain connection. Call Dacor for the part number of 2" (5.1 cm) from the cutout. • The electrical wiring, water supply and drain lines must enclose the dishwasher on the top, back and both sides. • Carefully check the location where the dishwasher is installed in diameter. In many cases, when a non-standard size dishwasher...
Installation Instructions
Page 8
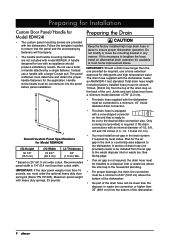
... drain hose supplied with the dishwasher must install an air gap in the drain system if required by a single fastener. Do not use a hose extension approved for detergents and high temperature water. Recommended panel width is 1/4" (6.4 mm) less than 35" (88.9 cm) from the top of drain hose (not provided) needs to be connected to a minimum 1/2" inside diameter drain connection. • The drain hose is equipped with a cone-shaped connector on the end...
... drain hose supplied with the dishwasher must install an air gap in the drain system if required by a single fastener. Do not use a hose extension approved for detergents and high temperature water. Recommended panel width is 1/4" (6.4 mm) less than 35" (88.9 cm) from the top of drain hose (not provided) needs to be connected to a minimum 1/2" inside diameter drain connection. • The drain hose is equipped with a cone-shaped connector on the end...
Installation Instructions
Page 10
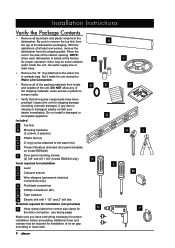
... the water line in a plastic bag. NOTE: Since each dishwasher is missing or damaged, please contact your dealer immediately. Place the unit to remove the toe kick from inside the unit, the water supply line or drain hose. • Remove the "O" ring attached to the water line) E Product literature (includes door panel template on model RDW24I) F Door panel mounting screws, (2) 3/8" and (6) 1 3/4" (model RDW24I only) Tools required for installation G Level H Crescent wrench J Wire strippers (permanent electrical connections only...
... the water line in a plastic bag. NOTE: Since each dishwasher is missing or damaged, please contact your dealer immediately. Place the unit to remove the toe kick from inside the unit, the water supply line or drain hose. • Remove the "O" ring attached to the water line) E Product literature (includes door panel template on model RDW24I) F Door panel mounting screws, (2) 3/8" and (6) 1 3/4" (model RDW24I only) Tools required for installation G Level H Crescent wrench J Wire strippers (permanent electrical connections only...

Installation Instructions
Page 11
... adjustment screw, both hoses and the wiring from pinched wires or hoses. Damage due to the handle installation instructions. Door Panel Installation (RDW24I Only) IMPORTANT: • The front panel must be installed before proceeding with installation of the dishwasher. • For proper operation and to prevent cabinet or panel damage, do not allow any electrical appliance, be sure the power has been turned off at the disconnect switch indicating that you are working...
... adjustment screw, both hoses and the wiring from pinched wires or hoses. Damage due to the handle installation instructions. Door Panel Installation (RDW24I Only) IMPORTANT: • The front panel must be installed before proceeding with installation of the dishwasher. • For proper operation and to prevent cabinet or panel damage, do not allow any electrical appliance, be sure the power has been turned off at the disconnect switch indicating that you are working...
Installation Instructions
Page 16
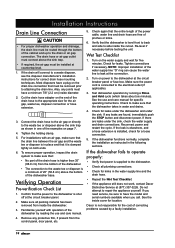
... location. Check for correct drain hose mounting techniques. Turn on the water supply and wait for a loose connection. 5. See the use and care manual. 4. Reconnect power and restart the cycle. The drain hose or air gap outlet must connect above the sink trap as instructed in the water supply line and the drain hose. • Repeat the Wet Test Checklist. • If the appliance still does not work, contact Dacor Distinctive Service at the circuit breaker panel. 2. Also, any leaks...
... location. Check for correct drain hose mounting techniques. Turn on the water supply and wait for a loose connection. 5. See the use and care manual. 4. Reconnect power and restart the cycle. The drain hose or air gap outlet must connect above the sink trap as instructed in the water supply line and the drain hose. • Repeat the Wet Test Checklist. • If the appliance still does not work, contact Dacor Distinctive Service at the circuit breaker panel. 2. Also, any leaks...
Installation Instructions
Page 18
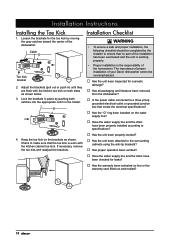
... part of the installation has been overlooked and the unit is working properly. • Proper installation is the responsibility of the dishwasher. Installation Instructions Installing the Toe Kick 1. Check to the surrounding cabinets using the anti-tip brackets? □□ Has proper operation been verified? □□ Have the water supply line and the drain hose been checked for the toe kick by pushing both sides as shown. Adjust the brackets...
... part of the installation has been overlooked and the unit is working properly. • Proper installation is the responsibility of the dishwasher. Installation Instructions Installing the Toe Kick 1. Check to the surrounding cabinets using the anti-tip brackets? □□ Has proper operation been verified? □□ Have the water supply line and the drain hose been checked for the toe kick by pushing both sides as shown. Adjust the brackets...
Use & Care Manuals
Page 4
... children. • Use only detergents and rinse agents designed for a period of time, turn on all enclosure panels (guard plate, access panel, toe kick etc.) are out of fire, electric shock, serious injury or death when using the dishwasher. Do not allow anyone, including children, to wash dishes, flatware, pots and pans). Disconnect the power before looking or reaching inside the dishwasher during this manual. Stepping or sitting...
... children. • Use only detergents and rinse agents designed for a period of time, turn on all enclosure panels (guard plate, access panel, toe kick etc.) are out of fire, electric shock, serious injury or death when using the dishwasher. Do not allow anyone, including children, to wash dishes, flatware, pots and pans). Disconnect the power before looking or reaching inside the dishwasher during this manual. Stepping or sitting...
Use & Care Manuals
Page 5
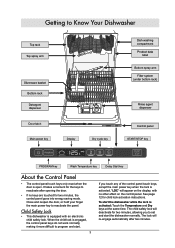
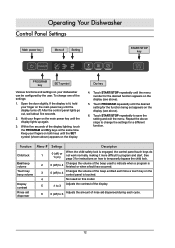
... main power key to Know Your Dishwasher Top rack Top spray arm Silverware basket Bottom rack Detergent dispenser Door latch Main power key Display Dry cycle key Dish washing compartment Product data label Bottom spray arm Filter system (under bottom rack) Rinse agent dispenser Control panel START/STOP key PROGRAM key Wash Temperature key Delay Start key About the Control Panel • The control panel touch keys only react when the door is open. It takes a moment for two minutes, the control panel goes into energy saving mode. When the child lock is...
... main power key to Know Your Dishwasher Top rack Top spray arm Silverware basket Bottom rack Detergent dispenser Door latch Main power key Display Dry cycle key Dish washing compartment Product data label Bottom spray arm Filter system (under bottom rack) Rinse agent dispenser Control panel START/STOP key PROGRAM key Wash Temperature key Delay Start key About the Control Panel • The control panel touch keys only react when the door is open. It takes a moment for two minutes, the control panel goes into energy saving mode. When the child lock is...
Use & Care Manuals
Page 12
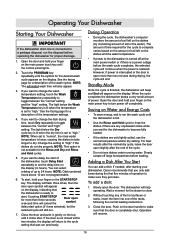
... completely shut. For best results after the normal dry cycle, leave the door open symbol delay start , hold your finger on the main power touch key until it was run previously. To add a dish: 1. The dishwasher will appear on Water and Energy Costs • To save energy, wait to run the wash cycle until the symbol for a description of up to turn power off completely. Close the door. You can add a dish, if needed...
... completely shut. For best results after the normal dry cycle, leave the door open symbol delay start , hold your finger on the main power touch key until it was run previously. To add a dish: 1. The dishwasher will appear on Water and Energy Costs • To save energy, wait to run the wash cycle until the symbol for a description of up to turn power off completely. Close the door. You can add a dish, if needed...
Use & Care Manuals
Page 14
... keys until the display lights up again. 3. Touch START/STOP repeatedly to program and start. Display contrast 5 -1 to 6 Adjusts the amount of the display. Open the door slightly. Hold your fingers on the main power key until the SET symbol (shown above steps to temporarily bypass the child lock. Dry key 4. Rinse aid dispenser 6 0 (off ) to indicate when a program is engaged, the control panel touch keys do not work normally, making it more...
... keys until the display lights up again. 3. Touch START/STOP repeatedly to program and start. Display contrast 5 -1 to 6 Adjusts the amount of the display. Open the door slightly. Hold your fingers on the main power key until the SET symbol (shown above steps to temporarily bypass the child lock. Dry key 4. Rinse aid dispenser 6 0 (off ) to indicate when a program is engaged, the control panel touch keys do not work normally, making it more...
Use & Care Manuals
Page 15
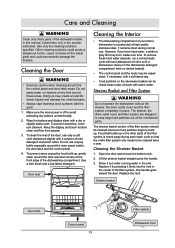
... damage the electrical parts. • Always wipe stainless steel surfaces with warm water. Strainer basket Door latch Control panel 13 Filter system Dishwasher floor Care and Cleaning warning Clean only those parts of the dishwasher listed in place. Make sure the main power is off to build up , gently clean around the the control panel and door latch areas. To prevent odors caused by the handle. 3. Strainer Basket and Filter System warning Do not operate the dishwasher without the...
... damage the electrical parts. • Always wipe stainless steel surfaces with warm water. Strainer basket Door latch Control panel 13 Filter system Dishwasher floor Care and Cleaning warning Clean only those parts of the dishwasher listed in place. Make sure the main power is off to build up , gently clean around the the control panel and door latch areas. To prevent odors caused by the handle. 3. Strainer Basket and Filter System warning Do not operate the dishwasher without the...
Use & Care Manuals
Page 18
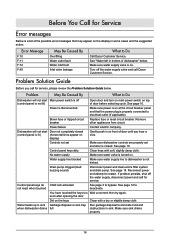
...) Open door and turn on main power switch on top of the possible error messages that the power plug is on . Dishwasher will not start Door not completely closed . Water supply line blocked Make sure water supply line to Do Call Dacor Customer Service. If problem persists, shut off the water supply valve and call for service, please review the Problem Solution Guide below . soon after opening the door. Error Message F:10 F:11 F:12 F:40 May Be Caused By Overfilling Water outlet fault Water inlet fault Inlet valve leakage...
...) Open door and turn on main power switch on top of the possible error messages that the power plug is on . Dishwasher will not start Door not completely closed . Water supply line blocked Make sure water supply line to Do Call Dacor Customer Service. If problem persists, shut off the water supply valve and call for service, please review the Problem Solution Guide below . soon after opening the door. Error Message F:10 F:11 F:12 F:40 May Be Caused By Overfilling Water outlet fault Water inlet fault Inlet valve leakage...

Use & Care Manuals
Page 19
...). Dishes not dry Drying option needed Select the Drying option for items blocking it . Check rinse agent dispenser setting. Also try opening . Door will not open) Old detergent Spray arms do not obstruct movement of drain hose. Water may have been selected for a prolonged period See instructions for service. Make sure holes in all the way into the dishwasher. 1 minute appears on page 13. Detergent left in hose or any other part of hose must...
...). Dishes not dry Drying option needed Select the Drying option for items blocking it . Check rinse agent dispenser setting. Also try opening . Door will not open) Old detergent Spray arms do not obstruct movement of drain hose. Water may have been selected for a prolonged period See instructions for service. Make sure holes in all the way into the dishwasher. 1 minute appears on page 13. Detergent left in hose or any other part of hose must...
Use & Care Manuals
Page 22
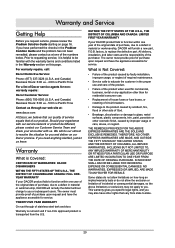
... numbers below. We will furnish a new part, F.O.B. Some states do not allow the exclusion or limitation of purchase, due to a defect in the proper use . • Replacement of house fuses or fuse boxes, or resetting of circuit breakers. • Damage to the product caused by improper usage or care, abuse, or neglect. For warranty repairs, call: Dacor Distinctive Service: Phone: (877) 337-3226 (U.S.A. All delivery, installation...
... numbers below. We will furnish a new part, F.O.B. Some states do not allow the exclusion or limitation of purchase, due to a defect in the proper use . • Replacement of house fuses or fuse boxes, or resetting of circuit breakers. • Damage to the product caused by improper usage or care, abuse, or neglect. For warranty repairs, call: Dacor Distinctive Service: Phone: (877) 337-3226 (U.S.A. All delivery, installation...
