Installation Instructions
Page 3
... and to heat or warm the room. Important: • Installer: In the interest of Contents Before You Begin 1 Important Safety Instructions 1 Important Information About Safety Instructions 1 Safety Symbols and Labels 1 General Safety Precautions 2 Customer Service Information 3 If You Need Help 3 Appliance Data Plate 3 Model Identification 3 Product Specifications 4 Electrical Specifications 4 Product Dimensions 4 Installation Specifications 6 Installation Planning 6 Installation Instructions 8 Verify the Package Contents 8 Remove the oven door(s 8 Electrical Connection...
... and to heat or warm the room. Important: • Installer: In the interest of Contents Before You Begin 1 Important Safety Instructions 1 Important Information About Safety Instructions 1 Safety Symbols and Labels 1 General Safety Precautions 2 Customer Service Information 3 If You Need Help 3 Appliance Data Plate 3 Model Identification 3 Product Specifications 4 Electrical Specifications 4 Product Dimensions 4 Installation Specifications 6 Installation Planning 6 Installation Instructions 8 Verify the Package Contents 8 Remove the oven door(s 8 Electrical Connection...
Installation Instructions
Page 4
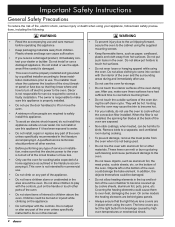
... location of the circuit breaker panel or fuse box so that they know where and how to turn off at the back of the oven during cooking. • To prevent damage, remove the meat probe from breakage caused by a qualified installer according to these surfaces have had sufficient time to cook without the convection filter installed. When the filter is not installed, the spinning fan blades at the circuit breaker or fuse box. • Only use...
... location of the circuit breaker panel or fuse box so that they know where and how to turn off at the back of the oven during cooking. • To prevent damage, remove the meat probe from breakage caused by a qualified installer according to these surfaces have had sufficient time to cook without the convection filter installed. When the filter is not installed, the spinning fan blades at the circuit breaker or fuse box. • Only use...
Installation Instructions
Page 5
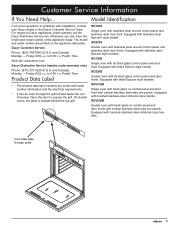
....dacor.com Dacor Distinctive Service (repairs under warranty call , have questions or problems with stainless steel around control panel and stainless steel door front. Dacor Customer Service Phone: (800) 793-0093 (U.S.A. RO230B Double oven with all black glass control panel and door fronts. Pacific Time Product Data Label • The product data label contains the model and serial number information and the electrical requirements. • It can be seen through grate 3 RO130B Single oven with all black glass control panel...
....dacor.com Dacor Distinctive Service (repairs under warranty call , have questions or problems with stainless steel around control panel and stainless steel door front. Dacor Customer Service Phone: (800) 793-0093 (U.S.A. RO230B Double oven with all black glass control panel and door fronts. Pacific Time Product Data Label • The product data label contains the model and serial number information and the electrical requirements. • It can be seen through grate 3 RO130B Single oven with all black glass control panel...
Installation Instructions
Page 15
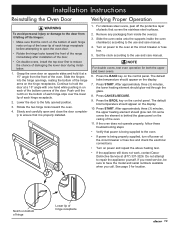
... use and care manual. 4. Press the BAKE key on the ceiling of the door. On some ovens the element is being properly supplied, turn off its hinges: • Make sure that covers the stainless steel surfaces. 2. Press START. Installation Instructions Reinstalling the Oven Door Verifying Proper Operation warning To avoid personal injury or damage to the door from it falling off power at the circuit breaker or fuse box and check the electrical connections...
... use and care manual. 4. Press the BAKE key on the ceiling of the door. On some ovens the element is being properly supplied, turn off its hinges: • Make sure that covers the stainless steel surfaces. 2. Press START. Installation Instructions Reinstalling the Oven Door Verifying Proper Operation warning To avoid personal injury or damage to the door from it falling off power at the circuit breaker or fuse box and check the electrical connections...
Use & Care Manuals
Page 4
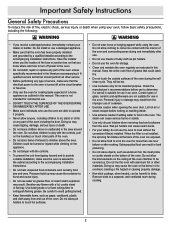
... line the oven with a lid, cookie sheet or flat tray. When the filter is secured to the cabinet according to the accompanying installation instructions. • Do not heat unopened food containers such as instructed in the oven for use a damaged appliance. • Make sure that the electrical power to the oven is turned off power to the oven. • Do not install, repair or replace any part of the oven unless specifically recommended...
... line the oven with a lid, cookie sheet or flat tray. When the filter is secured to the cabinet according to the accompanying installation instructions. • Do not heat unopened food containers such as instructed in the oven for use a damaged appliance. • Make sure that the electrical power to the oven is turned off power to the oven. • Do not install, repair or replace any part of the oven unless specifically recommended...

Use & Care Manuals
Page 6
... seven sets of racks depends on . They support the adjustable oven racks. K Convection element The convection element heats the air that you use the meat probe, insert the skewer into the meat and plug the other end into this connector. It is blown into the oven chamber during the convection cooking process. On double ovens, only the upper oven is closed. The total number of rack supports inside the oven during the self clean cycle. Do not block or cover the air...
... seven sets of racks depends on . They support the adjustable oven racks. K Convection element The convection element heats the air that you use the meat probe, insert the skewer into the meat and plug the other end into this connector. It is blown into the oven chamber during the convection cooking process. On double ovens, only the upper oven is closed. The total number of rack supports inside the oven during the self clean cycle. Do not block or cover the air...

Use & Care Manuals
Page 8
... for instructions. Display Symbols Convection Bake Broil Roast Meat probe Door lock (self clean) Timer Self clean 12 Timer numbers 6 This key sets all temperature settings back to zero and turns off automatically at a later time. On double ovens, there is a set of cooking you need to turn on or off, touch the light key. If you want to set the temperature, cook time or the time, use the number keypad. Select the type of delay timed cooking keys for details. Getting to Know Your Oven Control Panel Layout A START/CONTINUE key B Cooking mode keypad...
... for instructions. Display Symbols Convection Bake Broil Roast Meat probe Door lock (self clean) Timer Self clean 12 Timer numbers 6 This key sets all temperature settings back to zero and turns off automatically at a later time. On double ovens, there is a set of cooking you need to turn on or off, touch the light key. If you want to set the temperature, cook time or the time, use the number keypad. Select the type of delay timed cooking keys for details. Getting to Know Your Oven Control Panel Layout A START/CONTINUE key B Cooking mode keypad...

Use & Care Manuals
Page 10
... the temperature scale (Fahrenheit or Celsius) the oven uses to the previous mode, repeat the above conditions. Before You Cook... • Dacor recommends turning the oven on the oven's surfaces. Preheat time depends on ): 1. The display will cook. To leave the setting as military time. 1:36 PM = 13:36 military time. Enter the current time on the time display will go back to the regular clock display, set to regular time: 1. Turning the Control Panel "Beep" Off...
... the temperature scale (Fahrenheit or Celsius) the oven uses to the previous mode, repeat the above conditions. Before You Cook... • Dacor recommends turning the oven on the oven's surfaces. Preheat time depends on ): 1. The display will cook. To leave the setting as military time. 1:36 PM = 13:36 military time. Enter the current time on the time display will go back to the regular clock display, set to regular time: 1. Turning the Control Panel "Beep" Off...

Use & Care Manuals
Page 12
... cuts of meat, fish, and garlic bread. • PURE CONVECTION™ - A combination of the control panel. A combination of the various cooking modes. 3. Cooks using Pure Convection or one START key, on , for preheating, along with the convection fan. Carefully place your food in a deep pan. • CONVECTION BROIL - Touch CONTINUE. Cooking Mode Convection Bake Convection Broil Pure Convection Convection Roast Bake Broil Preset Temperature 325°F 555°F 325°F 375°F 350°F 555°F 10 Good for even heat. Uses convection cooking...
... cuts of meat, fish, and garlic bread. • PURE CONVECTION™ - A combination of the control panel. A combination of the various cooking modes. 3. Cooks using Pure Convection or one START key, on , for preheating, along with the convection fan. Carefully place your food in a deep pan. • CONVECTION BROIL - Touch CONTINUE. Cooking Mode Convection Bake Convection Broil Pure Convection Convection Roast Bake Broil Preset Temperature 325°F 555°F 325°F 375°F 350°F 555°F 10 Good for even heat. Uses convection cooking...
Use & Care Manuals
Page 14
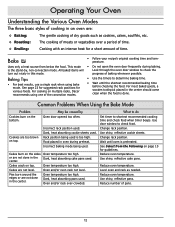
... baking mode being used . Dark, heat absorbing pans used . Oven and/or rack over a period of time. ◊ Broiling: Cooking with an intense heat for a short amount of time. What to do Set timer to check the turn out nicely in the center should come clean when the food is preheated. Reduce oven temperature. Reduce oven temperature. Reduce oven temperature. Oven temperature too high. Use door window to determine baking time. • Wait until oven is done. Operating Your Oven Understanding the Various Oven Modes...
... baking mode being used . Dark, heat absorbing pans used . Oven and/or rack over a period of time. ◊ Broiling: Cooking with an intense heat for a short amount of time. What to do Set timer to check the turn out nicely in the center should come clean when the food is preheated. Reduce oven temperature. Reduce oven temperature. Reduce oven temperature. Oven temperature too high. Use door window to determine baking time. • Wait until oven is done. Operating Your Oven Understanding the Various Oven Modes...
Use & Care Manuals
Page 16
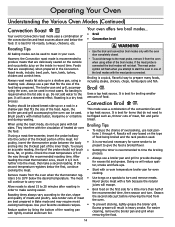
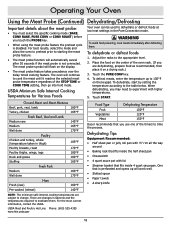
... baking modes can be used to 20 minutes after roasting in heavy smoke. If using a roasting rack. Results will escape. • Broil food on the inside in a shallow pan, using a meat thermometer, insert the probe halfway into the meat, then take a second reading. Operating Your Oven Understanding the Various Oven Modes (Continued) Convection Roast Your oven's Convection roast mode uses a combination of heated air over . Remove meats from the oven. • To prevent sticking, lightly grease the broiler grill. Your oven offers two broil modes...
... baking modes can be used to 20 minutes after roasting in heavy smoke. If using a roasting rack. Results will escape. • Broil food on the inside in a shallow pan, using a meat thermometer, insert the probe halfway into the meat, then take a second reading. Operating Your Oven Understanding the Various Oven Modes (Continued) Convection Roast Your oven's Convection roast mode uses a combination of heated air over . Remove meats from the oven. • To prevent sticking, lightly grease the broiler grill. Your oven offers two broil modes...

Use & Care Manuals
Page 17
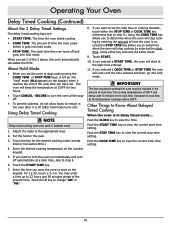
... Delay Timed Cooking • The delay timed options work for Timer 1 and Timer 2 have an effect on a timer... 1. continued... 15 To time 25 minutes, touch 2-5. The timer number will flash on the display when one or both of the various cook modes, except broil and convection broil. • You may use the Delay Timed Cooking Features. Things to remain in timers... • You can use . Your oven is equipped with two built-in the oven after hold mode...
... Delay Timed Cooking • The delay timed options work for Timer 1 and Timer 2 have an effect on a timer... 1. continued... 15 To time 25 minutes, touch 2-5. The timer number will flash on the display when one or both of the various cook modes, except broil and convection broil. • You may use the Delay Timed Cooking Features. Things to remain in timers... • You can use . Your oven is equipped with two built-in the oven after hold mode...
Use & Care Manuals
Page 18
... cooking temperature on the display) when it goes into hold mode. If you entered a COOK TIME or STOP TIME the oven will start at 150°F for the desired cooking mode (except Broil or Convection Broil.) 4. Push the START TIME key to remain in Sabbath mode. 1. If you want the oven to view the current cook time setting. 16 Touch START. 10. About Hold Mode • When you set the oven to determine when the oven will stop cooking using the COOK TIME...
... cooking temperature on the display) when it goes into hold mode. If you entered a COOK TIME or STOP TIME the oven will start at 150°F for the desired cooking mode (except Broil or Convection Broil.) 4. Push the START TIME key to remain in Sabbath mode. 1. If you want the oven to view the current cook time setting. 16 Touch START. 10. About Hold Mode • When you set the oven to determine when the oven will stop cooking using the COOK TIME...
Use & Care Manuals
Page 19
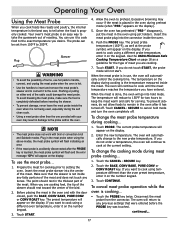
... the oven has preheated ("PRE-" disappears), put the meat in the thickest part of the meat. To change the meat probe temperature during meat probe cooking... 1. Touch the CANCEL · SECURE key. 2. To cancel meat probe operation while the oven is in use it to cook food to remain in the oven and with broil or convection broil and Sabbath modes. The oven will go into hold mode and turn the oven completely off . Touch START. 4. The preset probe temperature (160...
... the oven has preheated ("PRE-" disappears), put the meat in the thickest part of the meat. To change the meat probe temperature during meat probe cooking... 1. Touch the CANCEL · SECURE key. 2. To cancel meat probe operation while the oven is in use it to cook food to remain in the oven and with broil or convection broil and Sabbath modes. The oven will go into hold mode and turn the oven completely off . Touch START. 4. The preset probe temperature (160...
Use & Care Manuals
Page 20
... internal cooking temperatures are changes in the Pure Convection mode. Touch START. The meat probe symbol will continue to eradicate them . Touch the PURE CONV key. 4. Operating Your Oven Using the Meat Probe (Continued) Important details about the meat probe: • You must select the specific cooking mode (BAKE, CONV BAKE, PURE CONV or CONV ROAST) before you touch the PROBE key. • When using the meat probe feature the preheat cycle is not connected. The oven will...
... internal cooking temperatures are changes in the Pure Convection mode. Touch START. The meat probe symbol will continue to eradicate them . Touch the PURE CONV key. 4. Operating Your Oven Using the Meat Probe (Continued) Important details about the meat probe: • You must select the specific cooking mode (BAKE, CONV BAKE, PURE CONV or CONV ROAST) before you touch the PROBE key. • When using the meat probe feature the preheat cycle is not connected. The oven will...
Use & Care Manuals
Page 27
... of interior surfaces. CAUTION • Take extreme caution when cleaning the door gasket. When the door is not shut, an error message will only allow you to cook in one oven while the other is in self clean mode. • The oven lights do not operate while the oven is normal for cleaning the surfaces of the oven listed in the oven during self cleaning. Before self cleaning the oven, remove the racks, the convection filter, all parts are...
... of interior surfaces. CAUTION • Take extreme caution when cleaning the door gasket. When the door is not shut, an error message will only allow you to cook in one oven while the other is in self clean mode. • The oven lights do not operate while the oven is normal for cleaning the surfaces of the oven listed in the oven during self cleaning. Before self cleaning the oven, remove the racks, the convection filter, all parts are...

Use & Care Manuals
Page 28
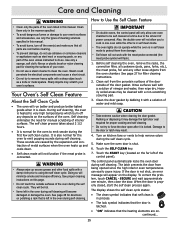
... self clean process, the door will lock. Remove the oven racks and all surfaces are dry after self cleaning. Using a soapy sponge, wipe down . The clean icon, lock icon and "ON" will make the self clean cycle work better and reduce smoke and odors. Prepare the oven for the door to unlock before opening the door. Touch START. The oven will release when the inside has cooled down the inside of the oven may enter a time...
... self clean process, the door will lock. Remove the oven racks and all surfaces are dry after self cleaning. Using a soapy sponge, wipe down . The clean icon, lock icon and "ON" will make the self clean cycle work better and reduce smoke and odors. Prepare the oven for the door to unlock before opening the door. Touch START. The oven will release when the inside has cooled down the inside of the oven may enter a time...

Use & Care Manuals
Page 29
... accidentally turning the oven on while cleaning the control panel, activate the lock-out feature. When the control panel is located in the back of the filter over the hole. Glass (Interior and Exterior) Use a mild glass cleaner to remove the filter during the self clean cycle. Touch the CANCEL · SECURE key for six seconds. Dry the control panel completely with Dacor Cooktop Cleaning Creme. Rinse well. They will not work properly. Clean the filter...
... accidentally turning the oven on while cleaning the control panel, activate the lock-out feature. When the control panel is located in the back of the filter over the hole. Glass (Interior and Exterior) Use a mild glass cleaner to remove the filter during the self clean cycle. Touch the CANCEL · SECURE key for six seconds. Dry the control panel completely with Dacor Cooktop Cleaning Creme. Rinse well. They will not work properly. Clean the filter...
Use & Care Manuals
Page 32
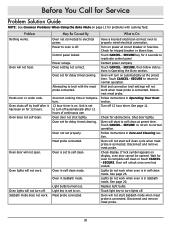
... Problems When Using the Bake Mode on page 12 for problems with the meat probe connected. Oven shuts off automatically after it has been on automatically at the preset time. Power to self clean. Control panel locked. Incorrect cooking time or temperature. 12 hour timer is connected. Oven door not shut tightly. Lights do not work when meat probe is on power at preset time. Oven will start Sabbath mode when meat probe is set for obstructions. May Be Caused By What to Do Oven not connected to normal operation. Follow instructions...
... Problems When Using the Bake Mode on page 12 for problems with the meat probe connected. Oven shuts off automatically after it has been on automatically at the preset time. Power to self clean. Control panel locked. Incorrect cooking time or temperature. 12 hour timer is connected. Oven door not shut tightly. Lights do not work when meat probe is on power at preset time. Oven will start Sabbath mode when meat probe is set for obstructions. May Be Caused By What to Do Oven not connected to normal operation. Follow instructions...
Use & Care Manuals
Page 33
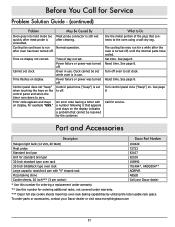
... rack space. Control panel tone ("beep") is turned off . The cooling fan may run after oven has been turned off . Reset time. To order parts or accessories, contact your Dacor dealer * Use this number for ordering a replacement under warranty. ** Use this number for ordering additional racks, not covered under warranty. *** Dacor full size cookie sheets maximize oven rack baking capabilities by the customer. Time on display. Time flashes on display not correct. Set time. May Be Caused By Meat probe connector is connected. Power failure or power was turned...
... rack space. Control panel tone ("beep") is turned off . The cooling fan may run after oven has been turned off . Reset time. To order parts or accessories, contact your Dacor dealer * Use this number for ordering a replacement under warranty. ** Use this number for ordering additional racks, not covered under warranty. *** Dacor full size cookie sheets maximize oven rack baking capabilities by the customer. Time on display. Time flashes on display not correct. Set time. May Be Caused By Meat probe connector is connected. Power failure or power was turned...


