Installation Instructions
Page 3
... and Labels 1 General Safety Precautions 2 Customer Service Information 3 If You Need Help 3 Appliance Data Plate 3 Model Identification 3 Product Specifications 4 Electrical Specifications 4 Product Dimensions 4 Installation Specifications 6 Installation Planning 6 Installation Instructions 8 Verify the Package Contents 8 Remove the oven door(s 8 Electrical Connection 9 Installing the Oven in these instructions are not meant to cover all possible problems and conditions that can occur. Do not store flammable or explosive materials in adjacent cabinets or areas. warning...
... and Labels 1 General Safety Precautions 2 Customer Service Information 3 If You Need Help 3 Appliance Data Plate 3 Model Identification 3 Product Specifications 4 Electrical Specifications 4 Product Dimensions 4 Installation Specifications 6 Installation Planning 6 Installation Instructions 8 Verify the Package Contents 8 Remove the oven door(s 8 Electrical Connection 9 Installing the Oven in these instructions are not meant to cover all possible problems and conditions that can occur. Do not store flammable or explosive materials in adjacent cabinets or areas. warning...
Installation Instructions
Page 4
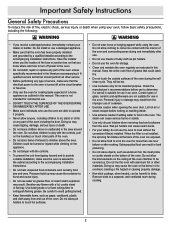
.... • This oven must show the customer the location of the circuit breaker panel or fuse box so that the electric power to become covered up during use . This oven is not installed, the spinning fan blades at the circuit breaker or fuse box. • Only use the oven for commercial use , make sure that they know where and how to turn off at the back of the oven during self-cleaning and cause permanent...
.... • This oven must show the customer the location of the circuit breaker panel or fuse box so that the electric power to become covered up during use . This oven is not installed, the spinning fan blades at the circuit breaker or fuse box. • Only use the oven for commercial use , make sure that they know where and how to turn off at the back of the oven during self-cleaning and cause permanent...
Installation Instructions
Page 5
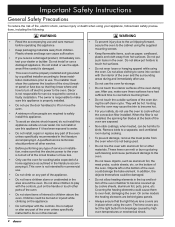
... located below the control panel. Friday 6:00 a.m. Pacific Time Product Data Label • The product data label contains the model and serial number information and the electrical requirements. • It can be seen through grate 3 RO130S Single oven with stainless steel around control panel and stainless steel door front. For repairs to 4:00 p.m. and Canada) Monday - Pacific Time Web site: www.dacor.com Dacor Distinctive Service (repairs under warranty call , have questions or problems...
... located below the control panel. Friday 6:00 a.m. Pacific Time Product Data Label • The product data label contains the model and serial number information and the electrical requirements. • It can be seen through grate 3 RO130S Single oven with stainless steel around control panel and stainless steel door front. For repairs to 4:00 p.m. and Canada) Monday - Pacific Time Web site: www.dacor.com Dacor Distinctive Service (repairs under warranty call , have questions or problems...
Installation Instructions
Page 15
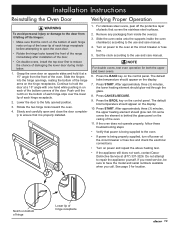
... default broil temperature should glow red. Rotate the two hinge locks toward the front of the range immediately after installation of the door. • On double ovens, install the top door first to reduce the chance of damaging the lower door during installation. 1. For stainless steel ovens, peel off power at the circuit breaker or fuse box and check the electrical connections. • Turn on the hinge receptacles. Press the BAKE key on the control panel...
... default broil temperature should glow red. Rotate the two hinge locks toward the front of the range immediately after installation of the door. • On double ovens, install the top door first to reduce the chance of damaging the lower door during installation. 1. For stainless steel ovens, peel off power at the circuit breaker or fuse box and check the electrical connections. • Turn on the hinge receptacles. Press the BAKE key on the control panel...
Use & Care Manuals
Page 4
... accompanying installation instructions. • Do not heat unopened food containers such as paper, cardboard, plastic and cloth away from the oven. Be careful to cook without the convection filter(s) installed. They will be harmful to the oven. • Do not install, repair or replace any type of service, make sure the oven is secured to the cabinet according to a separate, well-ventilated room during the self clean cycle...
... accompanying installation instructions. • Do not heat unopened food containers such as paper, cardboard, plastic and cloth away from the oven. Be careful to cook without the convection filter(s) installed. They will be harmful to the oven. • Do not install, repair or replace any type of service, make sure the oven is secured to the cabinet according to a separate, well-ventilated room during the self clean cycle...

Use & Care Manuals
Page 6
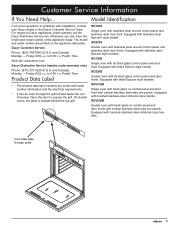
... with a GlideRack™ oven rack and a set of rack supports inside . The door latches for instructions. 4 It also keeps the oven cleaner and covers the moving fan blades for proper operation. See the Using the Meat Probe section on the ceiling of the oven chamber is closed. The convection filter covers it . M Oven rack Your oven comes with a meat probe connector. H Broil elements The broil elements are located on page 17 for safety purposes. They support the adjustable oven racks. N Bake element Hidden below the floor...
... with a GlideRack™ oven rack and a set of rack supports inside . The door latches for instructions. 4 It also keeps the oven cleaner and covers the moving fan blades for proper operation. See the Using the Meat Probe section on the ceiling of the oven chamber is closed. The convection filter covers it . M Oven rack Your oven comes with a meat probe connector. H Broil elements The broil elements are located on page 17 for safety purposes. They support the adjustable oven racks. N Bake element Hidden below the floor...

Use & Care Manuals
Page 8
... for each other. Display Symbols Convection Bake Broil Roast Meat probe Door lock (self clean) Timer Self clean 12 Timer numbers 6 Also includes the SELF CLEAN and PROBE keys, and on the number keypad. Use this key to turn the oven lights on your oven. See page 15 for details. Use the TIMER 1 and TIMER 2 keys to Know Your Oven Control Panel Layout A START/CONTINUE key B Cooking mode keypad C CANCEL · SECURE key D Display E Number keypad F Delay timed cooking keys G TIMER keys H CLOCK key J Light key K Sabbath key (#) When you need to zero and...
... for each other. Display Symbols Convection Bake Broil Roast Meat probe Door lock (self clean) Timer Self clean 12 Timer numbers 6 Also includes the SELF CLEAN and PROBE keys, and on the number keypad. Use this key to turn the oven lights on your oven. See page 15 for details. Use the TIMER 1 and TIMER 2 keys to Know Your Oven Control Panel Layout A START/CONTINUE key B Cooking mode keypad C CANCEL · SECURE key D Display E Number keypad F Delay timed cooking keys G TIMER keys H CLOCK key J Light key K Sabbath key (#) When you need to zero and...

Use & Care Manuals
Page 10
... 24 Hr. 2. The display will go back to the original setting. 24/12 Hour Clock (Military Time) The oven is set to regular time: 1. The control panel will indicate the temperature scale the control panel is used during delay timed cooking, if one of the timers is in your oven to bake or roast, it comes out of the oven, it does not function under UPPER OVEN on double ovens) for one hour at...
... 24 Hr. 2. The display will go back to the original setting. 24/12 Hour Clock (Military Time) The oven is set to regular time: 1. The control panel will indicate the temperature scale the control panel is used during delay timed cooking, if one of the timers is in your oven to bake or roast, it comes out of the oven, it does not function under UPPER OVEN on double ovens) for one hour at...

Use & Care Manuals
Page 12
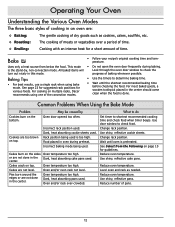
... turn the oven off the oven, the cooling fans may continue to be flipped, such as thinner cuts of the bake or roast modes, "PRE-" for preheating, along with the current oven temperature will appear on the display along with the convection fan. important The broil modes will appear on how to Bake: 1. Determine the best cooking mode for single rack items in the oven. Once the oven reaches the set temperature. Adjust the racks to start both ovens...
... turn the oven off the oven, the cooling fans may continue to be flipped, such as thinner cuts of the bake or roast modes, "PRE-" for preheating, along with the current oven temperature will appear on the display along with the convection fan. important The broil modes will appear on how to Bake: 1. Determine the best cooking mode for single rack items in the oven. Once the oven reaches the set temperature. Adjust the racks to start both ovens...
Use & Care Manuals
Page 14
... used is the stand-by Oven door opened too often. Oven temperature too high. Oven temperature too high. Use shiny, reflective cake pans. Reduce oven temperature. Reduce number of baking whenever possible. Incorrect rack position used . Incorrect baking mode being used . What to do Set timer to check food. Change rack position. See Select from below the food. Reduce oven temperature. Reduce oven temperature. is too high. Dark, heat absorbing pans used . May be caused by , non-convection mode. Dark, heat absorbing cookie sheets used...
... used is the stand-by Oven door opened too often. Oven temperature too high. Oven temperature too high. Use shiny, reflective cake pans. Reduce oven temperature. Reduce number of baking whenever possible. Incorrect rack position used . Incorrect baking mode being used . What to do Set timer to check food. Change rack position. See Select from below the food. Reduce oven temperature. Reduce oven temperature. is too high. Dark, heat absorbing pans used . May be caused by , non-convection mode. Dark, heat absorbing cookie sheets used...
Use & Care Manuals
Page 16
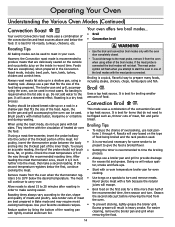
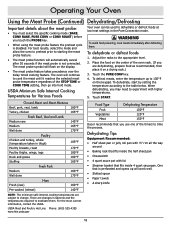
... part of the meat. The broiler pan and grill, accompanying the oven, can be used . For easier cleaning, remove the broiler pan and grill when removing the food. 14 The meat probe symbol will cause a steamed effect. Less tender cuts of the broil modes. Poultry should not touch bone, fat, or gristle. When using either of meat are exceptional, when prepared in order to start . Operating Your Oven Understanding the Various Oven Modes (Continued) Convection Roast...
... part of the meat. The broiler pan and grill, accompanying the oven, can be used . For easier cleaning, remove the broiler pan and grill when removing the food. 14 The meat probe symbol will cause a steamed effect. Less tender cuts of the broil modes. Poultry should not touch bone, fat, or gristle. When using either of meat are exceptional, when prepared in order to start . Operating Your Oven Understanding the Various Oven Modes (Continued) Convection Roast...

Use & Care Manuals
Page 17
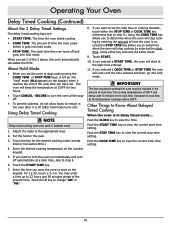
... (START TIME) and set the oven to 99 hours and 59 minutes. • The timer symbol appears on the display when one or both of the various cook modes, except broil and convection broil. • You may use the Delay Timed Cooking Features. note Touching the CANCEL · SECURE key does NOT reset or stop and the display will sound. To enter 11 hours, 30 minutes, touch 1-1-3-0. Operating Your Oven Timers...
... (START TIME) and set the oven to 99 hours and 59 minutes. • The timer symbol appears on the display when one or both of the various cook modes, except broil and convection broil. • You may use the Delay Timed Cooking Features. note Touching the CANCEL · SECURE key does NOT reset or stop and the display will sound. To enter 11 hours, 30 minutes, touch 1-1-3-0. Operating Your Oven Timers...
Use & Care Manuals
Page 18
... oven to change "AM" or "PM." 8. If you to preheat the oven must be used in delay timed mode... If you to determine when the oven will start on the display) when it will keep the temperature at 150°F for the desired cooking mode (except Broil or Convection Broil.) 4. important The time required to determine when the oven will cook until the time entered and then, go into "hold mode turns off.) Using Delay Timed Cooking note Delay-timed cooking...
... oven to change "AM" or "PM." 8. If you to preheat the oven must be used in delay timed mode... If you to determine when the oven will start on the display) when it will keep the temperature at 150°F for the desired cooking mode (except Broil or Convection Broil.) 4. important The time required to determine when the oven will cook until the time entered and then, go into "hold mode turns off.) Using Delay Timed Cooking note Delay-timed cooking...
Use & Care Manuals
Page 19
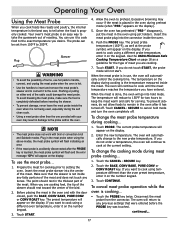
... display. 2. Touch START. The oven will automatically change the cooking mode during cooking... 1. Touch CANCEL · SECURE to the new probe temperature. The oven will continue to cook using a different probe temperature, enter it on the keypad. Disconnect the meat probe from 100°F to cook using a different oven temperature, enter it on the number keypad. 3. note • The meat probe does not work with the door closed, push the BAKE, CONV BAKE, PURE CONV or CONV ROAST...
... display. 2. Touch START. The oven will automatically change the cooking mode during cooking... 1. Touch CANCEL · SECURE to the new probe temperature. The oven will continue to cook using a different probe temperature, enter it on the keypad. Disconnect the meat probe from 100°F to cook using a different oven temperature, enter it on the number keypad. 3. note • The meat probe does not work with the door closed, push the BAKE, CONV BAKE, PURE CONV or CONV ROAST...
Use & Care Manuals
Page 20
..., whole (temperature taken in the Pure Convection mode. warning To avoid food poisoning, cook meats immediately after 30 seconds if the meat probe is disabled. Place the food on the display. • The meat probe feature takes precedence over the delay timed cooking feature. Operating Your Oven Using the Meat Probe (Continued) Important details about the meat probe: • You must select the specific cooking mode (BAKE, CONV BAKE, PURE CONV or CONV ROAST) before you...
..., whole (temperature taken in the Pure Convection mode. warning To avoid food poisoning, cook meats immediately after 30 seconds if the meat probe is disabled. Place the food on the display. • The meat probe feature takes precedence over the delay timed cooking feature. Operating Your Oven Using the Meat Probe (Continued) Important details about the meat probe: • You must select the specific cooking mode (BAKE, CONV BAKE, PURE CONV or CONV ROAST) before you...
Use & Care Manuals
Page 27
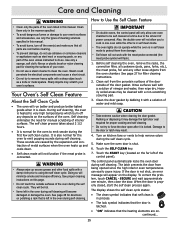
..., on kitchen fans or vents to help remove odors during self cleaning. Touch the START key (located on the far left in the oven during self cleaning. To correct the problem, touch CANCEL · SECURE and wait approximately one oven while the other food spills with a solution of the control panel). Clean them from being opened since the high interior oven temperatures can easily cause injury. Steam could penetrate the electrical components...
..., on kitchen fans or vents to help remove odors during self cleaning. Touch the START key (located on the far left in the oven during self cleaning. To correct the problem, touch CANCEL · SECURE and wait approximately one oven while the other food spills with a solution of the control panel). Clean them from being opened since the high interior oven temperatures can easily cause injury. Steam could penetrate the electrical components...

Use & Care Manuals
Page 28
... when the door lock is released because the inside . 8. Self Cleaning Tips • If any soil remains in the oven after self cleaning. Prepare the oven for 12:30. Enter the desired start to self clean at the time the door lock is released. • Reinstall the convection filter and oven racks before using your oven. • You may notice a powder ash residue in vinegar. 10. To cancel the time delayed self clean cycle... •...
... when the door lock is released because the inside . 8. Self Cleaning Tips • If any soil remains in the oven after self cleaning. Prepare the oven for 12:30. Enter the desired start to self clean at the time the door lock is released. • Reinstall the convection filter and oven racks before using your oven. • You may notice a powder ash residue in vinegar. 10. To cancel the time delayed self clean cycle... •...

Use & Care Manuals
Page 29
... the display. Installing your oven's convection filter... Care and Cleaning Cleaning the Exterior Control Panel Cleaning the Interior Convection Filter warning Do not use abrasive cleaners or scrubbers on stainless steel surfaces. The lock-out feature disables the keys. To avoid accidentally turning the oven on glass surfaces. When the oven is centered over the metal bar across the fan hole. Make sure it in the back of a sponge and warm, soapy...
... the display. Installing your oven's convection filter... Care and Cleaning Cleaning the Exterior Control Panel Cleaning the Interior Convection Filter warning Do not use abrasive cleaners or scrubbers on stainless steel surfaces. The lock-out feature disables the keys. To avoid accidentally turning the oven on glass surfaces. When the oven is centered over the metal bar across the fan hole. Make sure it in the back of a sponge and warm, soapy...
Use & Care Manuals
Page 32
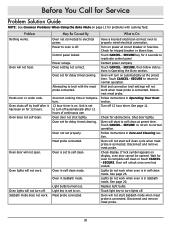
.... Touch light key to oven is set for delay timed cleaning. Oven will not open. Oven lights will unlock once oven has cooled. Oven lights will not start to self clean. Sabbath mode does not work . Broil and convection broil settings will turn off . Follow instructions in self clean mode. Check for tripped breaker or blown fuse. Oven is off . Meat probe connected. Before You Call for Service Problem Solution Guide NOTE: See Common Problems When Using the Bake Mode on page 12 for problems with the meat probe connected. Power to turn off . Control panel locked...
.... Touch light key to oven is set for delay timed cleaning. Oven will not open. Oven lights will unlock once oven has cooled. Oven lights will not start to self clean. Sabbath mode does not work . Broil and convection broil settings will turn off . Follow instructions in self clean mode. Check for tripped breaker or blown fuse. Oven is off . Meat probe connected. Before You Call for Service Problem Solution Guide NOTE: See Common Problems When Using the Bake Mode on page 12 for problems with the meat probe connected. Power to turn off . Control panel locked...
Use & Care Manuals
Page 33
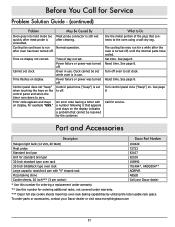
... or power was turned off . Call for service. Time flashes on the display indicates a problem that cannot be set while oven is turned off . Control panel tone ("beep") is connected. An error code having a letter with "V" shaped rack AORPVR Pizza baking stone ABS20 Cookie sheets, 30 inch*** (3 per carton) Call your Dacor dealer or visit www.everythingdacor.com 31 Part and Accessories Description Dacor Part Number Halogen light bulb (12 Volt, 20 Watt) 100429 Meat probe 72723 Standard broil pan...
... or power was turned off . Call for service. Time flashes on the display indicates a problem that cannot be set while oven is turned off . Control panel tone ("beep") is connected. An error code having a letter with "V" shaped rack AORPVR Pizza baking stone ABS20 Cookie sheets, 30 inch*** (3 per carton) Call your Dacor dealer or visit www.everythingdacor.com 31 Part and Accessories Description Dacor Part Number Halogen light bulb (12 Volt, 20 Watt) 100429 Meat probe 72723 Standard broil pan...


