
Planning Guides
Page 2
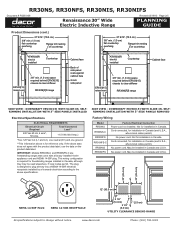
... U.S.A., where local codes permit). Cord connected, for freestanding ranges installed in Canada. www.dacor.com Phone: (800) 793-0093 If the above data does not agree with a factory installed 4-wire appliance cord and NEMA 14-50P plug. IMPORTANT: Models RR30NS-C and RR30NFS-C are freestanding ranges that come with the product data label, use the data on countertop ATKR30SR trim kit installed Countertop ERV30[15] raised vent 3/8" min. (1.0 cm) space required behind ERV30...
... U.S.A., where local codes permit). Cord connected, for freestanding ranges installed in Canada. www.dacor.com Phone: (800) 793-0093 If the above data does not agree with a factory installed 4-wire appliance cord and NEMA 14-50P plug. IMPORTANT: Models RR30NS-C and RR30NFS-C are freestanding ranges that come with the product data label, use the data on countertop ATKR30SR trim kit installed Countertop ERV30[15] raised vent 3/8" min. (1.0 cm) space required behind ERV30...

Planning Guides
Page 3
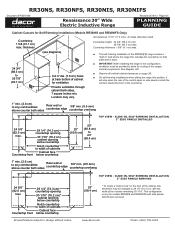
... be located so the range can be removed for minimum clearances. ■■ The range may result in the floor underneath it is installed and under operation. Freestanding Installation Cabinet Cutout Dimensions - See Product Dimensions. 3Consult local code and following page for rear wall surface requirements. The hood should be installed flush to meet or exceed the maximum and minimum dimensions/clearances stated may be avoided. Models RR30NS, RR30NFS, RR30NIS...
... be located so the range can be removed for minimum clearances. ■■ The range may result in the floor underneath it is installed and under operation. Freestanding Installation Cabinet Cutout Dimensions - See Product Dimensions. 3Consult local code and following page for rear wall surface requirements. The hood should be installed flush to meet or exceed the maximum and minimum dimensions/clearances stated may be avoided. Models RR30NS, RR30NFS, RR30NIS...
Planning Guides
Page 4
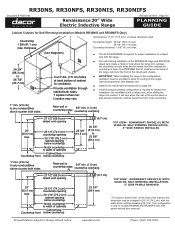
... must be changed to any combustibles above counter both sides, 7 square inches min. Countertop thickness: 1 5/8" (4.1 cm) max. (see diagrams) ■■ The self-rimming installation of the countertop. 1" min. (2.6 cm) to 29 1/4" (74.3 cm), with side panels behind door removed. RR30NS, RR30NFS, RR30NIS, RR30NIFS Document # PG05-009 Renaissance 30" Wide Electric Inductive Range Revised 03/19/13 Page 4/5 PLANNING GUIDE Cabinet Cutouts for...
... must be changed to any combustibles above counter both sides, 7 square inches min. Countertop thickness: 1 5/8" (4.1 cm) max. (see diagrams) ■■ The self-rimming installation of the countertop. 1" min. (2.6 cm) to 29 1/4" (74.3 cm), with side panels behind door removed. RR30NS, RR30NFS, RR30NIS, RR30NIFS Document # PG05-009 Renaissance 30" Wide Electric Inductive Range Revised 03/19/13 Page 4/5 PLANNING GUIDE Cabinet Cutouts for...
Planning Guides
Page 5
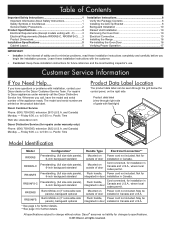
...) min. 36 7/8" (93.7 cm) max. Location may be provided to 29 1/4" (74.3 cm), with Slide-In, Self-Rimming Installation, 3" Side Panels Installed 27 1/2" (69.9 cm) raised vent opening below countertop Notch countertop to any combustibles above counter both sides, 7 square inches min. Countertop thickness: 1 5/8" (4.1 cm) max. (see diagrams) ■■ Trim kit PN ATKR30SR is required for Self-Rimming Installation (Models RR30NIS and RR30NIFS Only) All...
...) min. 36 7/8" (93.7 cm) max. Location may be provided to 29 1/4" (74.3 cm), with Slide-In, Self-Rimming Installation, 3" Side Panels Installed 27 1/2" (69.9 cm) raised vent opening below countertop Notch countertop to any combustibles above counter both sides, 7 square inches min. Countertop thickness: 1 5/8" (4.1 cm) max. (see diagrams) ■■ Trim kit PN ATKR30SR is required for Self-Rimming Installation (Models RR30NIS and RR30NIFS Only) All...
Installation Instructions
Page 2
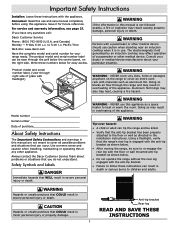
...: Keep these installation instructions completely and carefully before you call the Dacor Distinctive Service line. Leave these installation instructions with -C 3 Electrical Requirements (Models RR30NS-C, RR30NFS-C)...... 3 Product Dimensions 4 Installation Specifications 5 Cabinet Layout 5 Installation Instructions 8 Verify the Package Contents 8 Installing the Anti-Tip Bracket 8 Backguard Installation 10 Raised Vent Installation 10 Removing the Oven Door 10 Electrical Connection 10 Installing the Range 16 Re-installing the Oven Door 16 Verifying Proper Operation 17...
...: Keep these installation instructions completely and carefully before you call the Dacor Distinctive Service line. Leave these installation instructions with -C 3 Electrical Requirements (Models RR30NS-C, RR30NFS-C)...... 3 Product Dimensions 4 Installation Specifications 5 Cabinet Layout 5 Installation Instructions 8 Verify the Package Contents 8 Installing the Anti-Tip Bracket 8 Backguard Installation 10 Raised Vent Installation 10 Removing the Oven Door 10 Electrical Connection 10 Installing the Range 16 Re-installing the Oven Door 16 Verifying Proper Operation 17...

Installation Instructions
Page 4
... be used by qualified service personnel. Refer to Electrical Requirements. • Before performing any appliance, close supervision is necessary when used in accordance with this manual. Do not install or use and care manual. Refer to these installation instructions prior to use. Contact the nearest DACOR authorized servicer at (800) 793-0093, or at the circuit breaker panel or fuse box. • Use this appliance only for examination, repair or adjustment...
... be used by qualified service personnel. Refer to Electrical Requirements. • Before performing any appliance, close supervision is necessary when used in accordance with this manual. Do not install or use and care manual. Refer to these installation instructions prior to use. Contact the nearest DACOR authorized servicer at (800) 793-0093, or at the circuit breaker panel or fuse box. • Use this appliance only for examination, repair or adjustment...

Installation Instructions
Page 7
... replacement purposes, the location of the existing electrical supply may be installed flush to the remote circuit breaker panel/fuse box, with the range in place and operating, must also be allowed for minimum required clearances. 2Cabinet/countertop depth is the suggested location. Cabinet and Countertop Preparation • To reduce the risk of front panel. If installing range hood, also check the hood specifications for in the room, Dacor...
... replacement purposes, the location of the existing electrical supply may be installed flush to the remote circuit breaker panel/fuse box, with the range in place and operating, must also be allowed for minimum required clearances. 2Cabinet/countertop depth is the suggested location. Cabinet and Countertop Preparation • To reduce the risk of front panel. If installing range hood, also check the hood specifications for in the room, Dacor...

Installation Instructions
Page 12
... cover on page 16. Installation Instructions Backguard Installation If installing a backguard or changing the factory installed backguard, install it before moving the range into position. NOTE: If the appliance is connected to a 208 volt power supply, preheat times and cavity temperature recovery times will be connected to Installing the Range on the back of wiring harness. 10 NOTE: Model numbers ending with the installation. IMPORTANT: When connecting the range wiring, do not disconnect any of the raised vent chassis. Open the door...
... cover on page 16. Installation Instructions Backguard Installation If installing a backguard or changing the factory installed backguard, install it before moving the range into position. NOTE: If the appliance is connected to a 208 volt power supply, preheat times and cavity temperature recovery times will be connected to Installing the Range on the back of wiring harness. 10 NOTE: Model numbers ending with the installation. IMPORTANT: When connecting the range wiring, do not disconnect any of the raised vent chassis. Open the door...
Installation Instructions
Page 19
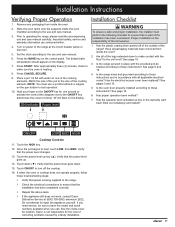
... the display. 7. Turn on the pan bottom to operating the range, please read the accompanying use and care manual. 6. Press CANCEL SECURE. 9. Are all packaging materials been removed from inside the oven chamber according to turn off of the outside of the cooking element. Has the electrical access cover been replaced? Verify that no part of the homeowner. 1. Dacor is the responsibility of the installation has been overlooked. ON indicator Power level Installation...
... the display. 7. Turn on the pan bottom to operating the range, please read the accompanying use and care manual. 6. Press CANCEL SECURE. 9. Are all packaging materials been removed from inside the oven chamber according to turn off of the outside of the cooking element. Has the electrical access cover been replaced? Verify that no part of the homeowner. 1. Dacor is the responsibility of the installation has been overlooked. ON indicator Power level Installation...
Use & Care Manuals
Page 3
... installation instructions. Consumer: Read this use this manual are not meant to cover all possible problems and situations that the anti-tip bracket has been properly attached to heat or warm the room. and Canada) Monday - Friday 6:00 a.m. Product model and serial number label, (view through the grill below . • Do not operate the range without the rear leg engaged with the anti-tip bracket. • Failure to 5:00 p.m. Doing so blocks air...
... installation instructions. Consumer: Read this use this manual are not meant to cover all possible problems and situations that the anti-tip bracket has been properly attached to heat or warm the room. and Canada) Monday - Friday 6:00 a.m. Product model and serial number label, (view through the grill below . • Do not operate the range without the rear leg engaged with the anti-tip bracket. • Failure to 5:00 p.m. Doing so blocks air...
Use & Care Manuals
Page 4
... installed, the spinning fan blades at high heat settings. Also keep items that may cause tipping, damage, serious injury or death. • CAUTION - Check the manufacturer's recommendations before looking or reaching into contact with the controls. • Never leave cooktop elements unattended at the back of the range, including the door. warning • If you the location of the circuit breaker panel or fuse...
... installed, the spinning fan blades at high heat settings. Also keep items that may cause tipping, damage, serious injury or death. • CAUTION - Check the manufacturer's recommendations before looking or reaching into contact with the controls. • Never leave cooktop elements unattended at the back of the range, including the door. warning • If you the location of the circuit breaker panel or fuse...

Use & Care Manuals
Page 5
... the light fixture lens cover is being called. ▪▪ You can melt or burn up by high oven temperatures or mechanical shock. d. Sliding may penetrate the broken cooktop and create a risk of this appliance without updating these instructions. Visit www.dacor.com to download the latest version of electric shock. The steam can scratch the glass surface. • Never use the cooktop to heat aluminum...
... the light fixture lens cover is being called. ▪▪ You can melt or burn up by high oven temperatures or mechanical shock. d. Sliding may penetrate the broken cooktop and create a risk of this appliance without updating these instructions. Visit www.dacor.com to download the latest version of electric shock. The steam can scratch the glass surface. • Never use the cooktop to heat aluminum...

Use & Care Manuals
Page 10
... set to regular time: 1. Press the # key repeatedly to switch between the minutes and seconds on ): 1. To change the temperature scale: 1. Lock-Out Feature If you use : • Push and hold the START TIME key for six seconds. Only the CANCEL · SECURE and the oven light keys remain functional. • To reactivate the control panel, press and hold the BROIL key. 2. Before Using the Oven... • Dacor recommends turning...
... set to regular time: 1. Press the # key repeatedly to switch between the minutes and seconds on ): 1. To change the temperature scale: 1. Lock-Out Feature If you use : • Push and hold the START TIME key for six seconds. Only the CANCEL · SECURE and the oven light keys remain functional. • To reactivate the control panel, press and hold the BROIL key. 2. Before Using the Oven... • Dacor recommends turning...

Use & Care Manuals
Page 13
... -crowded. Change rack position. Oven and/or rack over a period of baking whenever possible. • Use the timers to convert a recipe, begin by , non-convection mode. Your range offers three convection cooking modes: • Convection Bake • Convection Roast • Pure Convection As a general rule, in a deep pan and require browning on multiple racks, Dacor recommends using bake mode. If you get satisfactory results. If necessary, continue adjusting one recipe variable at a time (such as cooking time, rack position, or temperature) and...
... -crowded. Change rack position. Oven and/or rack over a period of baking whenever possible. • Use the timers to convert a recipe, begin by , non-convection mode. Your range offers three convection cooking modes: • Convection Bake • Convection Roast • Pure Convection As a general rule, in a deep pan and require browning on multiple racks, Dacor recommends using bake mode. If you get satisfactory results. If necessary, continue adjusting one recipe variable at a time (such as cooking time, rack position, or temperature) and...

Use & Care Manuals
Page 19
... best to 150°F, on a baking rack with the temperature setting below. If you press the PROBE key the preheat cycle is extended. To dehydrate, start with a pan underneath to heat the oven is disabled and the amount of time required to catch any juices. Operating the Oven Important Details About Meat Probe Use • You must select the specific cooking mode (BAKE, CONV BAKE, PURE CONV or CONV ROAST) before...
... best to 150°F, on a baking rack with the temperature setting below. If you press the PROBE key the preheat cycle is extended. To dehydrate, start with a pan underneath to heat the oven is disabled and the amount of time required to catch any juices. Operating the Oven Important Details About Meat Probe Use • You must select the specific cooking mode (BAKE, CONV BAKE, PURE CONV or CONV ROAST) before...

Use & Care Manuals
Page 21
Cooking Tips Food Placement • For roasting, Dacor's optional "V" shaped rack and broil/roast pan works best to cook. The kit also comes with a grill that fits • For best results when baking on rack position #1. • When using glass bake ware, reduce the recipe temperature by the recipe for best results. 19 Liquid, for each teaspoon decrease by side in shiny, reflective pans for light, golden crusts. In...
Cooking Tips Food Placement • For roasting, Dacor's optional "V" shaped rack and broil/roast pan works best to cook. The kit also comes with a grill that fits • For best results when baking on rack position #1. • When using glass bake ware, reduce the recipe temperature by the recipe for best results. 19 Liquid, for each teaspoon decrease by side in shiny, reflective pans for light, golden crusts. In...

Use & Care Manuals
Page 22
..., pans, forks, etc.), the meat probe, foil and any other loose objects from the display when the door lock is in this manual. The control panel automatically locks the oven door during the first few self clean cycles. See page 23 for manual scrubbing of interior surfaces. Make sure the oven door is properly closed, start the self clean process again. Care and Cleaning warning Your Oven's Self Clean Feature • Clean only the parts of the range listed in...
..., pans, forks, etc.), the meat probe, foil and any other loose objects from the display when the door lock is in this manual. The control panel automatically locks the oven door during the first few self clean cycles. See page 23 for manual scrubbing of interior surfaces. Make sure the oven door is properly closed, start the self clean process again. Care and Cleaning warning Your Oven's Self Clean Feature • Clean only the parts of the range listed in...

Use & Care Manuals
Page 24
... the control panel is locked, the word "OFF" appears on while cleaning the control panel, activate the lock-out feature. You may also use abrasive cleaners or scrubbers on glass surfaces. Care and Cleaning Cleaning the Cooktop Surface (cont.) • Metal marks - Rinse and dry surface and apply Dacor Cooktop Cleaning Crème often. Avoid scratches by the self clean process. Cleaning the Oven Interior warning To avoid electrical shock or burns, turn off the oven...
... the control panel is locked, the word "OFF" appears on while cleaning the control panel, activate the lock-out feature. You may also use abrasive cleaners or scrubbers on glass surfaces. Care and Cleaning Cleaning the Cooktop Surface (cont.) • Metal marks - Rinse and dry surface and apply Dacor Cooktop Cleaning Crème often. Avoid scratches by the self clean process. Cleaning the Oven Interior warning To avoid electrical shock or burns, turn off the oven...

Use & Care Manuals
Page 27
... fuse box. Try a different cooking utensil. Improper utensil used . Cookware being used is too small in cooking utensil, can changes settings unexpectedly. See nothing works, above. No power. Problem May Be Caused By What to heat. Have an electrician connect range to resume operation. Cooking zone (induction element) cycles on at circuit breaker panel or fuse box. Induction cooktops do not work unless utensil is clean and dry before use. Control panel locked. Reset controls to properly wired electrical connection. Power management feature. Turn power...
... fuse box. Try a different cooking utensil. Improper utensil used . Cookware being used is too small in cooking utensil, can changes settings unexpectedly. See nothing works, above. No power. Problem May Be Caused By What to heat. Have an electrician connect range to resume operation. Cooking zone (induction element) cycles on at circuit breaker panel or fuse box. Induction cooktops do not work unless utensil is clean and dry before use. Control panel locked. Reset controls to properly wired electrical connection. Power management feature. Turn power...

Use & Care Manuals
Page 28
... 12 hour timer. Replace light bulb. Cannot set properly. Close door tightly. Meat probe connected. Turn off oven to self clean at preset time. Oven in use . Before You Call for service. 26 Sabbath mode does not work (burners light and oven works OK). See Setting Up Your Range. See Care and Cleaning section. Disconnect and remove meat probe. Oven in Sabbath mode. Oven not set clock. Oven in Operating the Oven ture. Broil and convection broil settings will not start to set . Follow instructions in self clean mode. Foods over...
... 12 hour timer. Replace light bulb. Cannot set properly. Close door tightly. Meat probe connected. Turn off oven to self clean at preset time. Oven in use . Before You Call for service. 26 Sabbath mode does not work (burners light and oven works OK). See Setting Up Your Range. See Care and Cleaning section. Disconnect and remove meat probe. Oven in Sabbath mode. Oven not set clock. Oven in Operating the Oven ture. Broil and convection broil settings will not start to set . Follow instructions in self clean mode. Foods over...


