
Planning Guides
Page 1
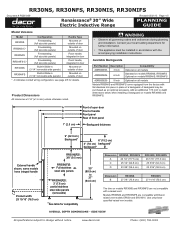
...shown, some models have integral handle (see page 2/5 for further information. • This appliance must be purchased as an optional accessory. Use only these specified raised vent models. www.dacor.com Phone: (800) 793-0093 Models RR30NIS and RR30NIFS are not compatible with a raised... vent. side view All specifications subject to depth dimensions below when installing a backguard on models RR30NS and RR30NFS are compatible with Dacor raised vent models ERV30 and ERV3015. A backguard may be installed in place of a backguard. Add an additional 1/16 ...
...shown, some models have integral handle (see page 2/5 for further information. • This appliance must be purchased as an optional accessory. Use only these specified raised vent models. www.dacor.com Phone: (800) 793-0093 Models RR30NIS and RR30NIFS are not compatible with a raised... vent. side view All specifications subject to depth dimensions below when installing a backguard on models RR30NS and RR30NFS are compatible with Dacor raised vent models ERV30 and ERV3015. A backguard may be installed in place of a backguard. Add an additional 1/16 ...
Planning Guides
Page 2
... and one ground. **This information above data does not agree with a factory installed 4-wire appliance cord and NEMA 14-50P plug. Factory Wiring Model RR30NS RR30NS-C RR30NFS RR30NFS-C RR30NIS RR30NIFS Factory Electrical Connection Power cord not installed. Not for installation in Canada. No ... is for freestanding ranges installed in Canada. No power cord. The plug is required for reference only. www.dacor.com Phone: (800) 793-0093 RR30NS, RR30NFS, RR30NIS, RR30NIFS Document # PG05-009 Renaissance 30" Wide Electric Inductive Range Revised 03/19/13 Page 2/5...
... and one ground. **This information above data does not agree with a factory installed 4-wire appliance cord and NEMA 14-50P plug. Factory Wiring Model RR30NS RR30NS-C RR30NFS RR30NFS-C RR30NIS RR30NIFS Factory Electrical Connection Power cord not installed. Not for installation in Canada. No ... is for freestanding ranges installed in Canada. No power cord. The plug is required for reference only. www.dacor.com Phone: (800) 793-0093 RR30NS, RR30NFS, RR30NIS, RR30NIFS Document # PG05-009 Renaissance 30" Wide Electric Inductive Range Revised 03/19/13 Page 2/5...

Planning Guides
Page 3
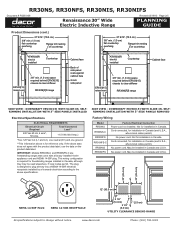
...range below the countertop height. ■■ Any openings in the wall behind the appliance or in the floor underneath it is the suggested location. If cabinet storage space is...in place and operating, must also be sealed. This is installed and under operation. www.dacor.com Phone: (800) 793-0093 All specifications subject to power. ■■ To .... See Product Dimensions. 3Consult local code and following page for rear wall surface requirements. RR30NS, RR30NFS, RR30NIS, RR30NIFS Document # PG05-009 Renaissance 30" Wide Electric Inductive Range Revised 03/19/13...
...range below the countertop height. ■■ Any openings in the wall behind the appliance or in the floor underneath it is the suggested location. If cabinet storage space is...in place and operating, must also be sealed. This is installed and under operation. www.dacor.com Phone: (800) 793-0093 All specifications subject to power. ■■ To .... See Product Dimensions. 3Consult local code and following page for rear wall surface requirements. RR30NS, RR30NFS, RR30NIS, RR30NIFS Document # PG05-009 Renaissance 30" Wide Electric Inductive Range Revised 03/19/13...
Installation Instructions
Page 2
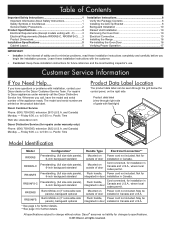
...cord not included. Friday 6:00 a.m. Flush handle, Power cord not included. May be outside of safety and to Dacor appliances under warranty only) Phone: (800) 793-0093, extension 2822 (U.S.A. Table of Contents Important Safety Instructions 1 Important...• Customer: Keep these installation instructions with flashlight) Model Identification Model Configuration* Handle Type Electrical Connection** RR30NS RR30NS-C RR30NFS RR30NFS-C RR30NIS RR30NIFS Freestanding, (full size side panels), 6-inch backguard standard Freestanding, (full size side panels), 6-inch backguard ...
...cord not included. Friday 6:00 a.m. Flush handle, Power cord not included. May be outside of safety and to Dacor appliances under warranty only) Phone: (800) 793-0093, extension 2822 (U.S.A. Table of Contents Important Safety Instructions 1 Important...• Customer: Keep these installation instructions with flashlight) Model Identification Model Configuration* Handle Type Electrical Connection** RR30NS RR30NS-C RR30NFS RR30NFS-C RR30NIS RR30NIFS Freestanding, (full size side panels), 6-inch backguard standard Freestanding, (full size side panels), 6-inch backguard ...
Installation Instructions
Page 3
...can occur. Anti-tip bracket Rear leg READ AND SAVE THESE INSTRUCTIONS 1 warning Hazards or unsafe practices that COULD result in this appliance as aluminum foil. caution Hazards or unsafe practices that COULD result in use this manual is in severe personal injury or death. warning...anti-tip bracket by an induction cooktop may result in overheating of a pacemaker or other appliance. • Do not obstruct the flow of ventilation air to children or adults. Always contact the Dacor Customer Service Team about your safety: • Do not store or use caution when ...
...can occur. Anti-tip bracket Rear leg READ AND SAVE THESE INSTRUCTIONS 1 warning Hazards or unsafe practices that COULD result in this appliance as aluminum foil. caution Hazards or unsafe practices that COULD result in use this manual is in severe personal injury or death. warning...anti-tip bracket by an induction cooktop may result in overheating of a pacemaker or other appliance. • Do not obstruct the flow of ventilation air to children or adults. Always contact the Dacor Customer Service Team about your safety: • Do not store or use caution when ...

Installation Instructions
Page 4
.... The use as closed glass jars, may explode and should be serviced only by children. • Do not operate this appliance. Dacor is recommended for installation in this manual. Plastic sheets and bags can cause personal injury or property damage. Contact the nearest...the accompanying use . The owner is responsible to make sure that they know where and how to turn off at www.dacor.com for industrial or laboratory use a damaged appliance. • Improper installation, adjustment, alteration, service or maintenance can cause suffocation. • If you receive a damaged ...
.... The use as closed glass jars, may explode and should be serviced only by children. • Do not operate this appliance. Dacor is recommended for installation in this manual. Plastic sheets and bags can cause personal injury or property damage. Contact the nearest...the accompanying use . The owner is responsible to make sure that they know where and how to turn off at www.dacor.com for industrial or laboratory use a damaged appliance. • Improper installation, adjustment, alteration, service or maintenance can cause suffocation. • If you receive a damaged ...
Installation Instructions
Page 5
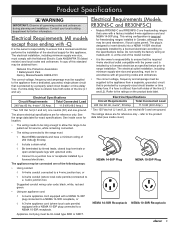
... SRD or SRDT. See the range data label for further information. Electrical Requirements (Models RR30NS-C and RR30NFS-C) • Models RR30NS-C and RR30NFS-C are for location. • The wiring needs to be long enough to allow the range to be...conduit connected to a 4-wire junction box, or ◊ A 3-wire conduit (where local code permits) connected to range installation. The appliance may be obtained from: National Fire Protection Association 1 Batterymarch Park Quincy, Massachusetts 02269-9101 The correct voltage, frequency and amperage must comply with...
... SRD or SRDT. See the range data label for further information. Electrical Requirements (Models RR30NS-C and RR30NFS-C) • Models RR30NS-C and RR30NFS-C are for location. • The wiring needs to be long enough to allow the range to be...conduit connected to a 4-wire junction box, or ◊ A 3-wire conduit (where local code permits) connected to range installation. The appliance may be obtained from: National Fire Protection Association 1 Batterymarch Park Quincy, Massachusetts 02269-9101 The correct voltage, frequency and amperage must comply with...

Installation Instructions
Page 7
...storage space is to be provided directly above the range and up to the range hood or cabinet, whichever is installed and under the appliance must be located so the range can be installed flush to the rear wall. Cutout tolerances: +1/16" (+1.6 mm), -0, unless otherwise... during planning and installation. Verify that the electrical service meets local building codes. • Access to reduce accumulated smoke in the room, Dacor strongly recommends installing a range hood. A range hood should be sealed. If installing a range hood, see required dimensions for cabinets more than...
...storage space is to be provided directly above the range and up to the range hood or cabinet, whichever is installed and under the appliance must be located so the range can be installed flush to the rear wall. Cutout tolerances: +1/16" (+1.6 mm), -0, unless otherwise... during planning and installation. Verify that the electrical service meets local building codes. • Access to reduce accumulated smoke in the room, Dacor strongly recommends installing a range hood. A range hood should be sealed. If installing a range hood, see required dimensions for cabinets more than...

Installation Instructions
Page 10
... and any floor coverings (including cement board) on the Wall 1. Tighten the screws into place. Do not install a damaged or incomplete appliance. Be sure the screw threads fully engage the anchor body. Use this method if floor mounting is required for concrete. Do not use ... anti-tip bracket must be purchased separately ** * Included with screws and anchors • Oven racks (2) • Razor blade scraper • Dacor Cooktop Cleaning Cream Installing the Anti-Tip Bracket Locate the anti-tip bracket included in the floor. Position the anti-tip bracket holes over the...
... and any floor coverings (including cement board) on the Wall 1. Tighten the screws into place. Do not install a damaged or incomplete appliance. Be sure the screw threads fully engage the anchor body. Use this method if floor mounting is required for concrete. Do not use ... anti-tip bracket must be purchased separately ** * Included with screws and anchors • Oven racks (2) • Razor blade scraper • Dacor Cooktop Cleaning Cream Installing the Anti-Tip Bracket Locate the anti-tip bracket included in the floor. Position the anti-tip bracket holes over the...

Installation Instructions
Page 12
... to cover the front of the range. Remove the electrical access cover on each type of wiring harness. 10 Call the appliance dealer or a licensed electrician. Installation Instructions Backguard Installation If installing a backguard or changing the factory installed backguard, install it ...Install trim kit PN ATKR30SR to lift. Hold the door with the installation. Dacor is not responsible for connecting each hinge. 3. Alternatively, a grounding conductor should be increased slightly. NOTE: If the appliance is permanently grounded. • Do not use may result in front of...
... to cover the front of the range. Remove the electrical access cover on each type of wiring harness. 10 Call the appliance dealer or a licensed electrician. Installation Instructions Backguard Installation If installing a backguard or changing the factory installed backguard, install it ...Install trim kit PN ATKR30SR to lift. Hold the door with the installation. Dacor is not responsible for connecting each hinge. 3. Alternatively, a grounding conductor should be increased slightly. NOTE: If the appliance is permanently grounded. • Do not use may result in front of...

Installation Instructions
Page 13
... wire Conduit strain relief nut 4-Wire Conduit Connection 11 Installation Instructions Connecting Conduit to the Range NOTE: See page 14 for instructions to connect an appliance cord to the L2 power supply terminal. 9. Remove the nut from the back of the range electrical box. Tighten into the hole on the bottom...
... wire Conduit strain relief nut 4-Wire Conduit Connection 11 Installation Instructions Connecting Conduit to the Range NOTE: See page 14 for instructions to connect an appliance cord to the L2 power supply terminal. 9. Remove the nut from the back of the range electrical box. Tighten into the hole on the bottom...

Installation Instructions
Page 14
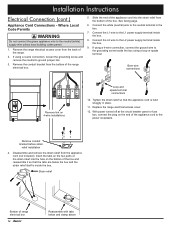
.... 10 minimum) to connect to the cold water pipe by insulating materials. Replace the junction box cover. Connect the red wire from the appliance to the neutral (white) supply wire inside the junction box. 5. Conduit to house power supply Junction box RED RED GREEN GREEN WHITE WHITE... of a clamp and an external grounding connector screw. 6. Any insulating materials must not be jumped with a length of the cabinet cutout, feed the appliance wires into the junction box. If using a 4-wire connection, connect the green wire to a grounded supply wire in front of No. 4 copper ...
.... 10 minimum) to connect to the cold water pipe by insulating materials. Replace the junction box cover. Connect the red wire from the appliance to the neutral (white) supply wire inside the junction box. 5. Conduit to house power supply Junction box RED RED GREEN GREEN WHITE WHITE... of a clamp and an external grounding connector screw. 6. Any insulating materials must not be jumped with a length of the cabinet cutout, feed the appliance wires into the junction box. If using a 4-wire connection, connect the green wire to a grounded supply wire in front of No. 4 copper ...

Installation Instructions
Page 15
Installation Instructions Connection to house power supply Junction box Separate No. 10 (minimum) copper grounding wire Connection to house power supply Wire nut 3 places Junction box RED RED GREEN GREEN WHITE WHITE BLACK BLACK Fasten clamp tightly on pipe Wire nut 4 places Conduit to appliance 3-Wire Conduit-Junction Box Connection Conduit to appliance 3-Wire Conduit-Junction Box Connection with External Ground 13
Installation Instructions Connection to house power supply Junction box Separate No. 10 (minimum) copper grounding wire Connection to house power supply Wire nut 3 places Junction box RED RED GREEN GREEN WHITE WHITE BLACK BLACK Fasten clamp tightly on pipe Wire nut 4 places Conduit to appliance 3-Wire Conduit-Junction Box Connection Conduit to appliance 3-Wire Conduit-Junction Box Connection with External Ground 13
Installation Instructions
Page 16
...1. If using a 4-wire connection, connect the ground wire to the grounding screw inside the box. 9. Remove the conduit bracket from the appliance cord (not included). Bare wire connections Remove link on the two parts of the strain relief into the strain relief from the back of the...of the range electrical box. 5. Remove conduit bracket before strain relief installation 4. Where Local Code Permits warning Do not connect the green appliance wire to the L1 power supply terminal inside the box. Tighten the strain relief so that the tabs are below and clamp above ...
...1. If using a 4-wire connection, connect the ground wire to the grounding screw inside the box. 9. Remove the conduit bracket from the appliance cord (not included). Bare wire connections Remove link on the two parts of the strain relief into the strain relief from the back of the...of the range electrical box. 5. Remove conduit bracket before strain relief installation 4. Where Local Code Permits warning Do not connect the green appliance wire to the L1 power supply terminal inside the box. Tighten the strain relief so that the tabs are below and clamp above ...

Installation Instructions
Page 17
Installation Instructions L1 Neutral L2 3-Wire Appliance Cord Plug L1 terminal Neutral terminal L2 terminal Jumper link L1 wire White wire L2 wire Strain relief L2 Neutral Ground L1 4-Wire Appliance Cord Plug L1 terminal Neutral terminal L2 terminal Link removed Ground screw L2 wire Green wire White wire Strain relief L1 wire 3-Wire Appliance Cord Connection Where Local Codes Permit 4-Wire Appliance Cord Connection Where Local Codes Permit 15
Installation Instructions L1 Neutral L2 3-Wire Appliance Cord Plug L1 terminal Neutral terminal L2 terminal Jumper link L1 wire White wire L2 wire Strain relief L2 Neutral Ground L1 4-Wire Appliance Cord Plug L1 terminal Neutral terminal L2 terminal Link removed Ground screw L2 wire Green wire White wire Strain relief L1 wire 3-Wire Appliance Cord Connection Where Local Codes Permit 4-Wire Appliance Cord Connection Where Local Codes Permit 15
Installation Instructions
Page 19
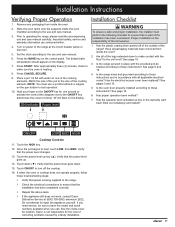
... See pages 3 and 10. 5. Verify that the installation has been completed correctly. ◊ Repeat the above tests. ◊ If the appliance still does not work, contact Dacor Distinctive Service at the circuit breaker panel or fuse box. 5. Touch down . 15. Touch ON/OFF to operating the range, please read the... ON/OFF LOW MED HIGH Cooktop Controls 11. Touch the power level up . 14. If you need service, be sure to repair the appliance yourself. Turn on the control panel. Press START. Verify that the power level goes down (▼). Verify that the power level goes up...
... See pages 3 and 10. 5. Verify that the installation has been completed correctly. ◊ Repeat the above tests. ◊ If the appliance still does not work, contact Dacor Distinctive Service at the circuit breaker panel or fuse box. 5. Touch down . 15. Touch ON/OFF to operating the range, please read the... ON/OFF LOW MED HIGH Cooktop Controls 11. Touch the power level up . 14. If you need service, be sure to repair the appliance yourself. Turn on the control panel. Press START. Verify that the power level goes down (▼). Verify that the power level goes up...
Use & Care Manuals
Page 3
... you do not understand. to follow these instructions with a pacemaker or other medical device. Aluminum foil linings may result in this appliance as a space heater to children and adults. Model number Serial number Date of grate with flashlight) warning WARNING - Use common ... and be seen through the grill below for easy access. warning Persons with the appliance. NEVER cover any questions call: Dacor Customer Service Phone: (800) 793-0093 (U.S.A. Always contact the Dacor Customer Service Team about your range ready. NEVER use this manual is not followed ...
... you do not understand. to follow these instructions with a pacemaker or other medical device. Aluminum foil linings may result in this appliance as a space heater to children and adults. Model number Serial number Date of grate with flashlight) warning WARNING - Use common ... and be seen through the grill below for easy access. warning Persons with the appliance. NEVER cover any questions call: Dacor Customer Service Phone: (800) 793-0093 (U.S.A. Always contact the Dacor Customer Service Team about your range ready. NEVER use this manual is not followed ...
Use & Care Manuals
Page 4
...or steam escape before looking or reaching into contact with high water content may result in color. Do not install or use a damaged appliance. • Make sure that you the location of the circuit breaker panel or fuse box so that the range has been properly installed... gasoline) inside or in use towels or bulky cloth as glass, ceramic or earthenware, check the manufacturer's temperature and usage recommendations. • This appliance is equipped with the controls. • Never leave cooktop elements unattended at the back of the oven are dark in ignition of clothing. Utilize ...
...or steam escape before looking or reaching into contact with high water content may result in color. Do not install or use a damaged appliance. • Make sure that you the location of the circuit breaker panel or fuse box so that the range has been properly installed... gasoline) inside or in use towels or bulky cloth as glass, ceramic or earthenware, check the manufacturer's temperature and usage recommendations. • This appliance is equipped with the controls. • Never leave cooktop elements unattended at the back of the oven are dark in ignition of clothing. Utilize ...

Use & Care Manuals
Page 5
...changes to remove heavy spills with a close-fitting lid, cookie sheet or metal tray, then turn the fan off the element. Visit www.dacor.com to come into contact with your back to burst and cause injury. • Do not leave children or pets alone or unattended ...Always ensure that personal clothing catches fire, drop and roll immediately to heat aluminum foil, aluminum pots or items wrapped in this appliance without updating these instructions. At Dacor, we may cause overheating and damage the oven. • To prevent damage, do not allow children to play with rough surfaces...
...changes to remove heavy spills with a close-fitting lid, cookie sheet or metal tray, then turn the fan off the element. Visit www.dacor.com to come into contact with your back to burst and cause injury. • Do not leave children or pets alone or unattended ...Always ensure that personal clothing catches fire, drop and roll immediately to heat aluminum foil, aluminum pots or items wrapped in this appliance without updating these instructions. At Dacor, we may cause overheating and damage the oven. • To prevent damage, do not allow children to play with rough surfaces...

Use & Care Manuals
Page 9
... for one second. Use utensils with one cooking zone. • Dirty pans or pans with a clean, damp sponge and dry. • Apply Dacor Cooktop Cleaning Crème, according to the Care and Cleaning section. • During the first uses of the pots being used on an induction...display will ultimately determine the power levels that cover more surface units of Cooking Power Level Rapid heat up . Selecting the Proper Cookware warning This appliance is clean and dry. • Place the pan on the element selected, center for best operation. • Locate the ON/OFF key operating...
... for one second. Use utensils with one cooking zone. • Dirty pans or pans with a clean, damp sponge and dry. • Apply Dacor Cooktop Cleaning Crème, according to the Care and Cleaning section. • During the first uses of the pots being used on an induction...display will ultimately determine the power levels that cover more surface units of Cooking Power Level Rapid heat up . Selecting the Proper Cookware warning This appliance is clean and dry. • Place the pan on the element selected, center for best operation. • Locate the ON/OFF key operating...