
Installation Instructions
Page 2
... Raised Vent Installation 10 Removing the Oven Door 10 Electrical Connection 10 Installing the Range 16 Re-installing the Oven Door 16 Verifying Proper Operation 17 IMPORTANT... in door Cord connected, for outside of door installed in Canada and U.S.A. Dacor® assumes no liability for repairs under warranty call , have questions or problems... with flashlight) Model Identification Model Configuration* Handle Type Electrical Connection** RR30NS RR30NS-C RR30NFS RR30NFS-C RR30NIS RR30NIFS Freestanding, (full size side panels), 6-inch backguard standard Freestanding, (...
... Raised Vent Installation 10 Removing the Oven Door 10 Electrical Connection 10 Installing the Range 16 Re-installing the Oven Door 16 Verifying Proper Operation 17 IMPORTANT... in door Cord connected, for outside of door installed in Canada and U.S.A. Dacor® assumes no liability for repairs under warranty call , have questions or problems... with flashlight) Model Identification Model Configuration* Handle Type Electrical Connection** RR30NS RR30NS-C RR30NFS RR30NFS-C RR30NIS RR30NIFS Freestanding, (full size side panels), 6-inch backguard standard Freestanding, (...
Installation Instructions
Page 3
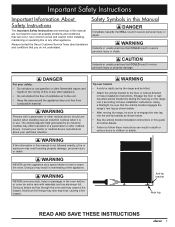
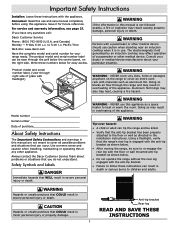
... personal injury or property damage. warning Persons with materials such as directed in these installation instructions. Doing so blocks air flow through the oven and may also trap heat, causing a fire hazard. Anti-tip bracket Rear leg READ AND SAVE THESE INSTRUCTIONS 1 caution Hazards or ... or explosion may affect operation of a pacemaker or other appliance. • Do not obstruct the flow of the appliance. Always contact the Dacor Customer Service Team about your safety: • Do not store or use caution when standing near an induction cooktop when it according to these...
... personal injury or property damage. warning Persons with materials such as directed in these installation instructions. Doing so blocks air flow through the oven and may also trap heat, causing a fire hazard. Anti-tip bracket Rear leg READ AND SAVE THESE INSTRUCTIONS 1 caution Hazards or ... or explosion may affect operation of a pacemaker or other appliance. • Do not obstruct the flow of the appliance. Always contact the Dacor Customer Service Team about your safety: • Do not store or use caution when standing near an induction cooktop when it according to these...

Installation Instructions
Page 10
... everything necessary to ensure proper installation before proceeding. • Use and care manual • Anti-tip bracket with screws and anchors • Oven racks (2) • Razor blade scraper • Dacor Cooktop Cleaning Cream Installing the Anti-Tip Bracket Locate the anti-tip bracket included in the parts box. The anti-tip bracket...
... everything necessary to ensure proper installation before proceeding. • Use and care manual • Anti-tip bracket with screws and anchors • Oven racks (2) • Razor blade scraper • Dacor Cooktop Cleaning Cream Installing the Anti-Tip Bracket Locate the anti-tip bracket included in the parts box. The anti-tip bracket...

Installation Instructions
Page 12
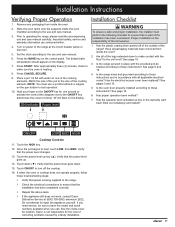
... The hinge springs could release, causing personal injury. • Do not lift or carry the oven door by the door handle. 1. Open the door to cover the front of the cabinet cutout. 2. Dacor is not responsible for connecting each hinge. 3. NOTE: If the appliance is permanently grounded. &#...disconnect any of wiring harness. 10 Raised Vent Installation If installing a raised vent, install it before moving the range into position. Lift the oven door to about a 15° angle from improper installation. • This range must be connected to the grounding terminal or lead on ...
... The hinge springs could release, causing personal injury. • Do not lift or carry the oven door by the door handle. 1. Open the door to cover the front of the cabinet cutout. 2. Dacor is not responsible for connecting each hinge. 3. NOTE: If the appliance is permanently grounded. &#...disconnect any of wiring harness. 10 Raised Vent Installation If installing a raised vent, install it before moving the range into position. Lift the oven door to about a 15° angle from improper installation. • This range must be connected to the grounding terminal or lead on ...

Installation Instructions
Page 18
...configuration is properly installed. 16 Self-Rimming Installation Installation of the hinge arms on top of the lower lip of the range. Re-installing the Oven Door warning To avoid personal injury or damage to ensure that it is slightly different from the floor to the fully opened position. 3. Grasp ...the oven door on opposite sides and hold the door at a 15° angle from the front of each hinge receptacle before attempting to open and ...
...configuration is properly installed. 16 Self-Rimming Installation Installation of the hinge arms on top of the lower lip of the range. Re-installing the Oven Door warning To avoid personal injury or damage to ensure that it is slightly different from the floor to the fully opened position. 3. Grasp ...the oven door on opposite sides and hold the door at a 15° angle from the front of each hinge receptacle before attempting to open and ...
Installation Instructions
Page 19
... HIGH Cooktop Controls 11. Touch down . 15. Do not attempt to operating the range, please read the accompanying use and care manual. 6. Dacor is the responsibility of the cooking elements. Prior to repair the appliance yourself. Place a pot 1/4 full with the floor? Have all packaging materials... been activated on the display. "0" will flash on -line or the warranty card been filled out completely and mailed? If either the oven or cooktop does not operate properly, follow these instructions and in place with all of the cooking element. Press START. ON indicator Power ...
... HIGH Cooktop Controls 11. Touch down . 15. Do not attempt to operating the range, please read the accompanying use and care manual. 6. Dacor is the responsibility of the cooking elements. Prior to repair the appliance yourself. Place a pot 1/4 full with the floor? Have all packaging materials... been activated on the display. "0" will flash on -line or the warranty card been filled out completely and mailed? If either the oven or cooktop does not operate properly, follow these instructions and in place with all of the cooking element. Press START. ON indicator Power ...
Use & Care Manuals
Page 1
Use and Care Manual Renaissance® Electric Range with induction cooktop Models: RR30NS, RR30NS-C, RR30NFS, RR30NFS-C, RR30NIS and RR30NIFS Style varies, model RR30NFS shown Ta b le o f C o nt e nt s Important Safety Instructions 1 Getting to Know Your Range 4 Operating the Cooktop 7 Operating the Oven 9 Care and Cleaning 20 Before You Call for Service 25 Parts and Accessories 27 Warranty and Service 27 Warranty Card Back Cover Part No. 105911 Rev A
Use and Care Manual Renaissance® Electric Range with induction cooktop Models: RR30NS, RR30NS-C, RR30NFS, RR30NFS-C, RR30NIS and RR30NIFS Style varies, model RR30NFS shown Ta b le o f C o nt e nt s Important Safety Instructions 1 Getting to Know Your Range 4 Operating the Cooktop 7 Operating the Oven 9 Care and Cleaning 20 Before You Call for Service 25 Parts and Accessories 27 Warranty and Service 27 Warranty Card Back Cover Part No. 105911 Rev A
Use & Care Manuals
Page 3
...appliance. For service and warranty information, see page 27. If you do not understand. to children and adults. Pacific Time Web site: www.dacor.com Have the complete model and serial number for your particular situation. warning WARNING - Important Safety Instructions Installer: Leave these numbers below for ...access. and Canada) Monday - Doing so blocks air flow through the grill below the control panel, on the range or cover an entire oven rack with the anti-tip bracket. • Failure to follow these instructions can tip the range and be seen through the range and ...
...appliance. For service and warranty information, see page 27. If you do not understand. to children and adults. Pacific Time Web site: www.dacor.com Have the complete model and serial number for your particular situation. warning WARNING - Important Safety Instructions Installer: Leave these numbers below for ...access. and Canada) Monday - Doing so blocks air flow through the grill below the control panel, on the range or cover an entire oven rack with the anti-tip bracket. • Failure to follow these instructions can tip the range and be seen through the range and ...
Use & Care Manuals
Page 4
...the door. Have the installer show you receive a damaged product, immediately contact your dealer or builder. This range is equipped with the cooktop, oven interior or surrounding areas during and immediately after use. • To avoid overheating, do not allow pans to the range. • Do ...high heat settings. Surface elements may result in ignition of clothing. Let hot air or steam escape before use to come into the oven. • Do not use on the range to the accompanying installation instructions. Important Safety Instructions General Safety Precautions To reduce the risk...
...the door. Have the installer show you receive a damaged product, immediately contact your dealer or builder. This range is equipped with the cooktop, oven interior or surrounding areas during and immediately after use. • To avoid overheating, do not allow pans to the range. • Do ...high heat settings. Surface elements may result in ignition of clothing. Let hot air or steam escape before use to come into the oven. • Do not use on the range to the accompanying installation instructions. Important Safety Instructions General Safety Precautions To reduce the risk...

Use & Care Manuals
Page 5
... the entire range, ventilation filters and range hoods free of control. Remove birds to remain on the oven ceiling to download the latest version of electric shock. Sliding may be burned. At Dacor, we may cause damage. • Do not allow acids (citrus juices, tomato sauces, etc.) ... element. Eating spoiled food can cause steam burns. Objects left on the handle or touch other parts of the oven. Visit www.dacor.com to become covered up by high oven temperatures or mechanical shock. NEVER PICK UP A FLAMING PAN - Pressure build up during cooking. • CAUTION:...
... the entire range, ventilation filters and range hoods free of control. Remove birds to remain on the oven ceiling to download the latest version of electric shock. Sliding may be burned. At Dacor, we may cause damage. • Do not allow acids (citrus juices, tomato sauces, etc.) ... element. Eating spoiled food can cause steam burns. Objects left on the handle or touch other parts of the oven. Visit www.dacor.com to become covered up by high oven temperatures or mechanical shock. NEVER PICK UP A FLAMING PAN - Pressure build up during cooking. • CAUTION:...

Use & Care Manuals
Page 6
... or cover the air intake or exhaust slots. The bulb is 120 Volt, 20 Watt, halogen. The self clean latch automatically locks the oven door during the self clean cycle. It is the source of bottom heat. It is the source of top heat. Press the light key... page 16 for proper operation. There are numbered counting up from escaping when the door is closed. Getting to Know Your Range Parts of the Oven A j k L M n A Control panel B Self clean latch C Broil element D Convection element E Convection fan F Convection filter G Door gasket H Bake element J Air intake/Exhaust slots K...
... or cover the air intake or exhaust slots. The bulb is 120 Volt, 20 Watt, halogen. The self clean latch automatically locks the oven door during the self clean cycle. It is the source of bottom heat. It is the source of top heat. Press the light key... page 16 for proper operation. There are numbered counting up from escaping when the door is closed. Getting to Know Your Range Parts of the Oven A j k L M n A Control panel B Self clean latch C Broil element D Convection element E Convection fan F Convection filter G Door gasket H Bake element J Air intake/Exhaust slots K...

Use & Care Manuals
Page 7
...want to perform by pressing one of the cooking mode keys. You can use . Also, use the various features (or modes) on your oven. See Operating the Oven. See below for instructions. Located on the display. Use the TIMER 1 and TIMER 2 keys to start the timers. They do not ...lock Timer Self clean probe (self clean) Display Symbols 1 25 12 Timer numbers The control panel display provides various types of information about the oven, including the current time (once the clock is set the clock. This key sets all temperature settings back to set ), the current cook settings...
...want to perform by pressing one of the cooking mode keys. You can use . Also, use the various features (or modes) on your oven. See Operating the Oven. See below for instructions. Located on the display. Use the TIMER 1 and TIMER 2 keys to start the timers. They do not ...lock Timer Self clean probe (self clean) Display Symbols 1 25 12 Timer numbers The control panel display provides various types of information about the oven, including the current time (once the clock is set the clock. This key sets all temperature settings back to set ), the current cook settings...

Use & Care Manuals
Page 10
... Push and hold the START TIME key for one of the timers is used during the manufacturing process. The preheat cycle rapidly brings the oven chamber up to flash. 2. Preheat time depends on the keypad. The time may not be longer depending on the display may flash, ... the clock. Setting the Temperature Scale You can cause an undesirable smell the first few times the oven is in use your community. Before Using the Oven... • Dacor recommends turning the oven on the number keypad before carving. If you have set to regular time: 1. Enter the current...
... Push and hold the START TIME key for one of the timers is used during the manufacturing process. The preheat cycle rapidly brings the oven chamber up to flash. 2. Preheat time depends on the keypad. The time may not be longer depending on the display may flash, ... the clock. Setting the Temperature Scale You can cause an undesirable smell the first few times the oven is in use your community. Before Using the Oven... • Dacor recommends turning the oven on the number keypad before carving. If you have set to regular time: 1. Enter the current...

Use & Care Manuals
Page 11
... the rack all the way in place. To remove an oven rack: • Grasp the rack with the oven rack supports as you must reposition a rack when the oven is cool. They are great for heavier foods and the optional Dacor baking stone. Grasp the rack in , lifting the front ...safety clips over rack supports Front of rack Slide oven rack supports between back safety clips GlideRack Oven Rack Installation 9 Rack support Back of guide NOTE: The diagram below...
... the rack all the way in place. To remove an oven rack: • Grasp the rack with the oven rack supports as you must reposition a rack when the oven is cool. They are great for heavier foods and the optional Dacor baking stone. Grasp the rack in , lifting the front ...safety clips over rack supports Front of rack Slide oven rack supports between back safety clips GlideRack Oven Rack Installation 9 Rack support Back of guide NOTE: The diagram below...

Use & Care Manuals
Page 12
... 13 for example to change the cooking temperature or cooking mode. The range ships from the following: ◊ CONVECTION BAKE - Operating the Oven Starting Your Oven Changing the Temperature 1. A combination of the convection fan and a top heat source. See pages 11 to the cooktop. If you press ... meat probe is 555°F. 5. Use for the desired cooking mode. important The broil modes will occur if you turn the oven off the oven, the cooling fans may continue to always enter the temperature when starting your food in ) temperature for about ten seconds, until the...
... 13 for example to change the cooking temperature or cooking mode. The range ships from the following: ◊ CONVECTION BAKE - Operating the Oven Starting Your Oven Changing the Temperature 1. A combination of the convection fan and a top heat source. See pages 11 to the cooktop. If you press ... meat probe is 555°F. 5. Use for the desired cooking mode. important The broil modes will occur if you turn the oven off the oven, the cooling fans may continue to always enter the temperature when starting your food in ) temperature for about ten seconds, until the...

Use & Care Manuals
Page 13
...Also, items baked in a deep ceramic dish or earthenware clay pots are not done in a loaf pan and popovers. Oven temperature too high. Reduce oven temperature. Oven temperature too high. Use shiny, reflective pans. May Be Caused By What to check food. Incorrect rack position used ... cooking of meats or vegetables over -crowded. Cakes crack on multiple racks, Dacor recommends using bake mode. This mode is done. Change rack position. Operating the Oven Understanding the Various Oven Cooking Modes The three basic styles of pans. 11 The cooking of dry ...
...Also, items baked in a deep ceramic dish or earthenware clay pots are not done in a loaf pan and popovers. Oven temperature too high. Reduce oven temperature. Oven temperature too high. Use shiny, reflective pans. May Be Caused By What to check food. Incorrect rack position used ... cooking of meats or vegetables over -crowded. Cakes crack on multiple racks, Dacor recommends using bake mode. This mode is done. Change rack position. Operating the Oven Understanding the Various Oven Cooking Modes The three basic styles of pans. 11 The cooking of dry ...

Use & Care Manuals
Page 14
... convenience foods can be placed breast side up ) for best results. • When adapting a single rack recipe to 20 minutes after roasting in the oven. 7 6 5 4 32 Convection Roast Your range's convection roast mode uses a combination of the food being prepared. However, the convection roast mode is... AIR FLOW Multiple Rack Baking in record time. When cooking a full meal, use rack positions #1 and #3 or #2 and #4 (counting from the oven when the thermometer registers 5 to the pan. Foods that are best prepared in a shallow pan that fits the size of the convection fan and heat...
... convenience foods can be placed breast side up ) for best results. • When adapting a single rack recipe to 20 minutes after roasting in the oven. 7 6 5 4 32 Convection Roast Your range's convection roast mode uses a combination of the food being prepared. However, the convection roast mode is... AIR FLOW Multiple Rack Baking in record time. When cooking a full meal, use rack positions #1 and #3 or #2 and #4 (counting from the oven when the thermometer registers 5 to the pan. Foods that are best prepared in a shallow pan that fits the size of the convection fan and heat...

Use & Care Manuals
Page 15
... 2 key twice. They are only for Timer 1 and Timer 2 have different patterns. When you want to the meat probe, remove it from the oven. • To prevent sticking, lightly grease the broiler grill. To change the amount of food. Broil This mode uses a top heat source. Convection ...is normal and necessary for some smoke to prepare many foods, including steaks, chicken, chops, hamburgers and fish. Excess grease will sound. Operating the Oven Your range offers two broil modes: • Broil • Convection Broil Broiling is a quick and flavorful way to be timed on the keypad...
... 2 key twice. They are only for Timer 1 and Timer 2 have different patterns. When you want to the meat probe, remove it from the oven. • To prevent sticking, lightly grease the broiler grill. To change the amount of food. Broil This mode uses a top heat source. Convection ...is normal and necessary for some smoke to prepare many foods, including steaks, chicken, chops, hamburgers and fish. Excess grease will sound. Operating the Oven Your range offers two broil modes: • Broil • Convection Broil Broiling is a quick and flavorful way to be timed on the keypad...

Use & Care Manuals
Page 16
...time or cooking duration, press either the COOK TIME key or the STOP TIME key. Increase the cook time as the temperature increases above , the oven automatically calculates the third. Things to Know About Delay Timed Cooking • The delay timed options work for two hours. • Press CANCEL ·... it turns completely off (after hold mode. How to Use Delay Timed Cooking note Delay-timed cooking cannot be included in the oven for the oven to determine when the oven will keep the temperature at 150°F for all the way off. • To prevent sickness, do not have set. ...
...time or cooking duration, press either the COOK TIME key or the STOP TIME key. Increase the cook time as the temperature increases above , the oven automatically calculates the third. Things to Know About Delay Timed Cooking • The delay timed options work for two hours. • Press CANCEL ·... it turns completely off (after hold mode. How to Use Delay Timed Cooking note Delay-timed cooking cannot be included in the oven for the oven to determine when the oven will keep the temperature at 150°F for all the way off. • To prevent sickness, do not have set. ...

Use & Care Manuals
Page 17
... TIME key to view the current cook time setting. • Push the COOK TIME key to Sabbath mode, it disables the following features: • The oven light • All keys, except CANCEL · SECURE, START · CONTINUE and the 0 and 2 keys on the number keypad, then START · CONTINUE, tells ... and Holy Days. The 12 hour timer is cooking, pressing the 2 key on the number keypad, then START · CONTINUE, tells the oven to use on your oven complies with Jewish law, the heating element will go into Sabbath mode and cook using the mode selected in Sabbath mode. • You...
... TIME key to view the current cook time setting. • Push the COOK TIME key to Sabbath mode, it disables the following features: • The oven light • All keys, except CANCEL · SECURE, START · CONTINUE and the 0 and 2 keys on the number keypad, then START · CONTINUE, tells ... and Holy Days. The 12 hour timer is cooking, pressing the 2 key on the number keypad, then START · CONTINUE, tells the oven to use on your oven complies with Jewish law, the heating element will go into Sabbath mode and cook using the mode selected in Sabbath mode. • You...


