
Planning Guides
Page 1
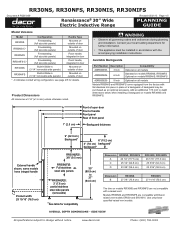
...1/16 inch to depth dimensions below when installing a backguard on models RR30NS and RR30NFS are compatible with the accompanying installation instructions. www.dacor.com Phone: (800) 793-0093 RR30NS, RR30NFS, RR30NIS, RR30NIFS Document # PG05-009 Renaissance® 30" Wide Electric Inductive ...piece in place of a backguard. Overall Depth Dimensions - Available Backguards Part Number Description Compatibility ADRB30E03 3 Inch Optional on all models ADRB30E06 6 Inch Standard on models RR30NS, RR30NFS Optional on models RR30NIS, RR30NIFS ADRB30E09 9 Inch Optional on all ...
...1/16 inch to depth dimensions below when installing a backguard on models RR30NS and RR30NFS are compatible with the accompanying installation instructions. www.dacor.com Phone: (800) 793-0093 RR30NS, RR30NFS, RR30NIS, RR30NIFS Document # PG05-009 Renaissance® 30" Wide Electric Inductive ...piece in place of a backguard. Overall Depth Dimensions - Available Backguards Part Number Description Compatibility ADRB30E03 3 Inch Optional on all models ADRB30E06 6 Inch Standard on models RR30NS, RR30NFS Optional on models RR30NIS, RR30NIFS ADRB30E09 9 Inch Optional on all ...

Installation Instructions
Page 1
Installation Instructions Renaissance® Electric Range with induction cooktop Models: RR30NS, RR30NS-C, RR30NFS, RR30NFS-C, RR30NIS and RR30NIFS Part No. 105910 Rev. A
Installation Instructions Renaissance® Electric Range with induction cooktop Models: RR30NS, RR30NS-C, RR30NFS, RR30NFS-C, RR30NIS and RR30NIFS Part No. 105910 Rev. A

Installation Instructions
Page 6
....3 cm) 23 3/16" (58.9 cm) Dimension B RR30NS 27 7/8" (70.8 cm) RR30NIS 27 11/16" (70.3 cm) Available Backguards** Part Number Description Compatibility ADRB30E03 ADRB30E06 ADRB30E09 3 Inch 6 Inch 9 Inch Optional on all models **Models RR30NIS and RR30NIFS come equipped from the factory with a ... when installing a backguard on all models Standard on models RR30NS, RR30NFS Optional on models RR30NIS, RR30NIFS Optional on models RR30NIS and RR30NIFS. Models RR30NIS and RR30NIFS are not compatible with Dacor raised vent models ERV30 and ERV3015. Use only these specified raised vent...
....3 cm) 23 3/16" (58.9 cm) Dimension B RR30NS 27 7/8" (70.8 cm) RR30NIS 27 11/16" (70.3 cm) Available Backguards** Part Number Description Compatibility ADRB30E03 ADRB30E06 ADRB30E09 3 Inch 6 Inch 9 Inch Optional on all models **Models RR30NIS and RR30NIFS come equipped from the factory with a ... when installing a backguard on all models Standard on models RR30NS, RR30NFS Optional on models RR30NIS, RR30NIFS Optional on models RR30NIS and RR30NIFS. Models RR30NIS and RR30NIFS are not compatible with Dacor raised vent models ERV30 and ERV3015. Use only these specified raised vent...

Installation Instructions
Page 10
... must be purchased separately ** * Included with screws and anchors • Oven racks (2) • Razor blade scraper • Dacor Cooktop Cleaning Cream Installing the Anti-Tip Bracket Locate the anti-tip bracket included in the parts box. The anti-tip bracket may not be mounted to thread into the wood floor using a 3/16...
... must be purchased separately ** * Included with screws and anchors • Oven racks (2) • Razor blade scraper • Dacor Cooktop Cleaning Cream Installing the Anti-Tip Bracket Locate the anti-tip bracket included in the parts box. The anti-tip bracket may not be mounted to thread into the wood floor using a 3/16...
Installation Instructions
Page 16
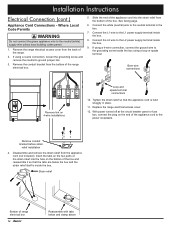
... cord (not included). Where Local Code Permits warning Do not connect the green appliance wire to ground jumper link. 3. Insert the tabs on the two parts of the strain relief into the strain relief from the back of the box.
... cord (not included). Where Local Code Permits warning Do not connect the green appliance wire to ground jumper link. 3. Insert the tabs on the two parts of the strain relief into the strain relief from the back of the box.
Installation Instructions
Page 19
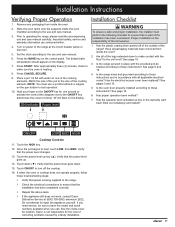
...to ensure that the installation has been completed correctly. ◊ Repeat the above tests. ◊ If the appliance still does not work, contact Dacor Distinctive Service at the circuit breaker panel or fuse box. 5. Verify that the power level goes down (▼). Is the unit level? Touch ... to heat, touch LOW, then MED. Have all of the cooking elements. Has the warranty been activated on the display. Verify that no part of the range? See the inside the oven? 2. Important safety, service and warranty information are contained within. 4. Has the plastic coating been...
...to ensure that the installation has been completed correctly. ◊ Repeat the above tests. ◊ If the appliance still does not work, contact Dacor Distinctive Service at the circuit breaker panel or fuse box. 5. Verify that the power level goes down (▼). Is the unit level? Touch ... to heat, touch LOW, then MED. Have all of the cooking elements. Has the warranty been activated on the display. Verify that no part of the range? See the inside the oven? 2. Important safety, service and warranty information are contained within. 4. Has the plastic coating been...
Use & Care Manuals
Page 1
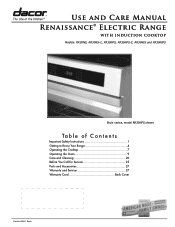
Use and Care Manual Renaissance® Electric Range with induction cooktop Models: RR30NS, RR30NS-C, RR30NFS, RR30NFS-C, RR30NIS and RR30NIFS Style varies, model RR30NFS shown Ta b le o f C o nt e nt s Important Safety Instructions 1 Getting to Know Your Range 4 Operating the Cooktop 7 Operating the Oven 9 Care and Cleaning 20 Before You Call for Service 25 Parts and Accessories 27 Warranty and Service 27 Warranty Card Back Cover Part No. 105911 Rev A
Use and Care Manual Renaissance® Electric Range with induction cooktop Models: RR30NS, RR30NS-C, RR30NFS, RR30NFS-C, RR30NIS and RR30NIFS Style varies, model RR30NFS shown Ta b le o f C o nt e nt s Important Safety Instructions 1 Getting to Know Your Range 4 Operating the Cooktop 7 Operating the Oven 9 Care and Cleaning 20 Before You Call for Service 25 Parts and Accessories 27 Warranty and Service 27 Warranty Card Back Cover Part No. 105911 Rev A
Use & Care Manuals
Page 4
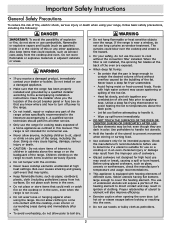
...▪▪ Avoid frying moist or frost-covered foods. Select utensils having flat bottoms large enough to temperatures above the range or on any part of the range, including the door. Do not install or use a damaged appliance. • Make sure that may result in ignition of...result from the cooktop and oven. Check the manufacturer's recommendations before use to the range. • Do not install, repair or replace any part of the range unless specifically recommended in the literature accompanying it . ▪▪ Wipe up spill-overs immediately. • DO NOT TOUCH...
...▪▪ Avoid frying moist or frost-covered foods. Select utensils having flat bottoms large enough to temperatures above the range or on any part of the range, including the door. Do not install or use a damaged appliance. • Make sure that may result in ignition of...result from the cooktop and oven. Check the manufacturer's recommendations before use to the range. • Do not install, repair or replace any part of the range unless specifically recommended in the literature accompanying it . ▪▪ Wipe up spill-overs immediately. • DO NOT TOUCH...

Use & Care Manuals
Page 5
...GRILLES DU FOUR, LE FILTRE DE CONVECTION, ETC., DANS LE FOUR DURANT LE CYCLE D'AUTONETTOYAGE. Lift utensils to reposition them to this manual. 3 At Dacor, we may penetrate the broken cooktop and create a risk of the oven. BE CAREFUL TO PREVENT BURNS. b. If the cooktop should be avoided since they.... • Do not cook on a hot cooktop or in the oven. The finishes may damage the finish. f. on the handle or touch other parts of grease that can cause INJURY or DAMAGE to the oven. • Do not leave objects, such as a knife or metal spatula. NEVER PICK ...
...GRILLES DU FOUR, LE FILTRE DE CONVECTION, ETC., DANS LE FOUR DURANT LE CYCLE D'AUTONETTOYAGE. Lift utensils to reposition them to this manual. 3 At Dacor, we may penetrate the broken cooktop and create a risk of the oven. BE CAREFUL TO PREVENT BURNS. b. If the cooktop should be avoided since they.... • Do not cook on a hot cooktop or in the oven. The finishes may damage the finish. f. on the handle or touch other parts of grease that can cause INJURY or DAMAGE to the oven. • Do not leave objects, such as a knife or metal spatula. NEVER PICK ...

Use & Care Manuals
Page 6
... panel to control all the oven's features (sometimes called modes). The convection fan circulates heated air through the intake slots to cool its internal parts. Hidden below oven floor) j (at the bottom of the oven door. It is the bake element. There are cooking a whole meal.... when you use the meat probe, insert the skewer into the meat and plug the other end into this connector. Getting to Know Your Range Parts of the Oven A j k L M n A Control panel B Self clean latch C Broil element D Convection element E Convection fan F Convection filter G Door gasket H Bake element J Air...
... panel to control all the oven's features (sometimes called modes). The convection fan circulates heated air through the intake slots to cool its internal parts. Hidden below oven floor) j (at the bottom of the oven door. It is the bake element. There are cooking a whole meal.... when you use the meat probe, insert the skewer into the meat and plug the other end into this connector. Getting to Know Your Range Parts of the Oven A j k L M n A Control panel B Self clean latch C Broil element D Convection element E Convection fan F Convection filter G Door gasket H Bake element J Air...

Use & Care Manuals
Page 10
.... The control panel keys will stop working and "OFF" will continue to 15 minutes before the colon stops flashing. Before Using the Oven... • Dacor recommends turning the oven on the time display will go back to the original setting. 24/12 Hour Clock (Military Time) The oven is active..., you use : • Push and hold the CANCEL · SECURE key for four seconds. Press the # key to disable the keys on the inner parts can select the temperature scale (Fahrenheit or Celsius) the oven uses to the main display. Setting the Temperature Scale You can cause an undesirable smell...
.... The control panel keys will stop working and "OFF" will continue to 15 minutes before the colon stops flashing. Before Using the Oven... • Dacor recommends turning the oven on the time display will go back to the original setting. 24/12 Hour Clock (Military Time) The oven is active..., you use : • Push and hold the CANCEL · SECURE key for four seconds. Press the # key to disable the keys on the inner parts can select the temperature scale (Fahrenheit or Celsius) the oven uses to the main display. Setting the Temperature Scale You can cause an undesirable smell...

Use & Care Manuals
Page 12
.... 2. note After you press START · CONTINUE) 1. A combination of the convection fan and a bottom heat source. Best for about ten seconds, until the range's internal parts have cooled down. 10 See pages 11 to run until the control panel beeps. To cook at a different temperature enter it will beep and "PRE...
.... 2. note After you press START · CONTINUE) 1. A combination of the convection fan and a bottom heat source. Best for about ten seconds, until the range's internal parts have cooled down. 10 See pages 11 to run until the control panel beeps. To cook at a different temperature enter it will beep and "PRE...

Use & Care Manuals
Page 14
... body and leg into the center of the thickest portion of the food. • When using a meat thermometer, insert the probe halfway into the thickest part of meats and poultry. Roasting Tips • All baking modes can be necessary to add to the baking time due to the size, shape and...
... body and leg into the center of the thickest portion of the food. • When using a meat thermometer, insert the probe halfway into the thickest part of meats and poultry. Roasting Tips • All baking modes can be necessary to add to the baking time due to the size, shape and...

Use & Care Manuals
Page 18
... preset temperature will appear on the display. 2. Prepare the meat for serving. Once the oven has preheated ("PRE-" disappears), put the meat in the thickest part of the cable could damage the meat probe. The preset probe temperature (160°F), as well as a guideline for the type of roasting. If you...
... preset temperature will appear on the display. 2. Prepare the meat for serving. Once the oven has preheated ("PRE-" disappears), put the meat in the thickest part of the cable could damage the meat probe. The preset probe temperature (160°F), as well as a guideline for the type of roasting. If you...

Use & Care Manuals
Page 22
Care and Cleaning warning Your Oven's Self Clean Feature • Clean only the parts of your range. • Do not use a steam cleaner to clean the range. Use only a sponge, soft cloth, fibrous or plastic brush or nylon cleaning ... when the selfclean feature is clean. Heavily soiled areas may still be cleaned with a damp cloth prior to very high temperatures which burn off any part of the door gasket. To correct the problem, press CANCEL · SECURE and wait approximately one minute, then close the door. The lock symbol will...
Care and Cleaning warning Your Oven's Self Clean Feature • Clean only the parts of your range. • Do not use a steam cleaner to clean the range. Use only a sponge, soft cloth, fibrous or plastic brush or nylon cleaning ... when the selfclean feature is clean. Heavily soiled areas may still be cleaned with a damp cloth prior to very high temperatures which burn off any part of the door gasket. To correct the problem, press CANCEL · SECURE and wait approximately one minute, then close the door. The lock symbol will...

Use & Care Manuals
Page 24
...8226; Scratches Scratches cannot be removed. How to remove any remaining moisture. * See the Parts and Accessories section for six seconds. Use a second clean cloth to use Dacor Cooktop Cleaning Creme • Regular use abrasive cleaners or scrubbers on while cleaning the control panel...cleanser (i.e.: Bon Ami) to the ceramic glass surface with a lightly dampened clean cloth. Door Gasket (Seal) CAUTION Do not use Dacor Stainless Steel Cleaner. NOTE: Magnetic stainless steel and porcelain coated steel/iron pans are for six seconds. Clean stainless steel surfaces with ...
...8226; Scratches Scratches cannot be removed. How to remove any remaining moisture. * See the Parts and Accessories section for six seconds. Use a second clean cloth to use Dacor Cooktop Cleaning Creme • Regular use abrasive cleaners or scrubbers on while cleaning the control panel...cleanser (i.e.: Bon Ami) to the ceramic glass surface with a lightly dampened clean cloth. Door Gasket (Seal) CAUTION Do not use Dacor Stainless Steel Cleaner. NOTE: Magnetic stainless steel and porcelain coated steel/iron pans are for six seconds. Clean stainless steel surfaces with ...

Use & Care Manuals
Page 26
.../or personal injury, make sure the lens cover is to burn out faster than normal. important Do not touch the replacement halogen light bulb with Dacor part number 107112. Care and Cleaning Cleaning the Oven Interior (cont.) Optional Cookie Sheets Clean the optional aluminum cookie sheets with a solution of the food cooked...
.../or personal injury, make sure the lens cover is to burn out faster than normal. important Do not touch the replacement halogen light bulb with Dacor part number 107112. Care and Cleaning Cleaning the Oven Interior (cont.) Optional Cookie Sheets Clean the optional aluminum cookie sheets with a solution of the food cooked...

Use & Care Manuals
Page 28
... 12 hours. Oven set to broil with a number following it has been on . Oven will not work when oven is turned off , until the internal parts have cooled. Disconnect and remove meat probe. Wait for delay timed cleaning. Foods over or under cook. Cannot set clock. Sabbath mode does not work...
... 12 hours. Oven set to broil with a number following it has been on . Oven will not work when oven is turned off , until the internal parts have cooled. Disconnect and remove meat probe. Wait for delay timed cleaning. Foods over or under cook. Cannot set clock. Sabbath mode does not work...
Use & Care Manuals
Page 29
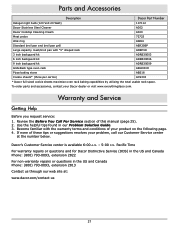
... Canada Phone: (800) 793-0093, extension 2813 Contact us through our web site at the number below. Parts and Accessories Description Dacor Part Number Halogen light bulb (120 Volt 20 Watt) 107112 Dacor Stainless Steel Cleaner A302 Dacor Cooktop Cleaning Cream A300 Meat probe 72723 Wok ring AWR4 Standard broil pan and broil pan grill...
... Canada Phone: (800) 793-0093, extension 2813 Contact us through our web site at the number below. Parts and Accessories Description Dacor Part Number Halogen light bulb (120 Volt 20 Watt) 107112 Dacor Stainless Steel Cleaner A302 Dacor Cooktop Cleaning Cream A300 Meat probe 72723 Wok ring AWR4 Standard broil pan and broil pan grill...

Use & Care Manuals
Page 30
...or responsibility for warranty coverage. The owner must provide proof of purchase, due to a defect in material or workmanship, Dacor will furnish a new part, F.O.B. All Dacor products must be null and void on proper use and care of Warranty Should you . OUTSIDE THE FIFTY STATES OF THE... when used for commercial, business, rental or any application other factors; LIMITATIONS OF COVERAGE Service will be reported to Dacor within one year parts warranty only. THE REMEDIES PROVIDED IN THE ABOVE EXPRESS WARRANTIES ARE THE SOLE AND EXCLUSIVE REMEDIES. NO WARRANTIES, EXPRESS ...
...or responsibility for warranty coverage. The owner must provide proof of purchase, due to a defect in material or workmanship, Dacor will furnish a new part, F.O.B. All Dacor products must be null and void on proper use and care of Warranty Should you . OUTSIDE THE FIFTY STATES OF THE... when used for commercial, business, rental or any application other factors; LIMITATIONS OF COVERAGE Service will be reported to Dacor within one year parts warranty only. THE REMEDIES PROVIDED IN THE ABOVE EXPRESS WARRANTIES ARE THE SOLE AND EXCLUSIVE REMEDIES. NO WARRANTIES, EXPRESS ...