Planning Guides
Page 1
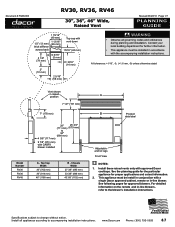
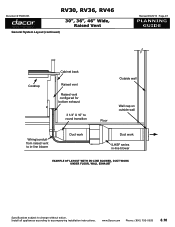
... NOTES: 1. For detailed information on the remote and in accordance with the accompanying installation instructions. Install these raised vents only with approved Dacor cooktops. See following pages for proper applications and cutout information. 2. Install all governing codes and ordinances during ...single Dacor approved cabinet, remote or in raised position 7 1/2" (191 mm) 7" (178 mm) 28" (711 mm) 26 3/4" (679 mm) to 34" (864 mm) 4 5/8" (117 mm) 9 7/8" (251 mm) with CABP3 blower installed A - Document # PG08-003 RV30, RV36, RV46 30", 36", 46" Wide, Raised Vent Revised...
... NOTES: 1. For detailed information on the remote and in accordance with the accompanying installation instructions. Install these raised vents only with approved Dacor cooktops. See following pages for proper applications and cutout information. 2. Install all governing codes and ordinances during ...single Dacor approved cabinet, remote or in raised position 7 1/2" (191 mm) 7" (178 mm) 28" (711 mm) 26 3/4" (679 mm) to 34" (864 mm) 4 5/8" (117 mm) 9 7/8" (251 mm) with CABP3 blower installed A - Document # PG08-003 RV30, RV36, RV46 30", 36", 46" Wide, Raised Vent Revised...
Planning Guides
Page 2
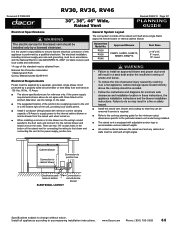
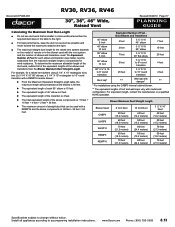
... and connect it to the remote blower and raised vent on the ends. RV30, RV36, RV46 Document # PG08-003 30", 36", 46" Wide, Raised Vent Revised 03/29/10 Page 2/7 PLANNING GUIDE Electrical Specifications WARNING The electric service for the raised vent should be installed only by reaching over a hot... in bottom Electrical Layout Connection to remote/in a back draft and/or the insufficient venting of smoke and fumes. • To reduce the risk of the raised vent itself and a single Dacor approved remote blower or internal cabinet blower. Failure to do not agree with minimum current...
... and connect it to the remote blower and raised vent on the ends. RV30, RV36, RV46 Document # PG08-003 30", 36", 46" Wide, Raised Vent Revised 03/29/10 Page 2/7 PLANNING GUIDE Electrical Specifications WARNING The electric service for the raised vent should be installed only by reaching over a hot... in bottom Electrical Layout Connection to remote/in a back draft and/or the insufficient venting of smoke and fumes. • To reduce the risk of the raised vent itself and a single Dacor approved remote blower or internal cabinet blower. Failure to do not agree with minimum current...
Planning Guides
Page 3
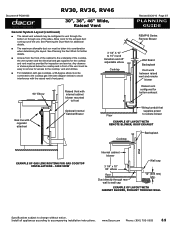
...service. www.Dacor.com Phone: (800) 793-0093 8.9 See Planning the Duct Work for further details. ■■ Access from the front of the cabinet to the underside of the cooktop, the vent system and the electrical and gas supplies for the cooktop and vent must be.... Install all appliances according to accompanying installation instructions. Document # PG08-003 RV30, RV36, RV46 30", 36", 46" Wide, Raised Vent General System Layout (continued) ■■ The raised vent exhaust may be configured to vent through the bottom or through rear wall to wall cap 12" (305 mm) Min. ...
...service. www.Dacor.com Phone: (800) 793-0093 8.9 See Planning the Duct Work for further details. ■■ Access from the front of the cabinet to the underside of the cooktop, the vent system and the electrical and gas supplies for the cooktop and vent must be.... Install all appliances according to accompanying installation instructions. Document # PG08-003 RV30, RV36, RV46 30", 36", 46" Wide, Raised Vent General System Layout (continued) ■■ The raised vent exhaust may be configured to vent through the bottom or through rear wall to wall cap 12" (305 mm) Min. ...
Planning Guides
Page 4
www.Dacor.com Phone: (800) 793-0093 8.10 Install all appliances according to change without notice. RV30, RV36, RV46 Document # PG08-003 30", 36", 46" Wide, Raised Vent General System Layout (continued) Revised 03/29/10 Page 4/7 PLANNING GUIDE Cooktop Cabinet back Raised vent Raised vent configured for bottom exhaust 3 1/4" X 10" to round transition Outside wall Floor Wall cap...
www.Dacor.com Phone: (800) 793-0093 8.10 Install all appliances according to change without notice. RV30, RV36, RV46 Document # PG08-003 30", 36", 46" Wide, Raised Vent General System Layout (continued) Revised 03/29/10 Page 4/7 PLANNING GUIDE Cooktop Cabinet back Raised vent Raised vent configured for bottom exhaust 3 1/4" X 10" to round transition Outside wall Floor Wall cap...

Planning Guides
Page 5
...9632; Do not rely on the bottom is removed to prevent combustion by the raised vent. Specifications subject to duct air outside . Document # PG08-003 Planning the Duct Work RV30, RV36, RV46 30", 36", 46" Wide, Raised Vent Revised 03/29/10 Page 5/7 PLANNING GUIDE WARNING • To reduce the ... Fasten all connections with sheet metal screws and tape all duct joints securely to expose the exhaust. BLOWER RATINGS FOR DACOR BLOWERS APPROVED FOR USE WITH RV SERIES RAISED VENTS Model Number Rating CABP3 (cabinet) 600 CFM* ILHSF8 (in-line) 600 CFM** ILHSF10 (in this unit must ...
...9632; Do not rely on the bottom is removed to prevent combustion by the raised vent. Specifications subject to duct air outside . Document # PG08-003 Planning the Duct Work RV30, RV36, RV46 30", 36", 46" Wide, Raised Vent Revised 03/29/10 Page 5/7 PLANNING GUIDE WARNING • To reduce the ... Fasten all connections with sheet metal screws and tape all duct joints securely to expose the exhaust. BLOWER RATINGS FOR DACOR BLOWERS APPROVED FOR USE WITH RV SERIES RAISED VENTS Model Number Rating CABP3 (cabinet) 600 CFM* ILHSF8 (in-line) 600 CFM** ILHSF10 (in this unit must ...

Planning Guides
Page 6
www.Dacor.com B 6" (152 mm) 9" (229 mm) C 12" (205 mm) 9" (229 mm) Phone: (800) 793-0093 8.12 Bottom Exhaust Raised vent Countertop center line B 11 5/8" (295 mm) 3 1/4 X 10 Duct connection Duct connection center line Cooktop CABP3 CL 8 3/8" (213 mm)... and Dimensions for CABP3 Internal Cabinet Blower Model RV30 RV36 RV46 A 2" (51 mm) 5" (127 mm) Specifications subject to change without notice. Document # PG08-003 RV30, RV36, RV46 30", 36", 46" Wide, Raised Vent Planning the Duct Work (continued) Raised vent Countertop center line Revised 03/29/10 Page 6/7 PLANNING ...
www.Dacor.com B 6" (152 mm) 9" (229 mm) C 12" (205 mm) 9" (229 mm) Phone: (800) 793-0093 8.12 Bottom Exhaust Raised vent Countertop center line B 11 5/8" (295 mm) 3 1/4 X 10 Duct connection Duct connection center line Cooktop CABP3 CL 8 3/8" (213 mm)... and Dimensions for CABP3 Internal Cabinet Blower Model RV30 RV36 RV46 A 2" (51 mm) 5" (127 mm) Specifications subject to change without notice. Document # PG08-003 RV30, RV36, RV46 30", 36", 46" Wide, Raised Vent Planning the Duct Work (continued) Raised vent Countertop center line Revised 03/29/10 Page 6/7 PLANNING ...
Planning Guides
Page 7
...The maximum amount of Feet for each elbow and transition (see table) must be used . www.Dacor.com Phone: (800) 793-0093 8.13 Document # PG08-003 RV30, RV36, RV46 30", 36", 46" Wide, Raised Vent Revised 03/29/10 Page 7/7 PLANNING GUIDE Calculating the Maximum Duct Run Length ■■ Do...the duct run as short as possible and never exceed the maximums stated at the right. ■■ The maximum straight duct length for a raised vent system using the CABP3 internal cabinet blower. ** The equivalent lengths of roof and wall caps vary with a REMP16 remote blower: ►► ...
...The maximum amount of Feet for each elbow and transition (see table) must be used . www.Dacor.com Phone: (800) 793-0093 8.13 Document # PG08-003 RV30, RV36, RV46 30", 36", 46" Wide, Raised Vent Revised 03/29/10 Page 7/7 PLANNING GUIDE Calculating the Maximum Duct Run Length ■■ Do...the duct run as short as possible and never exceed the maximums stated at the right. ■■ The maximum straight duct length for a raised vent system using the CABP3 internal cabinet blower. ** The equivalent lengths of roof and wall caps vary with a REMP16 remote blower: ►► ...
Installation Instructions
Page 1
Installation Instructions Downdraft Raised Vent Models: RV30, RV36, RV46 Includes installation instructions for the particular cooktop model being installed to determine suitability. H Use these downdraft raised vents only with approved Dacor ® cooktops. See the installation instructions for optional cabinet blower (Dacor model CABP3) Part No. 85515 Rev.
Installation Instructions Downdraft Raised Vent Models: RV30, RV36, RV46 Includes installation instructions for the particular cooktop model being installed to determine suitability. H Use these downdraft raised vents only with approved Dacor ® cooktops. See the installation instructions for optional cabinet blower (Dacor model CABP3) Part No. 85515 Rev.

Installation Instructions
Page 2
...questions or problems with the customer. • Customer: Keep these installation instructions completely and carefully before you call the Dacor Distinctive Service line. Friday 6:00 a.m. All specifications subject to minimize problems, read these installation instructions for Household Electric Cooking... building inspector's use. Table of the unit. Pacific Time RV30 = 30-inch wide raised vent RV36 = 36-inch wide raised vent RV46 = 46-inch wide raised vent Tested in the Cutout 11 Electrical Installation 12 Final Installation 14 Verifying Proper Operation 14 Installation...
...questions or problems with the customer. • Customer: Keep these installation instructions completely and carefully before you call the Dacor Distinctive Service line. Friday 6:00 a.m. All specifications subject to minimize problems, read these installation instructions for Household Electric Cooking... building inspector's use. Table of the unit. Pacific Time RV30 = 30-inch wide raised vent RV36 = 36-inch wide raised vent RV46 = 46-inch wide raised vent Tested in the Cutout 11 Electrical Installation 12 Final Installation 14 Verifying Proper Operation 14 Installation...
Installation Instructions
Page 4
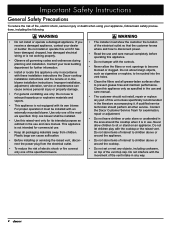
...Do not store items of interest to children above or around the cooktop when it is not equipped with these installation instructions the Dacor cooktop installation instructions and the remote or in the use . • Keep all other service. warning • The installer must be... alone or unattended in the area around the appliance. • Do not store items of interest to be installed with the cooktop or the raised vent. If you receive a damaged appliance, contact your appliance, follow basic safety precautions, including the following: Warning • Do not install or operate...
...Do not store items of interest to children above or around the cooktop when it is not equipped with these installation instructions the Dacor cooktop installation instructions and the remote or in the use . • Keep all other service. warning • The installer must be... alone or unattended in the area around the appliance. • Do not store items of interest to be installed with the cooktop or the raised vent. If you receive a damaged appliance, contact your appliance, follow basic safety precautions, including the following: Warning • Do not install or operate...

Installation Instructions
Page 6
...; The above the cooktop should be supplied by a separate, grounded, single phase circuit protected by a licensed electrician. General System Layout The vent system consists of the raised vent itself and a single, Dacor approved, externally mounted blower (see cooktop installation instructions See the cooktop installation instructions for reference only. Failure to do not agree with...
...; The above the cooktop should be supplied by a separate, grounded, single phase circuit protected by a licensed electrician. General System Layout The vent system consists of the raised vent itself and a single, Dacor approved, externally mounted blower (see cooktop installation instructions See the cooktop installation instructions for reference only. Failure to do not agree with...
Installation Instructions
Page 7
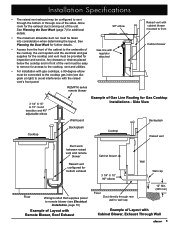
... front of the cabinet to the underside of the unit. Side View Wall board Backsplash Cooktop Backsplash Cooktop Raised vent Duct work between raised vent and remote blower Raised vent configured for bottom exhaust Floor Wiring/conduit that supplies power to remote blower (see diagram at right) to...° elbow Floor Duct directly through one of Gas Line Routing for Gas Cooktop Installations - Installation Specifications • The raised vent exhaust may be configured to vent through the bottom or through rear wall to wall cap Wall cap 12" Min. (305 mm) Example of Layout with...
... front of the cabinet to the underside of the unit. Side View Wall board Backsplash Cooktop Backsplash Cooktop Raised vent Duct work between raised vent and remote blower Raised vent configured for bottom exhaust Floor Wiring/conduit that supplies power to remote blower (see diagram at right) to...° elbow Floor Duct directly through one of Gas Line Routing for Gas Cooktop Installations - Installation Specifications • The raised vent exhaust may be configured to vent through the bottom or through rear wall to wall cap Wall cap 12" Min. (305 mm) Example of Layout with...

Installation Instructions
Page 8
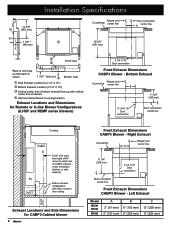
Installation Specifications General System Layout (Continued) Cooktop Cabinet back Raised vent Raised vent configured for bottom exhaust 3 1/4" X 10" to round transition Outside wall Floor Wall cap on outside wall Wiring/conduit from raised vent to in-line blower Duct work Duct work ILHSF series in-line blower Example of Layout with In-line Blower, Duct Work Under Floor, Wall Exhaust 6
Installation Specifications General System Layout (Continued) Cooktop Cabinet back Raised vent Raised vent configured for bottom exhaust 3 1/4" X 10" to round transition Outside wall Floor Wall cap on outside wall Wiring/conduit from raised vent to in-line blower Duct work Duct work ILHSF series in-line blower Example of Layout with In-line Blower, Duct Work Under Floor, Wall Exhaust 6

Installation Instructions
Page 9
...reduce the risk of fire and to properly exhaust air, be sure to the front of the raised vent with the exhaust pointing in the desire direction. APPROVED DACOR BLOWERS FOR USE WITH RV SERIES RAISED VENTS Model Number Rating CABP3 600 CFM* ILHSF8 600 CFM** ILHSF10 REMP3 1100 CFM** 600 CFM** ...wiring to keep a minimum of 24" of adjacent elbows. • Do not use round duct instead of the Dacor blower models listed below for actual blower rating. • The raised vent can greatly reduce the air draw by -products, smoke or odors from adjacent open windows or doors, heating/air...
...reduce the risk of fire and to properly exhaust air, be sure to the front of the raised vent with the exhaust pointing in the desire direction. APPROVED DACOR BLOWERS FOR USE WITH RV SERIES RAISED VENTS Model Number Rating CABP3 600 CFM* ILHSF8 600 CFM** ILHSF10 REMP3 1100 CFM** 600 CFM** ...wiring to keep a minimum of 24" of adjacent elbows. • Do not use round duct instead of the Dacor blower models listed below for actual blower rating. • The raised vent can greatly reduce the air draw by -products, smoke or odors from adjacent open windows or doors, heating/air...
Installation Instructions
Page 10
...line C 11 3/4" (298 mm) 3 1/4 X 10 Duct connection Duct connection center line Front Exhaust Dimensions CABP3 Blower - Bottom Exhaust Raised vent Countertop center line B 11 5/8" (295 mm) 3 1/4 X 10 Duct connection Duct connection center line Cooktop CABP3 CL RV DUCT ... CABP3 Blower - Left Exhaust Model RV30 RV36 RV46 A B 2" (51 mm) 6" (152 mm) 5" (127 mm) 9" (229 mm) C 12" (205 mm) 9" (229 mm) Installation Specifications 14 3/8" (365 mm) CL 1 7/8" * (48 mm) CL Raised vent Countertop center line 25 5/8" (651 mm) Duct...
...line C 11 3/4" (298 mm) 3 1/4 X 10 Duct connection Duct connection center line Front Exhaust Dimensions CABP3 Blower - Bottom Exhaust Raised vent Countertop center line B 11 5/8" (295 mm) 3 1/4 X 10 Duct connection Duct connection center line Cooktop CABP3 CL RV DUCT ... CABP3 Blower - Left Exhaust Model RV30 RV36 RV46 A B 2" (51 mm) 6" (152 mm) 5" (127 mm) 9" (229 mm) C 12" (205 mm) 9" (229 mm) Installation Specifications 14 3/8" (365 mm) CL 1 7/8" * (48 mm) CL Raised vent Countertop center line 25 5/8" (651 mm) Duct...
Installation Instructions
Page 11
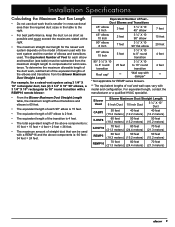
... work , subtract all of the equivalent lengths of the elbows and transitions from the maximum straight length to compensate for wind resistance. For example, for a raised vent system using 3 1/4" X 10" rectangular duct, two (2) 3 1/4" X 10" 90° elbows, a 3 1/4" X 10" rectangular to 10" round transition with a REMP16...damper* ** * Not applicable for REMP series blowers. ** The equivalent lengths of Feet for the raised vent system depends on the model of blower used with the vent system and the number of straight duct that is smaller in cross-sectional area than the required duct...
... work , subtract all of the equivalent lengths of the elbows and transitions from the maximum straight length to compensate for wind resistance. For example, for a raised vent system using 3 1/4" X 10" rectangular duct, two (2) 3 1/4" X 10" 90° elbows, a 3 1/4" X 10" rectangular to 10" round transition with a REMP16...damper* ** * Not applicable for REMP series blowers. ** The equivalent lengths of Feet for the raised vent system depends on the model of blower used with the vent system and the number of straight duct that is smaller in cross-sectional area than the required duct...

Installation Instructions
Page 12
... backing off the tape and attach it . 7. Cover the opening . Top retainer bracket Flange Vent cover Attach foam to right/left flanges on the inside of the raised vent using the CABP3 cabinet blower, skip to the right and left flanges Bottom cover Exhaust Cover Removal... installation. Also locate the supplied foam tape. Adjustable anchor legs Installation Preparation for Raised Vent with the flange facing outward. Remove and retain the two (2) screws on the left sides of raised vent 2. Reinstall the top retainer bracket over the exhaust that meets the specifications. &#...
... backing off the tape and attach it . 7. Cover the opening . Top retainer bracket Flange Vent cover Attach foam to right/left flanges on the inside of the raised vent using the CABP3 cabinet blower, skip to the right and left flanges Bottom cover Exhaust Cover Removal... installation. Also locate the supplied foam tape. Adjustable anchor legs Installation Preparation for Raised Vent with the flange facing outward. Remove and retain the two (2) screws on the left sides of raised vent 2. Reinstall the top retainer bracket over the exhaust that meets the specifications. &#...

Installation Instructions
Page 13
... blower exhaust in step 2. Possible Duct Hole Locations 2. out with the three (3) wing nuts removed in the desired orientation. 4. Installing the Raised Vent 1. Cut a hole in place with the electrical access panel toward the front. 3. Remove and retain the three (3) wing nuts from the cooktop...bracket on the front of the unit by pushing the blower against it according to the cabinet floor with the raised vent. Gently slide the vent into bottom retainer bracket Cabinet Blower Installation 11 Secure the anchoring legs to the blower installation instructions. Locate the foam...
... blower exhaust in step 2. Possible Duct Hole Locations 2. out with the three (3) wing nuts removed in the desired orientation. 4. Installing the Raised Vent 1. Cut a hole in place with the electrical access panel toward the front. 3. Remove and retain the three (3) wing nuts from the cooktop...bracket on the front of the unit by pushing the blower against it according to the cabinet floor with the raised vent. Gently slide the vent into bottom retainer bracket Cabinet Blower Installation 11 Secure the anchoring legs to the blower installation instructions. Locate the foam...
Installation Instructions
Page 14
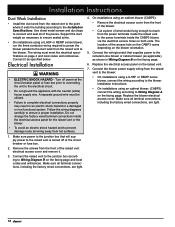
... may result in an electric shock hazard or a damaged or non-functional system. Connect the wiring/conduit that will supply power to the raised vent is turned off power at the circuit breaker or fuse box. 2. Make sure all of wire/conduit long enough to reach from the ...are tight. 12 Make sure all wiring away from hot surfaces. 1. Replace the blower electrical access cover. Connect the blower power supply wiring from the raised vent to the blower: • On installations using a ILHSF or REMP series blower, connect the wiring according to the blower installation instructions. • On...
... may result in an electric shock hazard or a damaged or non-functional system. Connect the wiring/conduit that will supply power to the raised vent is turned off power at the circuit breaker or fuse box. 2. Make sure all of wire/conduit long enough to reach from the ...are tight. 12 Make sure all wiring away from hot surfaces. 1. Replace the blower electrical access cover. Connect the blower power supply wiring from the raised vent to the blower: • On installations using a ILHSF or REMP series blower, connect the wiring according to the blower installation instructions. • On...
Installation Instructions
Page 15
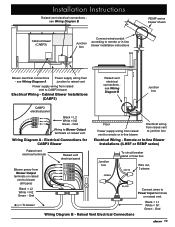
...Raised vent electrical terminals Blower power from Blower Output terminals on raised vent to Blower Output terminals on raised vent To blower Black = L1 White = N1 Green - Cabinet Blower Installations (CABP3) Raised vent electrical connections see Wiring Diagram A Power supply wiring from junction to raised vent Power supply wiring from raised vent...Connect wires to remote or in -line blower Electrical wiring from raised vent to junction box Electrical Wiring - Installation Instructions Raised vent electrical connections see Wiring Diagram B Cabinet blower (CABP3) Junction ...
...Raised vent electrical terminals Blower power from Blower Output terminals on raised vent to Blower Output terminals on raised vent To blower Black = L1 White = N1 Green - Cabinet Blower Installations (CABP3) Raised vent electrical connections see Wiring Diagram A Power supply wiring from junction to raised vent Power supply wiring from raised vent...Connect wires to remote or in -line blower Electrical wiring from raised vent to junction box Electrical Wiring - Installation Instructions Raised vent electrical connections see Wiring Diagram B Cabinet blower (CABP3) Junction ...


