Planning Guides
Page 2
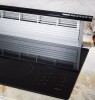
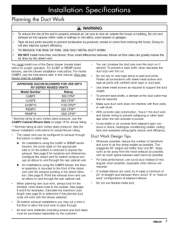
... appliance installation instructions and the blower installation instructions. RV30 RV36 RV46 Approved Blowers CABP3, ILHSF8, ILHSF10, REMP3, REMP16 Duct Sizes 3 1/4"x10", 8" round, 10" round WARNING • Failure to install an approved blower and proper duct work and connect it to the remote blower and raised vent on the label. ■■ The suggested location of the junction box supplying power to the unit is to ensure that they can be removed if service is required...
... appliance installation instructions and the blower installation instructions. RV30 RV36 RV46 Approved Blowers CABP3, ILHSF8, ILHSF10, REMP3, REMP16 Duct Sizes 3 1/4"x10", 8" round, 10" round WARNING • Failure to install an approved blower and proper duct work and connect it to the remote blower and raised vent on the label. ■■ The suggested location of the junction box supplying power to the unit is to ensure that they can be removed if service is required...
Planning Guides
Page 3
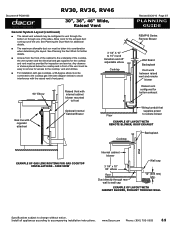
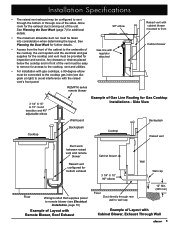
..." round transition and 45° adjustable elbow Cooktop Revised 03/29/10 Page 3/7 PLANNING GUIDE REMP16 Series Remote Blower Wall Board Backsplash Duct work between raised vent and remote blower 90° Elbow Raised Vent with internal cabinet blower mounted to front Raised vent configured for bottom exhaust Gas line with regulator attached Optional Internal Cabinet Blower Floor Wiring/conduit that supplies power to remote blower Example of Layout with Cabinet Blower, Exhaust Through Wall Specifications subject to change without notice. Side View Internal cabinet blower Wall cap...
..." round transition and 45° adjustable elbow Cooktop Revised 03/29/10 Page 3/7 PLANNING GUIDE REMP16 Series Remote Blower Wall Board Backsplash Duct work between raised vent and remote blower 90° Elbow Raised Vent with internal cabinet blower mounted to front Raised vent configured for bottom exhaust Gas line with regulator attached Optional Internal Cabinet Blower Floor Wiring/conduit that supplies power to remote blower Example of Layout with Cabinet Blower, Exhaust Through Wall Specifications subject to change without notice. Side View Internal cabinet blower Wall cap...

Planning Guides
Page 5
...; Use sheet metal screws as possible. ■■ For best performance, use an elbow to vent through the rear cabinet wall. ►► On installations using a remote or in this unit must be purchased separately by the customer. ■■ You can greatly reduce the air draw by -products, smoke or odors from the hood exhaust as possible. Keep turns as much space between blower air flow rates can increase the duct size over...
...; Use sheet metal screws as possible. ■■ For best performance, use an elbow to vent through the rear cabinet wall. ►► On installations using a remote or in this unit must be purchased separately by the customer. ■■ You can greatly reduce the air draw by -products, smoke or odors from the hood exhaust as possible. Keep turns as much space between blower air flow rates can increase the duct size over...

Installation Instructions
Page 2
... raised vent RV46 = 46-inch wide raised vent Tested in the Cutout 11 Electrical Installation 12 Final Installation 14 Verifying Proper Operation 14 Installation Checklist 14 Technical Data 15 RV Raised Vent Wiring Diagram 15 CABP3 Cabinet Blower Ratings 15 Before You Begin... Dacor assumes no liability for future reference and the local building inspector's use. Dacor Customer Service Phone: (800) 793-0093 (U.S.A. and Canada) Monday - and Canada) Monday - All specifications subject to 5:00 p.m. Model...
... raised vent RV46 = 46-inch wide raised vent Tested in the Cutout 11 Electrical Installation 12 Final Installation 14 Verifying Proper Operation 14 Installation Checklist 14 Technical Data 15 RV Raised Vent Wiring Diagram 15 CABP3 Cabinet Blower Ratings 15 Before You Begin... Dacor assumes no liability for future reference and the local building inspector's use. Dacor Customer Service Phone: (800) 793-0093 (U.S.A. and Canada) Monday - and Canada) Monday - All specifications subject to 5:00 p.m. Model...
Installation Instructions
Page 3
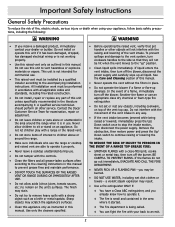
... in these instructions are not meant to the outdoors." b) Always turn hood ON when cooking at high settings. d) Use proper pan size. See Customer Service Information on accidentally. TO REDUCE THE RISK OF FIRE, ELECTRIC SHOCK, OR INJURY TO PERSONS, OBSERVE THE FOLLOWING: a) Installation work and electrical wiring must always be locked, securely fasten a prominent warning device, such as aerosol cans, away from being switched on...
... in these instructions are not meant to the outdoors." b) Always turn hood ON when cooking at high settings. d) Use proper pan size. See Customer Service Information on accidentally. TO REDUCE THE RISK OF FIRE, ELECTRIC SHOCK, OR INJURY TO PERSONS, OBSERVE THE FOLLOWING: a) Installation work and electrical wiring must always be locked, securely fasten a prominent warning device, such as aerosol cans, away from being switched on...
Installation Instructions
Page 4
... reduce the risk of electric shock or fire connect only one blower shall be installed with the cooktop or the raised vent. Use only one of the vent intake in any part of this unit unless specifically recommended in -line blower installation instructions. Never allow the filters or vent openings to disconnect power. • Read the use and care manual. • The customer should perform all grease-laden surfaces often to children...
... reduce the risk of electric shock or fire connect only one blower shall be installed with the cooktop or the raised vent. Use only one of the vent intake in any part of this unit unless specifically recommended in -line blower installation instructions. Never allow the filters or vent openings to disconnect power. • Read the use and care manual. • The customer should perform all grease-laden surfaces often to children...

Installation Instructions
Page 6
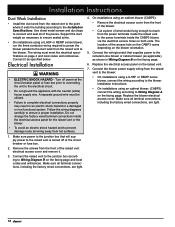
... installed only by a properly sized circuit breaker or time delay fuse and rated at right angles. The electrical installation, including minimum supply wire size and grounding, must be solid and at 120 Vac, 60 Hz, 15 Amps. • The above the cooktop should be removed if service is required. • Refer to the cooktop installation instructions for the minimum cutout dimensions specific to the particular raised vent model being installed. • The raised vent...
... installed only by a properly sized circuit breaker or time delay fuse and rated at right angles. The electrical installation, including minimum supply wire size and grounding, must be solid and at 120 Vac, 60 Hz, 15 Amps. • The above the cooktop should be removed if service is required. • Refer to the cooktop installation instructions for the minimum cutout dimensions specific to the particular raised vent model being installed. • The raised vent...
Installation Instructions
Page 7
... wall cap Wall cap 12" Min. (305 mm) Example of Layout with Cabinet Blower, Exhaust Through Wall 5 Allow room for access to the cooktop, vent and utilities. • For installation with gas cooktops, a 90-degree elbow must be easy to remove for the exhaust duct coming out of the unit. See Planning the Duct Work (page 7) for bottom exhaust Floor Wiring/conduit that supplies power to remote blower (see diagram at right) to the cooktop gas inlet (see Electrical Installation...
... wall cap Wall cap 12" Min. (305 mm) Example of Layout with Cabinet Blower, Exhaust Through Wall 5 Allow room for access to the cooktop, vent and utilities. • For installation with gas cooktops, a 90-degree elbow must be easy to remove for the exhaust duct coming out of the unit. See Planning the Duct Work (page 7) for bottom exhaust Floor Wiring/conduit that supplies power to remote blower (see diagram at right) to the cooktop gas inlet (see Electrical Installation...

Installation Instructions
Page 9
... operation. Duct Work Design Tips • Wherever possible, reduce the number of transitions and turns to as few sharp angles as possible. • For best performance, use an elbow to vent through . • All duct work materials (including screws and duct tape) must install one of the Dacor blower models listed below for actual rating. ** Nominal rating at zero inches static pressure, see the blower installation instructions. APPROVED DACOR BLOWERS FOR USE WITH RV SERIES RAISED VENTS Model Number Rating CABP3 600 CFM* ILHSF8 600 CFM...
... operation. Duct Work Design Tips • Wherever possible, reduce the number of transitions and turns to as few sharp angles as possible. • For best performance, use an elbow to vent through . • All duct work materials (including screws and duct tape) must install one of the Dacor blower models listed below for actual rating. ** Nominal rating at zero inches static pressure, see the blower installation instructions. APPROVED DACOR BLOWERS FOR USE WITH RV SERIES RAISED VENTS Model Number Rating CABP3 600 CFM* ILHSF8 600 CFM...

Installation Instructions
Page 12
... three (3) wing nuts removed in noise and decrease performance. • Loosely attach the anchoring legs to install an electrical circuit that will be used (bottom or side). Exhaust flange Exhaust Flange Installation (bottom shown) 3. Installation Instructions Parts List • Product literature • Vent cover • Anchoring legs • 2 wood screws, #14 x 2 1/2 (PN 83047) • 3 wire nuts • 2 sheet metal screws, #10 x 1/2 (PN 83022) • 3 ¼" X 10 duct mounting flange • 2 keps...
... three (3) wing nuts removed in noise and decrease performance. • Loosely attach the anchoring legs to install an electrical circuit that will be used (bottom or side). Exhaust flange Exhaust Flange Installation (bottom shown) 3. Installation Instructions Parts List • Product literature • Vent cover • Anchoring legs • 2 wood screws, #14 x 2 1/2 (PN 83047) • 3 wire nuts • 2 sheet metal screws, #10 x 1/2 (PN 83022) • 3 ¼" X 10 duct mounting flange • 2 keps...

Installation Instructions
Page 13
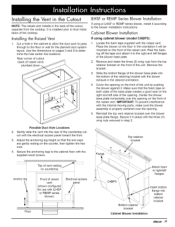
... wall for use with the internal moving parts, make sure the blower assembly is properly centered over the opening on the front of the raised vent. Cut a hole in the cabinet to allow the duct work to pass through to final installation of the cutout, separate from the top retainer bracket on the front of raised vent (shown configured for the planned duct system layout. Remove the bracket. 3. Installation Instructions Installing...
... wall for use with the internal moving parts, make sure the blower assembly is properly centered over the opening on the front of the raised vent. Cut a hole in the cabinet to allow the duct work to pass through to final installation of the cutout, separate from the top retainer bracket on the front of raised vent (shown configured for the planned duct system layout. Remove the bracket. 3. Installation Instructions Installing...
Installation Instructions
Page 14
... the electrical specifications on both units. Connect the raised vent to the junction box according to Wiring Diagram B on the blower orientation. 5. Replace the blower electrical access cover. Support the duct weight as necessary to ensure sealed joints. • On installations using a ILHSF or REMP series blower, run the three conductor wiring required to power the blower parallel to the duct work from the raised vent to the point where it . 3. Follow the wiring diagrams carefully to ensure a proper installation. The...
... the electrical specifications on both units. Connect the raised vent to the junction box according to Wiring Diagram B on the blower orientation. 5. Replace the blower electrical access cover. Support the duct weight as necessary to ensure sealed joints. • On installations using a ILHSF or REMP series blower, run the three conductor wiring required to power the blower parallel to the duct work from the raised vent to the point where it . 3. Follow the wiring diagrams carefully to ensure a proper installation. The...
Installation Instructions
Page 16
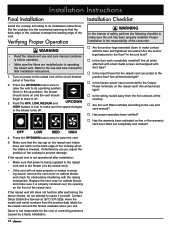
... not function after installation: • Make sure that power is lowered. Have the model and serial numbers from the hot surfaces of correcting problems caused by a faulty installation. 14 Installation Instructions Final Installation Install the cooktop according to make sure the speed changes or the blower turns off. Once in the up position, the blower should begin to draw in turn to its operating position. Contact Dacor Distinctive Service at the circuit breaker panel or fuse box. 2.
... not function after installation: • Make sure that power is lowered. Have the model and serial numbers from the hot surfaces of correcting problems caused by a faulty installation. 14 Installation Instructions Final Installation Install the cooktop according to make sure the speed changes or the blower turns off. Once in the up position, the blower should begin to draw in turn to its operating position. Contact Dacor Distinctive Service at the circuit breaker panel or fuse box. 2.
Use & Care Manuals
Page 4
... unit's surfaces. If liquid enters the vent intake, then turn off the blower, disconnect the power supply and carefully wipe up develops. See the Care and Cleaning section of the vent intake in place. • Do not operate the blower if a flame or flare-up all applicable codes and standards, including fire-rated construction. • Do not install, repair or replace any way. • If the vent...
... unit's surfaces. If liquid enters the vent intake, then turn off the blower, disconnect the power supply and carefully wipe up develops. See the Care and Cleaning section of the vent intake in place. • Do not operate the blower if a flame or flare-up all applicable codes and standards, including fire-rated construction. • Do not install, repair or replace any way. • If the vent...
Use & Care Manuals
Page 5
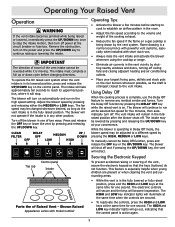
... high speed setting. To operate the RV raised vent system when the vent intake is a normal occurrence with powerful vent systems, especially when installed with model number Operating Tips: • Activate the blower a few minutes before changing directions. The fan speed may be reversed while it will turn off and if pressing the UP/DOWN key, the vent will go out, indicating that the keys (buttons) do not function. The blower...
... high speed setting. To operate the RV raised vent system when the vent intake is a normal occurrence with powerful vent systems, especially when installed with model number Operating Tips: • Activate the blower a few minutes before changing directions. The fan speed may be reversed while it will turn off and if pressing the UP/DOWN key, the vent will go out, indicating that the keys (buttons) do not function. The blower...
Installation Guide
Page 2
... the Cutout 11 Electrical Installation 12 Final Installation 14 Verifying Proper Operation 14 Installation Checklist 14 Technical Data 15 RV Raised Vent Wiring Diagram 15 CABP3 Cabinet Blower Ratings 15 Important: • Installer: In the interest of safety and to minimize problems, read these installation instructions with installation, contact your Dacor dealer or the Dacor Customer Service Team. and Canada) Monday - Whenever you begin the installation process. and Canada) Monday - All specifications subject to change without...
... the Cutout 11 Electrical Installation 12 Final Installation 14 Verifying Proper Operation 14 Installation Checklist 14 Technical Data 15 RV Raised Vent Wiring Diagram 15 CABP3 Cabinet Blower Ratings 15 Important: • Installer: In the interest of safety and to minimize problems, read these installation instructions with installation, contact your Dacor dealer or the Dacor Customer Service Team. and Canada) Monday - Whenever you begin the installation process. and Canada) Monday - All specifications subject to change without...
Installation Guide
Page 4
... operate a damaged app iance. Do not store items of interest to children above or around the appliance. • Do not store items of the vent top cap. Contact the Dacor Customer Service Team for further information. ' InStall or 0cate this appliance only as specified in use and care manual. • The customer should not install, repair or replace any way. 2 _mC_ droppedl has damaged electrical wiring...
... operate a damaged app iance. Do not store items of interest to children above or around the appliance. • Do not store items of the vent top cap. Contact the Dacor Customer Service Team for further information. ' InStall or 0cate this appliance only as specified in use and care manual. • The customer should not install, repair or replace any way. 2 _mC_ droppedl has damaged electrical wiring...
Installation Guide
Page 9
..., ceiling fans and recessed ceiling lights reduce vent efficiency. Do not vent exhaust air into spaces within walls or ceilings or into attics, crawl spaces or garages. • Tape all joints with certified silver tape or duct tape. • Use sheet metal screws as required to support the duct weight. • To prevent back-drafts, a damper at zero inches static pressure, see the blower installation instructions. Only one blower. On installations using the ILHSF or REMP series blowers, the cover plate...
..., ceiling fans and recessed ceiling lights reduce vent efficiency. Do not vent exhaust air into spaces within walls or ceilings or into attics, crawl spaces or garages. • Tape all joints with certified silver tape or duct tape. • Use sheet metal screws as required to support the duct weight. • To prevent back-drafts, a damper at zero inches static pressure, see the blower installation instructions. Only one blower. On installations using the ILHSF or REMP series blowers, the cover plate...

Installation Guide
Page 12
... unit. Secure it . , Make sure that will be used (bottom or side). Discard the cover plate that meets the specifications. • Install the vent only in the Cutout on the next page. , Remove and retain the two (2) screws on the cover plate over the top of the vent cover flange. Parts List • Product literature • Vent cover • Anchoring legs • 2 wood screws, #14 x 2 1/2 (PN 83047) • 3 wire nuts • 2 sheet...
... unit. Secure it . , Make sure that will be used (bottom or side). Discard the cover plate that meets the specifications. • Install the vent only in the Cutout on the next page. , Remove and retain the two (2) screws on the cover plate over the top of the vent cover flange. Parts List • Product literature • Vent cover • Anchoring legs • 2 wood screws, #14 x 2 1/2 (PN 83047) • 3 wire nuts • 2 sheet...
Installation Guide
Page 13
... internal moving parts, make sure the blower assembly is installed prior to final installation of raised vent (shown configured for the planned duct system layout. Possible Duct Hole Locations , Gently slide the vent into the rear of the countertop cutout with the electrical access panel toward the front. , Adjust the anchoring leg height so that the foam tape on both sides of the base plate creates...
... internal moving parts, make sure the blower assembly is installed prior to final installation of raised vent (shown configured for the planned duct system layout. Possible Duct Hole Locations , Gently slide the vent into the rear of the countertop cutout with the electrical access panel toward the front. , Adjust the anchoring leg height so that the foam tape on both sides of the base plate creates...


