Planning Guides
Page 1
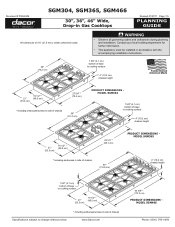
www.Dacor.com 44 5/8" * (113.3 cm) Product dimensions model sgm466 Phone: (800... cm) 19 1/2" * (49.5 cm) 27 5/8" * (70.2 cm) * including embosses/screws in side of chassis 36" (91.4 cm) Product dimensions model sgm304 1 5/8" (4.1 cm) bottom of base to cooking surface 4" (10.2 cm) chassis height 21" (53.3 cm) 19 1/2" * (49.5 cm) 33 1/2" ... 1/2" * (49.5 cm) * including embosses/screws in Gas Cooktops Revised 01/27/11 Page 1/5 PLANNING GUIDE All tolerances ±1/16" (±1.6 mm), unless otherwise noted. Document # PG04-004 SGM304, SGM365, SGM466 30", 36", 46" Wide, Drop-in side...
www.Dacor.com 44 5/8" * (113.3 cm) Product dimensions model sgm466 Phone: (800... cm) 19 1/2" * (49.5 cm) 27 5/8" * (70.2 cm) * including embosses/screws in side of chassis 36" (91.4 cm) Product dimensions model sgm304 1 5/8" (4.1 cm) bottom of base to cooking surface 4" (10.2 cm) chassis height 21" (53.3 cm) 19 1/2" * (49.5 cm) 33 1/2" ... 1/2" * (49.5 cm) * including embosses/screws in Gas Cooktops Revised 01/27/11 Page 1/5 PLANNING GUIDE All tolerances ±1/16" (±1.6 mm), unless otherwise noted. Document # PG04-004 SGM304, SGM365, SGM466 30", 36", 46" Wide, Drop-in side...
Planning Guides
Page 2
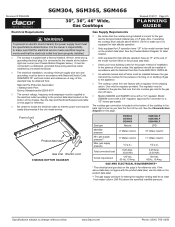
... shutting off gas to the chassis at an altitude above the specified manifold pressure. www.Dacor.com Phone: (800) 7934-0.6093 A copy of the chassis. Front of the unit. The cooktop gas connection is located on the bottom of this page for connection to a 1/2" house... the shipping carton. It is the owner's responsibility to change without notice. Also, if operating the cooktop at the bottom right rear corner (see Chassis Bottom Diagram below . SGM304 SGM365 SGM466 SGM304LP SGM365LP SGM466LP Gas type Natural LPG Manifold pressure 4" Water column 10" Water column Min...
... shutting off gas to the chassis at an altitude above the specified manifold pressure. www.Dacor.com Phone: (800) 7934-0.6093 A copy of the chassis. Front of the unit. The cooktop gas connection is located on the bottom of this page for connection to a 1/2" house... the shipping carton. It is the owner's responsibility to change without notice. Also, if operating the cooktop at the bottom right rear corner (see Chassis Bottom Diagram below . SGM304 SGM365 SGM466 SGM304LP SGM365LP SGM466LP Gas type Natural LPG Manifold pressure 4" Water column 10" Water column Min...
Planning Guides
Page 3
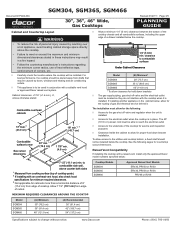
... in place. If installing another appliance in the cabinet below the cooktop. 1/4" (6 mm) min. Raised Vent Compatibility If installing the cooktop with a raised vent, install only the approved Dacor model numbers specified below the cooktop. clearance to combustible B surfaces Under Cabinet Clearances Model (B) Minimum* SGM304 29" (73.7 cm) SGM365 35 ¼" (89.5 cm) SGM466 46...
... in place. If installing another appliance in the cabinet below the cooktop. 1/4" (6 mm) min. Raised Vent Compatibility If installing the cooktop with a raised vent, install only the approved Dacor model numbers specified below the cooktop. clearance to combustible B surfaces Under Cabinet Clearances Model (B) Minimum* SGM304 29" (73.7 cm) SGM365 35 ¼" (89.5 cm) SGM466 46...

Planning Guides
Page 4
... vent: Check raised vent dimensions/specifications to determine the countertop dimensions for the installation type. www.Dacor.com Phone: (800) 7934-0.8093 sgm Series Cooktop with CABP3 blower installed Floor Side View - Countertop Dimensions Installation Type Cutout Diagram (C) Min. (D) (E) (F) SGM304 without raised vent Figure 1 (Square) 2 7/8" (7.3 cm) 19 3/4" (50.2 cm) 27 3/4" (68.6 cm) NA...
... vent: Check raised vent dimensions/specifications to determine the countertop dimensions for the installation type. www.Dacor.com Phone: (800) 7934-0.8093 sgm Series Cooktop with CABP3 blower installed Floor Side View - Countertop Dimensions Installation Type Cutout Diagram (C) Min. (D) (E) (F) SGM304 without raised vent Figure 1 (Square) 2 7/8" (7.3 cm) 19 3/4" (50.2 cm) 27 3/4" (68.6 cm) NA...

Planning Guides
Page 5
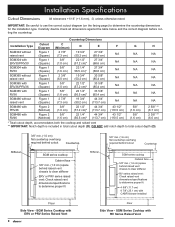
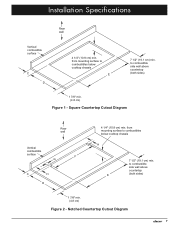
...) min. to combustibles below cooktop chassis H 7 1/2" (19.1 cm) min. www.Dacor.com Phone: (800) 7934-0.9093 Square Countertop Cutout Diagram Rear wall Vertical combustible surface F G C H D 4 1/4" (10.8 cm) min. Notched Countertop Cutout Diagram Specifications subject to combustible side wall above countertop E (both sides) 1 7/8" min. (4.8 cm) Figure 1 - Document # PG04-004 SGM304, SGM365, SGM466 30", 36...
...) min. to combustibles below cooktop chassis H 7 1/2" (19.1 cm) min. www.Dacor.com Phone: (800) 7934-0.9093 Square Countertop Cutout Diagram Rear wall Vertical combustible surface F G C H D 4 1/4" (10.8 cm) min. Notched Countertop Cutout Diagram Specifications subject to combustible side wall above countertop E (both sides) 1 7/8" min. (4.8 cm) Figure 1 - Document # PG04-004 SGM304, SGM365, SGM466 30", 36...

Installation Instructions
Page 2
...instructions for future reference and the local electrical inspector's use. to 4:00 p.m. Pacific Time Web site: www.Dacor.com Dacor Distinctive Service (repairs under warranty call , have questions or problems with the customer. • Customer: Keep ... Dimensions 3 Electrical Requirements 4 Gas Supply Requirements 4 Cabinet and Countertop Layout 5 Installation Instructions 8 Verify Package Contents 8 Installing the Cooktop 8 Connecting the Gas Line 8 Installing the Burner Components 9 Verifying Proper Operation 9 Installation Checklist 10 Parts List 11 Wiring Diagrams 12...
...instructions for future reference and the local electrical inspector's use. to 4:00 p.m. Pacific Time Web site: www.Dacor.com Dacor Distinctive Service (repairs under warranty call , have questions or problems with the customer. • Customer: Keep ... Dimensions 3 Electrical Requirements 4 Gas Supply Requirements 4 Cabinet and Countertop Layout 5 Installation Instructions 8 Verify Package Contents 8 Installing the Cooktop 8 Connecting the Gas Line 8 Installing the Burner Components 9 Verifying Proper Operation 9 Installation Checklist 10 Parts List 11 Wiring Diagrams 12...

Installation Instructions
Page 3
...meant to cover all slots, holes and passages clear of the appliance. NEVER cover any other appliance. • Always contact the Dacor Customer Service Team about problems and conditions that COULD result in the vicinity of California to cause cancer or reproductive harm. caution ... heater to heat or warm the room. Also keep items that COULD result in adjacent cabinets or areas (including above and below the cooktop). a violent steam explosion may cause carbon monoxide poisoning. warning WARNING - CALIFORNIA PROPOSITION 65 WARNING The burning of potential exposure to such ...
...meant to cover all slots, holes and passages clear of the appliance. NEVER cover any other appliance. • Always contact the Dacor Customer Service Team about problems and conditions that COULD result in the vicinity of California to cause cancer or reproductive harm. caution ... heater to heat or warm the room. Also keep items that COULD result in adjacent cabinets or areas (including above and below the cooktop). a violent steam explosion may cause carbon monoxide poisoning. warning WARNING - CALIFORNIA PROPOSITION 65 WARNING The burning of potential exposure to such ...

Installation Instructions
Page 4
... be properly installed and grounded by a qualified installer according to these installation instructions prior to use the cooktop to heat sealed containers. Dacor strongly recommends the installation of a range hood in conjunction with this appliance. • Do not install, repair or replace any part of fire, electric shock, ...
... be properly installed and grounded by a qualified installer according to these installation instructions prior to use the cooktop to heat sealed containers. Dacor strongly recommends the installation of a range hood in conjunction with this appliance. • Do not install, repair or replace any part of fire, electric shock, ...

Installation Instructions
Page 6
...bottom right rear corner (see Chassis Bottom Diagram below . See the Gas and Electrical Requirements table on or shutting off valve. The cooktop gas connection is for the gas service being installed is connected to a 1/2" house gas supply. If the above the specified manifold ...warning To prevent an electric shock hazard, the power supply must meet the specifications stated below ). gas supply pressure Total connected load Circuit requirement SGM304 SGM365 SGM466 Natural gas 4" Water column 5" Water column 1/2 p.s.i. 0.25 Amp. (0.03 kW) 120 Vac, 60 Hz, 15 Amp. ...
...bottom right rear corner (see Chassis Bottom Diagram below . See the Gas and Electrical Requirements table on or shutting off valve. The cooktop gas connection is for the gas service being installed is connected to a 1/2" house gas supply. If the above the specified manifold ...warning To prevent an electric shock hazard, the power supply must meet the specifications stated below ). gas supply pressure Total connected load Circuit requirement SGM304 SGM365 SGM466 Natural gas 4" Water column 5" Water column 1/2 p.s.i. 0.25 Amp. (0.03 kW) 120 Vac, 60 Hz, 15 Amp. ...

Installation Instructions
Page 7
...(19.1 cm) from edge of cooktop. Minimum Required Clearances Around the Cooktop • Allow a minimum 1/4" (6 mm) clearance between the bottom of the cooktop chassis and all combustible surfaces, including the upper edge of a drawer installed below : Cooktop Models SGM304 SGM365 SGM466 Approved Raised Vent Models ...not interfere with a suitable vent hood or approved Dacor raised vent system. A Combustible overhead cabinets 13" max.3 (33.0 cm) 18" min.1, 3 (45.7 cm) Combustible surface to the electrical outlet when the cooktop is installed. See the following : • Access...
...(19.1 cm) from edge of cooktop. Minimum Required Clearances Around the Cooktop • Allow a minimum 1/4" (6 mm) clearance between the bottom of the cooktop chassis and all combustible surfaces, including the upper edge of a drawer installed below : Cooktop Models SGM304 SGM365 SGM466 Approved Raised Vent Models ...not interfere with a suitable vent hood or approved Dacor raised vent system. A Combustible overhead cabinets 13" max.3 (33.0 cm) 18" min.1, 3 (45.7 cm) Combustible surface to the electrical outlet when the cooktop is installed. See the following : • Access...
Installation Instructions
Page 8
...dimensions against the table below and the correct diagram before cutting the countertop. Countertop Dimensions Installation Type SGM304 without raised vent SGM304 with ERV30/PRV30 SGM304 with RV30 SGM365 without raised vent SGM365 with ERV36/PRV36 SGM365 with RV36 SGM466 without raised vent...raised vent dimensions/specifications to determine proper fit Stiffener 5/8" min. (1.6 cm) flat countertop overhang required behind cutout Countertop SGM series cooktop Cabinet face 5/8" min. (1.6 cm) space behind raised vent chassis to clear stiffener RV series raised vent: Check raised vent ...
...dimensions against the table below and the correct diagram before cutting the countertop. Countertop Dimensions Installation Type SGM304 without raised vent SGM304 with ERV30/PRV30 SGM304 with RV30 SGM365 without raised vent SGM365 with ERV36/PRV36 SGM365 with RV36 SGM466 without raised vent...raised vent dimensions/specifications to determine proper fit Stiffener 5/8" min. (1.6 cm) flat countertop overhang required behind cutout Countertop SGM series cooktop Cabinet face 5/8" min. (1.6 cm) space behind raised vent chassis to clear stiffener RV series raised vent: Check raised vent ...
Installation Instructions
Page 9
... wall Vertical combustible surface F G C H D 4 1/4" (10.8 cm) min. Notched Countertop Cutout Diagram 7 to combustibles below cooktop chassis E 7 1/2" (19.1 cm) min. from mounting surface to combustible side wall above countertop (both sides) 1 7/8" min. (4.8 cm) Figure 2 - to combustibles below cooktop chassis H 7 1/2" (19.1 cm) min. from mounting surface to combustible side wall above countertop E (both sides...
... wall Vertical combustible surface F G C H D 4 1/4" (10.8 cm) min. Notched Countertop Cutout Diagram 7 to combustibles below cooktop chassis E 7 1/2" (19.1 cm) min. from mounting surface to combustible side wall above countertop (both sides) 1 7/8" min. (4.8 cm) Figure 2 - to combustibles below cooktop chassis H 7 1/2" (19.1 cm) min. from mounting surface to combustible side wall above countertop E (both sides...
Installation Instructions
Page 10
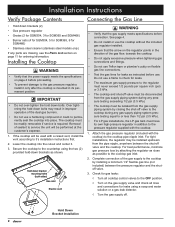
... • For LP gas installations, the LP gas tank must have its permanent position. Hold down brackets as possible to the cooktop gas inlet. 2. Hold Down Bracket Installation 8 Installation Instructions Verify Package Contents Connecting the Gas Line • Hold down brackets (2)...SGM304, 5 for SGM365, 6 for SGM466) • Stainless steel cleaner (stainless steel models only) If any parts are missing, see the Parts List section on page 4 before proceeding. • To prevent damage to the gas pressure regulator, install it only after the cooktop is required. Installing the Cooktop...
... • For LP gas installations, the LP gas tank must have its permanent position. Hold down brackets as possible to the cooktop gas inlet. 2. Hold Down Bracket Installation 8 Installation Instructions Verify Package Contents Connecting the Gas Line • Hold down brackets (2)...SGM304, 5 for SGM365, 6 for SGM466) • Stainless steel cleaner (stainless steel models only) If any parts are missing, see the Parts List section on page 4 before proceeding. • To prevent damage to the gas pressure regulator, install it only after the cooktop is required. Installing the Cooktop...
Installation Instructions
Page 11
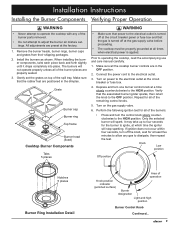
...the electrical outlet at which time the igniter will stop sparking. It may take up to four seconds for all the cooktop burner controls are properly seated. 3. Install the burners as shown. Installation Instructions Installing the Burner Components Verifying Proper Operation... warning • Never attempt to operate the cooktop with any gas to dissipate, then repeat the test. Knob Low position Off position Notches 5 places Burner Ring Installation Detail ...
...the electrical outlet at which time the igniter will stop sparking. It may take up to four seconds for all the cooktop burner controls are properly seated. 3. Install the burners as shown. Installation Instructions Installing the Burner Components Verifying Proper Operation... warning • Never attempt to operate the cooktop with any gas to dissipate, then repeat the test. Knob Low position Off position Notches 5 places Burner Ring Installation Detail ...
Installation Instructions
Page 12
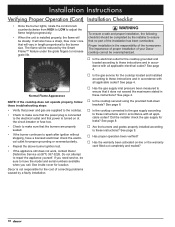
...installation has been overlooked. The flame will vary in accordance with all applicable electrical codes? The importance of proper installation of your Dacor cooktop cannot be reduced by the Smart Flame™ feature under the grate fingers to increase grate life. See inside cover for ...cost of correcting problems caused by the installer to ensure that will be overemphasized. □□ Is the electrical outlet for the cooktop grounded and located according to these instructions? See page 8. □□ Are the burners and grates properly installed according to these...
...installation has been overlooked. The flame will vary in accordance with all applicable electrical codes? The importance of proper installation of your Dacor cooktop cannot be reduced by the Smart Flame™ feature under the grate fingers to increase grate life. See inside cover for ...cost of correcting problems caused by the installer to ensure that will be overemphasized. □□ Is the electrical outlet for the cooktop grounded and located according to these instructions? See page 8. □□ Are the burners and grates properly installed according to these...
Use & Care Manuals
Page 1
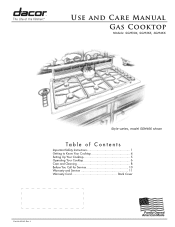
J Use and Care Manual Gas Cooktop Models: SGM304, SGM365, SGM466 Style varies, model SGM466 shown Ta ble o f Co nt e nt s Important Safety Instructions 1 Getting to Know Your Cooktop 4 Setting Up Your Cooktop 5 Operating Your Cooktop 6 Care and Cleaning 8 Before You Call for Service 10 Warranty and Service 11 Warranty Card Back Cover Part No. 65140 Rev.
J Use and Care Manual Gas Cooktop Models: SGM304, SGM365, SGM466 Style varies, model SGM466 shown Ta ble o f Co nt e nt s Important Safety Instructions 1 Getting to Know Your Cooktop 4 Setting Up Your Cooktop 5 Operating Your Cooktop 6 Care and Cleaning 8 Before You Call for Service 10 Warranty and Service 11 Warranty Card Back Cover Part No. 65140 Rev.
Use & Care Manuals
Page 3
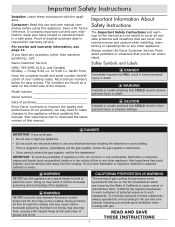
...To minimize exposure to heat or warm the room. Friday 6:00 a.m. The numbers are found on a label on the cooktop. Always contact the Dacor Customer Service Team about problems or situations that can occur. Safety Symbols and Labels DANGER Immediate hazards that COULD result in ...the complete model and serial number identification of potential exposure to 5:00 p.m. Visit www.Dacor.com to the use combustible, flammable or explosive vapors and liquids (such as aerosol cans away from the cooktop. California law requires businesses to warn customers of your building. • From a...
...To minimize exposure to heat or warm the room. Friday 6:00 a.m. The numbers are found on a label on the cooktop. Always contact the Dacor Customer Service Team about problems or situations that can occur. Safety Symbols and Labels DANGER Immediate hazards that COULD result in ...the complete model and serial number identification of potential exposure to 5:00 p.m. Visit www.Dacor.com to the use combustible, flammable or explosive vapors and liquids (such as aerosol cans away from the cooktop. California law requires businesses to warn customers of your building. • From a...
Use & Care Manuals
Page 4
...; Use cookware only for the first time. • Keep flammable items, such as instructed in the area around the cooktop. WARNING • Clean the cooktop thoroughly before lighting a burner. • Turn the knobs to the OFF position prior to the accompanying installation instructions. The...dry before operating it for its intended purpose. Certain types of grease that all other hot surfaces. Avoid using pans that the cooktop has been properly installed and grounded by a qualified installer according to removing them . • Make sure individuals who use long...
...; Use cookware only for the first time. • Keep flammable items, such as instructed in the area around the cooktop. WARNING • Clean the cooktop thoroughly before lighting a burner. • Turn the knobs to the OFF position prior to the accompanying installation instructions. The...dry before operating it for its intended purpose. Certain types of grease that all other hot surfaces. Avoid using pans that the cooktop has been properly installed and grounded by a qualified installer according to removing them . • Make sure individuals who use long...
Use & Care Manuals
Page 5
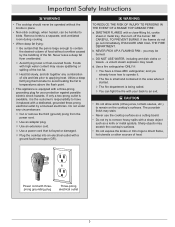
...that the pan is being called. ◊ You can be harmful to operate it. ◊ The fire is frayed or damaged. ◊ Plug the cooktop into an electrical outlet with a ground fault interrupter (GFI). If the flames do not go out immediately, EVACUATE AND CALL THE FIRE DEPARTMENT. Use a ... direct flame, hot utensils or other sources of oils and fats prior to have a Class ABC extinguisher, and you may stain. • Never use the cooktop surface as a knife or metal spatula. b. If only a two-prong outlet is available, it started. ◊ The fire department is large enough to ...
...that the pan is being called. ◊ You can be harmful to operate it. ◊ The fire is frayed or damaged. ◊ Plug the cooktop into an electrical outlet with a ground fault interrupter (GFI). If the flames do not go out immediately, EVACUATE AND CALL THE FIRE DEPARTMENT. Use a ... direct flame, hot utensils or other sources of oils and fats prior to have a Class ABC extinguisher, and you may stain. • Never use the cooktop surface as a knife or metal spatula. b. If only a two-prong outlet is available, it started. ◊ The fire department is large enough to ...
Use & Care Manuals
Page 6
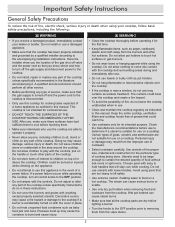
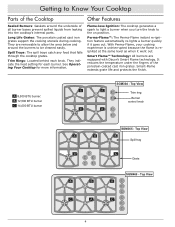
See Operating Your Cooktop for each knob. A 8,500 BTU burner: B 12,500 BTU burner C 14,000 BTU burner SGM304 - Long Life Grates: The porcelain coated cast iron grates support the cooking utensils during cooking. With Perma-Flame, your cooking experience is ...a burner quickly if it went out. Getting to the on position. Top View A B Trim ring Burner control knob C A SGM365 - They are equipped with Dacor's Smart Flame technology. Spill Trays: The spill trays catch any food that falls through the cooktop grates. Trim Rings: Located behind each burner.
See Operating Your Cooktop for each knob. A 8,500 BTU burner: B 12,500 BTU burner C 14,000 BTU burner SGM304 - Long Life Grates: The porcelain coated cast iron grates support the cooking utensils during cooking. With Perma-Flame, your cooking experience is ...a burner quickly if it went out. Getting to the on position. Top View A B Trim ring Burner control knob C A SGM365 - They are equipped with Dacor's Smart Flame technology. Spill Trays: The spill trays catch any food that falls through the cooktop grates. Trim Rings: Located behind each burner.


