Planning Guides
Page 1
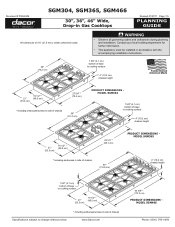
...in side of chassis 46" (116.8 cm) Product dimensions model sgm365 4" (10.2 cm) chassis height 1 5/8" (4.1 cm) bottom of base to cooking surface 21" (53.3 cm) 19 1/2" * (49.5 cm) * including embosses/screws in Gas Cooktops Revised 01/27/11 Page 1/5 PLANNING GUIDE All tolerances ±1/...16" (±1.6 mm), unless otherwise noted. Document # PG04-004 SGM304, SGM365, SGM466 30", 36", 46" Wide, Drop-in side of chassis Specifications subject to change without notice. www.Dacor.com 44 5/8"...
...in side of chassis 46" (116.8 cm) Product dimensions model sgm365 4" (10.2 cm) chassis height 1 5/8" (4.1 cm) bottom of base to cooking surface 21" (53.3 cm) 19 1/2" * (49.5 cm) * including embosses/screws in Gas Cooktops Revised 01/27/11 Page 1/5 PLANNING GUIDE All tolerances ±1/...16" (±1.6 mm), unless otherwise noted. Document # PG04-004 SGM304, SGM365, SGM466 30", 36", 46" Wide, Drop-in side of chassis Specifications subject to change without notice. www.Dacor.com 44 5/8"...
Planning Guides
Page 2
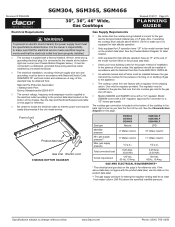
...gas inlet and the cooktop for the purpose of this standard may be supplied to the electrical outlet according to the gas shut off gas...Gas Code ... gas ...Gas and Electrical Requirements* * The electrical and gas data on this page is the owner's responsibility to a 1/2" house gas supply. See the Gas...cooktop comes from the cooktop gas inlet to the product data label located on the product data label. The cooktop gas...cooktop being provided (natural gas or LP gas). Front of installation. SGM304, SGM365, SGM466 Document # PG04-004 30", 36", 46" Wide, Gas Cooktops...gas...
...gas inlet and the cooktop for the purpose of this standard may be supplied to the electrical outlet according to the gas shut off gas...Gas Code ... gas ...Gas and Electrical Requirements* * The electrical and gas data on this page is the owner's responsibility to a 1/2" house gas supply. See the Gas...cooktop comes from the cooktop gas inlet to the product data label located on the product data label. The cooktop gas...cooktop being provided (natural gas or LP gas). Front of installation. SGM304, SGM365, SGM466 Document # PG04-004 30", 36", 46" Wide, Gas Cooktops...gas...
Planning Guides
Page 3
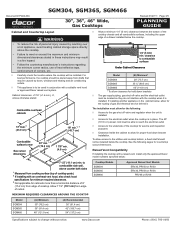
...a hot appliance, avoid locating cabinet storage space directly above counter both sides 1 Measured from cooking surface (top of cooktop grate). 2 If installing with a raised vent, install only the approved Dacor model numbers specified below: 7 1/2" (19.1 cm) min. Cabinet tolerances: +1/16" (+1.6 mm), -0, unless ... cm) SGM466 46" (116.8 cm) * To allow for the routing of gas and electrical service behind it is installed. Document # PG04-004 SGM304, SGM365, SGM466 30", 36", 46" Wide, Gas Cooktops Revised 01/27/11 Page 3/5 PLANNING GUIDE Cabinet and Countertop Layout WARNING •...
...a hot appliance, avoid locating cabinet storage space directly above counter both sides 1 Measured from cooking surface (top of cooktop grate). 2 If installing with a raised vent, install only the approved Dacor model numbers specified below: 7 1/2" (19.1 cm) min. Cabinet tolerances: +1/16" (+1.6 mm), -0, unless ... cm) SGM466 46" (116.8 cm) * To allow for the routing of gas and electrical service behind it is installed. Document # PG04-004 SGM304, SGM365, SGM466 30", 36", 46" Wide, Gas Cooktops Revised 01/27/11 Page 3/5 PLANNING GUIDE Cabinet and Countertop Layout WARNING •...

Planning Guides
Page 4
... Document # PG04-004 SGM304, SGM365, SGM466 30", 36", 46" Wide, Gas Cooktops Revised 01/27/11 Page 4/5 ... SGM304 with RV30 SGM365 without raised vent SGM365 with ERV36 or PRV36 SGM365 with CABP3 blower ...installed Floor Side View - Carefully double check all dimensions against the table below and the correct diagram before cutting the countertop. sgm Series Cooktop...cooktop and raised vent ** IMPORTANT: Notch depth is included in total cutout depth (D). sgm Series Cooktop...behind cutout Countertop SGM series cooktop Cabinet face 5/8" min....
... Document # PG04-004 SGM304, SGM365, SGM466 30", 36", 46" Wide, Gas Cooktops Revised 01/27/11 Page 4/5 ... SGM304 with RV30 SGM365 without raised vent SGM365 with ERV36 or PRV36 SGM365 with CABP3 blower ...installed Floor Side View - Carefully double check all dimensions against the table below and the correct diagram before cutting the countertop. sgm Series Cooktop...cooktop and raised vent ** IMPORTANT: Notch depth is included in total cutout depth (D). sgm Series Cooktop...behind cutout Countertop SGM series cooktop Cabinet face 5/8" min....

Planning Guides
Page 5
... (4.8 cm) Figure 2 - to combustibles below cooktop chassis E 7 1/2" (19.1 cm) min. Document # PG04-004 SGM304, SGM365, SGM466 30", 36", 46" Wide, Gas Cooktops Cutout tolerances +1/16" (+1.6 mm), -0, unless ...otherwise noted Rear wall Revised 01/27/11 Page 5/5 PLANNING GUIDE Vertical combustible surface C D 4 1/4" (10.8 cm) min. to change without notice. Square Countertop Cutout Diagram Rear wall Vertical combustible surface F G C H D 4 1/4" (10.8 cm) min. www.Dacor...
... (4.8 cm) Figure 2 - to combustibles below cooktop chassis E 7 1/2" (19.1 cm) min. Document # PG04-004 SGM304, SGM365, SGM466 30", 36", 46" Wide, Gas Cooktops Cutout tolerances +1/16" (+1.6 mm), -0, unless ...otherwise noted Rear wall Revised 01/27/11 Page 5/5 PLANNING GUIDE Vertical combustible surface C D 4 1/4" (10.8 cm) min. to change without notice. Square Countertop Cutout Diagram Rear wall Vertical combustible surface F G C H D 4 1/4" (10.8 cm) min. www.Dacor...

Installation Instructions
Page 2
... product data label. and Canada) Monday - to specifications. © 2007 Dacor, all rights reserved. Pacific Time Web site: www.Dacor.com Dacor Distinctive Service (repairs under warranty call , have questions or problems with the ... Safety Precautions 2 Installation Specifications 3 Product Dimensions 3 Electrical Requirements 4 Gas Supply Requirements 4 Cabinet and Countertop Layout 5 Installation Instructions 8 Verify Package Contents 8 Installing the Cooktop 8 Connecting the Gas Line 8 Installing the Burner Components 9 Verifying Proper Operation 9 Installation...
... product data label. and Canada) Monday - to specifications. © 2007 Dacor, all rights reserved. Pacific Time Web site: www.Dacor.com Dacor Distinctive Service (repairs under warranty call , have questions or problems with the ... Safety Precautions 2 Installation Specifications 3 Product Dimensions 3 Electrical Requirements 4 Gas Supply Requirements 4 Cabinet and Countertop Layout 5 Installation Instructions 8 Verify Package Contents 8 Installing the Cooktop 8 Connecting the Gas Line 8 Installing the Burner Components 9 Verifying Proper Operation 9 Installation...

Installation Instructions
Page 3
...and passages clear of this or any other appliance. • Always contact the Dacor Customer Service Team about problems and conditions that could explode, such as aerosol cans, away from the cooktop. DANGER IMPORTANT: If you smell gas: • Do not use or light any appliance. • Do not ... unsafe practices that COULD result in adjacent cabinets or areas (including above and below the cooktop). NEVER PICK UP A FLAMING PAN - DO NOT USE WATER, including wet dish cloths or towels - Follow the gas supplier's instructions. • If you may be burned. Do not store flammable or ...
...and passages clear of this or any other appliance. • Always contact the Dacor Customer Service Team about problems and conditions that could explode, such as aerosol cans, away from the cooktop. DANGER IMPORTANT: If you smell gas: • Do not use or light any appliance. • Do not ... unsafe practices that COULD result in adjacent cabinets or areas (including above and below the cooktop). NEVER PICK UP A FLAMING PAN - DO NOT USE WATER, including wet dish cloths or towels - Follow the gas supplier's instructions. • If you may be burned. Do not store flammable or ...

Installation Instructions
Page 4
... burned or injured while climbing on top of outlet is near a window, do not use the cooktop to make sure that the gas supply is turned off at the gas supply valve and that the power plug is disconnected from the electrical outlet. • Disconnect the...children alone or unattended in conjunction with a ground fault interrupter (GFI). 2 Dacor strongly recommends the installation of a range hood in the area around the cooktop. Children could blow over the cooktop. • Do not climb on the cooktop. The container and contents may explode, causing personal injury. • If...
... burned or injured while climbing on top of outlet is near a window, do not use the cooktop to make sure that the gas supply is turned off at the gas supply valve and that the power plug is disconnected from the electrical outlet. • Disconnect the...children alone or unattended in conjunction with a ground fault interrupter (GFI). 2 Dacor strongly recommends the installation of a range hood in the area around the cooktop. Children could blow over the cooktop. • Do not climb on the cooktop. The container and contents may explode, causing personal injury. • If...

Installation Instructions
Page 6
Front of unit Product data label Gas inlet Electric cord Chassis Bottom Diagram • Be certain that the cooktop being provided (natural gas or LP gas). Gas type Manifold pressure Min. gas supply pressure Total connected load Circuit requirement SGM304 SGM365 SGM466 Natural gas 4" Water column 5" Water column 1/2 p.s.i. 0.25 Amp. (0.03 kW) 120 Vac, 60 Hz, 15 Amp. SGM304LP...
Front of unit Product data label Gas inlet Electric cord Chassis Bottom Diagram • Be certain that the cooktop being provided (natural gas or LP gas). Gas type Manifold pressure Min. gas supply pressure Total connected load Circuit requirement SGM304 SGM365 SGM466 Natural gas 4" Water column 5" Water column 1/2 p.s.i. 0.25 Amp. (0.03 kW) 120 Vac, 60 Hz, 15 Amp. SGM304LP...

Installation Instructions
Page 7
...appliance in the cabinet below : Cooktop Models SGM304 SGM365 SGM466 Approved Raised Vent Models ERV30, PRV30 or RV30 ERV36, PRV36 or RV36 PRV46 or RV46 Model SGM304 SGM365 SGM466 A: Minimum 30" (76...down brackets • The gas supply piping, gas shut-off valve and regulator when the unit is installed. • Access to the electrical outlet when the cooktop is installed. Allow 7 ... is to be used in conjunction with a suitable vent hood or approved Dacor raised vent system. to combustible side wall, above the cooktop. • Failure to rear See cutout dimensions 30" min.1, 2 (76...
...appliance in the cabinet below : Cooktop Models SGM304 SGM365 SGM466 Approved Raised Vent Models ERV30, PRV30 or RV30 ERV36, PRV36 or RV36 PRV46 or RV46 Model SGM304 SGM365 SGM466 A: Minimum 30" (76...down brackets • The gas supply piping, gas shut-off valve and regulator when the unit is installed. • Access to the electrical outlet when the cooktop is installed. Allow 7 ... is to be used in conjunction with a suitable vent hood or approved Dacor raised vent system. to combustible side wall, above the cooktop. • Failure to rear See cutout dimensions 30" min.1, 2 (76...
Installation Instructions
Page 10
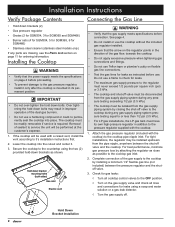
... install or use the cooktop without the included gas regulator installed. • Ensure that the arrow on flexible gas line connections. • Test the gas lines for leaks. • The maximum gas supply pressure to the ...cooktop is required. Complete connection of sealant to service the unit will be disconnected from the pipe nipple, anywhere between the pressure regulator and the shutoff valve. 3. Installation Instructions Verify Package Contents Connecting the Gas Line • Hold down brackets (2) • Gas pressure regulator • Grates (2 for SGM304, 3 for SGM365...
... install or use the cooktop without the included gas regulator installed. • Ensure that the arrow on flexible gas line connections. • Test the gas lines for leaks. • The maximum gas supply pressure to the ...cooktop is required. Complete connection of sealant to service the unit will be disconnected from the pipe nipple, anywhere between the pressure regulator and the shutoff valve. 3. Installation Instructions Verify Package Contents Connecting the Gas Line • Hold down brackets (2) • Gas pressure regulator • Grates (2 for SGM304, 3 for SGM365...
Installation Instructions
Page 11
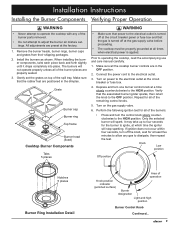
...Components Tabs 5 places warning • Make sure that power to the electrical outlet is turned off at the gas supply valve before proceeding. • The cooktop must be properly grounded at the circuit breaker panel or fuse box and that the rubber feet are in the... breaker or fuse box. 4. Installation Instructions Installing the Burner Components Verifying Proper Operation warning • Never attempt to operate the cooktop with any gas to dissipate, then repeat the test. When installing the burner components, twist each piece back and forth slightly until it drops completely...
...Components Tabs 5 places warning • Make sure that power to the electrical outlet is turned off at the gas supply valve before proceeding. • The cooktop must be properly grounded at the circuit breaker panel or fuse box and that the rubber feet are in the... breaker or fuse box. 4. Installation Instructions Installing the Burner Components Verifying Proper Operation warning • Never attempt to operate the cooktop with any gas to dissipate, then repeat the test. When installing the burner components, twist each piece back and forth slightly until it drops completely...
Installation Instructions
Page 12
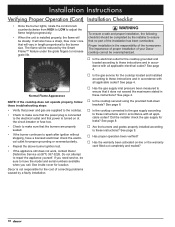
.... Do not attempt to these instructions and in these troubleshooting steps: • Verify that power and gas are properly seated. • If the burner continues to increase grate life. Dacor is not responsible for the cooktop located and installed according to these instructions? Proper installation is turned on -line or the warranty card...
.... Do not attempt to these instructions and in these troubleshooting steps: • Verify that power and gas are properly seated. • If the burner continues to increase grate life. Dacor is not responsible for the cooktop located and installed according to these instructions? Proper installation is turned on -line or the warranty card...
Use & Care Manuals
Page 1
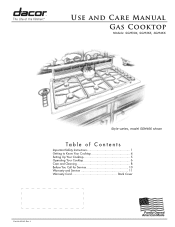
J Use and Care Manual Gas Cooktop Models: SGM304, SGM365, SGM466 Style varies, model SGM466 shown Ta ble o f Co nt e nt s Important Safety Instructions 1 Getting to Know Your Cooktop 4 Setting Up Your Cooktop 5 Operating Your Cooktop 6 Care and Cleaning 8 Before You Call for Service 10 Warranty and Service 11 Warranty Card Back Cover Part No. 65140 Rev.
J Use and Care Manual Gas Cooktop Models: SGM304, SGM365, SGM466 Style varies, model SGM466 shown Ta ble o f Co nt e nt s Important Safety Instructions 1 Getting to Know Your Cooktop 4 Setting Up Your Cooktop 5 Operating Your Cooktop 6 Care and Cleaning 8 Before You Call for Service 10 Warranty and Service 11 Warranty Card Back Cover Part No. 65140 Rev.
Use & Care Manuals
Page 3
...that WILL result in the vicinity of our products, we may cause carbon monoxide poisoning. Keep your cooktop ready. Model number Serial number Date of purchase Since Dacor continues to the appliance without updating this appliance as gasoline) inside or in severe personal injury or ...and situations that COULD result in adjacent cabinets or areas. READ AND SAVE THESE INSTRUCTIONS 1 CALIFORNIA PROPOSITION 65 WARNING The burning of gas cooking fuel generates some by the State of the chassis. WARNING NEVER use combustible, flammable or explosive vapors and liquids (such as...
...that WILL result in the vicinity of our products, we may cause carbon monoxide poisoning. Keep your cooktop ready. Model number Serial number Date of purchase Since Dacor continues to the appliance without updating this appliance as gasoline) inside or in severe personal injury or ...and situations that COULD result in adjacent cabinets or areas. READ AND SAVE THESE INSTRUCTIONS 1 CALIFORNIA PROPOSITION 65 WARNING The burning of gas cooking fuel generates some by the State of the chassis. WARNING NEVER use combustible, flammable or explosive vapors and liquids (such as...
Use & Care Manuals
Page 4
... cause steam burns. • Make sure that the gas supply is turned off the gas supply and disconnect power to the cooktop. • Do not install, repair or replace any part of the cooktop unless specifically recommended in the area around the cooktop. Do not allow anyone, including children to sit, ...such as baby food jars and cans. Do not allow pot holders to touch hot surfaces or gas burners. • Do not wear loose or hanging apparel while using pans that the cooktop has been properly installed and grounded by a qualified installer according to play with the cover in these...
... cause steam burns. • Make sure that the gas supply is turned off the gas supply and disconnect power to the cooktop. • Do not install, repair or replace any part of the cooktop unless specifically recommended in the area around the cooktop. Do not allow anyone, including children to sit, ...such as baby food jars and cans. Do not allow pot holders to touch hot surfaces or gas burners. • Do not wear loose or hanging apparel while using pans that the cooktop has been properly installed and grounded by a qualified installer according to play with the cover in these...

Use & Care Manuals
Page 8
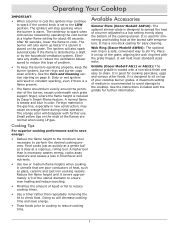
... a match or other open flame. • If the gas does not ignite after four seconds or if the flame goes out and gas escapes, turn it slowly counterclockwise to reposition them on the grate. Operating Your Cooktop Selecting the Cookware Lighting a Burner WARNING • NEVER cover...least five minutes for the food being cooked. Sliding may cause carbon monoxide poisoning. For overall safety and best cooktop performance, select the correct cooking utensil for the gas to the off when you turn the knob, the burner igniters will stop sparking when ignition occurs. 1.
... a match or other open flame. • If the gas does not ignite after four seconds or if the flame goes out and gas escapes, turn it slowly counterclockwise to reposition them on the grate. Operating Your Cooktop Selecting the Cookware Lighting a Burner WARNING • NEVER cover...least five minutes for the food being cooked. Sliding may cause carbon monoxide poisoning. For overall safety and best cooktop performance, select the correct cooking utensil for the gas to the off when you turn the knob, the burner igniters will stop sparking when ignition occurs. 1.
Use & Care Manuals
Page 9
...griddle for easy cleaning. Small yellow tips on page 8. See the instructions included with a non-stick finish and easy to the cooktop. Operating Your Cooktop IMPORTANT: • When a burner is cool the igniters may cause an orange flame during initial operation. The tendency to reduce...section starting on the ends of medium is recommended to avoid damage to clean. Foreign material in the gas line, especially in utensils that are normal when using LP gas. Griddle (Dacor Model# AG11 or AG13): The optional griddle is a safe, convenient way to reduce cooking time. ...
...griddle for easy cleaning. Small yellow tips on page 8. See the instructions included with a non-stick finish and easy to the cooktop. Operating Your Cooktop IMPORTANT: • When a burner is cool the igniters may cause an orange flame during initial operation. The tendency to reduce...section starting on the ends of medium is recommended to avoid damage to clean. Foreign material in the gas line, especially in utensils that are normal when using LP gas. Griddle (Dacor Model# AG11 or AG13): The optional griddle is a safe, convenient way to reduce cooking time. ...
Use & Care Manuals
Page 12
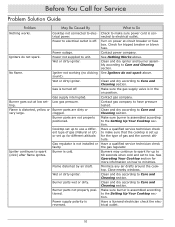
...Power supply polarity is in the on how to the Setting Up Your Cooktop section. Check to make sure that the cooktop is assembled according to minimize. Igniters do not spark above . See Nothing Works above . Contact gas company. ting. Burner is connected to make sure power cord is .... Before You Call for tripped breaker or blown fuse. No flame. Power not supplied to use a different type of gas and the correct altitude. Cooktop set up to unit. Gas regulator is not installed or faulty. Have a licensed electrician check the electrical outlet. 10
...Power supply polarity is in the on how to the Setting Up Your Cooktop section. Check to make sure that the cooktop is assembled according to minimize. Igniters do not spark above . See Nothing Works above . Contact gas company. ting. Burner is connected to make sure power cord is .... Before You Call for tripped breaker or blown fuse. No flame. Power not supplied to use a different type of gas and the correct altitude. Cooktop set up to unit. Gas regulator is not installed or faulty. Have a licensed electrician check the electrical outlet. 10


