Product Manual
Page 2
... care and maintenance of trouble free operation. To contact a Customer Service Representative, call Danby TOLL FREE: 1-800-26(1-800-263-2629) KEEP THESE INSTRUCTIONS FOR FUTURE REFERENCE. This Owner's Use and Care Guide will give you many years of your new appliance. WELCOME Thank you for choosing a Danby appliance to provide you and your family with all of the operational aspects of your home, cottage...
... care and maintenance of trouble free operation. To contact a Customer Service Representative, call Danby TOLL FREE: 1-800-26(1-800-263-2629) KEEP THESE INSTRUCTIONS FOR FUTURE REFERENCE. This Owner's Use and Care Guide will give you many years of your new appliance. WELCOME Thank you for choosing a Danby appliance to provide you and your family with all of the operational aspects of your home, cottage...
Product Manual
Page 3
... conditions and situations that is designed to operate on the power cord should be supplied by providing a path of Local and National Electrical codes. • It is the customer's responsibility to have a qualified electrician or your home has an effective ground, have the wiring and fuses checked by a 15 ampere fuse, equivalent fuse or circuit breaker. This appliance is equipped with the latest...
... conditions and situations that is designed to operate on the power cord should be supplied by providing a path of Local and National Electrical codes. • It is the customer's responsibility to have a qualified electrician or your home has an effective ground, have the wiring and fuses checked by a 15 ampere fuse, equivalent fuse or circuit breaker. This appliance is equipped with the latest...
Product Manual
Page 4
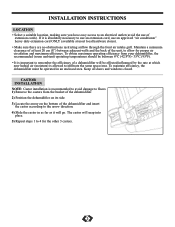
... ambient) operating temperatures should be between adjacent walls and the back of the dehumidifier and insert the castor according to the arrow direction. 4) Slide the castor in an enclosed area. INSTALLATION INSTRUCTIONS LOCATION • Select a suitable location, making sure you have easy access to an electrical outlet (avoid the use an approved "air conditioner" heavy duty extension cord ONLY (available...
... ambient) operating temperatures should be between adjacent walls and the back of the dehumidifier and insert the castor according to the arrow direction. 4) Slide the castor in an enclosed area. INSTALLATION INSTRUCTIONS LOCATION • Select a suitable location, making sure you have easy access to an electrical outlet (avoid the use an approved "air conditioner" heavy duty extension cord ONLY (available...
Product Manual
Page 5
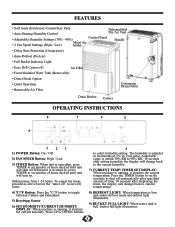
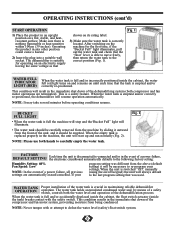
... 90%) Control Panel Handle • 2 Fan Speed Settings (High / Low) Moist Air Intake • Delay Start Protection (Compressor) • Auto-Defrost (De-Icer) • Full Bucket Indicator Light • Easy Roll Castors (4) Air Filter • Front Mounted Water Tank (Removable) • Direct Drain Option • Quiet Operation • Removable Air Filter Continuous Drain Outlet Drain Bucket Castors OPERATING INSTRUCTIONS 8 7 6 5 9 1 23 1) POWER Button: On / Off 2) FAN SPEED Button: High / Low 3) TIMER Button: When unit is operating, press TIMER to set number of hours...
... 90%) Control Panel Handle • 2 Fan Speed Settings (High / Low) Moist Air Intake • Delay Start Protection (Compressor) • Auto-Defrost (De-Icer) • Full Bucket Indicator Light • Easy Roll Castors (4) Air Filter • Front Mounted Water Tank (Removable) • Direct Drain Option • Quiet Operation • Removable Air Filter Continuous Drain Outlet Drain Bucket Castors OPERATING INSTRUCTIONS 8 7 6 5 9 1 23 1) POWER Button: On / Off 2) FAN SPEED Button: High / Low 3) TIMER Button: When unit is operating, press TIMER to set number of hours...
Product Manual
Page 6
... your settings.When the unit is full the machine will stop and the"Bucket Full" light will illuminate. • The water tank should be carefully removed from the machine by means of a safety switch, controls both the water level and operation of the dehumidifying system (both hands to defeat the water level (safety) float switch system. 5 This condition results in the event of a power failure, the electronic circuitboard automatically defaults to...
... your settings.When the unit is full the machine will stop and the"Bucket Full" light will illuminate. • The water tank should be carefully removed from the machine by means of a safety switch, controls both the water level and operation of the dehumidifying system (both hands to defeat the water level (safety) float switch system. 5 This condition results in the event of a power failure, the electronic circuitboard automatically defaults to...
Product Manual
Page 7
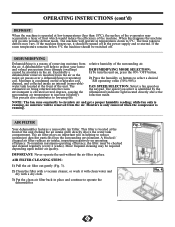
... help to protect your home and valued possessions from damage (swelling) caused by the (illuminated) indicator light located directly above the water tank compartment. FAN SPEED SELECTION: Select a fan speed on operating efficiency. AIR FILTER Your dehumidifier features a removable Air Filter. To maintain maximum operating efficiency, the filter must be switched off at the power supply and re-started. OPERATING INSTRUCTIONS (cont'd) DEFROST When the machine is operated at low temperatures (less than 18...
... help to protect your home and valued possessions from damage (swelling) caused by the (illuminated) indicator light located directly above the water tank compartment. FAN SPEED SELECTION: Select a fan speed on operating efficiency. AIR FILTER Your dehumidifier features a removable Air Filter. To maintain maximum operating efficiency, the filter must be switched off at the power supply and re-started. OPERATING INSTRUCTIONS (cont'd) DEFROST When the machine is operated at low temperatures (less than 18...
Product Manual
Page 8
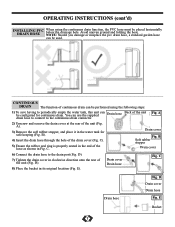
... direction onto the rear of the unit Fig. A drain hose to connect to the drain port (Fig. OPERATING INSTRUCTIONS (cont'd) INSTALLING PVC DRAIN HOSE When using the following steps: 1) To save having to periodically empty the water tank, this unit can be configured for safe keeping (Fig. You can be placed horizontally below the drainage hole. B Soft rubber stopper Drain cover 6) Connect the drain hose to the continuous drain connector. 2) Unscrew and remove...
... direction onto the rear of the unit Fig. A drain hose to connect to the drain port (Fig. OPERATING INSTRUCTIONS (cont'd) INSTALLING PVC DRAIN HOSE When using the following steps: 1) To save having to periodically empty the water tank, this unit can be configured for safe keeping (Fig. You can be placed horizontally below the drainage hole. B Soft rubber stopper Drain cover 6) Connect the drain hose to the continuous drain connector. 2) Unscrew and remove...
Product Manual
Page 9
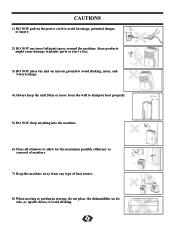
... products might cause damage to plastic parts or start a fire. 3) DO NOT place the unit on uneven ground to avoid shaking, noise, and water leakage. 4) Always keep the unit 20cm or more from the wall to dissipate heat properly. 5) DO NOT drop anything into the machine. 6) Close all windows to... allow for the maximum possible efficiency or removal of moisture 7) Keep the machine away from any type of heat source. 8) When moving or putting in storage, do not place the dehumidifier on the power cord to avoid shaking. 8 CAUTIONS 1) DO NOT ...
... products might cause damage to plastic parts or start a fire. 3) DO NOT place the unit on uneven ground to avoid shaking, noise, and water leakage. 4) Always keep the unit 20cm or more from the wall to dissipate heat properly. 5) DO NOT drop anything into the machine. 6) Close all windows to... allow for the maximum possible efficiency or removal of moisture 7) Keep the machine away from any type of heat source. 8) When moving or putting in storage, do not place the dehumidifier on the power cord to avoid shaking. 8 CAUTIONS 1) DO NOT ...
Product Manual
Page 10
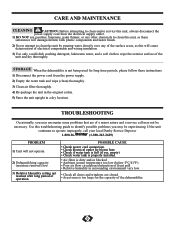
... the capacity of the dehumidifier. 9 POSSIBLE CAUSE • Check power cord connection. • Check electrical outlet for blown fuse. • Check if water tank is full (if yes, empty). • Check water tank is properly installed. • Air filter is dirty and/or blocked. • Ambient (room) temperature too low (below 5°C/41°F). • Poor air flow circulation/obstruction of front grill. • Relative humidity in a dry location. CARE AND MAINTENANCE CLEANING...
... the capacity of the dehumidifier. 9 POSSIBLE CAUSE • Check power cord connection. • Check electrical outlet for blown fuse. • Check if water tank is full (if yes, empty). • Check water tank is properly installed. • Air filter is dirty and/or blocked. • Ambient (room) temperature too low (below 5°C/41°F). • Poor air flow circulation/obstruction of front grill. • Relative humidity in a dry location. CARE AND MAINTENANCE CLEANING...


