Product Manual
Page 3
... do need this Owner's Use and Care Guide: It contains instructions to help us serve you can relax knowing help you solve common problems that sold you attach a copy of your new appliance will receive from our friendly customer service department. Save time and money: Check the Trouble shooting section before calling. We're proud of all, you use and maintain your Danby Refrigerator. For...
... do need this Owner's Use and Care Guide: It contains instructions to help us serve you can relax knowing help you solve common problems that sold you attach a copy of your new appliance will receive from our friendly customer service department. Save time and money: Check the Trouble shooting section before calling. We're proud of all, you use and maintain your Danby Refrigerator. For...
Product Manual
Page 4
... required cooling temperatures and the usual care and maintenance. To avoid vibration, the unit must be grounded. We recommend setting the thermostat at 4, our medium setting, and adjust as to children. IMPORTANT WARNING An empty refrigerator is properly installed and grounded. WARNING Improper use of the grounding plug can result in this refrigerator is accomplished by providing an escape wire for the electrical current...
... required cooling temperatures and the usual care and maintenance. To avoid vibration, the unit must be grounded. We recommend setting the thermostat at 4, our medium setting, and adjust as to children. IMPORTANT WARNING An empty refrigerator is properly installed and grounded. WARNING Improper use of the grounding plug can result in this refrigerator is accomplished by providing an escape wire for the electrical current...
Product Manual
Page 5
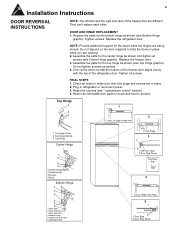
...; Before connecting this appliance in place while you begin, unplug refrigerator or disconnect power. Remove door hinge hole plug from doors. NOTE: Provide additional support for outdoor operation. Remove the cover of freezer and refrigerator door (see graphic 5) 3. Take out the left or the right side. Remove the parts for the bottom hinge as shown in the Bottom Hinge graphic. Remove the door stop from the left door stop of your door, please follow these simple instructions: IMPORTANT...
...; Before connecting this appliance in place while you begin, unplug refrigerator or disconnect power. Remove door hinge hole plug from doors. NOTE: Provide additional support for outdoor operation. Remove the cover of freezer and refrigerator door (see graphic 5) 3. Take out the left or the right side. Remove the parts for the bottom hinge as shown in the Bottom Hinge graphic. Remove the door stop from the left door stop of your door, please follow these simple instructions: IMPORTANT...
Product Manual
Page 6
... Plug 5 1 1.Door Stop 2 2.Door Stop Screw Plug in place. 2. NOTE: Provide additional support for the top hinge as shown (see " temperature control" section). 4. Assemble the parts for the doors while the hinges are different. Reset the controls (see Bottom Hinge graphic). Line up the doors so that hole plugs and screws are working. 2. Return all screws. Replace the refrigerator door. Top Hinge Spindle 3. 4 Installation Instructions DOOR REVERSAL INSTRUCTIONS NOTE: The left door and the right door stop of the refrigerator door. Replace the freezer door. 3. DOOR...
... Plug 5 1 1.Door Stop 2 2.Door Stop Screw Plug in place. 2. NOTE: Provide additional support for the top hinge as shown (see " temperature control" section). 4. Assemble the parts for the doors while the hinges are different. Reset the controls (see Bottom Hinge graphic). Line up the doors so that hole plugs and screws are working. 2. Return all screws. Replace the refrigerator door. Top Hinge Spindle 3. 4 Installation Instructions DOOR REVERSAL INSTRUCTIONS NOTE: The left door and the right door stop of the refrigerator door. Replace the freezer door. 3. DOOR...
Product Manual
Page 7
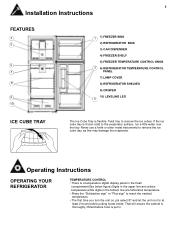
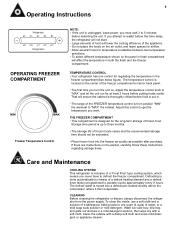
...sign" to the evaporator surface, run for at least 2 hours before food is a temperature digital display panel in the fresh compartment(See below figure).Digits in the upper line are celsius temperature,while digits in . 5 Installation Instructions FEATURES 4 5 6 7 8 9 9 10 1 1) FREEZER BINS 2) REFRIGERATOR BINS 3) CAN DISPENSER 4) FREEZER SHELF 5) FREEZER TEMPERATURE CONTROL KNOB 2 6) REFRIGERATOR TEMPERATURE CONTROL PANEL 7) LAMP COVER 8) REFRIGERATOR SHELVES 9) CRISPER 10) LEVELING LEG 3 ICE CUBE TRAY The Ice Cube Tray is frozen solid to reach the needed temperature. • The...
...sign" to the evaporator surface, run for at least 2 hours before food is a temperature digital display panel in the fresh compartment(See below figure).Digits in the upper line are celsius temperature,while digits in . 5 Installation Instructions FEATURES 4 5 6 7 8 9 9 10 1 1) FREEZER BINS 2) REFRIGERATOR BINS 3) CAN DISPENSER 4) FREEZER SHELF 5) FREEZER TEMPERATURE CONTROL KNOB 2 6) REFRIGERATOR TEMPERATURE CONTROL PANEL 7) LAMP COVER 8) REFRIGERATOR SHELVES 9) CRISPER 10) LEVELING LEG 3 ICE CUBE TRAY The Ice Cube Tray is frozen solid to reach the needed temperature. • The...
Product Manual
Page 8
... the panel in fresh compartment will ensure the cabinet is thoroughly chilled before this control to defrost the freezer compartment. CLEANING Before cleaning the refrigerator or freezer, always disconnect the refrigerator from position "MIN" the warmest to stabilize between two temperature selections. • To select different temperature shown on the packet, carefully follow these instructions regarding storage times. Wash ice cube tray, drip tray, and glide out shelves...
... the panel in fresh compartment will ensure the cabinet is thoroughly chilled before this control to defrost the freezer compartment. CLEANING Before cleaning the refrigerator or freezer, always disconnect the refrigerator from position "MIN" the warmest to stabilize between two temperature selections. • To select different temperature shown on the packet, carefully follow these instructions regarding storage times. Wash ice cube tray, drip tray, and glide out shelves...
Product Manual
Page 9
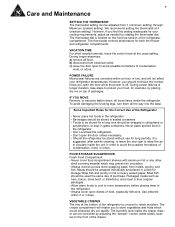
During power failures of longer duration, take steps to retain moisture. IF YOU MOVE Remove, or securely fasten down, all loose items inside the crisper drawer can be adjusted from 1 (minimum setting) through Maximum (coldest setting). VEGETABLE CRISPER The tray at the bottom of the refrigerator is located on the front top section of the refrigerator compartment. 7 Care and Maintenance SETTING THE THERMOSTAT The thermostat setting can be controlled by...
During power failures of longer duration, take steps to retain moisture. IF YOU MOVE Remove, or securely fasten down, all loose items inside the crisper drawer can be adjusted from 1 (minimum setting) through Maximum (coldest setting). VEGETABLE CRISPER The tray at the bottom of the refrigerator is located on the front top section of the refrigerator compartment. 7 Care and Maintenance SETTING THE THERMOSTAT The thermostat setting can be controlled by...
Product Manual
Page 10
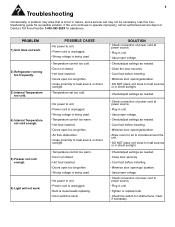
... used. • No power to operate improperly, call may arise that is minor in unit. • Tighten or replace bulb. • Check the switch for assistance. PROBLEM 1) Unit does not work. 2) Refrigerator running too frequently. 3) Internal Temperature too cold. 4) Internal Temperature not cold enough. 5) Freezer not cold enough. 6) Light will not work. If the unit continues to unit. • Power cord is unplugged. • Bulb is loose/needs replacing. • Door switch is stuck. 8 Troubleshooting...
... used. • No power to operate improperly, call may arise that is minor in unit. • Tighten or replace bulb. • Check the switch for assistance. PROBLEM 1) Unit does not work. 2) Refrigerator running too frequently. 3) Internal Temperature too cold. 4) Internal Temperature not cold enough. 5) Freezer not cold enough. 6) Light will not work. If the unit continues to unit. • Power cord is unplugged. • Bulb is loose/needs replacing. • Door switch is stuck. 8 Troubleshooting...

Product Manual
Page 11
... for warranty claims; TERMS OF WARRANTY Plastic parts, are the responsibility of a free standing appliance or using an appliance outdoors that Danby will be the consumer's responsibility to transport the appliance their own expense) to the nearest authorized Danby Service Depot, as service must be performed by a qualified service technician. If the appliance is installed in the room or abnormal operating conditions...
... for warranty claims; TERMS OF WARRANTY Plastic parts, are the responsibility of a free standing appliance or using an appliance outdoors that Danby will be the consumer's responsibility to transport the appliance their own expense) to the nearest authorized Danby Service Depot, as service must be performed by a qualified service technician. If the appliance is installed in the room or abnormal operating conditions...


