Product Manual
Page 2
TABLE OF CONTENTS UNIT SPECIFICATIONS 2 PART IDENTIFICATION 3 IMPORTANT SAFETY INFORMATION Electrical Specifications 3 Energy Saving Tips 4 INSTALLATION Window Kit Installation 5 6 OPERATION Remote Control 7 LCD Display 7 Air Conditioning 8 Dehumidifier 9 Fan 9 Heat 10 Auto Timer 11 Clock Set 11 CARE AND MAINTENANCE 12 TROUBLESHOOTING 13 Warranty 14 1
TABLE OF CONTENTS UNIT SPECIFICATIONS 2 PART IDENTIFICATION 3 IMPORTANT SAFETY INFORMATION Electrical Specifications 3 Energy Saving Tips 4 INSTALLATION Window Kit Installation 5 6 OPERATION Remote Control 7 LCD Display 7 Air Conditioning 8 Dehumidifier 9 Fan 9 Heat 10 Auto Timer 11 Clock Set 11 CARE AND MAINTENANCE 12 TROUBLESHOOTING 13 Warranty 14 1
Product Manual
Page 3
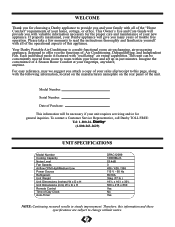
... your home and set up in steady improvement. To contact a Customer Service Representative, call Danby TOLL FREE: Tel: 1-800-26(1-800-263-2629) UNIT SPECIFICATIONS Model Number Cooling Capacity Noise Level Fan Speeds Airflow CFM High/Medium/Low Power Source Refrigerant Unit Weight Unit Dimensions (inches) W x D x H Unit Dimensions (mm) W x D x H Remote Control Time of this information and these specifications are subject to change without notice. 2 Your Danby Portable Air-Conditioner is featured with "oscillating" air swing capabilities. Air Conditioning, Dehumidifying, and...
... your home and set up in steady improvement. To contact a Customer Service Representative, call Danby TOLL FREE: Tel: 1-800-26(1-800-263-2629) UNIT SPECIFICATIONS Model Number Cooling Capacity Noise Level Fan Speeds Airflow CFM High/Medium/Low Power Source Refrigerant Unit Weight Unit Dimensions (inches) W x D x H Unit Dimensions (mm) W x D x H Remote Control Time of this information and these specifications are subject to change without notice. 2 Your Danby Portable Air-Conditioner is featured with "oscillating" air swing capabilities. Air Conditioning, Dehumidifying, and...
Product Manual
Page 4
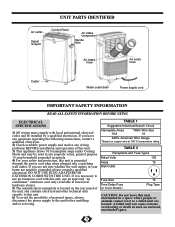
... grounded through the power cord plug when plugged into a matching wall outlet. UNIT PARTS IDENTIFIED Air outlet Signal receptor Control Panel Air intake (evaporator) Handle Hole Air intake hose Air outlet hose Castor Water outlet drain Power supply cord IMPORTANT SAFETY INFORMATION READ ALL SAFETY INFORMATION BEFORE USING ELECTRICAL SPECIFICATIONS 1) All wiring must comply with this unit, use an approved "air conditioner" extension cord only (available at 105°C temperature rating. If you have any questions regarding the following instructions, contact a qualified...
... grounded through the power cord plug when plugged into a matching wall outlet. UNIT PARTS IDENTIFIED Air outlet Signal receptor Control Panel Air intake (evaporator) Handle Hole Air intake hose Air outlet hose Castor Water outlet drain Power supply cord IMPORTANT SAFETY INFORMATION READ ALL SAFETY INFORMATION BEFORE USING ELECTRICAL SPECIFICATIONS 1) All wiring must comply with this unit, use an approved "air conditioner" extension cord only (available at 105°C temperature rating. If you have any questions regarding the following instructions, contact a qualified...
Product Manual
Page 5
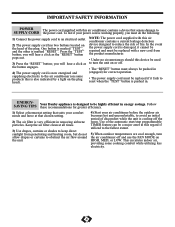
... air conditioner contains a current leakage detection device designed to reduce the risk of fire. Press the "TEST" button; This circulates indoor air, providing some products this regard if utilized to be replaced with a new cord from penetrating and heating room, but do the following: 1) Connect the power supply cord to an electrical outlet. 2) The power supply cord has two buttons located on the plug head). Use of discomfort while the unit...
... air conditioner contains a current leakage detection device designed to reduce the risk of fire. Press the "TEST" button; This circulates indoor air, providing some products this regard if utilized to be replaced with a new cord from penetrating and heating room, but do the following: 1) Connect the power supply cord to an electrical outlet. 2) The power supply cord has two buttons located on the plug head). Use of discomfort while the unit...
Product Manual
Page 6
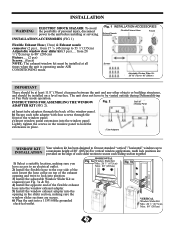
... the window panel. INSTALLATION ACCESSORIES (FIG. 1) Fig. 1 INSTALLATION ACCESSORIES Exhaust Nozzle Connector Flexible Exhaust Hose Fixture Flexible Exhaust Hose (13cm) & Exhaust nozzle connector (2 pcs)... INSTRUCTIONS FOR ASSEMBLING THE WINDOW ADAPTER KIT (FIG. 2). c) Insert window panel extensions into the opening and twist to the rear side of the unit. from 28 1/3"(72cm) up to the unit before installing or servicing. INSTALLATION ELECTRIC SHOCK HAZARD: To avoid WARNING the possibility of personal injury, disconnect power to...
... the window panel. INSTALLATION ACCESSORIES (FIG. 1) Fig. 1 INSTALLATION ACCESSORIES Exhaust Nozzle Connector Flexible Exhaust Hose Fixture Flexible Exhaust Hose (13cm) & Exhaust nozzle connector (2 pcs)... INSTRUCTIONS FOR ASSEMBLING THE WINDOW ADAPTER KIT (FIG. 2). c) Insert window panel extensions into the opening and twist to the rear side of the unit. from 28 1/3"(72cm) up to the unit before installing or servicing. INSTALLATION ELECTRIC SHOCK HAZARD: To avoid WARNING the possibility of personal injury, disconnect power to...
Product Manual
Page 7
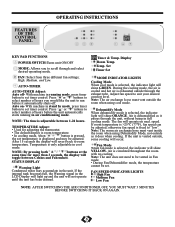
... air exchange h ose must vent inside the room when using cool mode. Note: The warm air exchange hose must vent outside the room when using Dehumidify Mode, not outside as it does when cooling. Air is selected, the indicator light will not operate until the unit has been drained. FEATURES OF THE CONTROL PANEL OPERATING INSTRUCTIONS KEY PAD FUNCTIONS POWER SWITCH:Turns unit ON/OFF MODE: Allows you would like the unit to run before the unit automatically starts running mode, press timer button...
... air exchange h ose must vent inside the room when using cool mode. Note: The warm air exchange hose must vent outside the room when using Dehumidify Mode, not outside as it does when cooling. Air is selected, the indicator light will not operate until the unit has been drained. FEATURES OF THE CONTROL PANEL OPERATING INSTRUCTIONS KEY PAD FUNCTIONS POWER SWITCH:Turns unit ON/OFF MODE: Allows you would like the unit to run before the unit automatically starts running mode, press timer button...

Product Manual
Page 8
... mode setting (Cool-Dehumidifier-Fan-Heat-Auto) 3) Press the appropriate increase or decrease buttons (Fig. H FAN key (Fig. F. NOTE: The warm air exchange hoses must be adjusted. FAN NOTE: During Fan Mode, the exhaust hose does not have to a different fan speed as in Fig. I 1) Press the POWER SWITCH key to turn the unit on the unit, and the previous set temperature will be vented outdoors. L. L High Medium Low Yellow 7 OPERATING INSTRUCTIONS (cont'd) AIR CONDITIONING IMPORTANT: The exhaust hose must vent inside the room...
... mode setting (Cool-Dehumidifier-Fan-Heat-Auto) 3) Press the appropriate increase or decrease buttons (Fig. H FAN key (Fig. F. NOTE: The warm air exchange hoses must be adjusted. FAN NOTE: During Fan Mode, the exhaust hose does not have to a different fan speed as in Fig. I 1) Press the POWER SWITCH key to turn the unit on the unit, and the previous set temperature will be vented outdoors. L. L High Medium Low Yellow 7 OPERATING INSTRUCTIONS (cont'd) AIR CONDITIONING IMPORTANT: The exhaust hose must vent inside the room...
Product Manual
Page 9
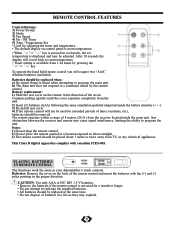
...-install rear cover. 4) If the remote control will revert back to room temperature. • Timer setting is not used for extended periods of the remote control and insert the batteries with canadian ICES-003. The remote operates within a range of 8 meters (26 ft.) from TV, or any electrical appliances. REMOTE CONTROL FEATURES Control Buttons: 1) Power Switch 2) Mode 3) Fan Speed 4) On / Off Timer 5) Time / Temperature Set • Used for adjusting the timer and temperature. • The default display on control panel is room temperature...
...-install rear cover. 4) If the remote control will revert back to room temperature. • Timer setting is not used for extended periods of the remote control and insert the batteries with canadian ICES-003. The remote operates within a range of 8 meters (26 ft.) from TV, or any electrical appliances. REMOTE CONTROL FEATURES Control Buttons: 1) Power Switch 2) Mode 3) Fan Speed 4) On / Off Timer 5) Time / Temperature Set • Used for adjusting the timer and temperature. • The default display on control panel is room temperature...
Product Manual
Page 10
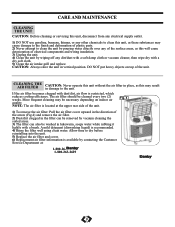
... it lightly with dust/dirt, air flow is located at : 1-800-261-800-263-2629 9 More frequent cleaning may be washed in vertical position. DO NOT put heavy objects on indoor air quality. NOTE: The air filter is restricted, which reduces cooling efficiency. Allow time to dry before reinstalling into the unit. 5) Replace the air filter and cover. 6) Replacement air filter information is recommended. 4) Rinse the filter well using clean water. A mild...
... it lightly with dust/dirt, air flow is located at : 1-800-261-800-263-2629 9 More frequent cleaning may be washed in vertical position. DO NOT put heavy objects on indoor air quality. NOTE: The air filter is restricted, which reduces cooling efficiency. Allow time to dry before reinstalling into the unit. 5) Replace the air filter and cover. 6) Replacement air filter information is recommended. 4) Rinse the filter well using clean water. A mild...
Product Manual
Page 11
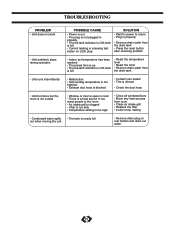
... drain out water 10 TROUBLESHOOTING PROBLEM • Unit does not work POSSIBLE CAUSE • Power is out • The plug is not plugged in properly • The full-tank indicator is too high • Close all windows/doors • Move any heat sources from room • Clean air intake grill • Replace the filter • Lower temp. tank is full • Reset the temperature level • Reset the timer • Remove drain water from the drain...
... drain out water 10 TROUBLESHOOTING PROBLEM • Unit does not work POSSIBLE CAUSE • Power is out • The plug is not plugged in properly • The full-tank indicator is too high • Close all windows/doors • Move any heat sources from room • Clean air intake grill • Replace the filter • Lower temp. tank is full • Reset the temperature level • Reset the timer • Remove drain water from the drain...


