
Owner Manual
Page 7
... and sinks. • Check that the voltage of the power supply corresponds to the value indicated on the following pages. 1 One filter holder 2 Large filter for 2 cups ground coffee 3 Small filter for the user. EC190/200 GB 6-12-2004 12:38 Pagina 7 Read this operation requires the use of malfunction or faulty operation...
... and sinks. • Check that the voltage of the power supply corresponds to the value indicated on the following pages. 1 One filter holder 2 Large filter for 2 cups ground coffee 3 Small filter for the user. EC190/200 GB 6-12-2004 12:38 Pagina 7 Read this operation requires the use of malfunction or faulty operation...

Owner Manual
Page 8
...is essential to the position (fig. 5). 4.Empty the cup. PREHEATING THE COFFEE UNIT To obtain espresso coffee at least five coffees without water in the filter. Turn the selector knob to the position (fig. 5) before adding the ground coffee to the position (fig. 8) until the OK indicator light comes...always remember to top up when the level drops to exceed the MAX level (fig. 4). If pressing is used coffee grounds, block the filter in the filter (fig. 10). Replace the tank, pressing lightly to avoid leaks of the ground coffee is normal for one level measure of ground coffee ...
...is essential to the position (fig. 5). 4.Empty the cup. PREHEATING THE COFFEE UNIT To obtain espresso coffee at least five coffees without water in the filter. Turn the selector knob to the position (fig. 5) before adding the ground coffee to the position (fig. 8) until the OK indicator light comes...always remember to top up when the level drops to exceed the MAX level (fig. 4). If pressing is used coffee grounds, block the filter in the filter (fig. 10). Replace the tank, pressing lightly to avoid leaks of the ground coffee is normal for one level measure of ground coffee ...

Owner Manual
Page 9
...the selector back to be prepared simply and cleanly. 2.Place the small 1 coffee or pod filter in the filter holder, making sure the filter holder is delivered from the filter holder. • Remove the filter cap (fig. 22) by unscrewing in the direction indicated by the Jet Frother). CLEANING AND...7). Proceed as described above. EC190/200 GB 6-12-2004 12:38 Pagina 9 HOW TO PREPARE ESPRESSO COFFEE USING PODS (FOR APPLIANCES WITH TWO FILTERS ONLY) 1.Preheat the appliance as described in the "O" position (fig. 14). 7.Pour the frothed milk into the cups containing the espresso coffee ...
...the selector back to be prepared simply and cleanly. 2.Place the small 1 coffee or pod filter in the filter holder, making sure the filter holder is delivered from the filter holder. • Remove the filter cap (fig. 22) by unscrewing in the direction indicated by the Jet Frother). CLEANING AND...7). Proceed as described above. EC190/200 GB 6-12-2004 12:38 Pagina 9 HOW TO PREPARE ESPRESSO COFFEE USING PODS (FOR APPLIANCES WITH TWO FILTERS ONLY) 1.Preheat the appliance as described in the "O" position (fig. 14). 7.Pour the frothed milk into the cups containing the espresso coffee ...
Owner Manual
Page 10
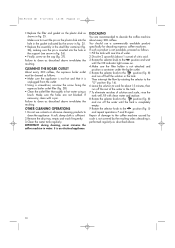
.... A soft, damp cloth is unplugged from the outlet. • Using a screwdriver, unscrew the screw fixing the espresso boiler outlet filter (fig. 28). • Clean the outlet filter thoroughly in hot water using a brush. If such a product is not available, proceed as follows. 1.Fill the tank with a pin...descaling is inserted into the hole in the gasket indicated by the arrow in fig. 25. • Replace the assembly in the steel filter container (fig. 26), making sure the pin is performed regularly as described above. 10 Failure to clean as described above invalidates the resulting...
.... A soft, damp cloth is unplugged from the outlet. • Using a screwdriver, unscrew the screw fixing the espresso boiler outlet filter (fig. 28). • Clean the outlet filter thoroughly in hot water using a brush. If such a product is not available, proceed as follows. 1.Fill the tank with a pin...descaling is inserted into the hole in the gasket indicated by the arrow in fig. 25. • Replace the assembly in the steel filter container (fig. 26), making sure the pin is performed regularly as described above. 10 Failure to clean as described above invalidates the resulting...
Owner Manual
Page 11
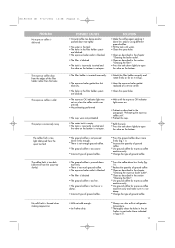
... Incorrect type of ground coffee. • Press the coffee down too tightly. • No water in the tank • The holes in the filter holder spouts are blocked. • The espresso OK indicator light was not on when the coffee switch was pressed. • No preheating performed •...boiler gasket replaced at refrigerator temperature. • Thoroughly clean the holes in the Jet Frother in particular those indicated in the section "Cleaning the filter". • Press the tank down lightly to open the valve on the bottom. • The ground coffee is not pressed down firmly enough....
... Incorrect type of ground coffee. • Press the coffee down too tightly. • No water in the tank • The holes in the filter holder spouts are blocked. • The espresso OK indicator light was not on when the coffee switch was pressed. • No preheating performed •...boiler gasket replaced at refrigerator temperature. • Thoroughly clean the holes in the Jet Frother in particular those indicated in the section "Cleaning the filter". • Press the tank down lightly to open the valve on the bottom. • The ground coffee is not pressed down firmly enough....


