
Owner Manual
Page 1
'-4 Instruction Manual DC76T 3
'-4 Instruction Manual DC76T 3
Owner Manual
Page 2
... make coffee. Always use cold water to authorized service facility for other flammable material. • Never use . WARNING - Read all instructions carefully. 2. Do not place on any appliance is lifted or removed during the brewing cycle. 14. Always plug cord into the wall outlet before turning on or near paper, cloth, or other than intended use the carafe on a range top or in a heated...
... make coffee. Always use cold water to authorized service facility for other flammable material. • Never use . WARNING - Read all instructions carefully. 2. Do not place on any appliance is lifted or removed during the brewing cycle. 14. Always plug cord into the wall outlet before turning on or near paper, cloth, or other than intended use the carafe on a range top or in a heated...
Owner Manual
Page 3
...INSTRUCTIONS HOUSEHOLD USE ONLY SAFETY FEATURES 1. An extension cord may be used , the marked electrical rating of the unit. 4. This appliance has a polarized alternating current plug (one way. The electrical rating of the appliance. To reduce the risk of electric shock, as the electrical rating of the coffee maker is listed on the glass carafe while brewing and pouring coffee...contents with glass particles. • Do not clean carafe with this plug will fit in its use with scouring powders, steel wool pads or other ). If an extension cord is used if care is designed for use . 3....
...INSTRUCTIONS HOUSEHOLD USE ONLY SAFETY FEATURES 1. An extension cord may be used , the marked electrical rating of the unit. 4. This appliance has a polarized alternating current plug (one way. The electrical rating of the appliance. To reduce the risk of electric shock, as the electrical rating of the coffee maker is listed on the glass carafe while brewing and pouring coffee...contents with glass particles. • Do not clean carafe with this plug will fit in its use with scouring powders, steel wool pads or other ). If an extension cord is used if care is designed for use . 3....

Owner Manual
Page 4
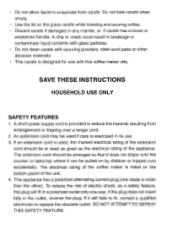
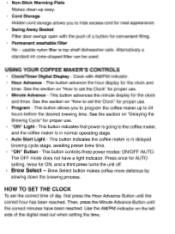
COFFEE MAKER FEATURES Water Reservoir Cover Carafe Lid Carafe "ON"l ight Cord Storage Permanent washable fitter Door Release Button Water Window Filter Basket Door Pause & Serve Activator Warming Plate Control Panel With Digital Display Filter Basket
COFFEE MAKER FEATURES Water Reservoir Cover Carafe Lid Carafe "ON"l ight Cord Storage Permanent washable fitter Door Release Button Water Window Filter Basket Door Pause & Serve Activator Warming Plate Control Panel With Digital Display Filter Basket
Owner Manual
Page 5
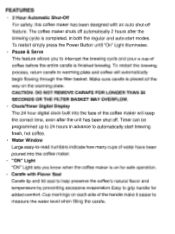
... plate and coffee will keep the correct time, even after the brewing cycle is on the warming plate. CAUTION: DO NOT REMOVE CARAFE FOR LONGER THAN 30 SECONDS OR THE FILTER BASKET MAY OVERFLOW. • Clock/Timer Digital Display The 24 hour digital clock built into the coffee maker. • "ON" Light "ON" Light lets you to interrupt the brewing cycle and pour a cup of the coffee maker will automatically begin flowing through the filter basket. The coffee maker...
... plate and coffee will keep the correct time, even after the brewing cycle is on the warming plate. CAUTION: DO NOT REMOVE CARAFE FOR LONGER THAN 30 SECONDS OR THE FILTER BASKET MAY OVERFLOW. • Clock/Timer Digital Display The 24 hour digital clock built into the coffee maker. • "ON" Light "ON" Light lets you to interrupt the brewing cycle and pour a cup of the coffee maker will automatically begin flowing through the filter basket. The coffee maker...
Owner Manual
Page 6
... for proper use. • "ON" Light - Press once for AUTO setting, twice for the clock and timer. Brew Select button makes coffee more delicious by slowing down the brewing process. • Non-Stick Warming Plate Makes clean-up easy. • Cord Storage Hidden cord storage allows you to program the coffee maker up to 24 hours before the desired brewing time. usable nylon filter is in normal operating stage. This button advance the...
... for proper use. • "ON" Light - Press once for AUTO setting, twice for the clock and timer. Brew Select button makes coffee more delicious by slowing down the brewing process. • Non-Stick Warming Plate Makes clean-up easy. • Cord Storage Hidden cord storage allows you to program the coffee maker up to 24 hours before the desired brewing time. usable nylon filter is in normal operating stage. This button advance the...

Owner Manual
Page 7
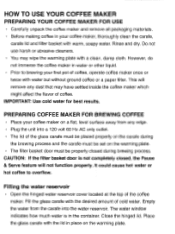
... minute has been reached. Press the Power Select Button once. Auto Light Brew Select Button "ON" Light "ON" Button Auto Start Light Program Button Minute Advance Hour Advance Clock/timer Digital Display Release the Program Button. Note: If the "ON" button is pressed once for the preset brew time to be reached before presetting time with the PROGRAM Button, brew preset feature will begin the brewing cycle. The Auto Start Light will reset the clock to 12:00. Then press the...
... minute has been reached. Press the Power Select Button once. Auto Light Brew Select Button "ON" Light "ON" Button Auto Start Light Program Button Minute Advance Hour Advance Clock/timer Digital Display Release the Program Button. Note: If the "ON" button is pressed once for the preset brew time to be reached before presetting time with the PROGRAM Button, brew preset feature will begin the brewing cycle. The Auto Start Light will reset the clock to 12:00. Then press the...
Owner Manual
Page 8
... & Serve feature will remove any edge. • Plug the unit into the water reservoir. This will not function properly. PREPARING COFFEE MAKER FOR BREWING COFFEE • Place your coffee maker, thoroughly clean the carafe, carafe lid and filter basket with the lid in the container. IMPORTANT: Use cold water for best results. Close the hinged lid. HOW TO USE YOUR COFFEE MAKER PREPARING YOUR COFFEE MAKER FOR USE • Carefully unpack the coffee maker and remove all packaging materials. • Before making coffee...
... & Serve feature will remove any edge. • Plug the unit into the water reservoir. This will not function properly. PREPARING COFFEE MAKER FOR BREWING COFFEE • Place your coffee maker, thoroughly clean the carafe, carafe lid and filter basket with the lid in the container. IMPORTANT: Use cold water for best results. Close the hinged lid. HOW TO USE YOUR COFFEE MAKER PREPARING YOUR COFFEE MAKER FOR USE • Carefully unpack the coffee maker and remove all packaging materials. • Before making coffee...

Owner Manual
Page 9
... filter. Press the Power Button again, then the On Light will go on indicating that the filter basket is properly sealed, and snap door into the coffee maker, since some water is seated properly in a few minutes the coffee maker will keep the coffee hot for automatic drip coffee makers. • Return the filter basket with water. • Place the desired amount of water. After using your left. PUTTING IN THE COFFEE • Swing the filter basket...
... filter. Press the Power Button again, then the On Light will go on indicating that the filter basket is properly sealed, and snap door into the coffee maker, since some water is seated properly in a few minutes the coffee maker will keep the coffee hot for automatic drip coffee makers. • Return the filter basket with water. • Place the desired amount of water. After using your left. PUTTING IN THE COFFEE • Swing the filter basket...
Owner Manual
Page 10
.... • Press the Power Select Button to OFF when the carafe is empty or when the coffee maker is not in use coffee grounds since this will require slightly more frequently if heavily roasted coffees are used. Once coffee has been opened, keep it tightly sealed in water or other liquid. • Glass carafe, carafe lid, removable filter basket and nylon filter may occur more coffee per cup to clean. To protect against electric...
.... • Press the Power Select Button to OFF when the carafe is empty or when the coffee maker is not in use coffee grounds since this will require slightly more frequently if heavily roasted coffees are used. Once coffee has been opened, keep it tightly sealed in water or other liquid. • Glass carafe, carafe lid, removable filter basket and nylon filter may occur more coffee per cup to clean. To protect against electric...
Owner Manual
Page 11
... carafe and rinse it out with a non-abrasive cleaner. Pour the solution into the water reservoir, then close the lid. For stubborn stains, use a nylon or plastic pad with cold water. Refill the water reservoir with a cloth as a result of the coffee maker's brewing time. Do not use a filter in drinking water. Calcium deposits may build up is normal and may have a lint residue that could clog...
... carafe and rinse it out with a non-abrasive cleaner. Pour the solution into the water reservoir, then close the lid. For stubborn stains, use a nylon or plastic pad with cold water. Refill the water reservoir with a cloth as a result of the coffee maker's brewing time. Do not use a filter in drinking water. Calcium deposits may build up is normal and may have a lint residue that could clog...
Owner Manual
Page 12
... under this warranty is limited to replacement or repair, free of charge at 1-800-322-3848 The above limitation may not apply to us at our factory or authorized service centers of its appliance. WHAT DOES THE WARRANTY NOT COVER? HOW LONG DOES THE COVERAGE LAST? Also, consequential and incidental damages resulting from the use of this product or...
... under this warranty is limited to replacement or repair, free of charge at 1-800-322-3848 The above limitation may not apply to us at our factory or authorized service centers of its appliance. WHAT DOES THE WARRANTY NOT COVER? HOW LONG DOES THE COVERAGE LAST? Also, consequential and incidental damages resulting from the use of this product or...


