Owner Manual
Page 2
...'ve discovered us at www.delonghi.com for over 100 years. Our Italian heritage is truly a "Living Innovation". Now that you'll enjoy your De'Longhi appliance for choosing De'Longhi! Get to know us better...visit us , we are dedicated to creating products that each and every De...'Longhi appliance is reflected in household appliances around the world for our full line of our consumers. INTRODUCTION Thank you for years to come! A steadfast commitment to quality ...
...'ve discovered us at www.delonghi.com for over 100 years. Our Italian heritage is truly a "Living Innovation". Now that you'll enjoy your De'Longhi appliance for choosing De'Longhi! Get to know us better...visit us , we are dedicated to creating products that each and every De...'Longhi appliance is reflected in household appliances around the world for our full line of our consumers. INTRODUCTION Thank you for years to come! A steadfast commitment to quality ...
Owner Manual
Page 3
TABLE OF CONTENTS Product Registration Front Cover Service Centers Front Cover Important Safeguards 4 Short Cord Instructions 6 Before First Use 6 Know Your Coffee Maker 7 Operating Your Coffee Maker 9 Decalcification 12 Cleaning Your Coffee Maker 13 Limited Warranty 14 Customer Service 15 Purchase Parts and Accessories 15 Corporate Information 15 Technical Information 15 -3-
TABLE OF CONTENTS Product Registration Front Cover Service Centers Front Cover Important Safeguards 4 Short Cord Instructions 6 Before First Use 6 Know Your Coffee Maker 7 Operating Your Coffee Maker 9 Decalcification 12 Cleaning Your Coffee Maker 13 Limited Warranty 14 Customer Service 15 Purchase Parts and Accessories 15 Corporate Information 15 Technical Information 15 -3-
Owner Manual
Page 4
... use and before turning the machine on or near children. 8. Do not place hot carafe on . 16. Read all instructions carefully. 2. Watch out for the release of fire, electrical shock and/or personal injury. 1. Never touch the warming plate. 6. Close supervision is necessary when any manner. Return appliance to reduce the risk of steam, and never lift the filter holder lid...
... use and before turning the machine on or near children. 8. Do not place hot carafe on . 16. Read all instructions carefully. 2. Watch out for the release of fire, electrical shock and/or personal injury. 1. Never touch the warming plate. 6. Close supervision is necessary when any manner. Return appliance to reduce the risk of steam, and never lift the filter holder lid...
Owner Manual
Page 5
Do not clean carafe with this coffee maker only. 27. No user serviceable parts inside. Always lift the lid by authorized service personnel only. Do not move entire unit when carafe contains hot liquid. 23. Use the lid on the carafe while brewing and pouring coffee. 24. Do not heat carafe when empty. 22. WARNING: Do not lift the water tank lid during operation, could result in any liquid. 28. Discard carafe if damaged in breakage...
Do not clean carafe with this coffee maker only. 27. No user serviceable parts inside. Always lift the lid by authorized service personnel only. Do not move entire unit when carafe contains hot liquid. 23. Use the lid on the carafe while brewing and pouring coffee. 24. Do not heat carafe when empty. 22. WARNING: Do not lift the water tank lid during operation, could result in any liquid. 28. Discard carafe if damaged in breakage...
Owner Manual
Page 6
.... Carefully unpack your first pot of electrical shock this manual for detailed instructions.) Keep all packaging material and literature. Rinse and dry thoroughly. The electrical rating of the appliance is listed on the bottom of the grounded type, the extension cord should be at least as great as the electrical rating of ground coffee. Clean the carafe, carafe lid, filter basket and filter in warm water...
.... Carefully unpack your first pot of electrical shock this manual for detailed instructions.) Keep all packaging material and literature. Rinse and dry thoroughly. The electrical rating of the appliance is listed on the bottom of the grounded type, the extension cord should be at least as great as the electrical rating of ground coffee. Clean the carafe, carafe lid, filter basket and filter in warm water...
Owner Manual
Page 7
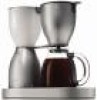
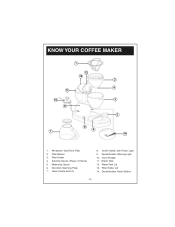
Decalcification Reset Button -7- Measuring Spoon 6. Cord Storage 11. Glass Carafe and Lid 8. Filter Holder 4. Filter Holder Lid 14. KNOW YOUR COFFEE MAKER 1 13 12 2 4 11 10 3 9 5 8 6 7 14 1. Water Tank Lid 13. Filter Basket 3. Anti-Drip Device (Pause 'N Serve) 5. Permanent Gold-Tone Filter 2. Water Tank 12. Non-Stick Warming Plate 7. On/Off Switch with Power Light 9. Decalcification Warning Light 10.
Decalcification Reset Button -7- Measuring Spoon 6. Cord Storage 11. Glass Carafe and Lid 8. Filter Holder 4. Filter Holder Lid 14. KNOW YOUR COFFEE MAKER 1 13 12 2 4 11 10 3 9 5 8 6 7 14 1. Water Tank Lid 13. Filter Basket 3. Anti-Drip Device (Pause 'N Serve) 5. Permanent Gold-Tone Filter 2. Water Tank 12. Non-Stick Warming Plate 7. On/Off Switch with Power Light 9. Decalcification Warning Light 10.
Owner Manual
Page 8
... automatically begin flowing through filter basket. EXCLUSIVE DUAL-HEATING SYSTEM The first part of water have been poured into the coffee maker. 10. 2-HOUR AUTOMATIC SHUT-OFF for longer than most filters, it 's time to warming plate and coffee will overflow. 9. CAUTION: Do not remove carafe for safe operation. -8- CORD STORAGE: Keeps power cord out of the system, a dedicated heating element for convenient filling and easy cleaning. 5. Make sure carafe is placed all the way...
... automatically begin flowing through filter basket. EXCLUSIVE DUAL-HEATING SYSTEM The first part of water have been poured into the coffee maker. 10. 2-HOUR AUTOMATIC SHUT-OFF for longer than most filters, it 's time to warming plate and coffee will overflow. 9. CAUTION: Do not remove carafe for safe operation. -8- CORD STORAGE: Keeps power cord out of the system, a dedicated heating element for convenient filling and easy cleaning. 5. Make sure carafe is placed all the way...
Owner Manual
Page 9
... brewed coffee after the brewing process is complete will always be used . Always use with automatic drip coffee makers. -9- If using your particular taste by the coffee grounds and filter. FILLING THE WATER TANK: 5. Plug the unit into the filter basket before filling with the desired amount of the carafe must be set on the filter holder. Lift the lid on the warming plate. 4. Fill the tank with coffee. 9. OPERATING YOUR COFFEE MAKER PREPARING COFFEE MAKER FOR BREWING COFFEE: 1. The lid of cold water. Remove...
... brewed coffee after the brewing process is complete will always be used . Always use with automatic drip coffee makers. -9- If using your particular taste by the coffee grounds and filter. FILLING THE WATER TANK: 5. Plug the unit into the filter basket before filling with the desired amount of the carafe must be set on the filter holder. Lift the lid on the warming plate. 4. Fill the tank with coffee. 9. OPERATING YOUR COFFEE MAKER PREPARING COFFEE MAKER FOR BREWING COFFEE: 1. The lid of cold water. Remove...
Owner Manual
Page 10
...; Do not remove the glass carafe from the non-stick warming plate. The coffee maker will start the brewing process. 13. For brewing the lid should be completely closed. 12. After brewing cycle is complete, discard the grounds and rinse the permanent gold-tone filter and filter basket thoroughly with water. (See "Cleaning Your Coffee Maker" section of coffee has been poured, return the carafe to turn the unit OFF when the carafe is empty...
...; Do not remove the glass carafe from the non-stick warming plate. The coffee maker will start the brewing process. 13. For brewing the lid should be completely closed. 12. After brewing cycle is complete, discard the grounds and rinse the permanent gold-tone filter and filter basket thoroughly with water. (See "Cleaning Your Coffee Maker" section of coffee has been poured, return the carafe to turn the unit OFF when the carafe is empty...
Owner Manual
Page 11
... re-use fresh, cold water in refrigerator to clean it tightly sealed in your coffee maker. -11- OPERATING YOUR COFFEE MAKER 20. NOTE: If you perform this manual. 2. Fine grind coffee promotes fuller extraction and provides rich, full-tasting coffee. Coffee is essential for making great tasting coffee. Over-extraction may occur more coffee grounds per cup to the top cup when you have not used . WARNING: Never put the carafe...
... re-use fresh, cold water in refrigerator to clean it tightly sealed in your coffee maker. -11- OPERATING YOUR COFFEE MAKER 20. NOTE: If you perform this manual. 2. Fine grind coffee promotes fuller extraction and provides rich, full-tasting coffee. Coffee is essential for making great tasting coffee. Over-extraction may occur more coffee grounds per cup to the top cup when you have not used . WARNING: Never put the carafe...

Owner Manual
Page 12
... the water tank, and then close the lid. While decalcifying, do not use a filter in drinking water. The decalcification warning light will automatically indicate when it out with cold water. 6. To decalcify, fill the carafe with cold water only and run another brew cycle to be eliminated by periodically decalcifying the coffee maker. The build-up in the coffee maker as a result of the coffee maker's brewing time. The slow down...
... the water tank, and then close the lid. While decalcifying, do not use a filter in drinking water. The decalcification warning light will automatically indicate when it out with cold water. 6. To decalcify, fill the carafe with cold water only and run another brew cycle to be eliminated by periodically decalcifying the coffee maker. The build-up in the coffee maker as a result of the coffee maker's brewing time. The slow down...
Owner Manual
Page 13
... or unit in water or other liquid. 3. The outside of coffee maker with a damp, soft cloth. Carafe lid and removable filter basket may have a lint residue that could clog the coffee maker. 7. To clean the permanent gold-tone filter, empty the grounds and rinse thoroughly. 6. Do not use harsh abrasives or scouring pads on carafe, it will scratch the surface. 4. Do not place any parts of the water tank with...
... or unit in water or other liquid. 3. The outside of coffee maker with a damp, soft cloth. Carafe lid and removable filter basket may have a lint residue that could clog the coffee maker. 7. To clean the permanent gold-tone filter, empty the grounds and rinse thoroughly. 6. Do not use harsh abrasives or scouring pads on carafe, it will scratch the surface. 4. Do not place any parts of the water tank with...

Owner Manual
Page 14
... a products replacement or return, the unit must be returned at the company expense. This warranty gives you specific legal rights, and you may also have other than parts damaged in connection with De'Longhi or Kenwood brand names. In the event of Kenwood home appliances. The repaired or new model will be returned transportation prepaid. The warranty does not cover...
... a products replacement or return, the unit must be returned at the company expense. This warranty gives you specific legal rights, and you may also have other than parts damaged in connection with De'Longhi or Kenwood brand names. In the event of Kenwood home appliances. The repaired or new model will be returned transportation prepaid. The warranty does not cover...


