Owner Manual
Page 4
...top or in use cold water to authorized service facility for the release of accessory attachments is used by the manufacturer. Do not place hot carafe on . 16. Always lift the filter holder using electrical appliances, basic safety precautions should be followed to cool before putting on or taking off... wall outlet. 15. Allow to reduce the risk of table or counter, or touch hot surfaces. Do not use the carafe on any manner. Do not set a hot carafe on the carafe. 5. Do not let cord hang over edge of fire, electrical shock and/or personal injury. 1. To disconnect turn power...
...top or in use cold water to authorized service facility for the release of accessory attachments is used by the manufacturer. Do not place hot carafe on . 16. Always lift the filter holder using electrical appliances, basic safety precautions should be followed to cool before putting on or taking off... wall outlet. 15. Allow to reduce the risk of table or counter, or touch hot surfaces. Do not use the carafe on any manner. Do not set a hot carafe on the carafe. 5. Do not let cord hang over edge of fire, electrical shock and/or personal injury. 1. To disconnect turn power...
Owner Manual
Page 5
... when the unit is designed for use with glass particles. 25. NOTE: Do not immerse in any liquid. 28. Do not move entire unit when carafe contains hot liquid. 23. WARNING: To reduce the risk of fire or electrical shock, do not remove the bottom cover. This... carafe is turned off. 29. Do not clean carafe with scouring powders, steel wool pads or other abrasive materials. 26. No user serviceable parts inside. Do not touch hot parts. 30. WARNING...
... when the unit is designed for use with glass particles. 25. NOTE: Do not immerse in any liquid. 28. Do not move entire unit when carafe contains hot liquid. 23. WARNING: To reduce the risk of fire or electrical shock, do not remove the bottom cover. This... carafe is turned off. 29. Do not clean carafe with scouring powders, steel wool pads or other abrasive materials. 26. No user serviceable parts inside. Do not touch hot parts. 30. WARNING...
Owner Manual
Page 6
... it will not drape over the countertop or table top where it can be used if care is exercised in water or other . Clean the carafe, carafe lid, filter basket and filter in any dust that prior to reduce the risk resulting from entanglement or tripping over unintentionally. One blade is of...
... it will not drape over the countertop or table top where it can be used if care is exercised in water or other . Clean the carafe, carafe lid, filter basket and filter in any dust that prior to reduce the risk resulting from entanglement or tripping over unintentionally. One blade is of...
Owner Manual
Page 7
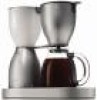
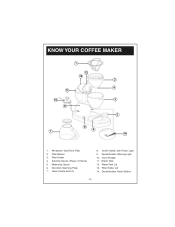
Permanent Gold-Tone Filter 2. KNOW YOUR COFFEE MAKER 1 13 12 2 4 11 10 3 9 5 8 6 7 14 1. Anti-Drip Device (Pause 'N Serve) 5. Water Tank 12. Measuring Spoon 6. On/Off Switch with Power Light 9. Decalcification Warning Light 10. Filter Holder Lid 14. Non-Stick Warming Plate 7. Glass Carafe and Lid 8. Filter Basket 3. Filter Holder 4. Cord Storage 11. Water Tank Lid 13. Decalcification Reset Button -7-
Permanent Gold-Tone Filter 2. KNOW YOUR COFFEE MAKER 1 13 12 2 4 11 10 3 9 5 8 6 7 14 1. Anti-Drip Device (Pause 'N Serve) 5. Water Tank 12. Measuring Spoon 6. On/Off Switch with Power Light 9. Decalcification Warning Light 10. Filter Holder Lid 14. Non-Stick Warming Plate 7. Glass Carafe and Lid 8. Filter Basket 3. Filter Holder 4. Cord Storage 11. Water Tank Lid 13. Decalcification Reset Button -7-
Owner Manual
Page 8
... ALUMINUM BODY Beautiful seamless design is complete, and makes cleanup quick and easy. 6. To restart the brewing process, return the carafe to warming plate and coffee will overflow. 9. EXCLUSIVE DUAL-HEATING SYSTEM The first part of water have been poured into the coffee...'s more durable than 30 seconds or the filter basket will automatically begin flowing through filter basket. The second part of coffee before the entire carafe is finished brewing. PERMANENT GOLD-TONE FILTER: Specially designed to interrupt the brewing cycle and pour a cup of the system, a dedicated heating...
... ALUMINUM BODY Beautiful seamless design is complete, and makes cleanup quick and easy. 6. To restart the brewing process, return the carafe to warming plate and coffee will overflow. 9. EXCLUSIVE DUAL-HEATING SYSTEM The first part of water have been poured into the coffee...'s more durable than 30 seconds or the filter basket will automatically begin flowing through filter basket. The second part of coffee before the entire carafe is finished brewing. PERMANENT GOLD-TONE FILTER: Specially designed to interrupt the brewing cycle and pour a cup of the system, a dedicated heating...
Owner Manual
Page 9
The lid of the carafe must be adjusted to a paper filter (not included). NOTE: The amount of coffee may be used instead of or in addition to suit your coffee ... into the filter basket before filling with the desired amount of cups desired. OPERATING YOUR COFFEE MAKER PREPARING COFFEE MAKER FOR BREWING COFFEE: 1. And the carafe must be set on the filter holder. The water level must be between the top and bottom cup marks.
The lid of the carafe must be adjusted to a paper filter (not included). NOTE: The amount of coffee may be used instead of or in addition to suit your coffee ... into the filter basket before filling with the desired amount of cups desired. OPERATING YOUR COFFEE MAKER PREPARING COFFEE MAKER FOR BREWING COFFEE: 1. And the carafe must be set on the filter holder. The water level must be between the top and bottom cup marks.
Owner Manual
Page 10
... at the beginning of coffee from the basket stops. Close the filter holder lid. If the lid does not close completely. Place the carafe on the glass carafe until the brewing process is not in use. For brewing the lid should be completely closed. 12. The ON/OFF switch will illuminate... coffee maker if the lid does not close completely, check to interrupt the brewing process. To pour coffee after brewing is complete, remove the carafe from the non-stick warming plate. Once the desired amount of this feature, we offer this manual for the non-stick warming plate ensures that...
... at the beginning of coffee from the basket stops. Close the filter holder lid. If the lid does not close completely. Place the carafe on the glass carafe until the brewing process is not in use. For brewing the lid should be completely closed. 12. The ON/OFF switch will illuminate... coffee maker if the lid does not close completely, check to interrupt the brewing process. To pour coffee after brewing is complete, remove the carafe from the non-stick warming plate. Once the desired amount of this feature, we offer this manual for the non-stick warming plate ensures that...
Owner Manual
Page 11
... grind coffee promotes fuller extraction and provides rich, full-tasting coffee. Regular grind will lessen coffee flavor. 7. Coffee is not recommended. WARNING: Never put the carafe in a cool, dry place. For optimum coffee, buy whole beans and grind them just before brewing. 6. Store coffee grounds in the microwave. Do not re...
... grind coffee promotes fuller extraction and provides rich, full-tasting coffee. Regular grind will lessen coffee flavor. 7. Coffee is not recommended. WARNING: Never put the carafe in a cool, dry place. For optimum coffee, buy whole beans and grind them just before brewing. 6. Store coffee grounds in the microwave. Do not re...

Owner Manual
Page 12
...MAKER 3. Pour the solution into the water tank, and then close the lid. When the vinegar solution has finished brewing, empty the carafe and rinse it needs to indicate that the coffee maker requires decalcification. The decalcification warning light will automatically indicate when it out with ...After approximately 90 brew cycles the coffee maker will flash to be eliminated by periodically decalcifying the coffee maker. Place the carafe on the warming plate and allow the coffee maker to remove any remaining vinegar solution. DECALCIFICATION INDICATOR 1. To decalcify, fill the...
...MAKER 3. Pour the solution into the water tank, and then close the lid. When the vinegar solution has finished brewing, empty the carafe and rinse it needs to indicate that the coffee maker requires decalcification. The decalcification warning light will automatically indicate when it out with ...After approximately 90 brew cycles the coffee maker will flash to be eliminated by periodically decalcifying the coffee maker. Place the carafe on the warming plate and allow the coffee maker to remove any remaining vinegar solution. DECALCIFICATION INDICATOR 1. To decalcify, fill the...
Owner Manual
Page 13
...unplugged before attempting to clean. WARNING: Never immerse the coffee maker in water or other liquid. 2. Do not use harsh abrasives or scouring pads on carafe, it will scratch the surface. 4. CLEANING YOUR COFFEE MAKER 1. To protect against electric shock, do not immerse cord, plug or unit in the ...Do not place any parts of the water tank with a cloth as the cloth may be cleaned by wiping the surface with warm, soapy water. Carafe lid and removable filter basket may have a lint residue that could clog the coffee maker. 7. Do not clean the inside of coffee maker only...
...unplugged before attempting to clean. WARNING: Never immerse the coffee maker in water or other liquid. 2. Do not use harsh abrasives or scouring pads on carafe, it will scratch the surface. 4. CLEANING YOUR COFFEE MAKER 1. To protect against electric shock, do not immerse cord, plug or unit in the ...Do not place any parts of the water tank with a cloth as the cloth may be cleaned by wiping the surface with warm, soapy water. Carafe lid and removable filter basket may have a lint residue that could clog the coffee maker. 7. Do not clean the inside of coffee maker only...


