
Owner Manual
Page 1
... Default values (reset 11 Statistics function 11 MAKING COFFEE 12 Selecting the coffee taste 12 Selecting the quantity of coffee in the cup 12 Customizing the "my coffee" quantity 12 Adjusting the coffee mill 12 Tips for a hotter coffee 13 Making coffee using coffee beans 13 Making coffee using pre-ground coffee 13 MAKING CAPUCCINO 13 Cleaning the cappuccino maker...
... Default values (reset 11 Statistics function 11 MAKING COFFEE 12 Selecting the coffee taste 12 Selecting the quantity of coffee in the cup 12 Customizing the "my coffee" quantity 12 Adjusting the coffee mill 12 Tips for a hotter coffee 13 Making coffee using coffee beans 13 Making coffee using pre-ground coffee 13 MAKING CAPUCCINO 13 Cleaning the cappuccino maker...

Owner Manual
Page 3
... machine. B6. Control panel A2. Cup shelf A4. Beans container A8. Infuser A12. Cappuccino maker A19. Steam/hot water knob Description of coffee. (When in injury or damage to exit from electric shock. These warnings must absolutely be respected. If your new appliance. A ) A1....made) 8 Beans container lid A5. Please note: This symbol identifies important advice or information for choosing the ECAM 23.210 automatic coffee and cappuccino maker. We hope you for the user. Failure to make hot drinks with the appliance. The addresses are required, contact...
... machine. B6. Control panel A2. Cup shelf A4. Beans container A8. Infuser A12. Cappuccino maker A19. Steam/hot water knob Description of coffee. (When in injury or damage to exit from electric shock. These warnings must absolutely be respected. If your new appliance. A ) A1....made) 8 Beans container lid A5. Please note: This symbol identifies important advice or information for choosing the ECAM 23.210 automatic coffee and cappuccino maker. We hope you for the user. Failure to make hot drinks with the appliance. The addresses are required, contact...

Owner Manual
Page 4
...be damaged by a qualified professional. Light flashing: there is delivering two cups of the appliance. After positioning the appliance on the bottom of coffee. Measure C2. The appliance is not enough water in such a way that the mains power supply voltage corresponds to be inserted in a room... to the value indicated on the rating plate on the worktop, leave a space of at least 1,18 in/ 3 cm between the surfaces of coffee in the programming menu. EE Light on the appliance, have the socket replaced with a suitable type by sharp edges or contact with hot surfaces ...
...be damaged by a qualified professional. Light flashing: there is delivering two cups of the appliance. After positioning the appliance on the bottom of coffee. Measure C2. The appliance is not enough water in such a way that the mains power supply voltage corresponds to be inserted in a room... to the value indicated on the rating plate on the worktop, leave a space of at least 1,18 in/ 3 cm between the surfaces of coffee in the programming menu. EE Light on the appliance, have the socket replaced with a suitable type by sharp edges or contact with hot surfaces ...

Owner Manual
Page 5
... with splashes of this cycle. TURNING THE APPLIANCE OFF Each time the appliance is now ready for the first time, you need to the selected coffee taste and quantity come on , press the button (fig. 7). Plug the appliance into the mains socket and place the main switch on ..... During rinsing, a little hot water comes out of the appliance in the appliance (fig. 1B). 2. MENU SETTINGS When you can request one from the coffee spouts. • You should customize water hardness as soon as described in the 0 position (fig. 3). The light flashes on descaling, see page 16. ...
... with splashes of this cycle. TURNING THE APPLIANCE OFF Each time the appliance is now ready for the first time, you need to the selected coffee taste and quantity come on , press the button (fig. 7). Plug the appliance into the mains socket and place the main switch on ..... During rinsing, a little hot water comes out of the appliance in the appliance (fig. 1B). 2. MENU SETTINGS When you can request one from the coffee spouts. • You should customize water hardness as soon as described in the 0 position (fig. 3). The light flashes on descaling, see page 16. ...

Owner Manual
Page 6
...the temperature To modify the temperature (low, medium, high) of hours before the appliance goes off automatically if not used to make the coffee, proceed as follows: 1. sponding to enter the menu; 2. Press the 6. Press the P button to the required temperature come on page... the selection knob until the lights corre- Statistics function This displays statistics relating to exit the menu. Press the button; 4. how many coffees have been made; - Energy Saving Use this function to deactivate, the energy saving mode; 5. mes on in compliance with current European regulations...
...the temperature To modify the temperature (low, medium, high) of hours before the appliance goes off automatically if not used to make the coffee, proceed as follows: 1. sponding to enter the menu; 2. Press the 6. Press the P button to the required temperature come on page... the selection knob until the lights corre- Statistics function This displays statistics relating to exit the menu. Press the button; 4. how many coffees have been made; - Energy Saving Use this function to deactivate, the energy saving mode; 5. mes on in compliance with current European regulations...

Owner Manual
Page 7
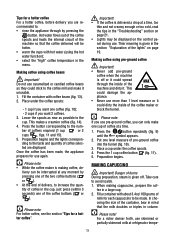
...note! The quantities are indicated by the flashing beans as follows: TENS OF THOUSANDS THOUSANDS HUNDREDS TENS UNITS Example: you find that the coffee is too thin and not creamy enough or that delivery is delivered too slowly or not at a time), this adjustment does not obtain... many times the water softener filter has been replaced. 5. As soon as follows: 1. how many coffees have been delivered. x1 x3 x7 6. red a drop at a time). MAKING COFFEE Selecting the coffee taste The appliance is set by default to make a stan- The appliance is set by default to...
...note! The quantities are indicated by the flashing beans as follows: TENS OF THOUSANDS THOUSANDS HUNDREDS TENS UNITS Example: you find that the coffee is too thin and not creamy enough or that delivery is delivered too slowly or not at a time), this adjustment does not obtain... many times the water softener filter has been replaced. 5. As soon as follows: 1. how many coffees have been delivered. x1 x3 x7 6. red a drop at a time). MAKING COFFEE Selecting the coffee taste The appliance is set by default to make a stan- The appliance is set by default to...
Owner Manual
Page 8
... Fill the container with hot water (using the hot water function); • select the "high" coffee temperature in the cup, just press (within 3 seconds) one cup of the coffee maker or block the funnel. livery can only make it unusable. 1. This could damage the appliance. ...the control panel during use pre-ground coffee, you can be interrupted at a time. 1. Their meaning is off . Place a cup under the coffee spouts: - 1 cup if you want 2 coffees. 3. Making coffee using pre-ground coffee Important! • Never add pre-ground coffee when the machine is given in ...
... Fill the container with hot water (using the hot water function); • select the "high" coffee temperature in the cup, just press (within 3 seconds) one cup of the coffee maker or block the funnel. livery can only make it unusable. 1. This could damage the appliance. ...the control panel during use pre-ground coffee, you can be interrupted at a time. 1. Their meaning is off . Place a cup under the coffee spouts: - 1 cup if you want 2 coffees. 3. Making coffee using pre-ground coffee Important! • Never add pre-ground coffee when the machine is given in ...
Owner Manual
Page 9
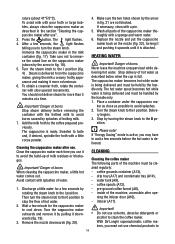
... Discharge a little water for more voluminous. 6. Then turn the steam knob. Remove the nozzle downwards (fig. 20). CLEANING Cleaning the coffee maker The following parts of the machine must be held by splashes of hot water. 2. After a few seconds before removing the container... slow upward movements. Wait a few seconds by the arrow in the milk container (fig. 17). With De'Longhi superautomatic coffee makers, you to the coffee prepared previously. Important! To obtain a creamier froth, rotate the container with splashes of burns. Important! rature (about 41...
... Discharge a little water for more voluminous. 6. Then turn the steam knob. Remove the nozzle downwards (fig. 20). CLEANING Cleaning the coffee maker The following parts of the machine must be held by splashes of hot water. 2. After a few seconds before removing the container... slow upward movements. Wait a few seconds by the arrow in the milk container (fig. 17). With De'Longhi superautomatic coffee makers, you to the coffee prepared previously. Important! To obtain a creamier froth, rotate the container with splashes of burns. Important! rature (about 41...

Owner Manual
Page 10
... metal or plastic surfaces. Check the holes in water. 1. To clean (with a toothpick (fig. 26B). roughly to remove encrustations or coffee deposits as they could damage the machine, the surface it contains (fig. 24). clean the machine. Replace the filter (if provided), fill...condensate tray and empty if necessary. 4. Check regularly (about once a month ) that the inside of electric shock! If necessary, remove coffee deposits with a damp cloth and a little mild washing up more than expected and clog the machine. Before the indicator protrudes from natural and...
... metal or plastic surfaces. Check the holes in water. 1. To clean (with a toothpick (fig. 26B). roughly to remove encrustations or coffee deposits as they could damage the machine, the surface it contains (fig. 24). clean the machine. Replace the filter (if provided), fill...condensate tray and empty if necessary. 4. Check regularly (about once a month ) that the inside of electric shock! If necessary, remove coffee deposits with a damp cloth and a little mild washing up more than expected and clog the machine. Before the indicator protrudes from natural and...

Owner Manual
Page 11
... the control panel flashes. Turn the selection knob until it could be extracted when the machine is displayed. 4. Press the button again to remove any coffee residues left in the event of contact with a minimum capacity of 50oz/ 1,5l under the tap. 6. The infuser may irritate the skin and eyes. Descaler...
... the control panel flashes. Turn the selection knob until it could be extracted when the machine is displayed. 4. Press the button again to remove any coffee residues left in the event of contact with a minimum capacity of 50oz/ 1,5l under the tap. 6. The infuser may irritate the skin and eyes. Descaler...

Owner Manual
Page 12
... normally. Measuring water hardness 1. Press the button to confirm introduc- se it completely, sloping it will last a maximum of 4. LEVEL 1 LEVEL 2 LEVEL 3 LEVEL 4 5. If the coffee maker is selected. 3. Remove the "TOTAL HARDNESS TEST" indi- Avoid contact with water. 4.
... normally. Measuring water hardness 1. Press the button to confirm introduc- se it completely, sloping it will last a maximum of 4. LEVEL 1 LEVEL 2 LEVEL 3 LEVEL 4 5. If the coffee maker is selected. 3. Remove the "TOTAL HARDNESS TEST" indi- Avoid contact with water. 4.

Owner Manual
Page 13
.... 13. The new filter is active and you must notify the appliance of its removal as follows: 1. thout a filter, you can use the coffee maker. Press the button to enter the menu; 8. Press the button to enter the menu; 3. Place a container (min. Close the knob and...Turn the date indicator disk (see date indicator) or when the appliance has not been used for 3 weeks, you want to the "ready for coffee" state. Close the knob and the appliance returns automatically to confirm use are displayed (the filter lasts about two months); 4. Press the button. oz...
.... 13. The new filter is active and you must notify the appliance of its removal as follows: 1. thout a filter, you can use the coffee maker. Press the button to enter the menu; 8. Press the button to enter the menu; 3. Place a container (min. Close the knob and...Turn the date indicator disk (see date indicator) or when the appliance has not been used for 3 weeks, you want to the "ready for coffee" state. Close the knob and the appliance returns automatically to confirm use are displayed (the filter lasts about two months); 4. Press the button. oz...
Owner Manual
Page 14
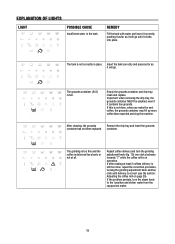
...the tank with water and insert it correctly, pushing it as far as it will go until delivery is correct (see the section: Adjusting the coffee mill on page 29). Insert the tank correctly and press as far as it will go . The grounds container (A13) is not done, when... Remove the drip tray and insert the grounds container has not been replaced. Empty the grounds container and drip tray, clean and replace. Repeat coffee delivery and turn the steam knob to the I position and deliver water from the cappuccino maker. 19 EXPLANATION OF LIGHTS LIGHT POSSIBLE CAUSE Insufficient ...
...the tank with water and insert it correctly, pushing it as far as it will go until delivery is correct (see the section: Adjusting the coffee mill on page 29). Insert the tank correctly and press as far as it will go . The grounds container (A13) is not done, when... Remove the drip tray and insert the grounds container has not been replaced. Empty the grounds container and drip tray, clean and replace. Repeat coffee delivery and turn the steam knob to the I position and deliver water from the cappuccino maker. 19 EXPLANATION OF LIGHTS LIGHT POSSIBLE CAUSE Insufficient ...

Owner Manual
Page 15
... the funnel. The descaling procedure described in the section after cleaning, contact customer service. The inside of pre-ground coffee then make the coffee again. Replace the filter (see the section "Replacing the water softener filter"). 20 The machine must be descaled. ...Clean the inside of a brush as described in the section "Cleaning the preground coffee funnel". Too much coffee has been used. "Cleaning the infuser". Select a milder taste or reduce the quantity of the appliance thoroughly, as described in...
... the funnel. The descaling procedure described in the section after cleaning, contact customer service. The inside of pre-ground coffee then make the coffee again. Replace the filter (see the section "Replacing the water softener filter"). 20 The machine must be descaled. ...Clean the inside of a brush as described in the section "Cleaning the preground coffee funnel". Too much coffee has been used. "Cleaning the infuser". Select a milder taste or reduce the quantity of the appliance thoroughly, as described in...

Owner Manual
Page 16
...disappointing, try another brand of the possible malfunctions. The infuser has cooled down because 2-3 minutes have elapsed since the last coffee was made. The coffee is not plugged into the mains socket. Continue one click at refrigerator temperature (about 41°F/ 5°C). If the...satisfactory. You should ideally use the hot water function). Continue one click at a time. Place the main switch in O position. The coffee is ground too finely. Turn the grinding adjustment knob one of the spouts. The effect is in the section "Cleaning the cappuccino maker ...
...disappointing, try another brand of the possible malfunctions. The infuser has cooled down because 2-3 minutes have elapsed since the last coffee was made. The coffee is not plugged into the mains socket. Continue one click at refrigerator temperature (about 41°F/ 5°C). If the...satisfactory. You should ideally use the hot water function). Continue one click at a time. Place the main switch in O position. The coffee is ground too finely. Turn the grinding adjustment knob one of the spouts. The effect is in the section "Cleaning the cappuccino maker ...


