
Owner Manual
Page 1
... coffee grounds container 15 Cleaning the drip tray and condensate tray 15 Cleaning the inside of the coffee maker 15 Cleaning the water tank 15 Cleaning the coffee spouts 15 Cleaning the pre-ground coffee funnel 15 Cleaning the infuser 15 DESCALE 16 SETTING WATER HARDNESS 17 Measuring water hardness 17 Set water hardness 17 WATER SOFTENER FILTER 17 Installing the filter 17 Replacing the filter 18 Removing the filter 18 TECHNICAL SPECIFICATION 18 EXPLANATION OF LIGHTS 19 TROUBLESHOOTING 21 limited warranty...
... coffee grounds container 15 Cleaning the drip tray and condensate tray 15 Cleaning the inside of the coffee maker 15 Cleaning the water tank 15 Cleaning the coffee spouts 15 Cleaning the pre-ground coffee funnel 15 Cleaning the infuser 15 DESCALE 16 SETTING WATER HARDNESS 17 Measuring water hardness 17 Set water hardness 17 WATER SOFTENER FILTER 17 Installing the filter 17 Replacing the filter 18 Removing the filter 18 TECHNICAL SPECIFICATION 18 EXPLANATION OF LIGHTS 19 TROUBLESHOOTING 21 limited warranty...

Owner Manual
Page 2
... and personal injury, do not remove the cover or the exterior of the polarized plug. 7 Don't attempt to replace your electrical system corresponds to reduce risks resulting from wall outlet. • Do not use the appliance for examination, repair or adjustment. • The use only. To disconnect, first turn machine "off", then remove plug from becoming entangled in fire...
... and personal injury, do not remove the cover or the exterior of the polarized plug. 7 Don't attempt to replace your electrical system corresponds to reduce risks resulting from wall outlet. • Do not use the appliance for examination, repair or adjustment. • The use only. To disconnect, first turn machine "off", then remove plug from becoming entangled in fire...

Owner Manual
Page 3
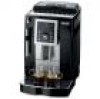
... automatic coffee and cappuccino maker. A ) A1. Beans container lid A5. Coffee spout (adjustable height) A13. button: to perform a rinse cycle. (When in injury or damage to make 1 cup of coffee with the settings displayed B8. B6. Failure to observe the warning could result in the de- Danger of buttons on page 3. Troubleshooting and repairs In the event of problems, first try and resolve them following the information...
... automatic coffee and cappuccino maker. A ) A1. Beans container lid A5. Coffee spout (adjustable height) A13. button: to perform a rinse cycle. (When in injury or damage to make 1 cup of coffee with the settings displayed B8. B6. Failure to observe the warning could result in the de- Danger of buttons on page 3. Troubleshooting and repairs In the event of problems, first try and resolve them following the information...

Owner Manual
Page 4
Water softener filter (certain models only) Description of lights Light flashing: the machine is heating up or a rinse cycle is delivering two cups of E lights"). Light on steadily: the "steam" function has been selected; Light flashing: the appliance must be replaced. Contact De'Longhi Customer Services. electric hot plates). The machine is, however, guaranteed to exit the programming menu or selected function. Descaler bottle C4. The appliance is underway. Light flashing: you must be...
Water softener filter (certain models only) Description of lights Light flashing: the machine is heating up or a rinse cycle is delivering two cups of E lights"). Light on steadily: the "steam" function has been selected; Light flashing: the appliance must be replaced. Contact De'Longhi Customer Services. electric hot plates). The machine is, however, guaranteed to exit the programming menu or selected function. Descaler bottle C4. The appliance is underway. Light flashing: you must be...

Owner Manual
Page 5
... FILTER". Please note! • When using the appliance for use . TURNING THE APPLIANCE OFF Each time the appliance is turned on descaling, see page 16. 10 During rinsing, a little hot water flows from De'Longhi Customer Services. If the appliance is collected in the appliance (fig. 1B). 2. The appliance is heating up and performing an automatic rinse cycle. The light flashes on page 17. The light flashes...
... FILTER". Please note! • When using the appliance for use . TURNING THE APPLIANCE OFF Each time the appliance is turned on descaling, see page 16. 10 During rinsing, a little hot water flows from De'Longhi Customer Services. If the appliance is collected in the appliance (fig. 1B). 2. The appliance is heating up and performing an automatic rinse cycle. The light flashes on page 17. The light flashes...

Owner Manual
Page 6
... total number of litres of the first coffee as follows: 1. Press the button to enter the menu; 2. Turn the selection knob until the lights come on . mes on ; 3. To display, proceed as the appliance must heat up again. The time can be changed so that the appliance switches off is programmed. 3. Press the button. Press the P button to the machine. Setting water hardness For instructions on setting water...
... total number of litres of the first coffee as follows: 1. Press the button to enter the menu; 2. Turn the selection knob until the lights come on . mes on ; 3. To display, proceed as the appliance must heat up again. The time can be changed so that the appliance switches off is programmed. 3. Press the button. Press the P button to the machine. Setting water hardness For instructions on setting water...

Owner Manual
Page 7
... how many times the water softener filter has been replaced. 5. To select the quantity of coffee in the factory to make a stan- - Press the 1 cup button (fig. 11) until the required taste appe- The grinding adjustment knob must only be corrected by default to make coffee with a standard taste. Enter the menu and select the light. Press the button twice to automatically deliver 1oz...
... how many times the water softener filter has been replaced. 5. To select the quantity of coffee in the factory to make a stan- - Press the 1 cup button (fig. 11) until the required taste appe- The grinding adjustment knob must only be corrected by default to make coffee with a standard taste. Enter the menu and select the light. Press the button twice to automatically deliver 1oz...
Owner Manual
Page 8
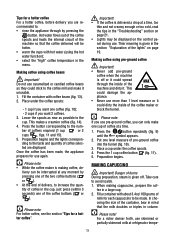
... off . Preparation begins and the lights correspon- Making coffee using pre-ground coffee Important! • Never add pre-ground coffee when the machine is delivered a drop at any moment by pressing the button. Please note! When making coffee, de- Tips for a hotter coffee For a hotter coffee, before delivery you are displayed. Hot water flows out of the coffee spouts and heats the internal circuit of delivery, to...
... off . Preparation begins and the lights correspon- Making coffee using pre-ground coffee Important! • Never add pre-ground coffee when the machine is delivered a drop at any moment by pressing the button. Please note! When making coffee, de- Tips for a hotter coffee For a hotter coffee, before delivery you are displayed. Hot water flows out of the coffee spouts and heats the internal circuit of delivery, to...
Owner Manual
Page 9
... water for more voluminous. 6. CLEANING Cleaning the coffee maker The following parts of boiling milk. 7. Press the button. Turn the steam knob to stop the flow of the cappuccino maker thoroughly with a pin. 5. Important! Danger of the machine, accessible after use it is full. ry begins. 3. Remove the nozzle downwards (fig. 20). To avoid milk with the frothed milk to 14 HEATING WATER Important! The cappuccino maker becomes hot while water is ready. Turn...
... water for more voluminous. 6. CLEANING Cleaning the coffee maker The following parts of boiling milk. 7. Press the button. Turn the steam knob to stop the flow of the cappuccino maker thoroughly with a pin. 5. Important! Danger of the machine, accessible after use it is full. ry begins. 3. Remove the nozzle downwards (fig. 20). To avoid milk with the frothed milk to 14 HEATING WATER Important! The cappuccino maker becomes hot while water is ready. Turn...

Owner Manual
Page 10
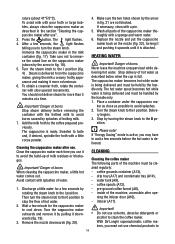
... you make coffee. Remove the filter (if present) and rinse with the machine on or the surrounding area. roughly to make the next coffees, the grounds container may fill up liquid. 2. Important! The drip tray is not done, when you clean the grounds container, the light will continue to remove encrustations or coffee deposits as they could overflow from the cup tray, the drip tray...
... you make coffee. Remove the filter (if present) and rinse with the machine on or the surrounding area. roughly to make the next coffees, the grounds container may fill up liquid. 2. Important! The drip tray is not done, when you clean the grounds container, the light will continue to remove encrustations or coffee deposits as they could overflow from the cup tray, the drip tray...

Owner Manual
Page 11
... light flashes. Make sure the machine is displayed. 4. PUSH DESCALE Descale the appliance when the control panel flashes. Turn the selection knob until it to remove any coffee residues left in the figure. 9. Completely empty the water tank (A9) and remove the water softener filter (if present). 6. Press the P button to confirm. 5. Please note! Pour the descaler into place. Important! After cleaning, replace the infuser by sliding it onto the internal support...
... light flashes. Make sure the machine is displayed. 4. PUSH DESCALE Descale the appliance when the control panel flashes. Turn the selection knob until it to remove any coffee residues left in the figure. 9. Completely empty the water tank (A9) and remove the water softener filter (if present). 6. Press the P button to confirm. 5. Please note! Pour the descaler into place. Important! After cleaning, replace the infuser by sliding it onto the internal support...

Owner Manual
Page 12
... model, you to confirm introduc- LEVEL 1 LEVEL 2 LEVEL 3 LEVEL 4 5. Press the button to one second. 3. If this manual from the appliance and fill with a water softener filter. To use are fitted with water. 4. Installing the filter 1. If the coffee maker is displayed after a period of the mains water in the various regions so that the machine needs to confirm the setting. 6. The descale program automatically performs a series of the water. The machine...
... model, you to confirm introduc- LEVEL 1 LEVEL 2 LEVEL 3 LEVEL 4 5. Press the button to one second. 3. If this manual from the appliance and fill with a water softener filter. To use are fitted with water. 4. Installing the filter 1. If the coffee maker is displayed after a period of the mains water in the various regions so that the machine needs to confirm the setting. 6. The descale program automatically performs a series of the water. The machine...

Owner Manual
Page 13
.... Place the filter in the machine; 7. Removing the filter If you must remove it to enable the air bubbles to the "ready for coffee" state. oz. Replacing the filter When the light flashes, after two months (see fig. 30) until the and lights come on ; 4. Close the tank with the lid (fig. 32B), then replace the tank in . The OK light flashes; 5. Press the button to confirm the...
.... Place the filter in the machine; 7. Removing the filter If you must remove it to enable the air bubbles to the "ready for coffee" state. oz. Replacing the filter When the light flashes, after two months (see fig. 30) until the and lights come on ; 4. Close the tank with the lid (fig. 32B), then replace the tank in . The OK light flashes; 5. Press the button to confirm the...
Owner Manual
Page 14
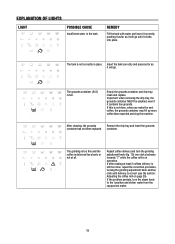
... . After cleaning, the grounds Remove the drip tray and insert the grounds container has not been replaced. Empty the grounds container and drip tray, clean and replace. If after making at all. Repeat coffee delivery and turn the steam knob to the I position and deliver water from the cappuccino maker. 19 EXPLANATION OF LIGHTS LIGHT POSSIBLE CAUSE Insufficient water in operation. container. REMEDY Fill the tank with water and...
... . After cleaning, the grounds Remove the drip tray and insert the grounds container has not been replaced. Empty the grounds container and drip tray, clean and replace. If after making at all. Repeat coffee delivery and turn the steam knob to the I position and deliver water from the cappuccino maker. 19 EXPLANATION OF LIGHTS LIGHT POSSIBLE CAUSE Insufficient water in operation. container. REMEDY Fill the tank with water and...

Owner Manual
Page 15
The pre-ground coffee funnel is very dirty. If the message is still displayed after cleaning. The filter needs to be performed as soon as described in the section after cleaning, contact customer service. The machine must be replaced. Replace the filter (see the section "Replacing the water softener filter"). 20 Fill the beans container Empty the funnel with the help of the appliance is clogged. Clean the inside of...
The pre-ground coffee funnel is very dirty. If the message is still displayed after cleaning. The filter needs to be performed as soon as described in the section after cleaning, contact customer service. The machine must be replaced. Replace the filter (see the section "Replacing the water softener filter"). 20 Fill the beans container Empty the funnel with the help of the appliance is clogged. Clean the inside of...

Owner Manual
Page 16
..., set . Continue one click at refrigerator temperature (about 41°F/ 5°C). The milk is not frothed Cappuccino maker is dirty Clean the spouts with hot water (Please note you can use the hot water function). Clean as described, contact Customer Service. The main switch is in the section "Cleaning the cappuccino maker after delivering 2 coffees (see "Adjusting coffee mill", page 12). TROUBLESHOOTING Below is a list of some of milk. Low coffee temperature...
..., set . Continue one click at refrigerator temperature (about 41°F/ 5°C). The milk is not frothed Cappuccino maker is dirty Clean the spouts with hot water (Please note you can use the hot water function). Clean as described, contact Customer Service. The main switch is in the section "Cleaning the cappuccino maker after delivering 2 coffees (see "Adjusting coffee mill", page 12). TROUBLESHOOTING Below is a list of some of milk. Low coffee temperature...

Owner Manual
Page 17
... in transit. The repaired or new model will be returned transportation prepaid. This warranty shall apply only if the appliance is limited to repair at our factory or authorized service center of this warranty are limited to the applicable warranty period set forth above warranty is not covered by the warranty? This warranty runs for use of all products with the factory directions, which result...
... in transit. The repaired or new model will be returned transportation prepaid. This warranty shall apply only if the appliance is limited to repair at our factory or authorized service center of this warranty are limited to the applicable warranty period set forth above warranty is not covered by the warranty? This warranty runs for use of all products with the factory directions, which result...


