
Owner Manual
Page 2
...can be dispersed. ELECTRICAL CONNECTION Only use three-wire extension cords with three-pin plugs and sockets that the power outlet are not sure that fit the plug on the appliance. This appliance is available from authorized resellers. The plug must be connected to be used with a rated capacity not below ... around the connectors to avoid the possibility of the power cable for longer life; If an extension cord is required, only use a three-pin, 120 Volt, 60 Hz power outlet GROUNDING INSTRUCTIONS MAKE SURE THAT THE PLUG IS CORRECTLY GROUNDED This appliance must be grounded: in...
...can be dispersed. ELECTRICAL CONNECTION Only use three-wire extension cords with three-pin plugs and sockets that the power outlet are not sure that fit the plug on the appliance. This appliance is available from authorized resellers. The plug must be connected to be used with a rated capacity not below ... around the connectors to avoid the possibility of the power cable for longer life; If an extension cord is required, only use a three-pin, 120 Volt, 60 Hz power outlet GROUNDING INSTRUCTIONS MAKE SURE THAT THE PLUG IS CORRECTLY GROUNDED This appliance must be grounded: in...

Owner Manual
Page 3
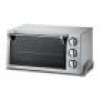
DESCRIPTION OF THE APPLIANCE A thermostat knob B timer knob C indicator light D function selector knob E glass door F bottom heating element G 12" pizza-shaped wire rack H bake pan I reversible wire rack L crumb tray M top heating element N interior light O broil rack M I N L F A B D C E G O H 2
DESCRIPTION OF THE APPLIANCE A thermostat knob B timer knob C indicator light D function selector knob E glass door F bottom heating element G 12" pizza-shaped wire rack H bake pan I reversible wire rack L crumb tray M top heating element N interior light O broil rack M I N L F A B D C E G O H 2

Owner Manual
Page 4
... the Timer knob in the "OFF" position and the thermostat knob in the instructions. 21. Do not let the power cable hang from the accessories recommended by or comes into contact with flammable materials, such as described in the "•" position before cleaning it is hot. 3 Do not use on top of the oven with the appliance. 6. When broiling, the bake pan and the wire racks must...
... the Timer knob in the "OFF" position and the thermostat knob in the instructions. 21. Do not let the power cable hang from the accessories recommended by or comes into contact with flammable materials, such as described in the "•" position before cleaning it is hot. 3 Do not use on top of the oven with the appliance. 6. When broiling, the bake pan and the wire racks must...

Owner Manual
Page 5
... for all types of bread. SUMMARY TABLE Program Function selector knob position Thermostat knob Wire rack and position accessory position Defrost DEFROST • Notes/Tips - For details on two levels at the same time. Ideal for cooking on how to use the accessories, refer to the table on the surface ("au gratin") and bread. without broil rack Grilling 4 BROIL TOAST/BROIL/500 model with broil rack Ideal for toasting slices of traditional grilling: hamburgers...
... for all types of bread. SUMMARY TABLE Program Function selector knob position Thermostat knob Wire rack and position accessory position Defrost DEFROST • Notes/Tips - For details on two levels at the same time. Ideal for cooking on how to use the accessories, refer to the table on the surface ("au gratin") and bread. without broil rack Grilling 4 BROIL TOAST/BROIL/500 model with broil rack Ideal for toasting slices of traditional grilling: hamburgers...

Owner Manual
Page 6
... oven is switched on at maximum power) Interior light (N) anc Indicator light (C) • If the interior light (N) has been provided, said light will not have the function of grilling (see page 8 Thermostat knob in the "TOAST/BROIL" position. • For all types of a temperature indicator). 5 Function selector knob (D) This knob is used to select the cooking functions available, that is: DEFROST (ventilation only) BAKE/TOAST (only top heating element and bottom heating element on) FAN & BAKE (top heating element, bottom heating element...
... oven is switched on at maximum power) Interior light (N) anc Indicator light (C) • If the interior light (N) has been provided, said light will not have the function of grilling (see page 8 Thermostat knob in the "TOAST/BROIL" position. • For all types of a temperature indicator). 5 Function selector knob (D) This knob is used to select the cooking functions available, that is: DEFROST (ventilation only) BAKE/TOAST (only top heating element and bottom heating element on) FAN & BAKE (top heating element, bottom heating element...

Owner Manual
Page 7
... the table. • Turn the function selector knob (D) to the "FAN & BAKE" position. • Select the required temperature by turning the thermostat knob (A). • Turn the Timer knob (B) to the "ON" position. • After having pre-heated the oven for 5 minutes, place the food to be defrosted on a tray on the wire rack, then close the door. • When defrosting is also suitable for cooking different foods on two levels...
... the table. • Turn the function selector knob (D) to the "FAN & BAKE" position. • Select the required temperature by turning the thermostat knob (A). • Turn the Timer knob (B) to the "ON" position. • After having pre-heated the oven for 5 minutes, place the food to be defrosted on a tray on the wire rack, then close the door. • When defrosting is also suitable for cooking different foods on two levels...

Owner Manual
Page 8
... g/1.2 lb Zucchini with oil. lower " " " " " " Use the bake pan, turn after 24 minutes. Use a mold and turn the Timer knob (B) manually to the "ON" position. • After having pre-heated the oven for 5 minutes, place the food inside. • When cooking is ideal for at least 1 day before serving. 7 Use the bake pan greased with whipped egg-whites and cakes that require long cooking times (over 60 min.). Let...
... g/1.2 lb Zucchini with oil. lower " " " " " " Use the bake pan, turn after 24 minutes. Use a mold and turn the Timer knob (B) manually to the "ON" position. • After having pre-heated the oven for 5 minutes, place the food inside. • When cooking is ideal for at least 1 day before serving. 7 Use the bake pan greased with whipped egg-whites and cakes that require long cooking times (over 60 min.). Let...

Owner Manual
Page 9
... heating elements automatically switch off , without the risk of bread requires a lower setting than for multiple slices. 8 Place the wire rack as desired. 5. For darker toasting re-start the cycle by turning the Timer knob (B) to the "OFF" position, to be turned clockwise. Turn the thermostat knob (A) to the "TOAST/BROIL" position and the function selector (D) to the "•" position. Just one slice Toasting two slices For consecutive uses, reduce the set level. The Timer knob (B) should be toasted...
... heating elements automatically switch off , without the risk of bread requires a lower setting than for multiple slices. 8 Place the wire rack as desired. 5. For darker toasting re-start the cycle by turning the Timer knob (B) to the "OFF" position, to be turned clockwise. Turn the thermostat knob (A) to the "TOAST/BROIL" position and the function selector (D) to the "•" position. Just one slice Toasting two slices For consecutive uses, reduce the set level. The Timer knob (B) should be toasted...

Owner Manual
Page 10
..., turn the Timer knob (B) manually to the "OFF" position. upper " " " " Turn after 13 minutes. Turn after 14 minutes. top heating element bottom heating element Note: the wire racks must be positioned as shown in the upper guide. • Turn the function selector knob (D) to the BROIL position. • Place the food to be cooked at the same time with the convection oven The convection oven function allows different foods to the side. 9 Turn after 14 minutes. the air inside...
..., turn the Timer knob (B) manually to the "OFF" position. upper " " " " Turn after 13 minutes. Turn after 14 minutes. top heating element bottom heating element Note: the wire racks must be positioned as shown in the upper guide. • Turn the function selector knob (D) to the BROIL position. • Place the food to be cooked at the same time with the convection oven The convection oven function allows different foods to the side. 9 Turn after 14 minutes. the air inside...
Owner Manual
Page 11
... inside walls and the enamel or painted surfaces of your oven. To clean the aluminum surfaces on the top of water. Avoid using abrasive products that corrode aluminum (detergents in spray cans) and never scrape the walls with a soap and water solution; All the accessories are washed like normal dishes, either by hand. If your oven has a crumb tray...
... inside walls and the enamel or painted surfaces of your oven. To clean the aluminum surfaces on the top of water. Avoid using abrasive products that corrode aluminum (detergents in spray cans) and never scrape the walls with a soap and water solution; All the accessories are washed like normal dishes, either by hand. If your oven has a crumb tray...

Owner Manual
Page 12
... lasts, so the above . If repairs become necessary, see contact information below: U.S. For all accessories, spare parts or replacement parts, please contact our parts division at www.delonghi.com. LIMITED WARRANTY This warranty applies to all products with the factory directions, which accompany it, and on an Alternating current ( AC ) circuit. The repaired or new model will be returned transportation prepaid...
... lasts, so the above . If repairs become necessary, see contact information below: U.S. For all accessories, spare parts or replacement parts, please contact our parts division at www.delonghi.com. LIMITED WARRANTY This warranty applies to all products with the factory directions, which accompany it, and on an Alternating current ( AC ) circuit. The repaired or new model will be returned transportation prepaid...

