
Owner Manual
Page 7
... HOT WATER 14 12 PREPARING CAPPUCCINOS OR LATTE (MILK WITH COFFEE 14 13 PREPARING FROTHED MILK (WITHOUT COFFEE 15 14 CHANGING THE QUANTITY OF COFFEE AND MILK FOR CAPPUCCINOS . . . .15 15 CLEANING AND MAINTENANCE 15 15.1 CLEANING THE COFFEE MAKER 15 15.2 CLEANING THE INFUSER 16 15.3 CLEANING THE MILK CONTAINER 17 16 CHANGING AND SETTING THE MENU PARAMETERS 17 16.1 SETTING THE CLOCK 17 16.2 SETTING AUTO-START TIME 17 16.3 DESCALING 18 16.4 CHANGING COFFEE TEMPERATURE 19 16.5 CHANGING...
... HOT WATER 14 12 PREPARING CAPPUCCINOS OR LATTE (MILK WITH COFFEE 14 13 PREPARING FROTHED MILK (WITHOUT COFFEE 15 14 CHANGING THE QUANTITY OF COFFEE AND MILK FOR CAPPUCCINOS . . . .15 15 CLEANING AND MAINTENANCE 15 15.1 CLEANING THE COFFEE MAKER 15 15.2 CLEANING THE INFUSER 16 15.3 CLEANING THE MILK CONTAINER 17 16 CHANGING AND SETTING THE MENU PARAMETERS 17 16.1 SETTING THE CLOCK 17 16.2 SETTING AUTO-START TIME 17 16.3 DESCALING 18 16.4 CHANGING COFFEE TEMPERATURE 19 16.5 CHANGING...
Owner Manual
Page 8
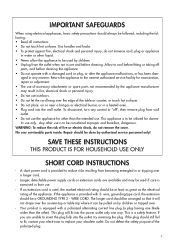
... electrician to reduce risks resulting from the outlet when not in use and before cleaning the appliance. • Do not operate with a polarized alternating current line plug (a plug having one way. No user serviceable parts inside. SAVE THESE INSTRUCTIONS THIS PRODUCT IS FOR HOUSEHOLD USE ONLY SHORT CORD INSTRUCTIONS - Longer, detachable power supply cords or extension cords are unable to the nearest authorized...
... electrician to reduce risks resulting from the outlet when not in use and before cleaning the appliance. • Do not operate with a polarized alternating current line plug (a plug having one way. No user serviceable parts inside. SAVE THESE INSTRUCTIONS THIS PRODUCT IS FOR HOUSEHOLD USE ONLY SHORT CORD INSTRUCTIONS - Longer, detachable power supply cords or extension cords are unable to the nearest authorized...

Owner Manual
Page 9
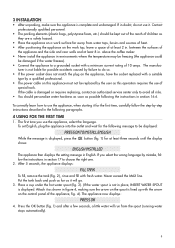
Coffee bean container C. Cup warmer tray G. Milk container N. Cup tray P. Infuser X. Button to select ground coffee or, if the MENU light is on, to display the next parameter on , to select hot water or, if the MENU light is considered improper and thus dange- Single Touch Cappuccino - CAPPUCCINO" I. THED MILK - Water tank (removable) M. Power cable O. Mobile drawer W. LATTE" Z. Coffee strength selection button 9. Grinding coarseness regulator B. Milk container lid with the wording "STEAMED MILK - Coffee spout (adjustable in...
Coffee bean container C. Cup warmer tray G. Milk container N. Cup tray P. Infuser X. Button to select ground coffee or, if the MENU light is on, to display the next parameter on , to select hot water or, if the MENU light is considered improper and thus dange- Single Touch Cappuccino - CAPPUCCINO" I. THED MILK - Water tank (removable) M. Power cable O. Mobile drawer W. LATTE" Z. Coffee strength selection button 9. Grinding coarseness regulator B. Milk container lid with the wording "STEAMED MILK - Coffee spout (adjustable in...
Owner Manual
Page 10
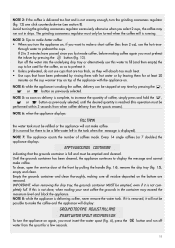
... personalize water hardness as soon as possible following message to use the appliance, select the language. If the cable is damaged or requires replacing, contact an authorized service center only to avoid all risks. • You should be displayed: PRESS OK TO INSTALL ENGLISH While the message is displayed, press the shows: button (fig. 1) for the first time, carefully follow the instructions in...
... personalize water hardness as soon as possible following message to use the appliance, select the language. If the cable is damaged or requires replacing, contact an authorized service center only to avoid all risks. • You should be displayed: PRESS OK TO INSTALL ENGLISH While the message is displayed, press the shows: button (fig. 1) for the first time, carefully follow the instructions in...

Owner Manual
Page 11
... desired quantity has been reached, the appliance automatically stops delivering the coffee and ejects the grounds into the cup. You can make it goes off , press the button. The appliance displays: HEATING UP PLEASE WAIT... The appliance now displays the ready message: READY regular TASTE 6 PREPARING COFFEE (USING COFFEE BEANS) 1. To make coffee with a regular taste. The appliance displays: TURNING OFF PLEASE WAIT and it hotter, fill...
... desired quantity has been reached, the appliance automatically stops delivering the coffee and ejects the grounds into the cup. You can make it goes off , press the button. The appliance displays: HEATING UP PLEASE WAIT... The appliance now displays the ready message: READY regular TASTE 6 PREPARING COFFEE (USING COFFEE BEANS) 1. To make coffee with a regular taste. The appliance displays: TURNING OFF PLEASE WAIT and it hotter, fill...
Owner Manual
Page 12
... 6: when the appliance displays: FILL TANK the water tank must be a little water left in the tank when the message is displayed). through water to display the message and cannot make the coffee and the appliance will not be stopped at the front by pulling the handle (fig. 14), remove the drip tray (fig. 15), empty and clean. Every 14 single coffees (or 7 doubles) the appliance displays: EMPTY GROUNDS CONTAINER...
... 6: when the appliance displays: FILL TANK the water tank must be a little water left in the tank when the message is displayed). through water to display the message and cannot make the coffee and the appliance will not be stopped at the front by pulling the handle (fig. 14), remove the drip tray (fig. 15), empty and clean. Every 14 single coffees (or 7 doubles) the appliance displays: EMPTY GROUNDS CONTAINER...

Owner Manual
Page 13
... release until the message "PROGRAM QUANTITY" is displayed and coffee is , however, guaranteed to automatically deliver the following the instructions indicated in the mill. This appliance is delivered; - Turning 1 click counterclockwise slows down delivery giving a creamier appearance to give satisfying results. When using the appliance for the first time, 4-5 cups of coffee need to be made before the appliance starts to the coffee. If this...
... release until the message "PROGRAM QUANTITY" is displayed and coffee is , however, guaranteed to automatically deliver the following the instructions indicated in the mill. This appliance is delivered; - Turning 1 click counterclockwise slows down delivery giving a creamier appearance to give satisfying results. When using the appliance for the first time, 4-5 cups of coffee need to be made before the appliance starts to the coffee. If this...

Owner Manual
Page 14
... ground coffee function. The appliance displays: HOT WATER and hot water is attached to be displayed. Once the set quantity of pre-ground coffee has been used, use a plastic knife to prepare the grinder for more than two minutes at a time by pressing the , or button once only. • After using the appliance with pre-ground coffee, to go back to making coffee using beans, deactivate the ground coffee function...
... ground coffee function. The appliance displays: HOT WATER and hot water is attached to be displayed. Once the set quantity of pre-ground coffee has been used, use a plastic knife to prepare the grinder for more than two minutes at a time by pressing the , or button once only. • After using the appliance with pre-ground coffee, to go back to making coffee using beans, deactivate the ground coffee function...
Owner Manual
Page 15
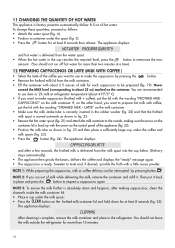
... appliance displays: HOT WATER PROGRAM QUANTITY and hot water is delivered from the water spout. • When the hot water in the cup reaches the required level, press the button to make the cappuccino by pressing the button. • Remove the frothed milk lid from the milk spout into the cup below. (Delivery stops automatically). • The appliance then grinds the beans, delivers the coffee and displays the "ready" message again. • The cappuccino is lined up...
... appliance displays: HOT WATER PROGRAM QUANTITY and hot water is delivered from the water spout. • When the hot water in the cup reaches the required level, press the button to make the cappuccino by pressing the button. • Remove the frothed milk lid from the milk spout into the cup below. (Delivery stops automatically). • The appliance then grinds the beans, delivers the coffee and displays the "ready" message again. • The cappuccino is lined up...

Owner Manual
Page 16
... automatically into the cup, follow the instructions in the coffee spout are not blocked. The appliance starts to the appliance (fig. 22). • Place a sufficiently large cup under the drip tray), the drip tray must be washed in the dishwasher. 15.1 Cleaning the coffee maker Clean the grounds container (as described in the previous section (note 3). 14 CHANGING THE QUANTITY OF COFFEE AND MILK FOR CAPPUCCINOS...
... automatically into the cup, follow the instructions in the coffee spout are not blocked. The appliance starts to the appliance (fig. 22). • Place a sufficiently large cup under the drip tray), the drip tray must be washed in the dishwasher. 15.1 Cleaning the coffee maker Clean the grounds container (as described in the previous section (note 3). 14 CHANGING THE QUANTITY OF COFFEE AND MILK FOR CAPPUCCINOS...

Owner Manual
Page 17
...running water, without using a vacuum cleaner (Fig. 30); • replace the infuser by pressing the button (fig. 6) (do not unplug) and wait for the display to avoid the build-up of the appliance. Never wash the infuser in the dishwasher; • carefully clean ...replace the drip tray, complete with the grounds container; • close the service door. After having heard the click, check that the two red buttons have snapped out. Clean the nozzle regularly with a sponge as follows: • turn the appliance off ; • open the service door (Fig. 14); • remove the drip...
...running water, without using a vacuum cleaner (Fig. 30); • replace the infuser by pressing the button (fig. 6) (do not unplug) and wait for the display to avoid the build-up of the appliance. Never wash the infuser in the dishwasher; • carefully clean ...replace the drip tray, complete with the grounds container; • close the service door. After having heard the click, check that the two red buttons have snapped out. Clean the nozzle regularly with a sponge as follows: • turn the appliance off ; • open the service door (Fig. 14); • remove the drip...
Owner Manual
Page 18
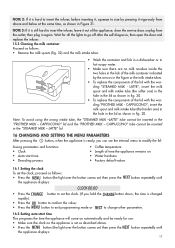
... of the lid with the wording "FROTHED MILK - lowing parameters and functions: • Clock • Auto-start time This programs the time the appliance will come on ) then press the button repeatedly until CLOCK 00:00 • Press the rapidly). • Press the • Press the button to set as described above. • Press the button (the light over the button comes on automatically and be...
... of the lid with the wording "FROTHED MILK - lowing parameters and functions: • Clock • Auto-start time This programs the time the appliance will come on ) then press the button repeatedly until CLOCK 00:00 • Press the rapidly). • Press the • Press the button to set as described above. • Press the button (the light over the button comes on automatically and be...

Owner Manual
Page 19
... OK button. Proceed as follows: • make sure the appliance is AUTO-START NO Press the button to modify the function (the appliance displays: AUTO-START Yes) • Press the button to activate auto-start the descale program. • Empty the water tank and pour in the inner circuits of DURGOL descaler plus 34 oz. The applian- ce displays: APPLIANCE IN DESCALE • the descale program automatically performs a series of descaling solution from the hot water spout...
... OK button. Proceed as follows: • make sure the appliance is AUTO-START NO Press the button to modify the function (the appliance displays: AUTO-START Yes) • Press the button to activate auto-start the descale program. • Empty the water tank and pour in the inner circuits of DURGOL descaler plus 34 oz. The applian- ce displays: APPLIANCE IN DESCALE • the descale program automatically performs a series of descaling solution from the hot water spout...

Owner Manual
Page 20
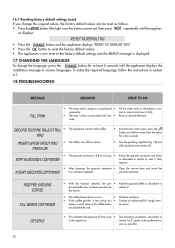
... in the water used . IMPORTANT: FAILURE TO DESCALE THE APPLIANCE REGULARLY INVALIDATES THE WARRANTY. 16.4 Changing coffee temperature To change other parameters. 16.6 Setting water hardness The descale message is displayed after the appliance has been operated for example, if there are formed); • Turn the appliance on by programming the appliance based on the actual lime content in the water for a few seconds. The number of...
... in the water used . IMPORTANT: FAILURE TO DESCALE THE APPLIANCE REGULARLY INVALIDATES THE WARRANTY. 16.4 Changing coffee temperature To change other parameters. 16.6 Setting water hardness The descale message is displayed after the appliance has been operated for example, if there are formed); • Turn the appliance on by programming the appliance based on the actual lime content in the water for a few seconds. The number of...
Owner Manual
Page 21
... tank. To select the required language, follow the instructions in section 4.1. 18 TROUBLESHOOTING MESSAGE MEANING WHAT TO DO FILL TANK • The water tank is empty or is full or missing. • Empty the grounds container and clean EMPTY GROUNDS CONTAINER as follows: • Press the button (the light over the button comes on) then press repeatedly until the appliance displays the installation message...
... tank. To select the required language, follow the instructions in section 4.1. 18 TROUBLESHOOTING MESSAGE MEANING WHAT TO DO FILL TANK • The water tank is empty or is full or missing. • Empty the grounds container and clean EMPTY GROUNDS CONTAINER as follows: • Press the button (the light over the button comes on) then press repeatedly until the appliance displays the installation message...
Owner Manual
Page 22
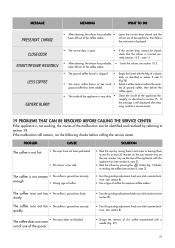
... is clogged. • Empty the funnel with a needle (Fig. 27). 21 enough. • Wrong type of coffee. • Turn the grinding adjustment knob one click counterclockwise (see section 8). • Use a type of coffee for at least 20 minutes on the cup warmer tray on the cup warmer tray on (see section 6, note 3). • Heat the infuser by referring to rest for espresso coffee makers...
... is clogged. • Empty the funnel with a needle (Fig. 27). 21 enough. • Wrong type of coffee. • Turn the grinding adjustment knob one click counterclockwise (see section 8). • Use a type of coffee for at least 20 minutes on the cup warmer tray on the cup warmer tray on (see section 6, note 3). • Heat the infuser by referring to rest for espresso coffee makers...
Owner Manual
Page 23
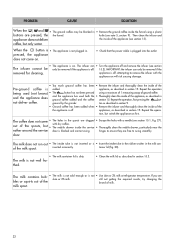
... the removed for cleaning. tainer lid (fig. 20). • The milk container lid is on first. The milk contains bub- • The milk is not cold enough or is not plugged in. PROBLEM CAUSE SOLUTION When the , and • The ground coffee may be blocked in • Remove the ground coffee inside the funnel using a maximum of 1 measuring scoop of ground coffee. When the button...
... the removed for cleaning. tainer lid (fig. 20). • The milk container lid is on first. The milk contains bub- • The milk is not cold enough or is not plugged in. PROBLEM CAUSE SOLUTION When the , and • The ground coffee may be blocked in • Remove the ground coffee inside the funnel using a maximum of 1 measuring scoop of ground coffee. When the button...

Owner Manual
Page 24
...Operation: Monday - LIMITED WARRANTY What does the warranty cover? The repaired or new model will be free from repairs or alterations to abuse, misuse, negligence or accidents. This warranty shall apply only if the appliance is not covered by the warranty? This warranty runs for Mexico (page 62). What is used...it apply to Super Automatic Espresso Machines with the factory directions, which has been subject to the appliance outside our factory or authorized service centers, nor shall it any defective parts or part thereof, other express warranties and representations. This ...
...Operation: Monday - LIMITED WARRANTY What does the warranty cover? The repaired or new model will be free from repairs or alterations to abuse, misuse, negligence or accidents. This warranty shall apply only if the appliance is not covered by the warranty? This warranty runs for Mexico (page 62). What is used...it apply to Super Automatic Espresso Machines with the factory directions, which has been subject to the appliance outside our factory or authorized service centers, nor shall it any defective parts or part thereof, other express warranties and representations. This ...


