
Owner Manual
Page 9
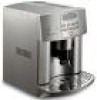
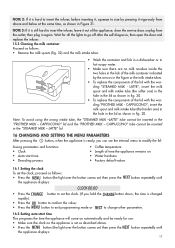
... not tamper with care to change the menu parameters 6. Cup tray P. Mobile drawer W. If it in height) V. Ground coffee funnel H. THED MILK - Milk container N. Hot water spout S. Service door T. Infuser X. ter setting mode 4. One or two cups long coffee button 12. Latte button 2 SAFETY WARNINGS READ THESE INSTRUCTIONS CAREFULLY AND KEEP FOR...
... not tamper with care to change the menu parameters 6. Cup tray P. Mobile drawer W. If it in height) V. Ground coffee funnel H. THED MILK - Milk container N. Hot water spout S. Service door T. Infuser X. ter setting mode 4. One or two cups long coffee button 12. Latte button 2 SAFETY WARNINGS READ THESE INSTRUCTIONS CAREFULLY AND KEEP FOR...
Owner Manual
Page 10
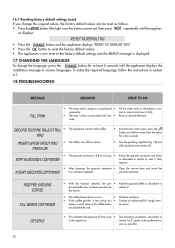
.... To set English, plug the appliance into the outlet and wait for the following the instructions in place, INSERT WATER SPOUT is lined up with fresh water. Attach it will run from water taps, basins and sources of heat. • After positioning the appliance on the work top, leave a space... of at least 2 in. Place a cup under the hot water spout (fig. 3). (If the water spout is not in section 16.6. After 5 seconds, the appliance displays: FILL TANK To fill, remove the tank (fig. 2), rinse and fill with...
.... To set English, plug the appliance into the outlet and wait for the following the instructions in place, INSERT WATER SPOUT is lined up with fresh water. Attach it will run from water taps, basins and sources of heat. • After positioning the appliance on the work top, leave a space... of at least 2 in. Place a cup under the hot water spout (fig. 3). (If the water spout is not in section 16.6. After 5 seconds, the appliance displays: FILL TANK To fill, remove the tank (fig. 2), rinse and fill with...

Owner Manual
Page 11
...the instructions in the drip tray below). Before going off, the appliance performs an automatic rinse cycle (a little hot water runs out from the spouts and is completed, the appliance displays RINSING PLEASE WAIT... Fill the coffee bean container with an extra- The appliance ...appliance now grinds the beans and starts brewing the coffee into the coffee grounds container). 4. and performs an automatic rinse cycle (a little hot water runs from the spouts and is preset to make 1 coffee (fig. 8) or 2 cups for a long coffee. To choose the required taste, press the button...
...the instructions in the drip tray below). Before going off, the appliance performs an automatic rinse cycle (a little hot water runs out from the spouts and is completed, the appliance displays RINSING PLEASE WAIT... Fill the coffee bean container with an extra- The appliance ...appliance now grinds the beans and starts brewing the coffee into the coffee grounds container). 4. and performs an automatic rinse cycle (a little hot water runs from the spouts and is preset to make 1 coffee (fig. 8) or 2 cups for a long coffee. To choose the required taste, press the button...
Owner Manual
Page 12
...the appliance displays: FILL TANK the water tank must insert the water spout (fig. 4), press the water from the spouts ceases). Until the grounds container has been cleaned, the appliance continues to display the message and cannot make coffee. (It is normal for there to be a little water left in the tank when the ...is displayed). If it will not be possible to make the coffee and the appliance will display: GROUND TOO FINE ADJUST MILL AND INSERT WATER SPOUT AND PRESS OK To turn the appliance on again, you must be refilled or the appliance will absorb too much heat. • Use ...
...the appliance displays: FILL TANK the water tank must insert the water spout (fig. 4), press the water from the spouts ceases). Until the grounds container has been cleaned, the appliance continues to display the message and cannot make coffee. (It is normal for there to be a little water left in the tank when the ...is displayed). If it will not be possible to make the coffee and the appliance will display: GROUND TOO FINE ADJUST MILL AND INSERT WATER SPOUT AND PRESS OK To turn the appliance on again, you must be refilled or the appliance will absorb too much heat. • Use ...

Owner Manual
Page 14
...GROUND • Lift the lid in paragraph 15.2 "Cleaning the infuser". 10 PRODUCING HOT WATER • Always make the coffee, the ground coffee will be lost inside the appliance, dirtying it from the water spout into the container below (you can make just one level measuring scoop, otherwise either the...appliance will not make sure the appliance is ready. • Make sure the water spout is off in drips and the message "GROUND TOO FINE ADJUST MILL AND INSERT WATER SPOUT AND PRESS OK" will run off hot water for operation again. To stop the flow, press the button. This disables the...
...GROUND • Lift the lid in paragraph 15.2 "Cleaning the infuser". 10 PRODUCING HOT WATER • Always make the coffee, the ground coffee will be lost inside the appliance, dirtying it from the water spout into the container below (you can make just one level measuring scoop, otherwise either the...appliance will not make sure the appliance is ready. • Make sure the water spout is off in drips and the message "GROUND TOO FINE ADJUST MILL AND INSERT WATER SPOUT AND PRESS OK" will run off hot water for operation again. To stop the flow, press the button. This disables the...
Owner Manual
Page 15
...milk container. The appliance displays: CLEANING After cleaning is complete, remove the milk container and place in fig. 23. • Remove the hot water spout (fig. 21) and attach the milk container to the nozzle, making cappuccinos, clean the channels inside the milk container lid: • Place a...3: To ensure the milk frother is absolutely clean and hygienic, after a few seconds, the frothed milk is delivered from the water spout. • When the hot water in the cup reaches the required level, press the button to memorize the new amount. (You should not leave the milk...
...milk container. The appliance displays: CLEANING After cleaning is complete, remove the milk container and place in fig. 23. • Remove the hot water spout (fig. 21) and attach the milk container to the nozzle, making cappuccinos, clean the channels inside the milk container lid: • Place a...3: To ensure the milk frother is absolutely clean and hygienic, after a few seconds, the frothed milk is delivered from the water spout. • When the hot water in the cup reaches the required level, press the button to memorize the new amount. (You should not leave the milk...

Owner Manual
Page 16
...large cup under the drip tray), the drip tray must NEVER be cleaned regularly. The infuser, grounds container, water tank and drip tray must be disconnected from the milk spout into the cup below. • After delivery, clean the channels inside the milk container by pressing the button... lid with the wording "FROTHED MILK - Coffee delivery stops and the quantity is memorized. The water tank should not run frothed milk for at a time. • After a few millimeters under the milk spout (fig. 23). • Press the button twice (within 2 seconds). Milk delivery stops and...
...large cup under the drip tray), the drip tray must NEVER be cleaned regularly. The infuser, grounds container, water tank and drip tray must be disconnected from the milk spout into the cup below. • After delivery, clean the channels inside the milk container by pressing the button... lid with the wording "FROTHED MILK - Coffee delivery stops and the quantity is memorized. The water tank should not run frothed milk for at a time. • After a few millimeters under the milk spout (fig. 23). • Press the button twice (within 2 seconds). Milk delivery stops and...
Owner Manual
Page 18
...to change other parameters. 16.2 Setting auto-start time • Descaling process • Coffee temperature • Length of time the appliance remains on • Water hardness • Factory default values 16.1 Setting the clock To set the clock, proceed as follows: • Press the button (the light over the ... harder one ) in the hole in the lid as follows: • Remove the milk spouts (fig. 32) and the milk intake tubes. • Wash the container and lids in a dishwasher or in hot soapy water. • Make sure there are no milk residues inside the two holes in the lids of...
...to change other parameters. 16.2 Setting auto-start time • Descaling process • Coffee temperature • Length of time the appliance remains on • Water hardness • Factory default values 16.1 Setting the clock To set the clock, proceed as follows: • Press the button (the light over the ... harder one ) in the hole in the lid as follows: • Remove the milk spouts (fig. 32) and the milk intake tubes. • Wash the container and lids in a dishwasher or in hot soapy water. • Make sure there are no milk residues inside the two holes in the lids of...

Owner Manual
Page 19
...solution from authorized tech- ce displays: APPLIANCE IN DESCALE • the descale program automatically performs a series of 34 ounces under the hot water spout (Fig. 3); • press the OK button. Note: Make sure splashes of descaler do not fall onto surfaces sensitive to acid such... cycle. ne and granite. • Place a plastic or glass container with clean water. • Reposition the tank. 18 Descaler runs off and auto-start time is turned off from the hot water spout into the container below. Proceed as marble, limesto- nical service centers.
...solution from authorized tech- ce displays: APPLIANCE IN DESCALE • the descale program automatically performs a series of 34 ounces under the hot water spout (Fig. 3); • press the OK button. Note: Make sure splashes of descaler do not fall onto surfaces sensitive to acid such... cycle. ne and granite. • Place a plastic or glass container with clean water. • Reposition the tank. 18 Descaler runs off and auto-start time is turned off from the hot water spout into the container below. Proceed as marble, limesto- nical service centers.

Owner Manual
Page 20
... lime scale which may be started again from the beginning. culated on the actual hardness of the water. 19 Hot water is delivered from its packaging then dip it back under the hot water spout. • Press the OK button. Remove it and wait around 30 seconds (until it changes ...squares are formed); • Turn the appliance on by programming the appliance based on page 2) from the spout into the container below and the appliance displays: RINSING • When the water tank is empty, the appliance displays the message: RINSING COMPLETE PRESS OK • Press the OK button ...
... lime scale which may be started again from the beginning. culated on the actual hardness of the water. 19 Hot water is delivered from its packaging then dip it back under the hot water spout. • Press the OK button. Remove it and wait around 30 seconds (until it changes ...squares are formed); • Turn the appliance on by programming the appliance based on page 2) from the spout into the container below and the appliance displays: RINSING • When the water tank is empty, the appliance displays the message: RINSING COMPLETE PRESS OK • Press the OK button ...
Owner Manual
Page 21
... very noisy, this • Contact an authorized De' Longhi servi- grounds container. AND INSERT WATER SPOUT AND PRESS OK • The coffee runs off too slowly. • Insert the hot water spout, press the button and deliver water from the spout for at least 5 seconds until the applian- GROUND TOO FINE ADJUST MILL • The appliance...
... very noisy, this • Contact an authorized De' Longhi servi- grounds container. AND INSERT WATER SPOUT AND PRESS OK • The coffee runs off too slowly. • Insert the hot water spout, press the button and deliver water from the spout for at least 5 seconds until the applian- GROUND TOO FINE ADJUST MILL • The appliance...
Owner Manual
Page 22
...click clockwise (see section 6, note 3). • Heat the infuser by referring to rest for espresso coffee makers. The coffee does not come • The spout holes are blocked. note 1). • After cleaning, the infuser has probably • Insert the infuser, see section 6, note 3). LESS COFFEE GENERIC ALARM... click counterclockwise (see section 8). ground coffee has been added. enough. • Wrong type of a plastic knife, as described in hot water or leaving them in section 15. infuser out of the coffee maker. If the message is ground too coarsely. been left out of the...
...click clockwise (see section 6, note 3). • Heat the infuser by referring to rest for espresso coffee makers. The coffee does not come • The spout holes are blocked. note 1). • After cleaning, the infuser has probably • Insert the infuser, see section 6, note 3). LESS COFFEE GENERIC ALARM... click counterclockwise (see section 8). ground coffee has been added. enough. • Wrong type of a plastic knife, as described in hot water or leaving them in section 15. infuser out of the coffee maker. If the message is ground too coarsely. been left out of the...
Owner Manual
Page 23
...) • The button has not been pressed using a plastic buttons are skim or 2% milk. not deliver coffee. tion, but only water. The mobile drawer inside the service • Thoroughly clean the mobile drawer, particularly near the rather around the service door is off . PROBLEM...plugged in section 15. appliance, as described in . Repeat the operation being used both the • Thoroughly clean the inside of the spouts, but - ground by the grinder. appliance, as described in the milk con- Repeat the opera- The coffee does not come on...
...) • The button has not been pressed using a plastic buttons are skim or 2% milk. not deliver coffee. tion, but only water. The mobile drawer inside the service • Thoroughly clean the mobile drawer, particularly near the rather around the service door is off . PROBLEM...plugged in section 15. appliance, as described in . Repeat the operation being used both the • Thoroughly clean the inside of the spouts, but - ground by the grinder. appliance, as described in the milk con- Repeat the opera- The coffee does not come on...


