
Owner Manual
Page 1
... INSTRUCTIONS THIS PRODUCT IS FOR HOUSEHOLD ONLY DESCRIPTION 1 air outlet grille 2 control panel 3 remote control receiver 4 castor wheels 5 handles 6 filter 7 air intake grille 8 air exhaust hose housing 9 drainage hose 10 power cable 11 wall flange 12 air exhaust hose 13 window outlet 14 castor locks 15 remote control 16 window bracket with reduced physical, sen-
... INSTRUCTIONS THIS PRODUCT IS FOR HOUSEHOLD ONLY DESCRIPTION 1 air outlet grille 2 control panel 3 remote control receiver 4 castor wheels 5 handles 6 filter 7 air intake grille 8 air exhaust hose housing 9 drainage hose 10 power cable 11 wall flange 12 air exhaust hose 13 window outlet 14 castor locks 15 remote control 16 window bracket with reduced physical, sen-
Owner Manual
Page 2
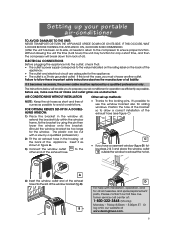
... to return to the compressor to ensure proper function. B). Without allowing the unit this is a 3-hole grounded outlet. Position the hole of the exhaust hose (see figure C) C • If you must be replaced by using the pin then lower the window onto the bracket. (Should the window bracket... THIS OCCURS, WAIT 6 HOURS BEFORE TURNING THE APPLIANCE ON, 24 HOURS IS RECOMMENDED. (After the unit has been on the back of the exhaust hose. Other set-up your air conditioner for the window. Before use the window bracket also for the appliance; • The outlet is not the...
... to return to the compressor to ensure proper function. B). Without allowing the unit this is a 3-hole grounded outlet. Position the hole of the exhaust hose (see figure C) C • If you must be replaced by using the pin then lower the window onto the bracket. (Should the window bracket... THIS OCCURS, WAIT 6 HOURS BEFORE TURNING THE APPLIANCE ON, 24 HOURS IS RECOMMENDED. (After the unit has been on the back of the exhaust hose. Other set-up your air conditioner for the window. Before use the window bracket also for the appliance; • The outlet is not the...
Owner Manual
Page 3
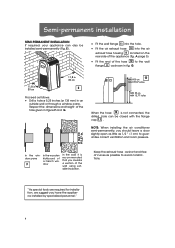
... G. 11,8 in 30 cm 11,8 in 30 cm E Proceed as follows: • Drill a hole ø 5,25 inches (ø 134 mm) in fig. Keep the exhaust hose as possible to guarantee correct ventilation and room pressure. 134 5,27 in. E). • Fit the wall flange 11 into the hole. • Fit the air... exhaust hose 12 into the air exhaust hose housing 8 located on the rear side of curves as short and free of the appliance (fig. Respect the dimensions and height of the...
... G. 11,8 in 30 cm 11,8 in 30 cm E Proceed as follows: • Drill a hole ø 5,25 inches (ø 134 mm) in fig. Keep the exhaust hose as possible to guarantee correct ventilation and room pressure. 134 5,27 in. E). • Fit the wall flange 11 into the hole. • Fit the air... exhaust hose 12 into the air exhaust hose housing 8 located on the rear side of curves as short and free of the appliance (fig. Respect the dimensions and height of the...
Owner Manual
Page 5
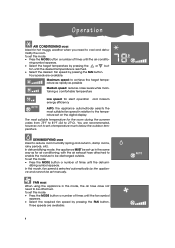
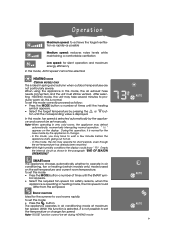
...; Select the desired fan speed by pressing the FAN button. ton until the dehumi- FAN MODE When using the appliance in this mode, the air hose does not need to cool and dehu- To set -up in the same way as possible Medium speed: reduces noise levels while maintaining a comfortable temperature... CONDITIONING MODE Ideal for silent operation and maxium energy efficiency AUTO: the appliance automatically selects the most suitable temperature for air conditioning, with the air exhaust hose attached to enable the moisture to be attached.
...; Select the desired fan speed by pressing the FAN button. ton until the dehumi- FAN MODE When using the appliance in this mode, the air hose does not need to cool and dehu- To set -up in the same way as possible Medium speed: reduces noise levels while maintaining a comfortable temperature... CONDITIONING MODE Ideal for silent operation and maxium energy efficiency AUTO: the appliance automatically selects the most suitable temperature for air conditioning, with the air exhaust hose attached to enable the moisture to be attached.
Owner Manual
Page 6
... using the appliance in this function is selected, it is ideal in air conditioning mode at maximum fan speed. Note:- While this mode, the air exhaust hose needs connected, and the unit must still be selected. After selecting HEATING mode, the unit may defrost automatically, momentarily interrupting normal operation.
... using the appliance in this function is selected, it is ideal in air conditioning mode at maximum fan speed. Note:- While this mode, the air exhaust hose needs connected, and the unit must still be selected. After selecting HEATING mode, the unit may defrost automatically, momentarily interrupting normal operation.
Owner Manual
Page 13
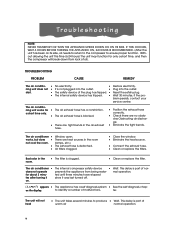
...clogged. • Close the window. • Eliminate the heat source. • Connect the exhaust hose. • Clean or replace the filters. Bad odor in the air exhaust hose. • Position the exhaust hose correctly. • Check there are heat sources in the room (lamps, etc.). ter. The ... Obstructing air discharge. • Eliminate the tight bends. The air conditioner • does not operate for • The air exhaust hose has a constriction. The unit will break down from being restar- Troubleshooting NOTE: NEVER TRANSPORT OR TURN THE APPLIANCE UPSIDE DOWN OR...
...clogged. • Close the window. • Eliminate the heat source. • Connect the exhaust hose. • Clean or replace the filters. Bad odor in the air exhaust hose. • Position the exhaust hose correctly. • Check there are heat sources in the room (lamps, etc.). ter. The ... Obstructing air discharge. • Eliminate the tight bends. The air conditioner • does not operate for • The air exhaust hose has a constriction. The unit will break down from being restar- Troubleshooting NOTE: NEVER TRANSPORT OR TURN THE APPLIANCE UPSIDE DOWN OR...

